1
2
3
4
Montage/Anschluß
D
Einstellknopf mit geeignetem Werkzeug abheben
Befestigungsschraube lösen
Gehäuseoberteil abnehmen
Geeigneten Montageort bestimmen
5
– Der Anschluß muß von einer Fachkraft mit entsprechender
Sorgfalt durchgeführt werden
– Vor der Montage Heizungsanlage ausschalten
– Überprüfen und sicherstellen, daß die Anschlußdrähte keine
Spannung führen.
– Anschlußleitungen durch die Öffnung im Gerätesockel führen
– Sockel auf festen, ebenen Grund oder UP-Dose montieren
– Anschlußdrähte fachgerecht abisolieren und dem Schaltbild
entsprechend anschließen, siehe Geräteaufkleber.
Die Regelgenauigkeit wird nur erreicht, wenn die angegebene
Stromaufnahme eingehalten wird.
Kennen Sie die Stromaufnahme des Verbrauchers?
Im Zweifelsfalle prüfen!
Wählen Sie beim Anschluß die richtige Anschlußklemme!
6
7
8
Bedienung
D
Technische Daten
D
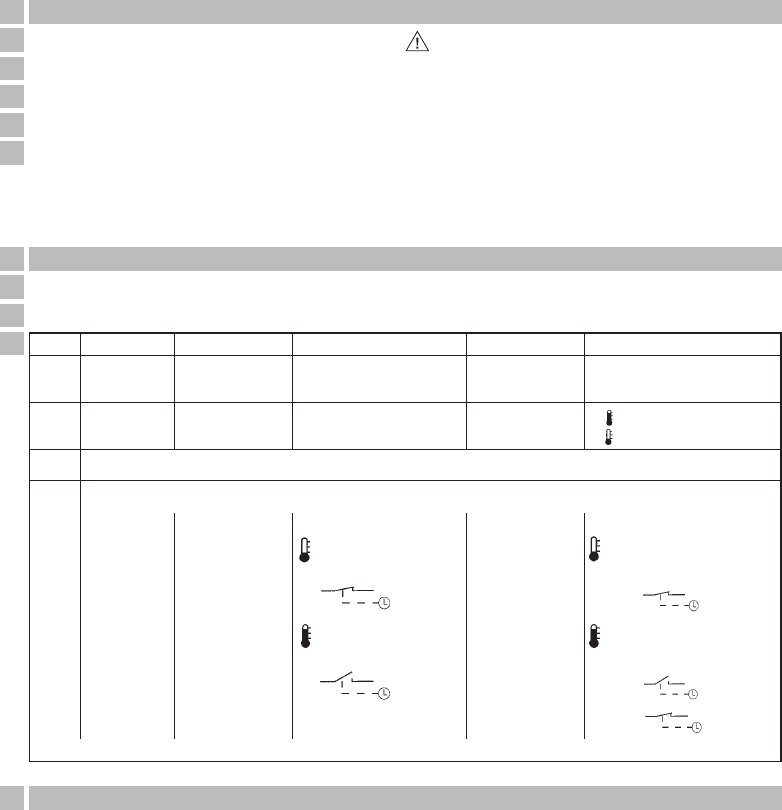
Temperaturbereich festlegen
thermio 102
a)
b)
c)
d)
thermio 402 thermio 103 thermio 403 thermio 513
–– – –
– – Klemme 3 Klemme 3–
LED AUS = Komforttemperatur
LED EIN = Absenktemperatur
––
Temperaturwert einstellen
Anschluß einer Schaltuhr
2 = Komforttemperatur
1 = Absenktemperatur
1 = Heizung EIN
0 = Heizung AUS
1 = Heizung EIN
0 = Heizung AUS
Einstellknopf auf Achse aufstecken. Markierungen beachten!
thermio 102
75 x 71 x 21
2-Draht
ca. 200 mW
0,5/5 A/250 V~
0,5/4 A/250 V~
0,5/1 A/24 V–
Öffner bei steigender Temperatur
Ag Ni
T 30
II nach entspr. Montage
–
–
–
Aufputz
Schraubklemme mit Drahtschutz
+5 °C bis +30 °C
–
ca. 1 K
thermisch
-20 °C bis +70 °C
IP 20
nach EN 55014
Maße H x B x T mm
Gewicht
Anschluß
Leistungsaufnahme
Schaltleistung
- bei ohmscher Last
- bei induktive Last cos. ϕ 0,6
- minimal
Schaltausgang
Schaltkontakte
Umgebungstemperatur
Schutzklasse
Schaltzustands-Anzeige
- Regler
- Wahlschalter
Montageart
Anschlußart
Tagtemperaturregelbereich
Nachtabsenkung
Temperaturschaltdifferenz
Rückführung
Lagertemperatur
Schutzart
Funkentstörung
thermio 402
75 x 71 x 21
2-Draht
ca. 200 mW
0,5/5 A/250 V~
0,5/4 A/250 V~
0,5/1 A/24 V–
Öffner bei steigender Temperatur
Ag Ni
T 30
II nach entspr. Montage
ja
–
Heizung Ein/Aus
Aufputz
Schraubklemme mit Drahtschutz
+5 °C bis +30 °C
–
ca. 1 K
thermisch
-20 °C bis +70 °C
IP 20
nach EN 55014
thermio 103
75 x 71 x 21
3-Draht
ca. 200 mW
10 A/250 V~
4 A/250 V~
0,1 A/230 V–
Öffner bei steigender Temperatur
Ag Ni
T 30
II nach entspr. Montage
–
–
–
Aufputz
Schraubklemme mit Drahtschutz
+5 °C bis +30 °C
ca. 4 K
ca. 0,5 K
thermisch
-20 °C bis +70 °C
IP 20
nach EN 55014
thermio 403
75 x 71 x 21
3-Draht
ca. 200 mW
10 A/250 V~
4 A/250 V~
0,1 A/230 V–
Öffner bei steigender Temperatur
Ag Ni
T 30
II nach entspr. Montage
ja
–
Heizung Ein/Aus
Aufputz
Schraubklemme mit Drahtschutz
+5 °C bis +30 °C
–
ca. 0,5 K
thermisch
-20 °C bis +70 °C
IP 20
nach EN 55014
thermio 513
75 x 71 x 21
3-Draht
ca. 200 mW
10 A/250 V~
4 A/250 V~
0,1 A/230 V–
Öffner bei steigender Temperatur
Ag Ni
T 30
II nach entspr. Montage
ja
LED grün
Nachtabsenkung Ein/Aus
Aufputz
Schraubklemme mit Drahtschutz
+5 °C bis +30 °C
ca. 4 K
ca. 0,5 K
thermisch
-20 °C bis +70 °C
IP 20
nach EN 55014
Absenktemperatur EIN
Raumtemperatur einstellen
z. B. 22°C
=
^
18°C
Absenktemperatur AUS
Raumtemperatur einstellen
z. B. 22°C
=
^
22°C
EIN
AUS
Absenktemperatur EIN
Raumtemperatur einstellen
z. B.22°C
LED EIN +
=
^
18°C
Absenktemperatur AUS
Raumtemperatur einstellen
z. B.22°C
LED AUS +
=
^
22°C
LED AUS +
=
^
22°C
EIN
AUS
EIN
* Absenktemperatur = Komforttemperatur minus 4° (Kelvin)