1
2
3
4
Assembly/Installation
GB
Lift the adjusting knob with a suitable tool
Release the fastening screw
Remove the upper part of the case
Determine the appropriate type of installation
5
– The unit must be connected by a qualified person exercising
due care
– Switch off the heating system before assembly
– Check and make sure that the connecting wires are not
live
–
Guide the connecting wires through the opening in the unit’s base
– Mount the base on a flat, firm surface or flush-mounted socket
–
Strip the connection wires properly and connect as shown in
the circuit diagram, see the circuit diagrams on the following
pages
Accuracy of control is only achieved if the stated current
values are adhered to.
Do you know how much current is drawn by the consumer?
If in doubt, check!
Select the right type of connection terminals when making the
connection!
6
7
8
Connection/Operation
GB
Technical data
GB
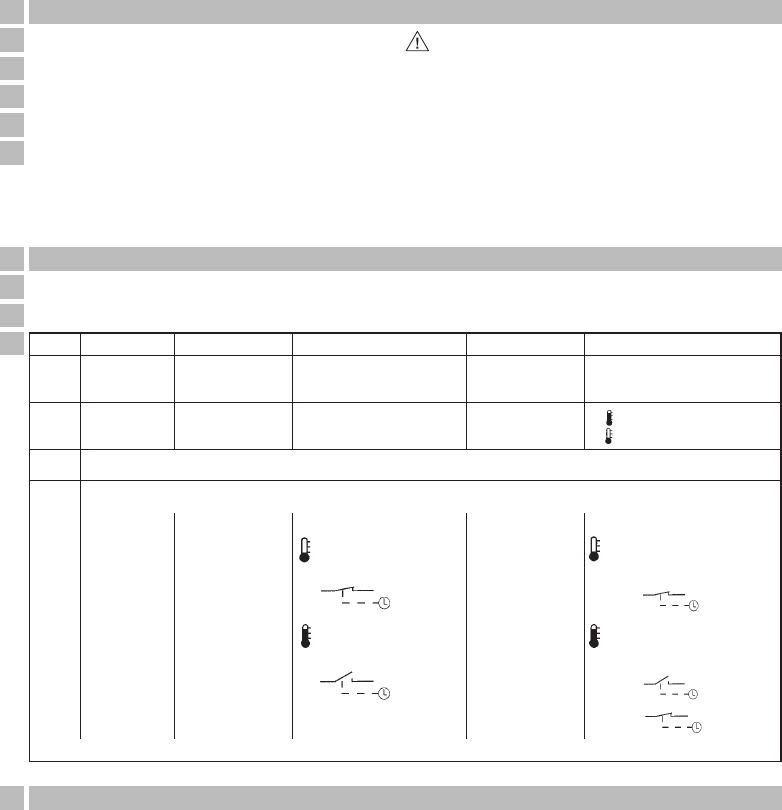
Determine the temperature range
thermio 102
a)
b)
c)
d)
thermio 402 thermio 103 thermio 403 thermio 513
–– – –
– – Connect terminal 3 Connect terminal 3–
LED OFF =
Comfort temperature
LED ON =
Lower temperature
––
Set temperature value
Connection of a time switch
2 =
Comfort temperature
1 =
Lower temperature
1=
Heating ON
0=
Heating OFF
1=
Heating ON
0=
Heating OFF
Put the setting knob on the shaf. Note the markings!
thermio 102
75 x 71 x 21
2-wire
approx. 200 mW
0,5/5 A/250 V~
0,5/4 A/250 V~
0,5/1 A/24 V–
Opens (with increasing temperature)
Ag Ni
T 30
II after suitable installation
–
–
–
Surface mounting
Screw terminal with wire fuse
+5 °C to +30 °C
–
approx. 1 K
Thermal
-20 °C to +70 °C
IP 20
as per EN 55014
Dimensions H x W x D mm
Weight g (approx.)
Connection
Power consumption
Switching capacity
- with ohmic load
-
with inductive load cos. ϕ 0,6
- minimum
Switching output
Switching contact
Ambient temperature
Protection class
Switching status indication
- thermostat
- selector switch
Type of installation
Type of connection
Day temperature regulation range
Overnight temperature drop
Temperature switching differential
Feedback
Storage temperature
Type of protection
Radio interference suppression
thermio 402
75 x 71 x 21
2-wire
approx. 200 mW
0,5/5 A/250 V~
0,5/4 A/250 V~
0,5/1 A/24 V–
Opens (with increasing temperature)
Ag Ni
T 30
II after suitable installation
yes
–
Heating On/Off
Surface mounting
Screw terminal with wire fuse
+5 °C to +30 °C
–
approx. 1 K
Thermal
-20 °C to +70 °C
IP 20
as per EN 55014
thermio 103
75 x 71 x 21
3-wire
approx. 200 mW
10 A/250 V~
4 A/250 V~
0,1 A/230 V–
Opens (with increasing temperature)
Ag Ni
T 30
II after suitable installation
–
–
–
Surface mounting
Screw terminal with wire fuse
+5 °C to +30 °C
approx. 4 K
approx. 0,5 K
Thermal
-20 °C to +70 °C
IP 20
as per EN 55014
thermio 403
75 x 71 x 21
3-wire
approx. 200 mW
10 A/250 V~
4 A/250 V~
0,1 A/230 V–
Opens (with increasing temperature)
Ag Ni
T 30
II after suitable installation
yes
–
Heating On/Off
Surface mounting
Screw terminal with wire fuse
+5 °C to +30 °C
–
approx. 0,5 K
Thermal
-20 °C to +70 °C
IP 20
as per EN 55014
thermio 513
75 x 71 x 21
3-wire
approx. 200 mW
10 A/250 V~
4 A/250 V~
0,1 A/230 V–
Opens (with increasing temperature)
Ag Ni
T 30
II after suitable installation
yes
LED green
Overnight temperature drop On/Off
Surface mounting
Screw terminal with wire fuse
+5 °C to +30 °C
approx. 4 K
approx. 0,5 K
Thermal
-20 °C to +70 °C
IP 20
as per EN 55014
Lower temperature O
N
Set the room temperature
e. g. 22°C
=
^
18°C
Lower temperature OFF
Set the room temperature
e. g. 22°C
=
^
22°C
ON
OFF
Lower temperature O
N
Set the room temperature
e. g.22 °C
LED ON +
=
^
18°C
Lower temperature OFF
Set the room temperature
e. g.22 °C
LED OFF +
=
^
22°C
LED OFF +
=
^
22°C
ON
OFF
ON
* Lower temperature = Comfort temperature minus 4 K (Kelvin)