The flash unit has 8 steps of poweroutput controlwhich indicated by 8
pieces of LED lamp fordifferent level.
Press the MODE key to M Mode. In this mode ,you can set TT520 II
/TT560 II onto your camerahotshoeorspeedlite triggerhotshoe to trigger
the flash unit. When shooting, adjust the flash powerandpress the
camera shutter, the flash light will flash under the camera synchronous
signal.
Press the MODE key to S1 Mode. Themode is applicable for slave flash
inorder to create many lighting effects. It is respectively applicable for
manual flash environment.
Press the MODE key to S2 Mode. Themode is applicable for slave flash
inorder to create many lighting effects.The flash unit won’t flash synchro-
nously with the first flash but the second flash from themaster flash,
which is the second flash synchroniza
tion.
WARNING
Thank you forpurchasing GODOX product.
Beforeuse, pleaseread this usermanual carefullyinorder to ensure
your safety. Keep it properly forreferencein future.
FOREWORD
Always keep this product fromrainordampinorder to prevent
fireorelectricshock.
The flashunit contains highvoltageelectric parts, donot try to
openorrepair the flash unit. If you touch thehigh-voltage circuit
inside thisproduct, electric shock may occur. Return it back to
thenominatedrepairservice station.
If theunit is extruded,fallen,suffered from strongimpact and thus its
insideis exposed, stop usingimmediately so as to prevent electric
shock leading from touching theinsideelectric components.
Donot fire the flash direct to the eye at short distance(especiallybaby’s
eye), or it maydamage the eye.When taking flash picture towardbaby,
it is recommended to keep the flash unit at least 1 meter(3.3feet) away
from the subject. Or use diffuserorbounce thelight to soften its intensity.
Always keep thebattery oranythingeasy to begulpedout of children's
reach. In case of gulpingdue to carelessness
,
please contact a doctor
immediately .
When there is caustic liquidleakageinside, it is necessary to wear
gloves to takeout thebatter.
Donot use the flash unit in the flammablegas, chemicalorsuch liquids.
These materials may beensitive to the flash from theunit insome circ-
umstance. It may cause fireorelectromagnetic interference.
Please pay attention to thewarningmarks in theshooting surroundings.
Donot leave or store the flash unit in temperature over 40
C(such like
in theautomobile), or it may damage theelectronic components.
The flash unit isn’t waterresistant.
Please keep it away fromrainorhumidity.
If the flash unit isidle forlong, please take out allbatteriesand keep
the flash unit indry area.
Open the battery cover
Slide thebattery cover
along thearrow
directionand thenopen
it by thumb.
Insert batteries
Install thebatteries
according to thedirection
indicated by the sickerin
thebattery holderand
make sure the + and –
battery contact are
correctly inserted at the
battery compartment.
Close the battery cover
Slide thebattery cover
along thearrowdirection
and slide it back inplace.
Thebattery coverwillbe
lockedwhen there is a
“click” sound.
Take out the battery when idle in case the battery leakage damages the
flash unit.
Attention:
Twist thelock ringanti-
clockwise to loosen it to the
highest point. Slide the
mounting foot of the flash
into thehotshoe of camera.
Twist thelock ring
clockwise to tighten it.
To remove the flash,
loosen the fixed knoband
slide it out of thehotshoe
of camera.
Mini Stand
Built-in Wide Panel
Reflection Board
Optic Control Sensor
Flash Head
Hot Shoe Stand
Lock Ring
Dedicated Hot Shoe Contact
Switch to the ON, the flash will start charging(the chargingindicator is
dim).After several seconds, the chargingindicator turns redand
TT520 II /TT560 II is ready to shoot.
For a test flash, press the test button. After use, press the ON/OFF to OFF to
power off.
If thered chargingindicatorlamp flickers in every 1s, it indicates low
battery. In such case, thepowerwill turn off automaticallyand you
need to replace thebatteries.
Note
:
Theoptic light sensorwill stop functioningunder M Mode.
Thehotshoe’s trigger functionwill stopunder S1 and S2 Mode.
To save battery power, the flash willenter stand-by state inabout 30
minutes of idle use. Press anybutton to wake it up.
In S1/S2 mode, the flash willenter stand-by state inabout 60minutes
of idle use. Press any button to wake it up.
In power-savingmode, the chargingindicator flickers in every 3 seconds.
Otherindicators are turned off.
Number of flashes that will activate over-temperature protection:
1.Bounce Lighting
Bounce flash means to take photos by bouncing thelight off wallor
ceiling to soften thelight on the subject, and the shadow shadeout,
to get moredesiredpicture.
2.UseReflection Board to Take Photos
Pullout therefectionboardandbuilt-inwidepanel from the flash head
at the same timeand thenpush thebuilt-inwidepanelback.
In such case, if this product is being used to take photos, it willproduce
a highlightedpoint on the eyes of thesubject and thus make theeyes
charming (catch lights). This function canreach optimal effect when
the flash head is up90°.
3.Use Wide-angle Diffuser
Pullout thebuilt-inwidepanel to enlarge flash lightingrange, so as to
get more softenedandnaturallighting effect.
Systematic over-temperature protection
2.Mounting the flash on the camera
Ⅲ.
USING THE FLASH
1. Powermanagement
5.S2 Mode
2.Power Control
3.M Mode
4.S1 Mode
Ⅳ.
ADVANCED APPLICATION
Ⅴ.
SPECIFICATIONS
Ⅱ.
INSTALLATION
1. Battery Installation
8.Power-saving Function
Ⅰ.
NOMENCLATURE
After use, press the ON/OFF to OFF to power off.
33 ( m ISO 100 )38 ( m ISO 100 )
TT520 IITT560 II
Recycle time
100-1500 times (AA alkalinebatteries used)
4xAAsicebatteries(AlkalineorNi-MH are usable)
0~270degrees
0~90degrees
M,S1,S2
5600K+200K
1/300s~1/20000s
190*75*55mm
310g
Lighting times
approx 0.1-5s(AA alkalinebatteries used)
Color temperature
Flash duration
Dimensions
Net weight
Guidenumber
Model
Flash mode
Verticalrotationangle
Horizontalrotationangle
Power
Press “+” to make powerhigherand they are 1/128
,
1/64
,
1/32
,
1/16,
1/8
,
1/4
,
1/2
,
1/1. Otherwise, press “-” to make powerlower.
Accessories:
Flash light ......
1
Protectingbag ......
1
Mini stand ......
1
Usermanual...
1
RT transmitter……
1
。
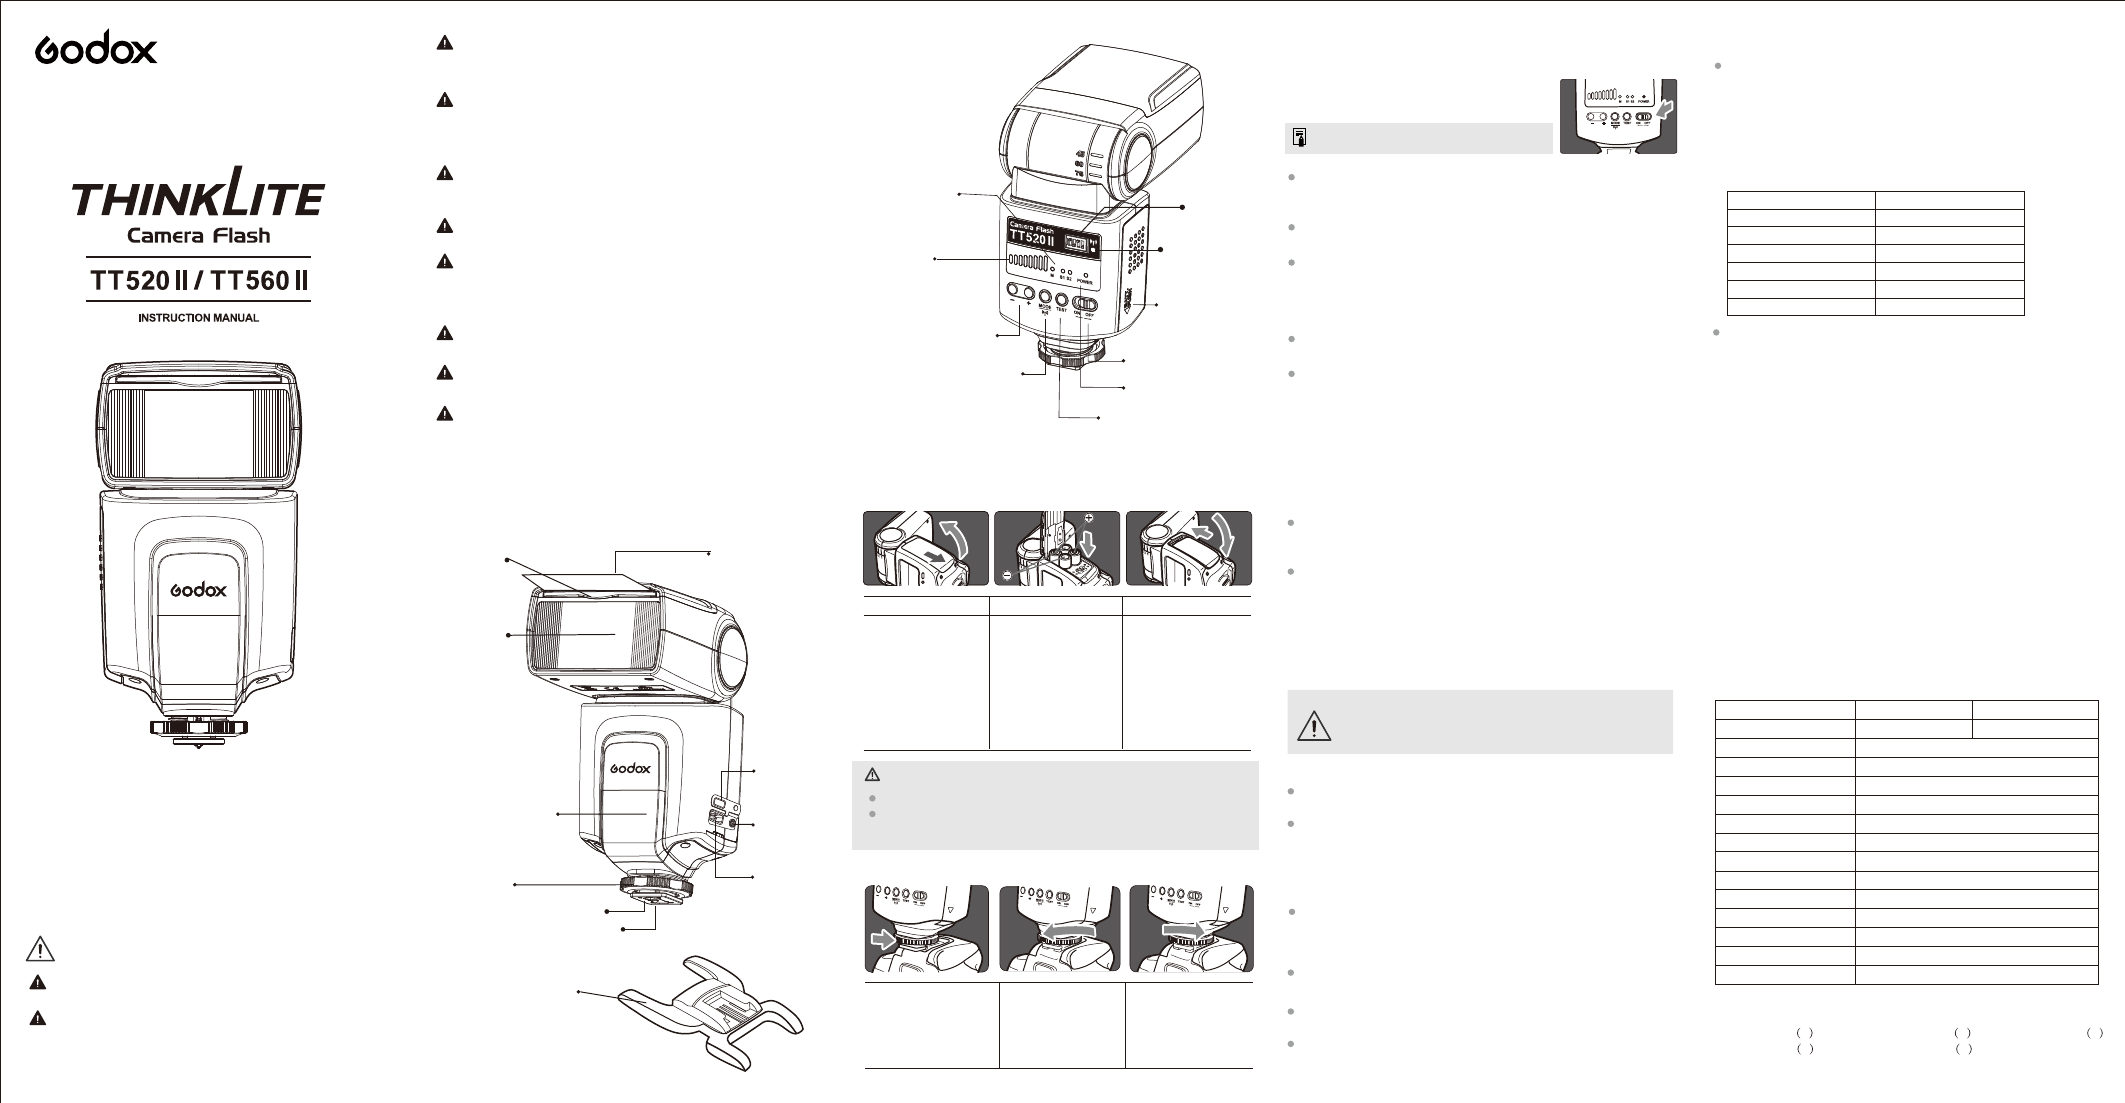
Power Switch
Test Button
Flash Power Level Button
Output Level
Indicator
Mode Select Indicator
(M、S1、S2)
Charging Indicator
Battery Cover
Mode Select Button
Takecare of thehot battery when changing them after continuous flashes.
When the flash is S1 mode, it will fire synchronously when themaster
flash fires, comparablewith the effect by the use of radio trigger.
Protection in continuous flashes
9.Protection Function
To prevent the flash head fromgetting toohot anddamage, pleasedo
not flash over20 times wheninpowerlevel 1/2
,
1/1. Please cooldown
the flash unit for at least 10minutes. The over-temperatureprotection
functionwillbe activated if you continue to flash after20 times. In this
state the charging timewill turn to 10-25s. Please cooldown the flash
unit around10minutes and it will turn to normal state.
When theinner circuit is over-heating, which indicates overuse of the
flash unit, theinner circuit will shut downpowerautomatically. The flash
unit will turn to normal state after theinner circuit is cooleddown.
-
Socket Cover
Charging Socket
Sync Cord Jack
6.Wireless Triggering Function
Channel
Wireless Indicator
As TT520 II/TT560 II has built-inwireless signal, please use RT transmitter
as the transmitterend.
Longpress MODE button for 2 seconds to control the ON/OFF of wireless
triggering function. When thewireless indicatorlighted, wireless triggering
function is ON; when thewireless indicatorput out, wireless triggering function
is OFF. To save power, turn off wireless triggering functionwheninidleuse.
The speedlite and camerawill trigger synchronously by using a PC sync
cord to connect the sync terminals of the cameraand the speedlite together.
7.Sync Trigger Function
PowerLevel
1/1
1/2
1/4
1/8
1/16,1/32
1/64
,
1/128
Number
20
33
50
66
100
200
Wireless frequency
Channel
Workabledistance
433MHz
16
15m
Need help? Post your question in this forum.
1
Forum
godox-tt520-ii
Reset search
Hi i buy same flash device and when i turn it on the red on power keep on blinking and not flashing someone help me why it happen.
Submitted on 19-6-2022 at 08:49
Libble takes abuse of its services very seriously. We're committed to dealing with such abuse according to the laws in your country of residence. When you submit a report, we'll investigate it and take the appropriate action. We'll get back to you only if we require additional details or have more information to share.
Product:
Forumrules
To achieve meaningful questions, we apply the following rules:
First, read the manual;
Check if your question has been asked previously;
Try to ask your question as clearly as possible;
Did you already try to solve the problem? Please mention this;
Is your problem solved by a visitor then let him/her know in this forum;
To give a response to a question or answer, do not use this form but click on the button 'reply to this question';
Your question will be posted here and emailed to our subscribers. Therefore, avoid filling in personal details.
Register
Register getting emails for Godox TT520 II at:
new questions and answers
new manuals
You will receive an email to register for one or both of the options.
Get your user manual by e-mail
Enter your email address to receive the manual of Godox TT520 II in the language / languages: English as an attachment in your email.
The manual is 1,13 mb in size.
You will receive the manual in your email within minutes. If you have not received an email, then probably have entered the wrong email address or your mailbox is too full. In addition, it may be that your ISP may have a maximum size for emails to receive.
The manual is sent by email. Check your email
If you have not received an email with the manual within fifteen minutes, it may be that you have a entered a wrong email address or that your ISP has set a maximum size to receive email that is smaller than the size of the manual.
The email address you have provided is not correct.
Please check the email address and correct it.
Your question is posted on this page
Would you like to receive an email when new answers and questions are posted? Please enter your email address.