2
B
3
D
Montage:
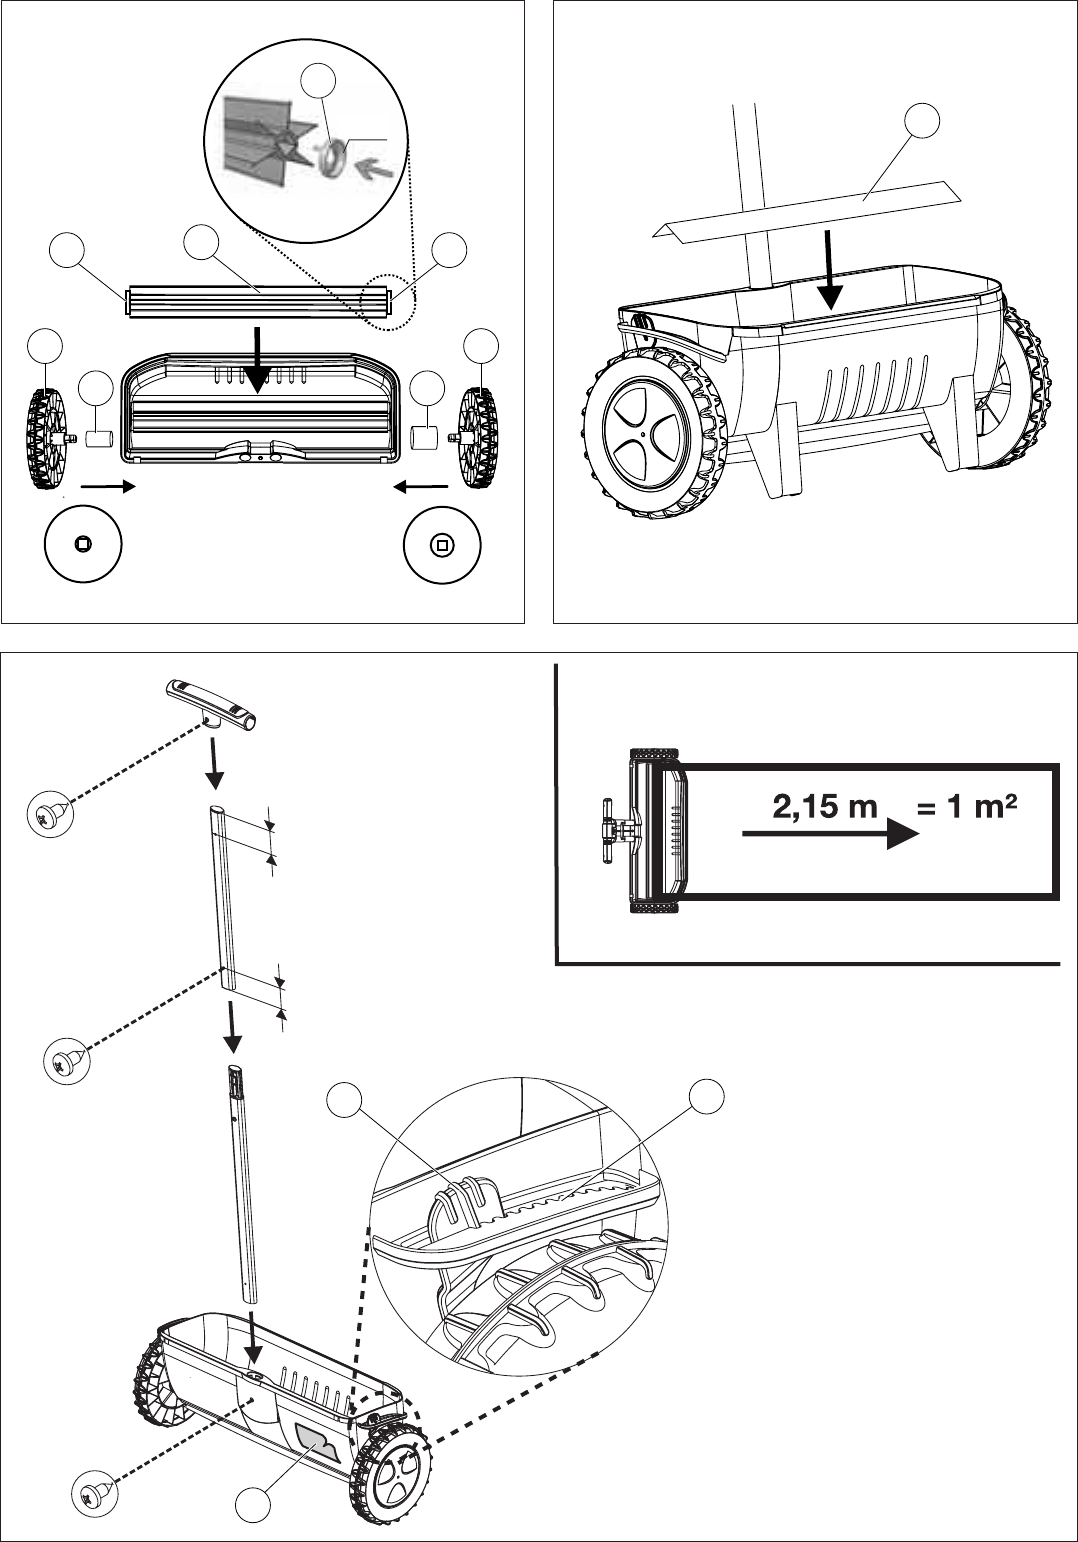
1.
A
montieren. Dabei darauf achten, dass die beiden Manschetten B auf der
Walze
A aufgesteckt sind. Räder C gleichzeitig bis zur Endposition ein L und
R beachten). Dabei darauf achten, dass die beiden Hülsen
D aufgesteckt sind.
2.
E
montieren.
3.
F
aufkleben.
Streumenge einstellen:
Gewünschte Streumenge entsprechend der Streuguttabelle
F
auf der Einstell G
wählen und die Hinweise des Streugutherstellers beachten.
1.
H
auf 0-Stellung (geschlossen) bringen.
2.
H
vom Rad wegdrücken und an gewünsch-
ter Stelle der Einstellskala
G
wieder einrasten lassen.
Bei Unterbrechung und zum Transport den Hebel
H
auf 0-Stellung bringen und den
eingefüllt sein.
Ausbringmenge des Streuguts ermitteln (siehe Bild A):
Es wird eine 1 m
2
große, glatte, trockene und saubere Testfläche (z.B. Garage) benötigt.
1.
2.
H
in Mittenstellung bringen und Streugut auf einer Länge von 2,15 m
(entspricht 1 m
2
Streufläche).
3.
vergleichen.
4.
die ausgebrachte Streumenge den Herstellerangaben entspricht.
Die Empfehlungen auf der Streuguttabelle
F
sind wegen den unterschiedlichen Korn-
größen von Dünger und Samen nur unverbindliche Richtwerte.
Ordnungsgemäßer Gebrauch:
Der Streuwagen dient der Ausbringung von folgendem Streugut:
Dünger, Samen, Kalk, Sand, Splitt, Salz, Winterstreugut.
Wartung
Nach dem Gebrauch die Walzen-Abdeckung
E
abnehmen, den Streuwagen
mit Wasser ausspülen. Reste des Streuguts entsprechend den
entsorgen.
Garantie:
GARDENA gewährt für dieses Produkt 2 Jahre Garantie (ab Kaufdatum).
Die Verbrauchsteile (z.
GB
Assembly:
1.
A. Ensure that the two collars B are fitted to the cylinder A.
Push both wheels
C
at the same time to the end position (observe left L and right R ).
Make sure that the two sleeves
D
are pushed on.
2.
E.
3.
F.
Setting the spreading quantity:
Select the spreading quantity you require by referring to the dosage table
F
on the setting
scale
G. Comply with the
1.
H
into the 0-position
2.
H
away from the wheel and let it engage
in the required position on the setting scale
G.
When interrupting operation or transporting the device, place the lever
H
in the 0-position
and pull the spreader (freewheel function). At least 750 g fertiliser, grit etc. must be filled
for the freewheel function.
Setting the spreading quantity (see figure A):
A 1 m
2
smooth, dry and clean test area is required (e.
1. Clean the test area (e.g. with a vacuum cleaner
2.
H
in the central position and spread grit over a length of 2.15 m
2
scattering area).
3.
turer specifications.
4.
corresponds with the manufacturer
Due to the different sizes of fertiliser and seeds, the information on the dosage table
F
is
given for reference purposes only.
Correct usage:
The spreader is used to discharge the following types of material:
fertiliser, seeds, lime, sand, chippings, salt and winter grit.
Maintenance
After use remove cylinder cover
E, empty spreader and rinse out with water.
any material residue in accordance with local regulations.
Warranty:
GARDENA offers a warranty of 2 years (from date of purchase) on this product.
The warranty does not cover non-repairable parts (e.
F
Montage:
1.
A. Veuill
ment
B
sont emboutis dans le cylindre A . Enchâsser les roues C simultanément
jusqu’en position finale (respecter L (gauche) et R (droite)). Veiller à ce que les deux
douilles
D
soient enfoncées.
2.
E
du cylindre.
3.
F.
Disposez le produit à épandre :
Sélectionnez la quantité de produits à épandre en vous référant au tableau de mesures
F
et aux graduationsG . Suivez les instructions
1.
H
dans la position 0 (fermé).
2.
H
sur la G .
En cas d’interruption et de transport de l’appareil, placer le levier
H
en position 0 et tirer
l’épandeur (fonction « roues libres »). Pour la fonction roues libres, remplir de 750 g au
moins de
Calculer la quantité de produit à épandre (voir figure A) :
Une surface de test lisse, sèche et propre de 1 m
2
est requise (ex. garage).
1. Nettoyer la surface de test (ex. avec un aspirateur
2.
H
en position intermédiaire et épandre le produit sur une longueur de
2,15 m (correspond à 1 m² de surface d'épandage).
3.
mandées du fabricant.
4.
ce que la quantité épandue corresponde aux indications du fabricant.
A cause des différentes granulosités des engrais et des semis, l’information sur la table
F
est communiquée uniquement à des fins
Utilisation :
L’épandeur est utilisé pour épandre les types de produits suivants : engrais, semis, sable,
gravier et sel.
Entretien
Après l’utilisation, enlevez le cache-cylindre
E, videz l’épandeur et
Garantie :
GARDENA accorde sur ce produit 2 ans de garantie (à partir de la date d’achat).
Les produits consommables (par ex. engrais) sont exclus de la garantie.
NL
Montage:
1.
A
monteren. Let erop dat de twee manchetten B
op wals A
zitten. Druk de wielen
C
er gelijktijdig in tot aan hun eindpositie (let op L en R ). Let er daarbij op, dat de beide
hulsen
D
erop zijn gestoken.
2.
E
monteren.
3. Monteer de duwboom en plak de strooigoedtabel
F
op.
Strooihoeveelheid instellen:
Gewenste strooihoeveelheid volgens de strooigoedtabel
F
op de instelschaalG
kiezen en
de aanwijzingen van de fabrikant van het strooigoed opvolgen.
1. Voor het vullen de hendel
H
op stand 0 (gesloten) zetten.
2.
H
van het wiel
en op de gewenste positie van de instelschaal
G
weer
Bij een onderbreking en om de strooiwagen te verplaatsen, zet u de
H
in de stand
0 en trekt u de strooiwagen (vrijloopfunctie). Met minstens 750g strooigoed vullen om de
vrijloopfunctie te gebruiken.
Hoeveelheid strooigoed bepalen (zie afbeelding A):
Daarvoor
2
(bijv.
1. Maak het testoppervlak schoon (bijv. met een stofzuiger
2.
H
in de middelste stand en strooi het strooigoed over een lengte van
2,15 m (dat komt overeen met 1 m
2
te bestrooien oppervlak).
3.
4.
zolang, totdat de gestrooide hoeveelheid strooigoed overeenkomt met de aanwijzingen
van de fabrikant.
De informatie op de strooigoedtabel
F
is slechts een richtlijn vanwege de
korrelgroottes van meststoffen en zaden.
Juiste gebruik:
De strooiwagen is voor het strooien van het volgende strooigoed:
Meststoffen, zaden, kalk, zand, split, zout en winterstrooigoed.
Onderhoud
Na gebruik de walsafdekplaat
E
verwijderen, de strooiwagen leegmaken en met water
schoonspoelen. Strooigoedresten volgens de gemeentelijke voorschriften
Garantie:
GARDENA geeft op dit product 2 jaar garantie (vanaf aankoopdatum).
Strooigoed (bijv. meststoffen) valt niet onder garantie.
S
Montering:
1.
A. Se till att de båda manschetterna B
sitter på valsen A . Tryck in
C
samtidigt till ändpositionen (skilj på L och R ). Se till att de båda hylsorna D
är
påsatta.
2.
E.
3. Montera handtaget och klistra på doseringstabellen
F
.
Ställ in gödningsmängd:
Se tabellen
F
för önskad strömängd och ställ in skalanG , beakta strötillverkarens
1.
H
till läge 0 (stängd) innan du fyller på materialet.
2.
H
från hjulet och låt skalanG
haka i vid
inställning.
För att avbryta och för att transportera sätter du spaken
H
i 0-läge och drar
(funktion frigång). Minst 750 g.
Fastställa strömängden för spridningsmaterialet (se bild A) :
Det behövs en 1 m
2
stor, slät, torr och ren testyta (t.
1. Rengör testytan (t.ex. med en dammsugare
2.
H
i mittläge och strö spridningsmaterial på en längd av 2,15 m (motsvarar
1 m² spridningsyta).
3.
4.
utströdda strömängden motsvarar
Rekommendationerna i doseringstabellen
F
är endast riktvärden. Gödningsmedel och
sådd har olika kornstorlek.
Avsedd användning:
Universalspridaren är avsedd för spridning av följande:
Gödning, sådd, kalk, sand, grus, salt, vintersand.
Underhåll /
Efter användningen skall cylinderskyddet
E
tas bort, universalspridaren
Garanti:
GARD
2
1. 2.
0
2
4
6
8
4 cm
4,5 cm
G
H
F
3.
E
Art. 430
^
A
L
R
A
B
C
C
D
D