332144
26
Zoom out
Zoom in
Previous page
1/28
Next page
Het vervangen van de hoofdregelaars van de
wokbrander
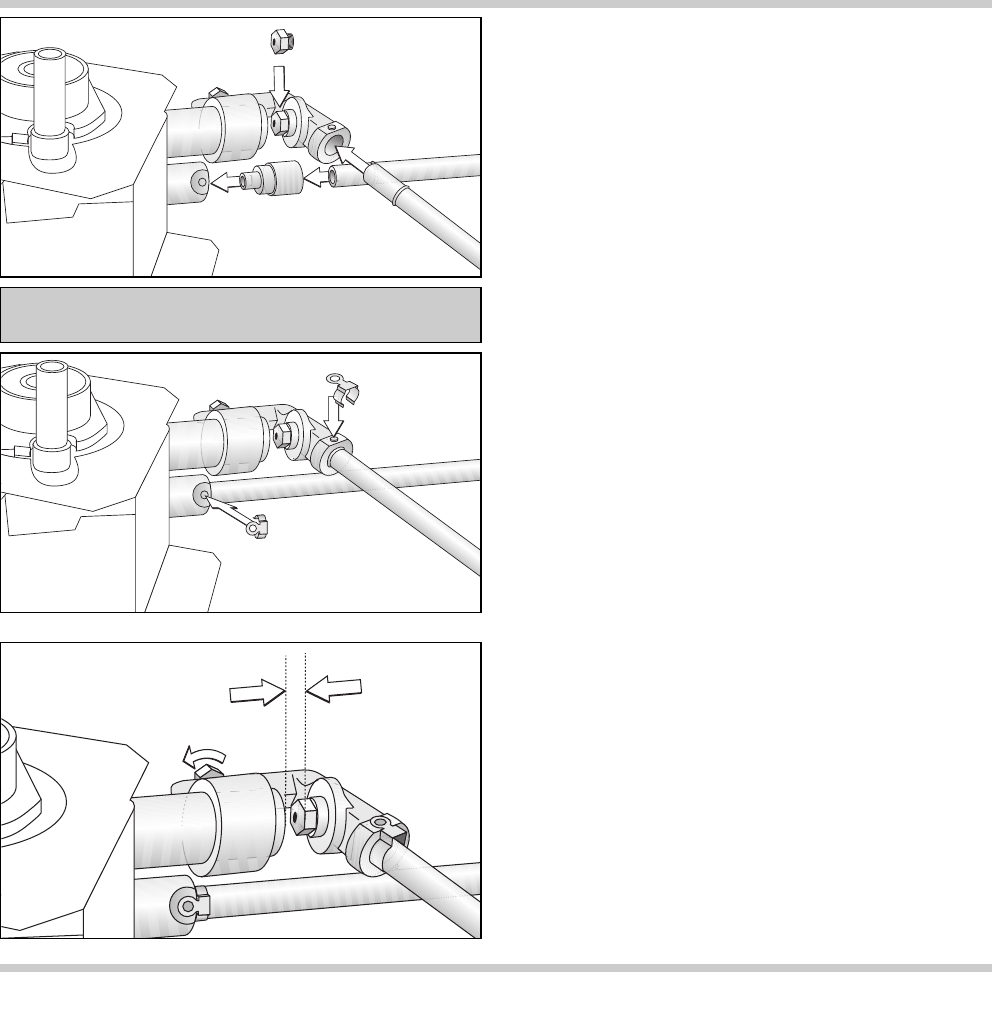
• Schroef de brander van de onderbak van de
kookplaat (Torx T20). Draai de schroef bij de
luchtmengbuis los. Schuif de luchtmengbuis
helemaal naar binnen. Trek de veiligheidsclips
van de branderleidingen. De vonkontsteking mag
aangesloten blijven.
• Trek de brander van de branderleidingen,
verwijder de gasregelaar en dichtring voor de
binnenste brander met de hand. Schroef de
gasregelaar voor de buitenste branderring eruit
(SW10).
• Controleer of de dichtring correct in de nieuwe
hoofdregelaar voor de binnenste brander zit.
Schuif de regelaar op de branderleiding.
Pas op! Verbuig de branderleidingen hierbij niet.
• Schroef de nieuwe hoofdregelaar voor de
buitenste brander tot aan de aanslag erin.
• Steek de brander op de branderleidingen. Klik de
veiligheidsclips op de branderleidingen.
• Schroef de brander weer op de onderbak van de
kookplaat.
• Luchtmengbuis na het losdraaien van de schroef
op de juiste mengverhouding instellen (zie tabel
gasregelaars). Draai de schroef vervolgens weer
vast.
• Plaats de vangschaal en schroef deze gelijkmatig
vast.
Controle van de werking van het apparaat
De branders zijn goed ingesteld, wanneer de
vlammen geen gele punten meer vertonen. Verder
mogen de branders niet uitgaan als snel wordt
overgeschakeld van grote naar kleine vlam.
Vergeet niet de oude sticker bij het gasaansluitpunt
te vervangen door de sticker die bij het
regelaarssetje is gevoegd. Zo documenteert u de
aanpassing aan de andere gassoort.
24
Voor het instellen van de gasregelaars zie de
tabel op de bladzijden 18-20.
Hoofdregelaar
buitenkant
Hoofdregelaar
binnenkant
26


Need help? Post your question in this forum.

Forumrules


Report abuse

Libble takes abuse of its services very seriously. We're committed to dealing with such abuse according to the laws in your country of residence. When you submit a report, we'll investigate it and take the appropriate action. We'll get back to you only if we require additional details or have more information to share.

Product:

For example, Anti-Semitic content, racist content, or material that could result in a violent physical act.

For example, a credit card number, a personal identification number, or an unlisted home address. Note that email addresses and full names are not considered private information.

Forumrules

To achieve meaningful questions, we apply the following rules:

Register

Register getting emails for Gaggenau cg 492 at:


You will receive an email to register for one or both of the options.


Get your user manual by e-mail

Enter your email address to receive the manual of Gaggenau cg 492 in the language / languages: Dutch as an attachment in your email.

The manual is 1,42 mb in size.


You will receive the manual in your email within minutes. If you have not received an email, then probably have entered the wrong email address or your mailbox is too full. In addition, it may be that your ISP may have a maximum size for emails to receive.

Others manual(s) of Gaggenau cg 492

Gaggenau cg 492 User Manual - English - 64 pages

Gaggenau cg 492 User Manual - English - 28 pages

Gaggenau cg 492 User Manual - German - 60 pages

Gaggenau cg 492 User Manual - German - 28 pages

Gaggenau cg 492 User Manual - Dutch, French, Italian - 60 pages

Gaggenau cg 492 User Manual - Portuguese, Spanish - 64 pages

Gaggenau cg 492 Installation Guide - All languages - 48 pages


The manual is sent by email. Check your email

If you have not received an email with the manual within fifteen minutes, it may be that you have a entered a wrong email address or that your ISP has set a maximum size to receive email that is smaller than the size of the manual.

The email address you have provided is not correct.

Please check the email address and correct it.

Your question is posted on this page

Would you like to receive an email when new answers and questions are posted? Please enter your email address.


Info