Autres élémentsAvec fenêtre de conrmation de la cassette lm, objectif
«gros plan» et xation de trépied
Dimensions et
poids
168 mm x 96 mm x 121 mm (sans les parties saillantes)/
612 g (sans les piles, la sangle, la cassette lm et l’objectif
gros plan)
* Les spécications peuvent changer sans préavis.
規格(中文)
底片
富士馬上看底片“instaxWIDE”
照片尺寸
62mm×99mm
鏡頭
伸縮式鏡頭,2組2片構成,f=95mm1:14
取景器
實像式取景器,0.37倍,帶瞄準標記
聚焦
電動2點轉換式(0.9m~3m/3m~∞),普通模式
(0.9m~3m)風景模式(3m~∞)
快門
經編程電子快門,1/64秒~1/200秒
曝光控制
自動調節,聯鎖範圍(ISO800):LV10.5~LV15,
曝光補償(濃淡控制):±2/3EV
底片排出
電動式
閃光燈
低亮度自動發光電子式自動閃光燈,充電時間:0.2秒
~6秒(使用新電池),閃光燈充電中指示燈
(LED點亮呈紅色),強制閃光模式,閃光燈有效範
圍:0.9
m~3m
液晶顯示屏
張數計數器(剩餘張數顯示式),濃淡控制,強制閃
光模式
供電
四節AA型1.5V鹼電池(LR6)可拍攝底片盒數:
10
盒(根據本公司的測試條件)
其他
含底片盒確認窗,簡易近拍鏡頭和三腳架座
尺寸和重量
168mmx96mmx121mm(不含突出部)/612g
(不帶電池、相機帶、底片盒和簡易近拍鏡頭)
*規格可能不經預告而修改。
(한국어)
필름후지필름인스턴트컬러필름“instaxWIDE”
화면사이즈62mm×99mm
렌즈침동식렌즈,2군2매구성,f=95mm,1:14
파인더실상식파인더,0.37배,타깃스팟기능포함
거리조절전동2점절환식(0.9m~3m/3m~∞),기본모드
(0.9m~3m)
원경모드(3m~∞)
셔터프로그램식전자셔터릴리즈,1/64초~1/200초.
노출조절자동조절,연동범위((ISO800):LV10.5~LV15,노출보
정(명암컨트롤):±2/3EV
필름송출전동식
플래쉬내장식,자동발광오토플래시,충전시간:0.2초~6초
(새배터리사용시),플래시충전표시등(적색LED점
등),강제발광플래시모드,플래시촬영범위:0.9m~3m
LCD표시노출카운터(미노출필름수),명암컨트롤,강제발광
플래시
모드
전원AA사이즈1.5V알칼라인배터리(LR6)4개촬영가능
수:10개필름팩(당사시험조건기준)
기타필름팩확인창,접사렌즈및삼각대소켓포함
크기및무게168mmx96mmx121mm(돌출부제외)/612g(배터리,
스트랩,
필름팩및접사렌즈제외)
*사양은예고없이변경될수가있습니다.
E
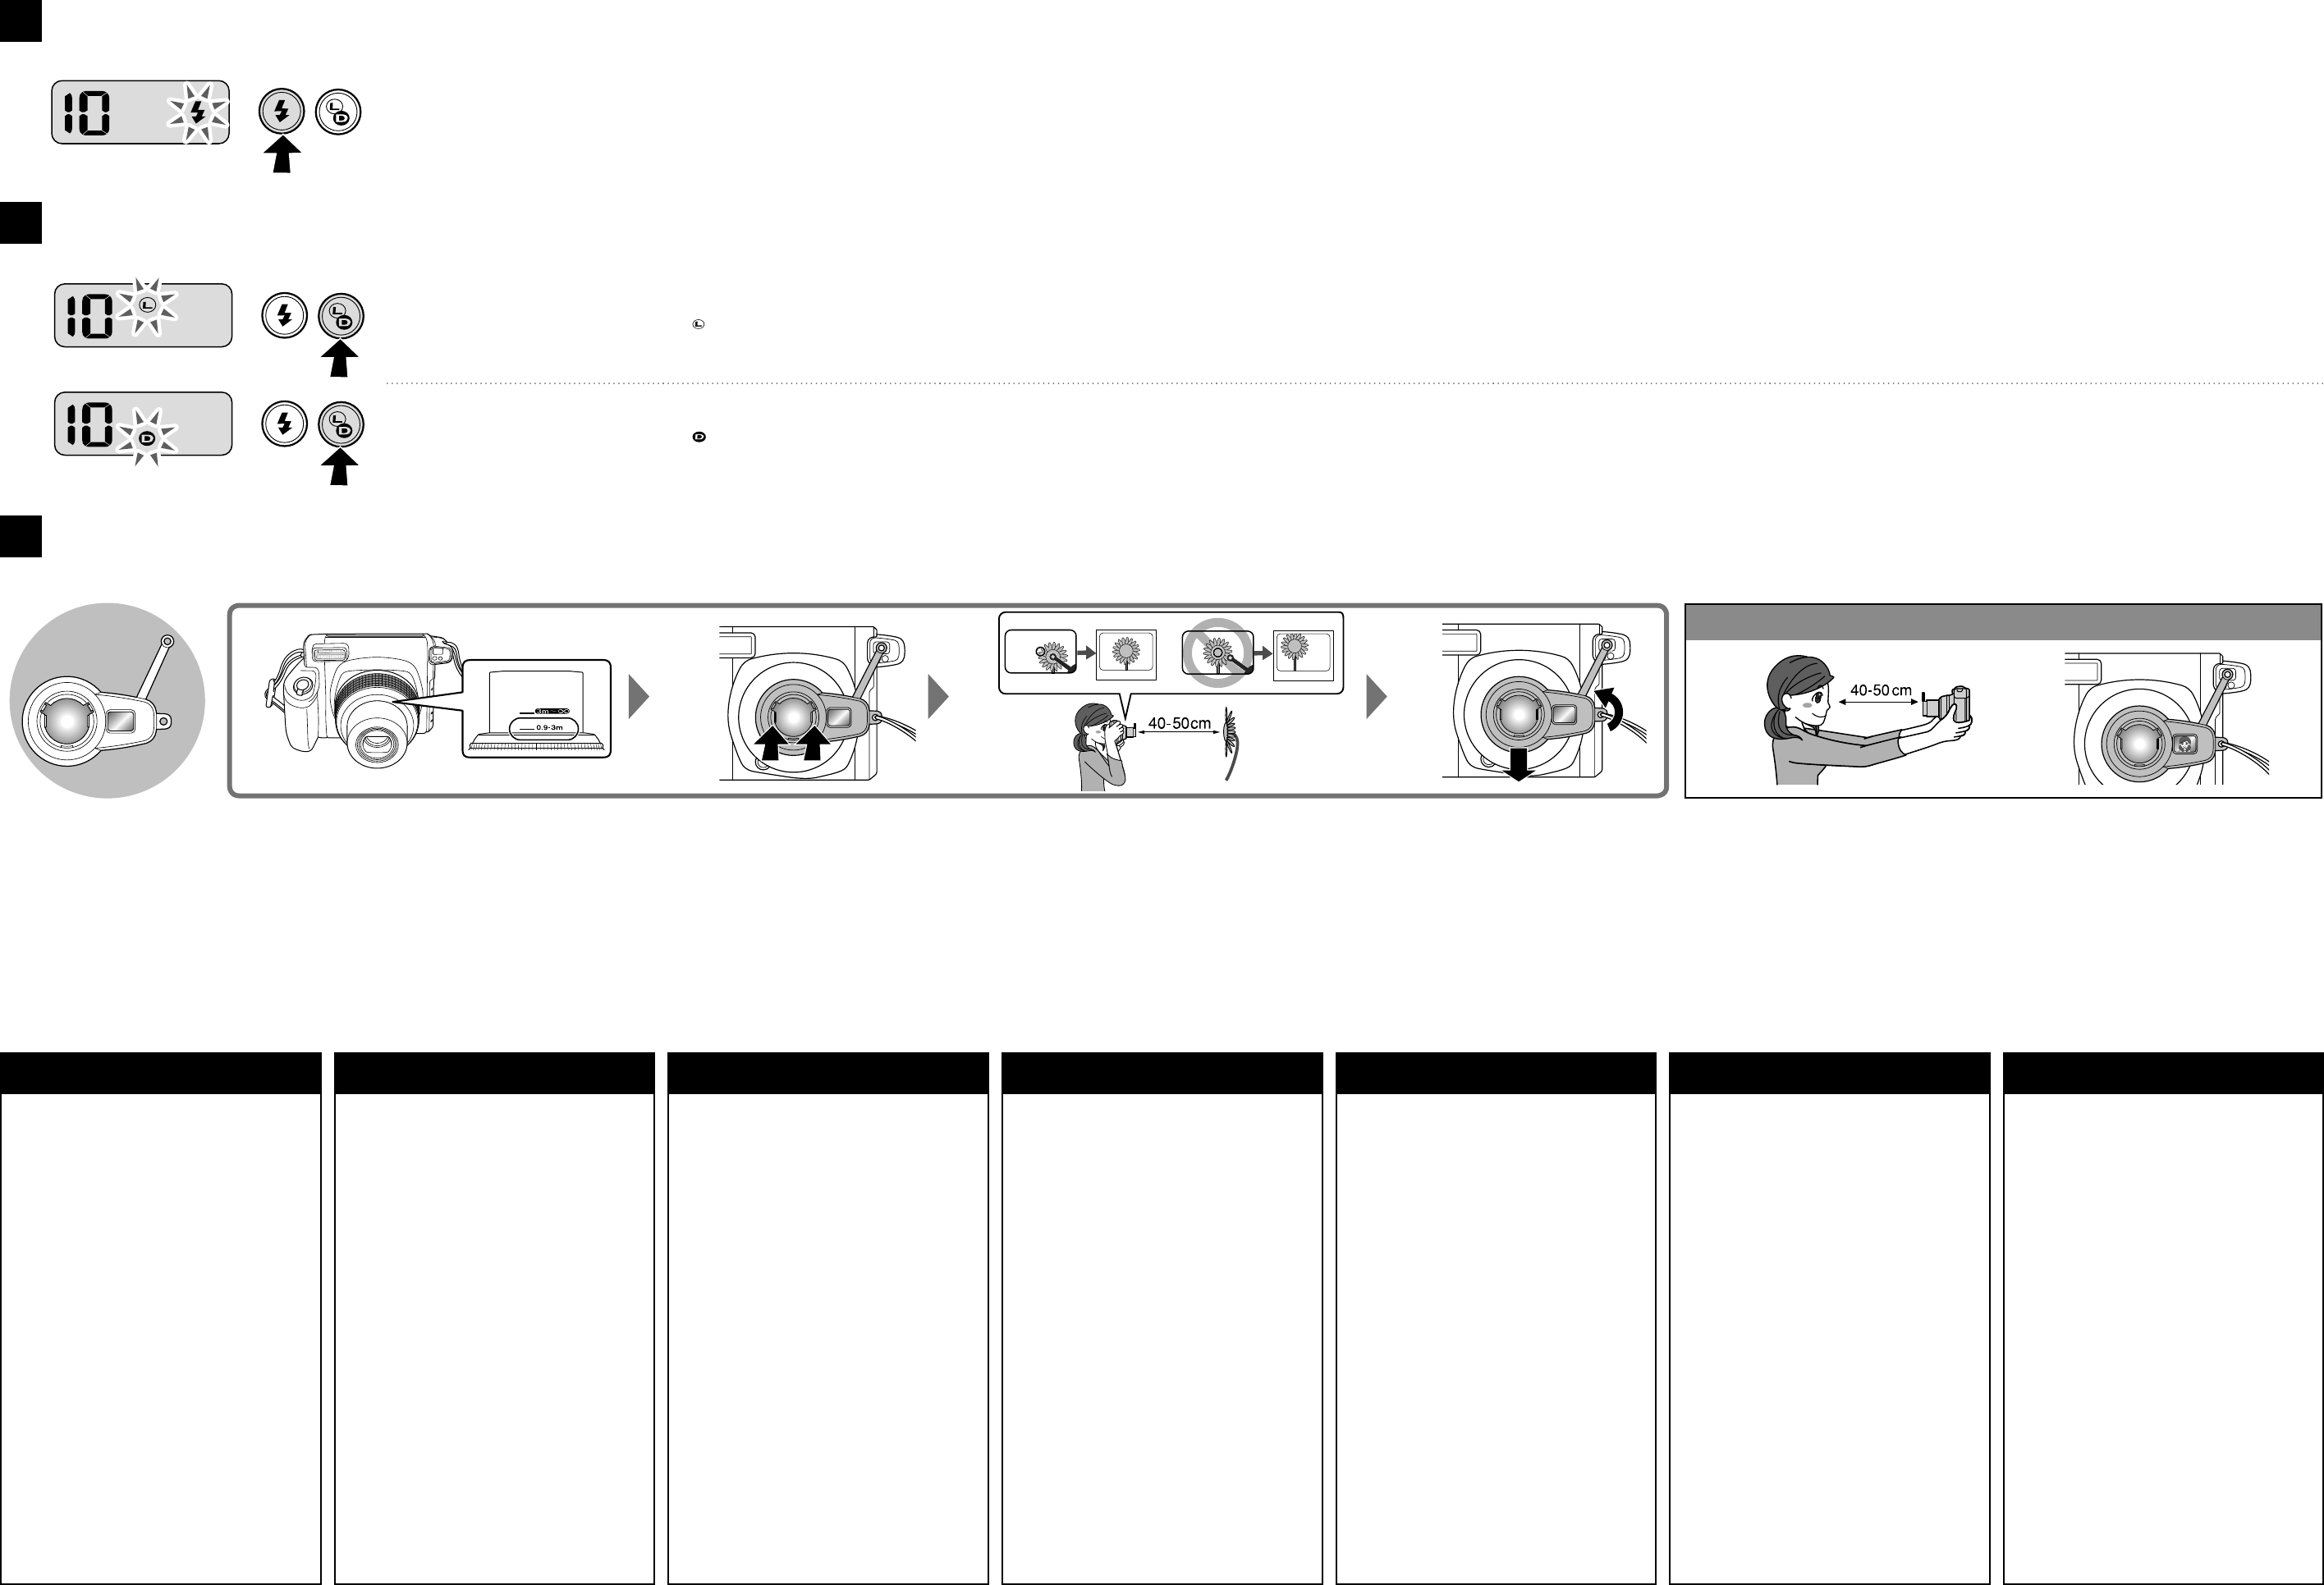
フラッシュの強制発光を使用する/Using Fill in Flash Mode/Verwendung des Aufhellblitz-Modus/Utilisation du mode «déclenchement forcé» du ash/Uso del modo de ash de relleno/使用強制閃光模式/플래시 모드의 강제발광 사용하기
フラッシュを強制的に発光することができます。/You can force ash to be used./Sie können die Blitzverwendung erzwingen./Vous pouvez forcer l'utilisation du ash./Es posible forzar el uso del ash./您可以讓要使用的閃光燈強制閃光。/플래시를 강제적으로 발광시킬 수 있습니다.
周囲の明るさに関係なく、フラッシュを発光させて撮影
したい場合に使用します。逆光時に被写体を明るく写す
ことができます。
Select when you want to use a ash regardless of the
brightness. The subject is photographed sharply with
backlighting.
Wählen Sie dies, wenn Sie einen Blitz ungeachtet der
Helligkeit verwenden möchten. Das Motiv wird auch bei
Gegenlicht scharf aufgenommen.
Sélectionnez cette fonction quand vous souhaitez utiliser
le ash quelle que soit la luminosité. Le sujet apparaît
nettement même dans le cas d’un contre-jour.
Se selecciona cuando desee usar el ash
independientemente de las condiciones de luz. El sujeto
estará nítido en la foto con contraluz.
無論周圍的亮度如何都要使用閃光燈時,請選擇此項。可
在逆光時將被攝物拍攝得很明亮。
주변밝기와관계없이플래시를사용할때선택합니다.
역광일
때에피사체를밝게찍을수가있습니다.
F
写真の濃淡を調節する/Adjusting the Brightness/Einstellen der Helligkeit/Ajustement de la luminosité/Ajuste de la luminosidad/調節亮度/명암 조절하기
写真全体の濃淡を調節することができます。/You can adjust the brightness of the whole picture./Sie können die Helligkeit des gesamten Bildes anpassen./Vous pouvez ajuster la luminosité de toute l’image./Puede ajustar la luminosidad de la imagen total./您可以調節整張照片的亮度。/사진 전체의 명암을 조절할 수 있습니다.
写真全体が明るめに撮影されます。被写体が暗い感じに
写ったときに設定してください。
Select
to lighten the picture if the picture is coming out
too dark.
Das Bild wird heller. Wählen Sie dies, wenn das Bild zu dunkel
wirkt.
L’image devient plus claire. Sélectionnez ce réglage quand
l’image parait sombre.
La imagen se vuelve clara. Se selecciona cuando la imagen
aparece oscura.
照片變亮。當照片看上去較暗時,請選擇此項。
밝게촬영됩니다.피사체가어둡게느껴질때
(보일때)
설정합니다.
写真全体が暗めに撮影されます。被写体が白っぽく写っ
たときに設定してください。
Select
to darken the picture if the picture is coming out
too bright.
Das Bild wird dunkler. Wählen Sie dies, wenn das Bild zu hell
wirkt.
L’image devient plus sombre. Sélectionnez ce réglage quand
l’image parait blanche.
La imagen se vuelve oscura. Se selecciona cuando la imagen
queda blanquecina.
照片變暗。當照片看上去較白時,請選擇此項。
사진전체가어둡게촬영됩니다.피사체가밝게느껴질때
(보일때)
설정합니다.
G
簡易接写レンズを使用する/Using the Close Up Lens/Verwendung der Nahlinse/Utilisation de l’objectif «gros plan»/Uso de la lente de aproximación/使用簡易近拍鏡頭/접사렌즈 사용하기
被写体に近づいて大きく撮影したり、セルフショットミラーを使用して、自分自身を撮影したりすることができます。/You can photograph objects close-up, and can photograph yourself using the self-portrait mirror./Sie können nahe Motive aufnehmen und sich selbst mit dem Selbstportrait-Spiegel fotograeren./Vous pouvez faire des prises de vue en gros plan et même vous prendre vous même en photo en utilisant le miroir autoportrait./Puede tomar fotos de objetos en primer plano, como
también puede fotograarse a sí mismo utilizando el espejo para autorretratos./您可以近拍被攝體,可以使用自拍鏡進行自拍。/피사체를 근접 촬영할 수 있고, 자화상 거울을 사용하여 셀프 촬영할 수 있습니다.
自分自身を撮影する/Taking self-portraits/Aufnehmen von Selbstportraits/Prise de vue d'autoportrait/
Toma de autorretratos/自拍/셀프 촬영하기
•撮影距離の設定は、近距離用(0.9m~3m)に設定してください。
•簡易接写レンズの取り付け/取り外しは、必ず電源を入れた状態
で行ってください。レンズカバーが正しく動作しない場合があ
ります。
•簡易接写レンズを取り付けるときは、ツメが左右になるように
して、真っ直ぐにはめ込みます。
•簡易接写レンズ用ターゲットマークが、被写体に合うようにカ
メラをセットしてください。
•セルフショットミラーで構図を確認しながら、自分自身を撮影
することができます。
•簡易接写レンズを取り外すときは軽く回すように外してください。
•Set the photographic distance to short-distance (0.9 m – 3 m).
•Switch on the camera before you attach/detach the close up lens.
Otherwise the lens cover may not work correctly.
•When you attach the close up lens, insert it straight into the camera
so that the tabs are to the left and right.
•Focus the target spot of the close up lens on the object.
•You can check composition while shooting self-portraits using the
self-portrait mirror.
•Turn the close up lens gently to detach it.
•Stellen Sie den Fotoabstand auf Nahbereich (0,9 m – 3 m).
•Schalten Sie die Kamera ein, bevor Sie das Nahlinse anbringen/
abnehmen. Andernfalls kann der Objektivdeckel nicht richtig
funktionieren.
•Wenn Sie das Nahlinse anbringen, setzen Sie dieses gerade in die
Kamera, so dass die Zapfen links und rechts liegen.
•Führen Sie den Zielpunkt der Nahlinse auf das Motiv.
•Sie können die Bildkomposition prüfen, während Sie Selbstportraits
mit dem Selbstportrait-Spiegel machen.
•Drehen Sie das Nahlinse leicht zum Abnehmen.
•Réglez la distance de prise de vue sur la prise de vue rapprochée
(0,9m à 3 m).
•Allumez l'appareil photo avant d'attacher/détacher l'objectif
gros plan. Sinon, le capuchon d'objectif peut ne pas fonctionner
correctement.
•Pour attacher l'objectif «gros plan» , insérez-le bien droit de façon à
ce que les languettes soient vers la gauche et la droite.
•Dirigez le point de cible de l'objectif «gros plan» sur l'objet.
•Vous pouvez vérier la composition quand vous vous prenez en
photo en utilisant le miroir autoportrait.
•Tournez doucement l'objectif gros plan pour le détacher.
•Ajuste la distancia fotográca a corta distancia (0,9 m – 3 m).
•Encienda la cámara antes de jar/quitar la lente de aproximación. De
lo contrario, la tapa del objetivo podría no funcionar correctamente.
•Al acoplar la lente de aproximación, insértela directamente en la
cámara de manera que las lengüetas queden a la izquierda y la
derecha.
•Enfoque en el objeto, el punto objetivo de la lente de aproximación.
•El espejo para autorretratos le permite comprobar la composición
durante la toma de autorretratos.
•Para quitar la lente de aproximación, gírela con suavidad.
Libble takes abuse of its services very seriously. We're committed to dealing with such abuse according to the laws in your country of residence. When you submit a report, we'll investigate it and take the appropriate action. We'll get back to you only if we require additional details or have more information to share.
Product:
Forumrules
To achieve meaningful questions, we apply the following rules:
First, read the manual;
Check if your question has been asked previously;
Try to ask your question as clearly as possible;
Did you already try to solve the problem? Please mention this;
Is your problem solved by a visitor then let him/her know in this forum;
To give a response to a question or answer, do not use this form but click on the button 'reply to this question';
Your question will be posted here and emailed to our subscribers. Therefore, avoid filling in personal details.
Register
Register getting emails for Fujifilm Instax Wide 300 at:
new questions and answers
new manuals
You will receive an email to register for one or both of the options.
Get your user manual by e-mail
Enter your email address to receive the manual of Fujifilm Instax Wide 300 in the language / languages: English, German, French, Spanish as an attachment in your email.
The manual is 1,32 mb in size.
You will receive the manual in your email within minutes. If you have not received an email, then probably have entered the wrong email address or your mailbox is too full. In addition, it may be that your ISP may have a maximum size for emails to receive.
The manual is sent by email. Check your email
If you have not received an email with the manual within fifteen minutes, it may be that you have a entered a wrong email address or that your ISP has set a maximum size to receive email that is smaller than the size of the manual.
The email address you have provided is not correct.
Please check the email address and correct it.
Your question is posted on this page
Would you like to receive an email when new answers and questions are posted? Please enter your email address.