The first time the chime unit is powered up, the sounds
available are demonstrated. Press the door push until
the chime responds with a tune.
You can leave this tune or change it to the desired tune
by using button A (Fig 7)(see Sound Selection for Tunes)
To program a second push, press the push button until
the chime sounds.
Press the button until the chime sounds, then use button
B to change the tune if required. Programming is now
completed.
If more than 5 minutes has elapsed, you will have to
reset the chime programming by pressing and holding
buttons A and B until the chime
sounds, this takes approximately 5 seconds.
The chime can then be
programmed to 1 or 2 pushes.
200m Chime Sound Variety:
1. Big Ben 2 Note (Default Tune for 1st Push)
2. Mini Bell 4 Note w/ Echo (Default Tune for 2nd Push)
3. Clarinet
4. Altosax
50m Plug-in Chime Sound Variety:
1. Tone Bar 2 Note (Default Tune for 1st Push)
2. Bass clarinet (Default Tune for 2nd Push)
Fig 3
Fig 5
Fig 6
Fig 7
Fig 4
Fig 2
-
+
+
-
+
-
Instructions
– Please retain these instructions for future reference
You will require:
3 x LR6 (AA) alkaline batteries for the Portable Door Chime.
Only long-life alkaline batteries must be used.
A small crosshead and flathead screwdriver, a ø5 masonry drill
Installation
Please note: The stated range of this product is
measured in open field conditions. Walls, ceilings and
the positioning the bell push or door chime on or near
metal structures or reinforced PVC doors or
doorframes will reduce the transmission range.
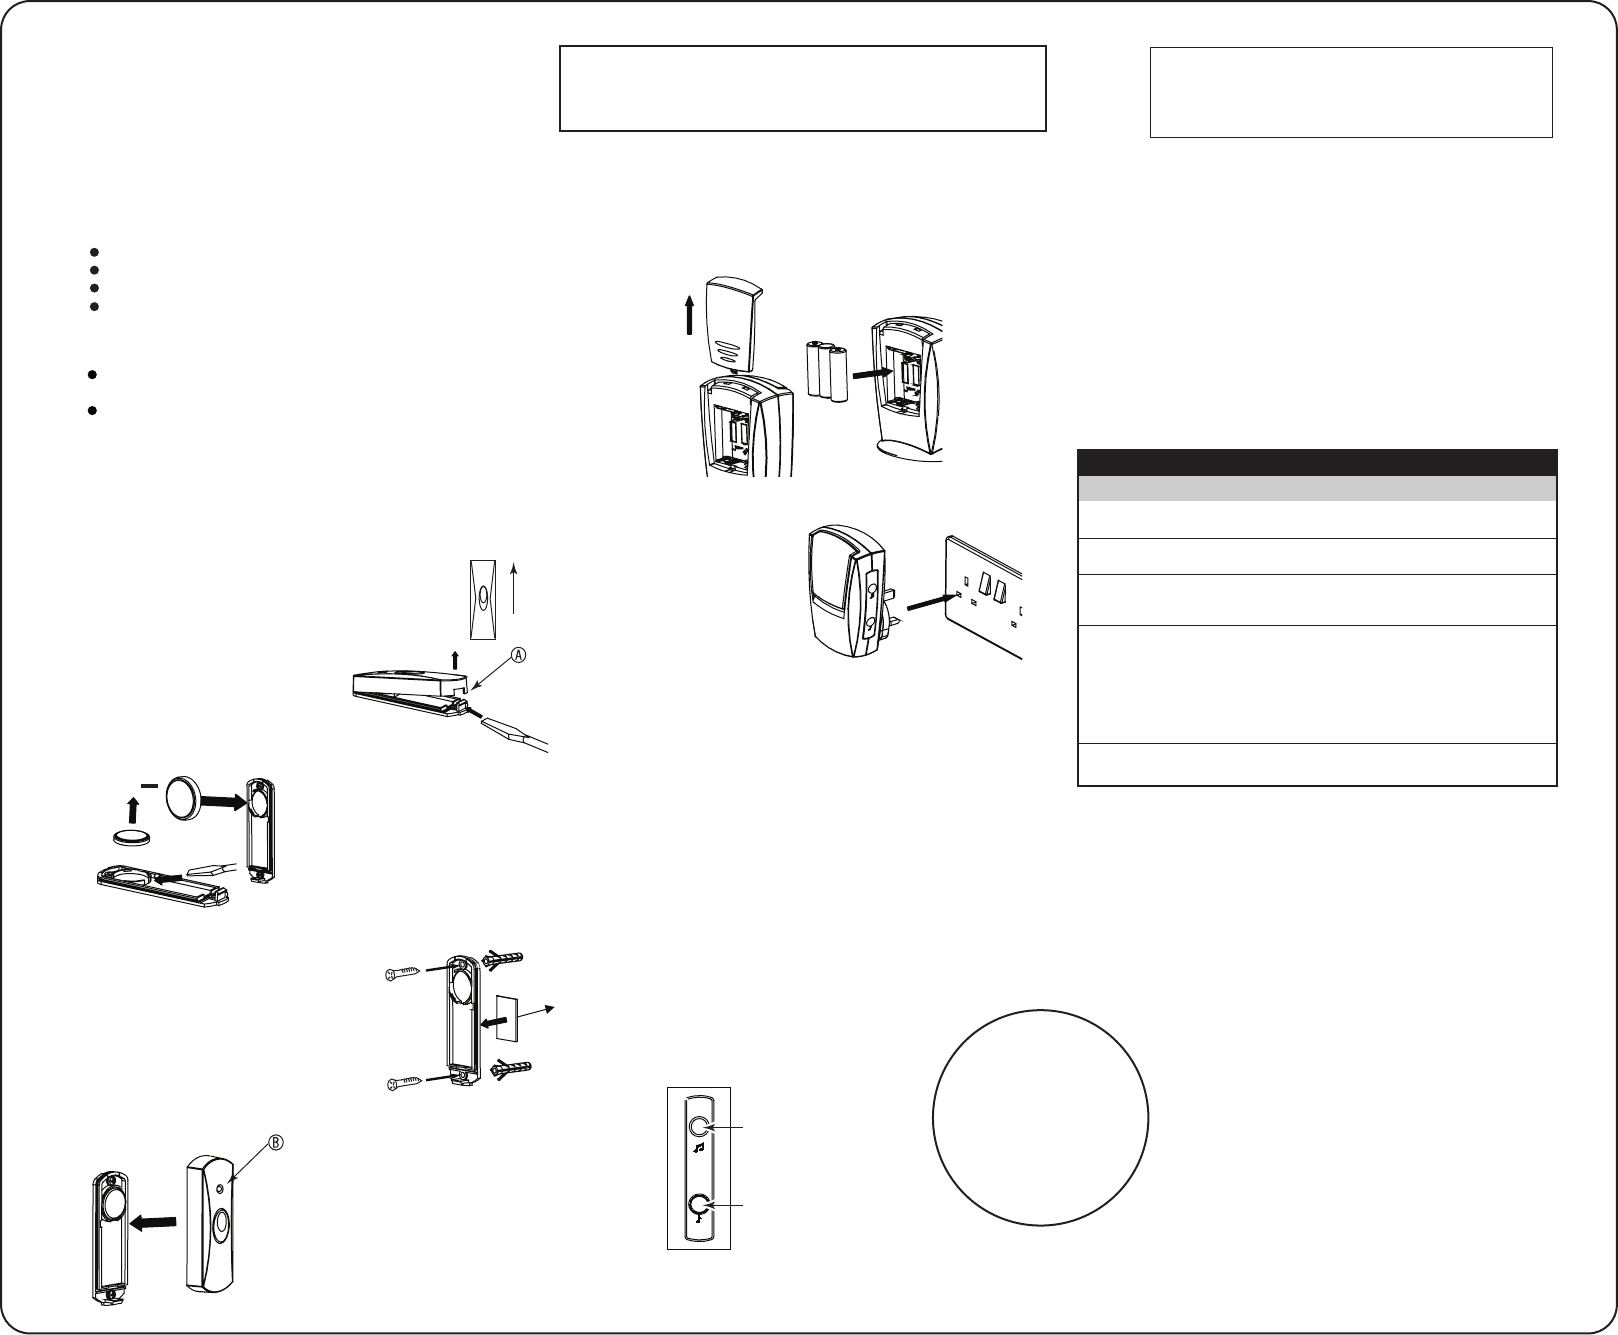
1. Open the bell push
To open the front cover carefully
insert a flat bladed screw driver,
into the slot and twist gently (A).
When refitting the front cover
to ensure the weather proofing
is maintained, always mount the
bell push in the upright position
and replace the cover securely. (Fig 1)
2. To fit or replace the battery
Open the front cover and insert
the CR 2032 Lithium coin cell
battery into the base as shown
in Fig 2. Any debris created
during installation must be
removed from the base before
fitting battery, to ensure
good contact.
3. Mount the bell push
Ensure the wall surface is clean
and dry. Mount using either the
double sided sticky pad on a
smooth surface, or the screws
and wall plugs provided,
See Fig 3. Do not mount the push
on or near (< 30cm) large metal
objects, as it will block signals from the push.
4. Test the bell push
When the bell push button is
pressed,the confidence light (B)
in Fig 4, will illuminate to reassure
the caller that the bell push is
working.
The light will
flash 5 times when the
battery needs replacing.
5. Fitting or replacing the batteries into the door-chime
Remove battery compartment cover and insert three
LR6 (AA) alkaline batteries as shown in Fig 5.
Refit the battery compartment cover.
6. Use of door-chime
Plug the chime into any
220-240V BS 1363 Socket,
as shown in Fig 6.
installed in a clean dry
environment, situated
within transmission
range of the bell push(es).
200m* Door chime
50m* Plug-in Door chime
8. Sound Selection
A = Main push sound selection
B = Second push sound selection
Chime tune options are as follows:
Declaration
Novar ED&S hereby declares that this Wirefree chime kit is in compliance with
the essential requirements and other relevant provisions of the Radio and
Telecommunications Terminal Equipment ( R & TTE ) directive, 1999/5/EC
Fig 1
Evo Home & Garden Kit
Pack contents:
50m* Plug-in Chime
200m* Portable Chime
Bell push with CR2032 Lithium coin cell battery
Adhesive pad, 2 x screws (ø3x20mm) 2 x wall plugs (ø5x25mm)
for mounting the bell push
Friedland guarantees this product for 3 years from date of purchase.
Proof of purchase is required, this does not affect your statutory rights.
If you require further information about our products, call the Friedland
helpline on 01268 563066.
Friedland a Novar business, Novar ED&S, The Arnold Centre,
Paycocke Road, Basildon, Essex, SS14 3EA, England
www.friedland.co.uk
+
A
B
Trouble Shooting
Chime not Sounding
Batteries may not be inserted correctly
Check all batteries have been inserted correctly
Chime may be positioned out of range of the bell pushMove
your chime closer to the bell push
A metallic object may be blocking the signal from bell push position
Experiment with the location of the chime to see if you can move
it in a more suitable place
The battery in the bell push may need replacing
Press the bell push. If the confidence light (B) flashes 5 times
after being pushed, replace the battery.
Note: In cold conditions, poor location or environment, operating
at maximum range it is advisable to replace the battery more
frequently before the indicator light flashes
(i.e every 12 - 18 months) to maintain optimum performance
Your bell push and chime haven't been programmed
Do the automatic programming of your chime and bell push
*
The stated transmission range of this product is measured in open field conditions.
Walls ceilings, and metal structures will reduce the maximum range.
Need help? Post your question in this forum.
Report abuse
Libble takes abuse of its services very seriously. We're committed to dealing with such abuse according to the laws in your country of residence. When you submit a report, we'll investigate it and take the appropriate action. We'll get back to you only if we require additional details or have more information to share.
Product:
Forumrules
To achieve meaningful questions, we apply the following rules:
First, read the manual;
Check if your question has been asked previously;
Try to ask your question as clearly as possible;
Did you already try to solve the problem? Please mention this;
Is your problem solved by a visitor then let him/her know in this forum;
To give a response to a question or answer, do not use this form but click on the button 'reply to this question';
Your question will be posted here and emailed to our subscribers. Therefore, avoid filling in personal details.
Register
Register getting emails for Friedland EvoHome and Garden Kit - D426E at:
new questions and answers
new manuals
You will receive an email to register for one or both of the options.
Get your user manual by e-mail
Enter your email address to receive the manual of Friedland EvoHome and Garden Kit - D426E in the language / languages: English as an attachment in your email.
The manual is 0,26 mb in size.
You will receive the manual in your email within minutes. If you have not received an email, then probably have entered the wrong email address or your mailbox is too full. In addition, it may be that your ISP may have a maximum size for emails to receive.
The manual is sent by email. Check your email
If you have not received an email with the manual within fifteen minutes, it may be that you have a entered a wrong email address or that your ISP has set a maximum size to receive email that is smaller than the size of the manual.
The email address you have provided is not correct.
Please check the email address and correct it.
Your question is posted on this page
Would you like to receive an email when new answers and questions are posted? Please enter your email address.