V1.1
305503000600
Support email: support@foscam.com
Quick Setup Guide
V
Ph
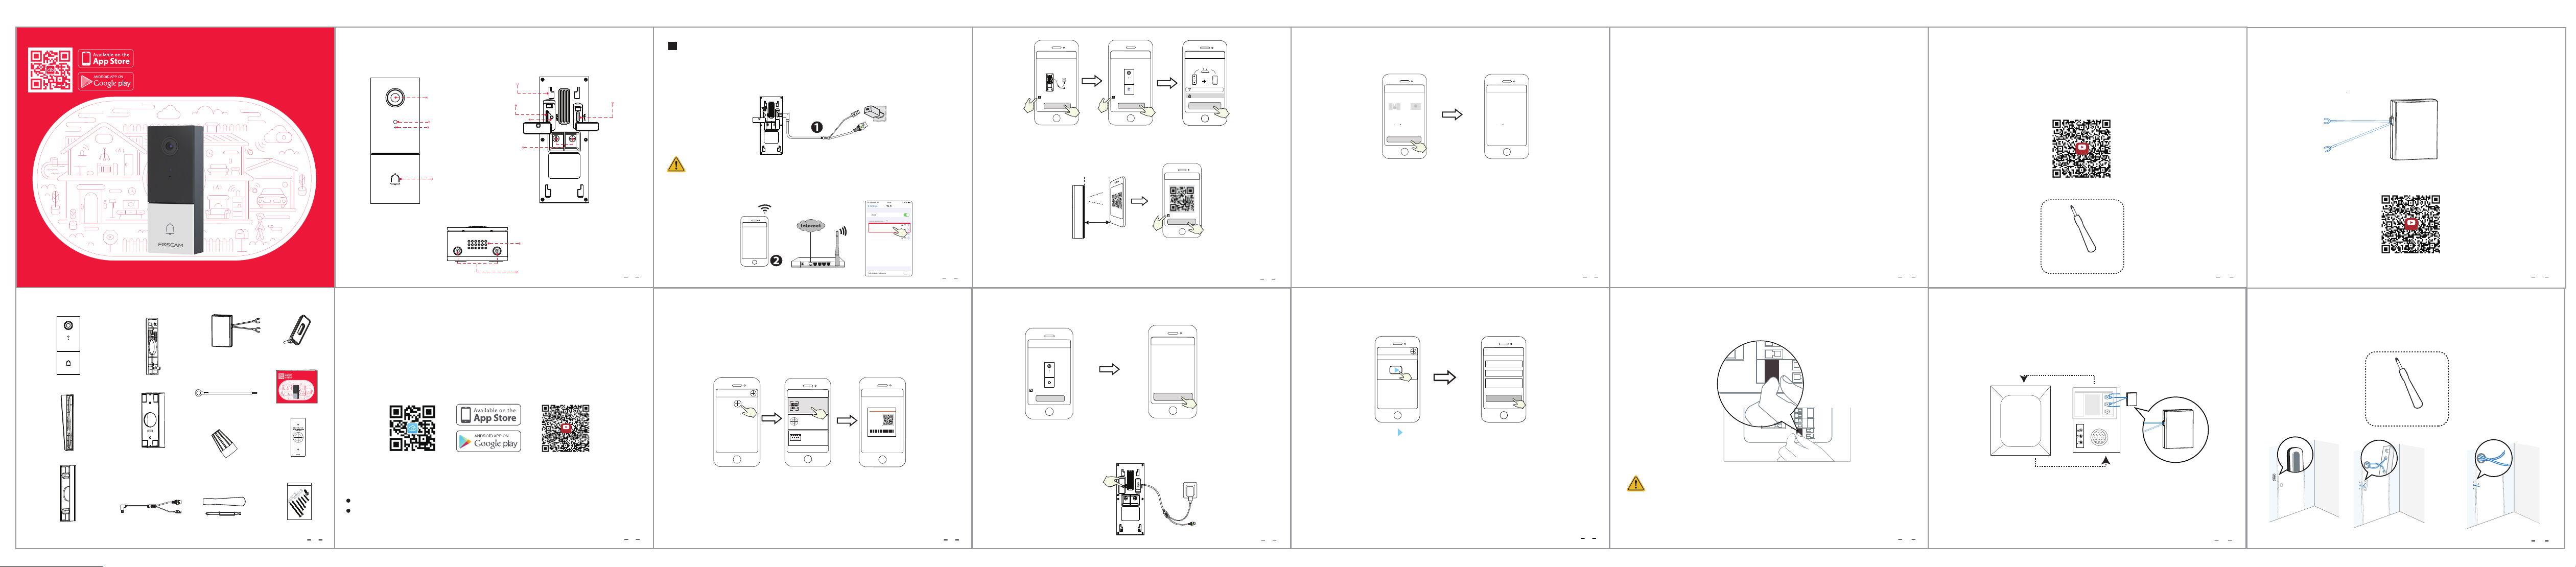
Camera Micro SD Card Slot
Reset
Light sensor
Microphone
Fron Rear Panel
Doorbell button
Power Input Port
Type-C Port
Mounting slots
Speaker
Bottom Panel
Security screw hole
2
Add De
App (Rec
It is strongly recommended that you c
process on the F
T
phone meet the following specications:
iOS: version 11 or higher
Android: 4.1 or higher
Unit (GPU).
Before
Scan the QR code below to download and install the F
doorbell to the APP
Note: F 3
1. Plug the smaller end of the USB cable into the
and the larger end into a USB wall charger such as yDC5V 1.0A power
output recommended for faster charReady
for ”
WiF
C onr m
WiFi connection
2. Make sure that your smart phone is connected to your
Foscam_1
Foscam_2
xxxxx_2.4G
xxxxx_5G
Tips: If you didn
camera.
Please note that it is forbidden to c
supply at the same time.
4
Tips: The camera supports dual-band 2.4GHz and 5GHz WiFi networks, so you can choose the
channel with the stronger signal to use. For example, choose your SSID: XXXXX_2.4G or XXXXX_5G.
3. Open the foscam APP and please sign up for a F
4. After logging into FT”+ " icon on the upper right
cornerScan the QR code " and scan the QR code that labeled at the bottom of your
camera.
Scan the QR code, located at
the bottom of your camera
T Select ”Scan the QR code”
T
Add Device
<
Scan the QR code
Search in LAN
Manually add
Scan QR Code
<
Model: XXX
MAC ID:000000000000
Username(default):admin
Password(default):(blank)
DDNS:XXXXXX.
myfoscam.org
FCC ID:XXXXX
IC:12558A-XX
S/N:FIAI1403000001
UID:XXXXXXXXXXX
FHD Wireless IP Camera
5. In Hello Foscam ", select the checkbox and tap ”Nex ”, continue to
conrm that the device is in the blue ashing state and tap ”Next ”. In
your Conrm " (see illustrations on next page).
5
Heard "Hello F
and tap "Next"
Conrm
device
ashes blue
I have heard “Hello Foscam”
Add Device
Next
Power the device on until
the device voice prompts
"Hello foscam"
<
Device flashes blue
Add Device
Next
Conrm that the device is
in the blue ashing state
Enter your
and tap "Conrm"
Wi-Fi connection
The device will added by scanning the QR
code and sound waves.
Foscam_2.4G
<
2.4GHz / 5.0GHz
WiFi Passwor
Conrm
6. Please scan the QR code on the doorbell with the smartphone camera, then you will hear a
voice prompt say ”W”. Select the checkbox and tap ” Nex”.
Place the QR code directly
in front of the camera
For WiFi configuration, please point the
QR code to the camera directly.
WiFi connection
<
I have heard the voice prompt
“WiFi connecting”
Next
Tick the checkbox and tap “Next”
10~15cm
3.94~5.9in
Tips: Please place the QR c
you encounter diculties y
6
13
12
Remove the existing doorbell button near the front door. Pull the two wires out carefully when
removing the old doorbell. Straighten the wire ends if necessary.
What's required: Dual-purpose screwdriver
Dual-purpose screwdriver
(Phillips screwdriver side)
Step 4
11
After removing the cov
terminal with the Pow
Y
9
V
Note:
1. Make sure you have installed the F
completed the "add device" process in the app bef
process.
2. If you choose to use AC pow
specication of the transformer in your home is 8V~24V A, the minimum power requirement
is 8 .
3. If you use DC power to powDC12V~30V pow
adapter, the minimum power requir6W .
4. If you use DC5/1A power
adapter, the minimum power requir5W .
Step 1
Ring the existing doorbell, make sure it’
the house.
Step 2
Shut o the master circuit breaker in y
sure the electricity in your house is properly shut o.
OFF
If you're not comfortable doing it yourself
8
Note: If the process of adding a camera fails, please r
according to the abov
Camera added successfully
and the name has been set
7. Wireless connection succeeded ”,
which means your camera has connected to your
camera name and tap S ”
Reset
Set name
Save
Camera added successfully
Please set the camera name:
My Camera
<
Device white light flashes
Add Device
Next
The Wi-F
complete, and the white
light of the device ashes
Conrm device white light ashes
7
10
YouTube
Step 3
Indoor chimes are generally of two types: mechanical, or digital. If you need to use the existing
mechanical chime or digital chime in your home, please install the P
chime. P
video doorbell replaces the traditional doorbell buttons.
How to distinguish between Digital Chime and mechanical Chime, please scan the f
code to view
What's required: Dual-purpose screwdriver
Dual-purpose screwdriver
(Phillips screwdriver side)
YouTube
10. After completing the above steps
9.
For y
video.
Set a new username and password
Camera Login
New camera username
Re-enter new camera
password
New camera password
Tap “ ”
Foscam_camera
On
Submit
8. In “Select Chime Type tap ”Select ”, and tap ” Next”. In
Chime Mechanical chime " or "Digital chime " or "None " (Please select the type of
your existing chime).
T
Select Chime Type
Select Chime Type
The video doorbell can work
with your existing Mechanical
chime or Digital chime. Please
select the type of your existing
chime after watching the video
with a description on this
subject.
Mechanical chime
Select Chime Type
Mechanica Chimel Digtal Chimel
OR
Digital chime
None
Select the type of
your existing chime
Note: Please carefully conrm the existing chime type in your home
incorrectly
to not work properly
metal with a metal striker
through a speaker
If you are still not sure, please w
customer service sta.
Bypass Model: If you don’
kit to the bypass interface, and then connect it in parallel to the existing chime.
short-
of chime. If you choose to use the P
"None" in your APP to av
14
15
FRONT
TRANS
REAR
Remove the cov
Replace the cover
Bypass Mode
Bypass Mode
APP add doorbell
instruction video
YouTube
Download the
Foscam APP
1
Wha
1 x
Type-c cable
1 x 5° Vertical angle bracket
1 x 15° Horizontal angle bracket
1 x
Power Kit
1 x Video Doorbell
1 x Mounting bracket
2 x
Wire Nuts
1 x
Silicone Plug
1 x
Dual-purpose screwdriver
1 x
Drill Hole
Position Template
1 x Thick mounting bracket
2 x
Wire Extenders
1 x Quick Setup Guide
1 x
Expansion Screws
Quick Setup Guide
Video Doorbell