3
Assembly Instructions
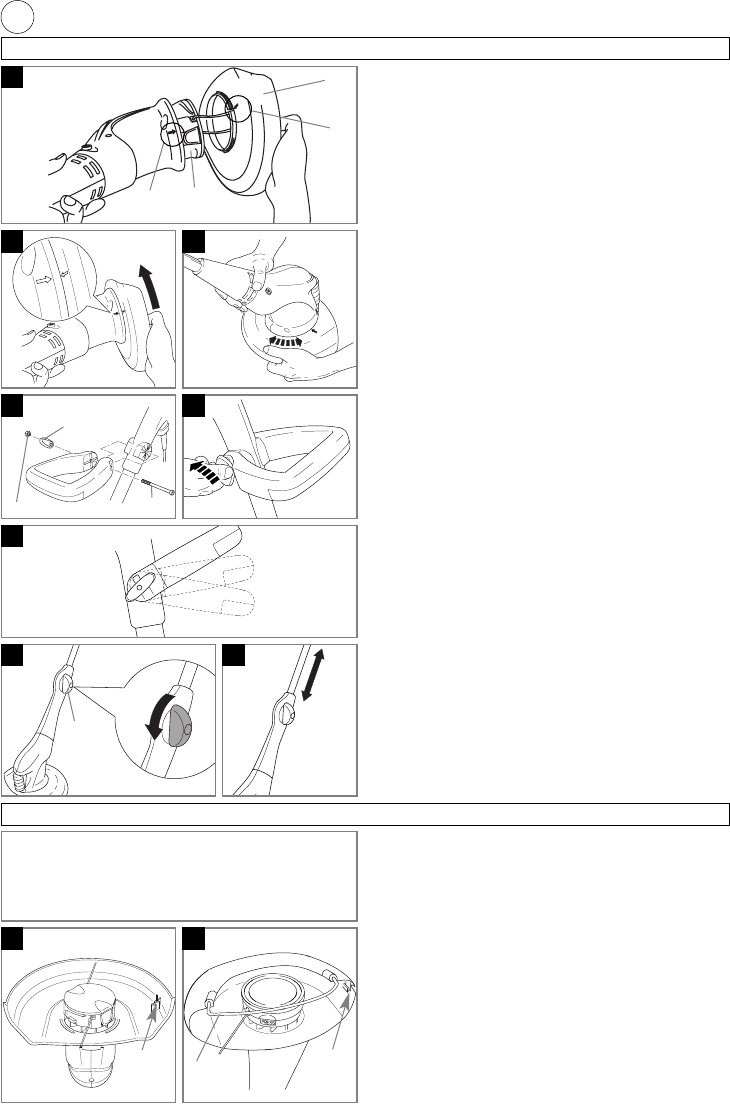
Safety Guard Assembly (A), (B) & (C)
• If you have a Multi Trim 200 your safety guard
will be fitted with a wire guard as shown in figure
J2.
1. Align the arrow on the top of the safety guard (A1)
with the arrow on the side of the trimmer (A2).
2. Locate the safety guard (A3) over the cutting head
(A4). Ensure the nylon line is fed through the hole in
the safety guard as illustrated in fig A.
Please note: Depending on which model you
have purchased, your trimmer may be fitted with
one line or two lines.
3. Push into location and turn safety guard in the direc-
tion illustrated in Fig B, until a click is heard and the
safety guard is securely locked in position.
• ENSURE THE SAFETY GUARD IS SECURELY IN
PLACE BY ATTEMPTING TO TWIST GUARD.
See fig C.
Steady Handle Assembly (D), (E) & (F)
1. Insert the nut into the handle knob. (if applicable).
2. Attach steady handle to product using bolt and han-
dle knob as shown in Fig D.
3. To adjust steady handle to new position, loosen han-
dle knob as shown in Fig E. and move handle to one
of the three positions as shown in Fig F.
4. Re-tighten handle knob
Height Adjustment (if fitted)
If your trimmer is fitted with Height Adjust, follow
the procedure below.
1. Loosen the height adjust knob. (fig G)
2. Adjust length of the handle to the most comfortable
operating position (fig H).
3. Re-tighten the height adjust knob.
A
B C
4
2
3
1
D
F
E
bolt
handle
knob
G H
height
adjust
knob
If you have a Multi Trim 200, it will be fitted with a
wire guard as shown in figure J2.
Please note: Depending on which model you have
purchased, your trimmer may be fitted with one line
or two lines.
Auto Line Feed System
How the automatic line feed works (J)
1. When initially switching on the trimmer, a small
length of line is fed out.
2. A ‘clattering’ noise will be heard when the nylon line
hits the line cutter. DO NOT BE ALARMED this is
quite normal. After approximately 5 seconds the
line will be cut to the correct length and the noise will
reduce as the motor reaches full speed.
• Make sure the motor is up to full speed before
trimming or edging.
3. If the noise of the nylon line being cut cannot be
heard, more line will need to be fed out.
4. To feed more line, it is first necessary to to allow the
motor to stop completely, then re-start, allowing the
motor to reach full speed.
5. Repeat step 4. until you hear the line hitting against the
cutter. (Do not repeat this procedure more than 6 times)
6. If problems are experienced with the automatic line
feed refer to Fault Finding Chart.
J1
J2
Multi Trim 200 only
line
cutter
line
cutter
wire
guard
nut (if applicable)