fig.4
fig.3
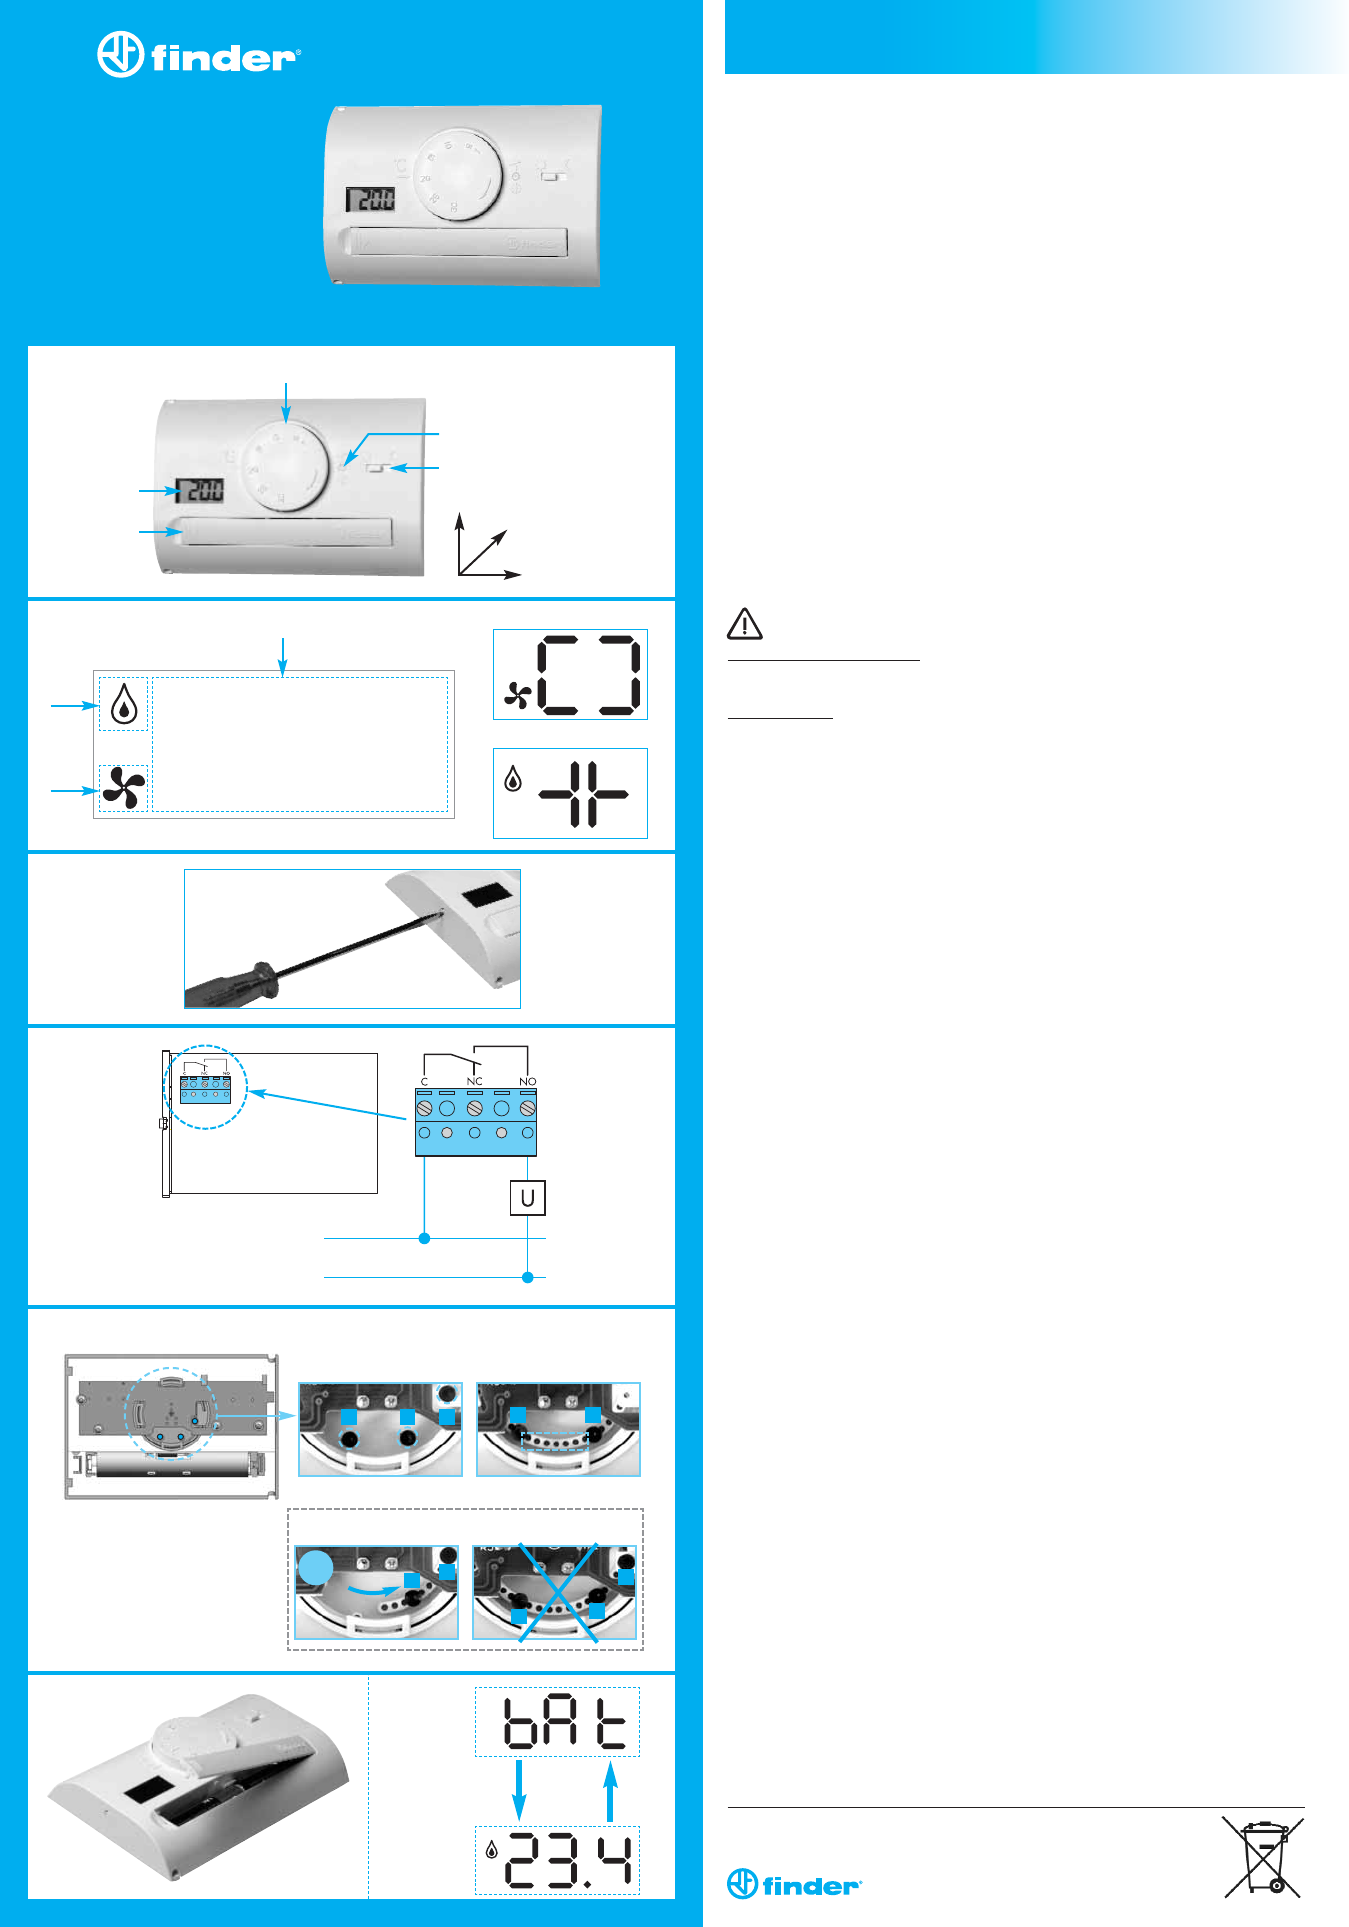
fig.1
fig.2
fig.5
73.3 mm
22 mm
110 mm
N
L
A
E
C
D
B
(fig.5/a) (fig.5/b)
1
2
1
2
3
(fig.5/c)
1
3
1
2
3
OK
www.findernet.com
D
E
88.8
fig.6
(fig.6/a)
A
B
C
1T.41
ITALIANO
ENGLISH
FRANCAIS
ESPAÑOL
ROMÂNĂ
PORTUGUÊS
IB1T41 - 07/13
ENGLISH
THERMOSTAT LEGEND (fig.1)
A Display
B Graduated knob ON/OFF
C SUMMER/WINTER select push-button
D DAY/ NIGHT selector switch
E Battery Compartment
DISPLAY LEGEND (fig.2)
A Heater ON
B Air-conditioning ON
C Set temperature, actual temperature, low battery
D SUMMER setting active
E WINTER setting active
TECHNICAL DATA
Power supply: 2 alkaline batteries 1.5V AAA
Adjustment range-heating: 8-30°C (5-27°C with night selector ON)
Adjustment range-cooling: 8-30°C (11-33°C with night selector ON)
Display resolution: 0.1°C
Display range: 0-50°C
Precision: +/– 0.5°C at 20°C
Temperature differential: 0.3°C
Sensing element: NTC
Degree of protection: IP20
Output: relay contact
Rating: 5A 250V AC
Mounting: wall mounted
INSTALLATION AND CONNECTIONS
SAFETY REQUIREMENTS
: before installing this thermostat, ensure that the supply voltage
to the electrical load (heater, pump, etc.) is not connected and that the load is within the
ratings shown inside the thermostat.
POSITIONING
: install the programmable thermostat away from sources of heat (heaters,
direct sunlight, kitchens) and from doors/windows, at a height of about 1.5 m above the floor.
INSTALLATION
- Open the thermostat by pressing the pin on the left side of the device (fig.3)
- Fix the base to the wall
- Connect the load to the terminals following the wiring diagram (cable Ø 2.5 mm
2
) (fig.4)
- Replace the cover to close the thermostat
ELECTRICAL CONNECTIONS (fig.
4)
U = load
C = common terminal
NO = normally open terminal
NC = normally closed terminal
SUMMER/WINTER SETTING
The thermostat can be used for “summer” or “winter” operation, depending on whether it
is connected to an air-conditioner or to a heater.
Press the button (C - fig.1) to change from SUMMER to WINTER setting, or vice versa.
DAY/NIGHT SETTING
Move the selector (D - fig.1) to change from DAY to NIGHT setting and vice versa.
Under NIGHT and WINTER setting, the temperature is automatically setback (lower) by 3°C
from the DAY temperature as set by the graduated knob (
B - fig.1) (Under NIGHT and
SUMMER setting the temperature will be 3°C higher than the temperature as set by knob
B - fig.1).
For a brief time the display will show the set temperature, decreased (or increased) by 3°C.
THERMOSTAT START-UP/SWITCHING OFF
Turn the graduated knob (
B - fig.1) to the right, to switch-ON the thermostat and to set the
temperature as shown on the display. Turn the graduated knob (B - fig.1) fully to the left
(until a click is heard) to switch the thermostat OFF, when the display will show OFF.
SETTING THE TEMPERATURES
After having set either SUMMER or WINTER and having set DAY, turn the graduated knob
(
B - fig.1) to the desired temperature, as showed on the display.
Note: by following the instructions below it is possible to mechanically block the graduated
knob to restrict the set temperature range within specific limits (fig.5):
- Open the thermostat by pressing the pin on the left side of the device (fig.3)
- With the knob set to 30°C, remove the tappets 1, 2 and 3 (fig.5/a)
- Rotate the knob to reveal a series of holes, and insert 2 tappets appropriate to the required
upper and lower limits. Each hole corresponds to 1°C (fig.5/b)
- Turn the graduated knob such that the third tappet can be inserted in the position shown,
ensuring it is between tappets 1 and 2 (fig.5/c)
- Replace the cover to close the thermostat
FROST PROTECTION OPERATION
The frost protection is always ON (under WINTER setting).
BATTERY (fig.6)
Power supply: 2 alkaline batteries 1.5 V AAA.
When the batteries are low, the display shows the word "bat" and the temperature,
displayed alternately (fig.6/a);
When the batteries are completely discharged, the display will show
only the word "bat". For changing the batteries, see fig.6.
Please dispose of the worn out batteries according to prevailing regulations.