•Slide the blue clips at the bottom of the phone to
the middle (towards each other).
Remove the battery before sliding the blue clips
•With your thumbs on the screen, press gently
and slide the screen down to detach it from the
body of the phone. You can now release the
screen separating it from the body.
•To insert the new screen, mind the 7 white
anchor points under the screen. With the help of
the side marks you can position the anchor
points in place before you slide the screen
upwards gently but rmly. You will hear a ‘click’
when it is in place.
Anchor points
Other app
notications
will appear
on the left
Press and
hold to
enable the
“EDIT”
button
Pull-down Menu
The Pull-down Menu gives you quick access to the
Notication Bar and the Settings Shortcuts.
Notication Bar
The Notication Bar gives you an overview of recent
calls, events, messages, app updates and more. You
can access the Notication Bar by swiping your
nger down from the top of the screen.
What’s in my box?
Inside the box, you will nd your Fairphone 2 and
battery. The back cover is underneath the tray.
There are also some extras to help you spread
the Fairphone love!
EN
User Guide
This brief user guide will get you up and running in
no time. We’ve only included the most essential
functions of this operating system, based on
Android
TM
, so if you’d like additional guidance or
want to dig into the technical details, please visit
www.fairphone.com/support.
Für Deutsch: einfach umdrehen!
Pour les francophones, merci de consulter
l’autre guide d’utilisation.
Zie de andere handleiding voor Nederlands
Contents
Getting Started 3
Touch Controls 6
Buttons, Icons, Panels and Menus 7
Buttons 7
Panels 7
Status Bar Icons 9
Pull-down Menu 10
Edge Swipe Menu 11
Basic Tasks 12
Phone Calls 12
Messages (SMS) 12
Camera 13
Internet 13
Contacts 14
Apps and Widgets 15
Accounts 18
Change the Language 18
Dual SIM functionality 19
Updates and DIY Repairs 20
Software Updates 20
Replace your Screen 20
We’re here to help 22
Getting Started
1. Remove the battery
Lift it out of the slot from the bottom of the battery
(see picture on page 5).
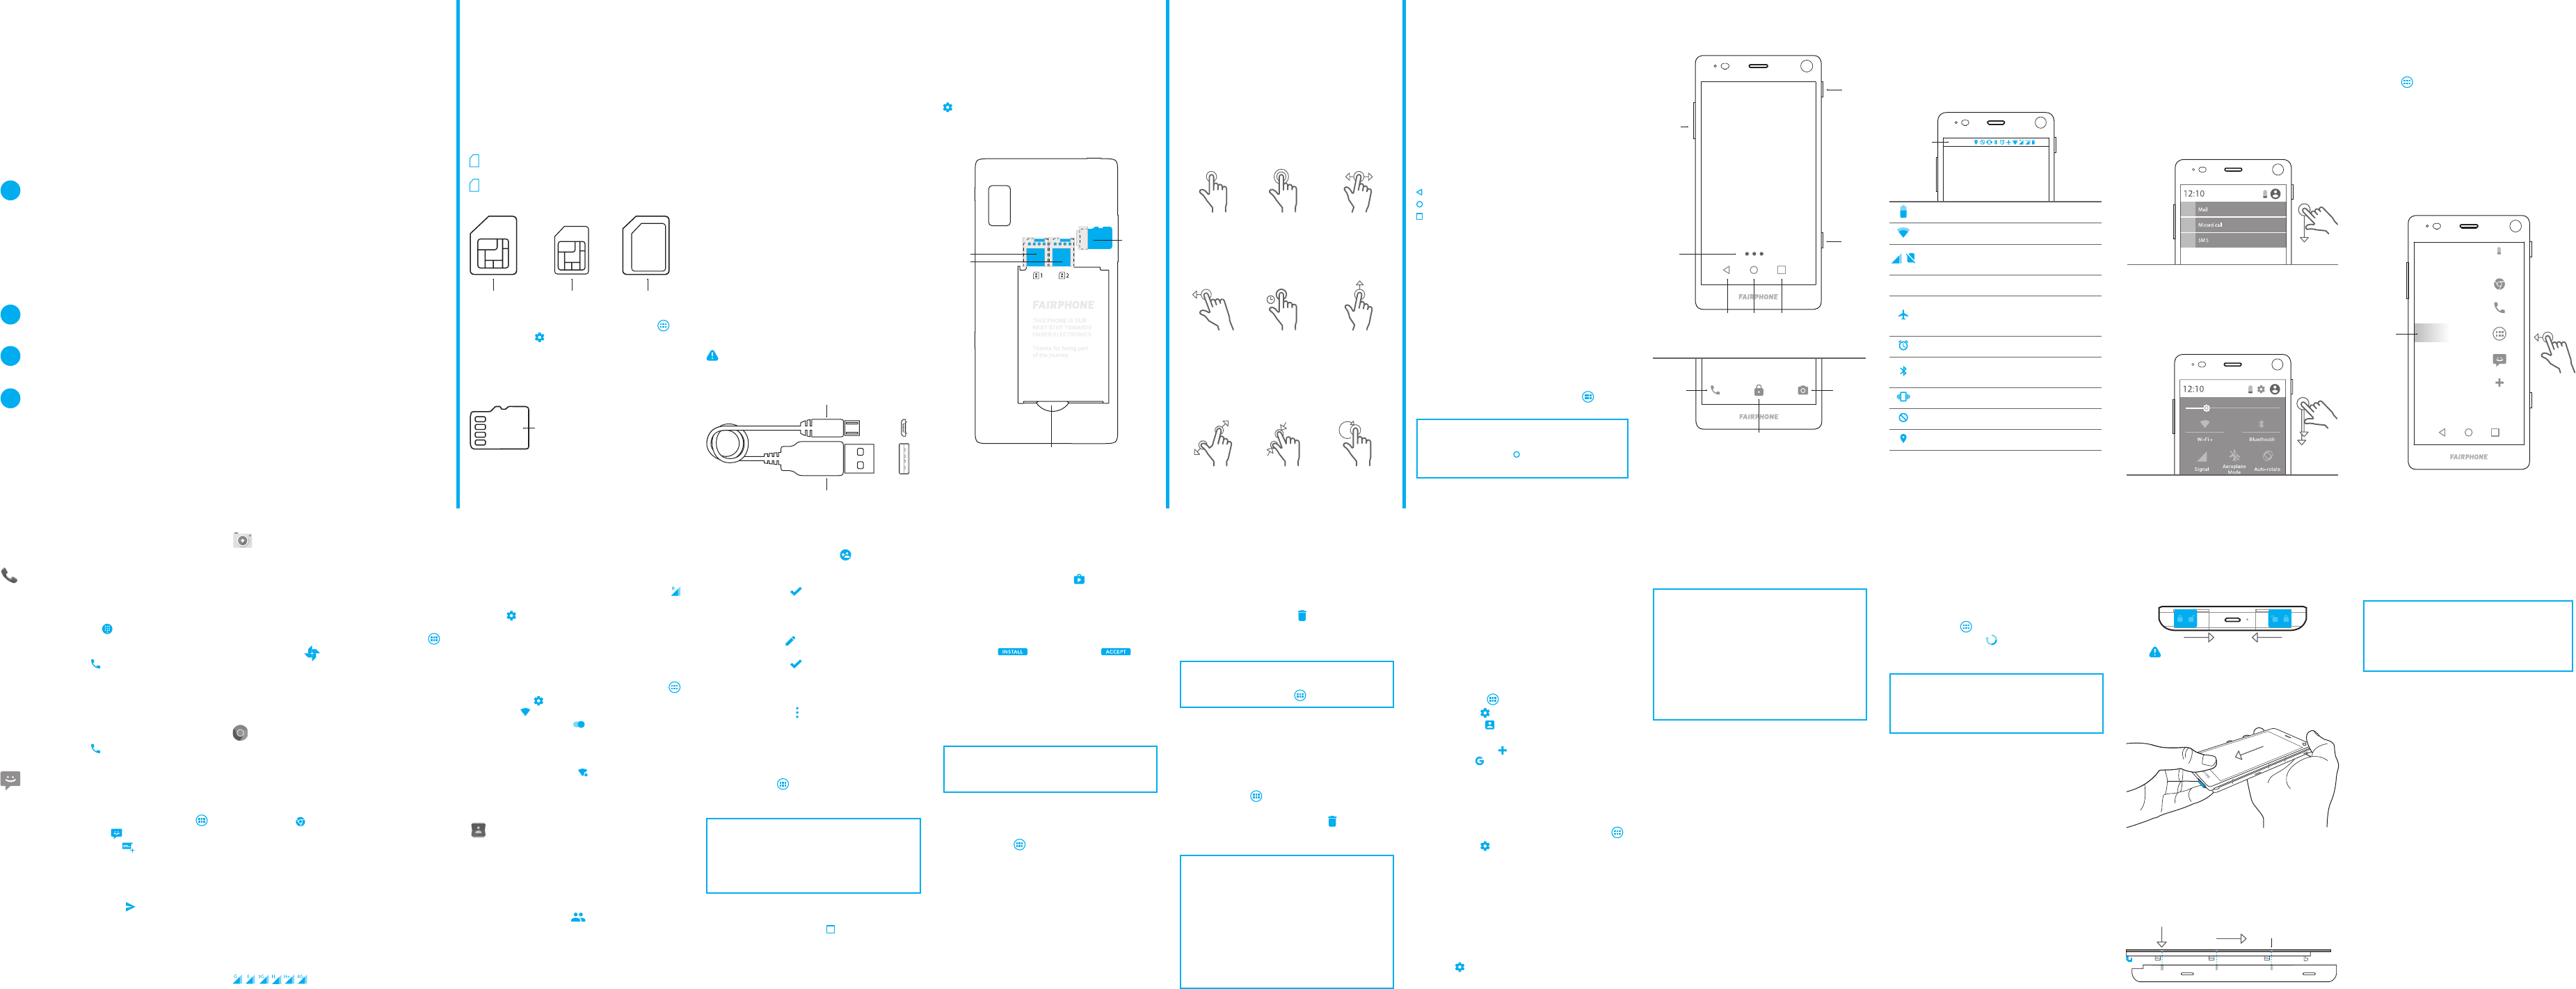
2. Insert one or two SIM cards
You can use Micro or Nano SIM cards in your
Fairphone. You will need an adapter to be able to
insert a Nano SIM card.
SIM
1
Insert your Micro SIM card or Nano SIM card
(with adapter) into slot 1.
SIM
2
Optional: Insert an additional Micro or Nano
SIM card (with adapter) into slot 2.
Micro SIM cardNano SIM cardNano SIM card adapter
+
To set your dual SIM preferences go All Apps
tap on Settings and select SIM Cards.
3. Insert a microSD Card (optional)
You can expand your storage with a microSD
memorycard (see image on page 5).
microSD card (not included)
4. Insert your battery
Insert the battery from the top and then press it into
place from the bottom.
5. Put the back cover on
Because the back cover ts snugly around the
phone, you may nd it a bit tricky to put on the rst
time. Start by sliding the top of the phone into the
cover and slowly press it into the back cover,
ensuring that the rubberized lip completely covers
the edges of the screen.
6. Turn on your Fairphone
Push and hold the on/off button on the right-hand
side of your phone for at least three seconds.
7. Charge your phone
A power adapter and USB cable are not included. To
charge your Fairphone, use a standard USB-cable
with a micro B connector.
Connect the USB cable to the USB port located at
the bottom of the phone and then plug it into your
computer or a power outlet (using an adapter with
a USB port). In addition to charging, you can also
use the USB cable to transfer data.
Please make sure that the nominal output of the
charger/USB port is 5 Volts and 1 Ampere. Make
sure you plug the USB cable in the right way.
USB (type micro B)
USB (type A)
8. Follow the instructions on the screen
Once your phone is on, the set up wizard will guide
you through the nal set up steps. During this
process you can also set up your Google
TM
account.
You can also use alternative services. To set up
another account, skip this tutorial, go to Settings
and tap on Accounts.
Touch Controls
You can control your Fairphone using basic touch
gestures:
Tap
Touch briefly with
your nger.
Double Tap
Tap the screen with
your nger quickly
two times.
Swipe
Touch the screen
and move your
nger to the left or
right.
Edge swipe
Touch the right or left
edge of the screen
and move your nger
slightly towards the
center.
Long press
Touch the screen
with your nger and
keep pressing for a
few seconds.
Scroll
Touch the screen
and move your
nger up or down.
Pinch open
Touch the screen
with your thumb and
index nger and
move them away
from each other to
zoom in.
Pinch close
Touch the screen
with your thumb and
index nger and
move them towards
each other to zoom
out.
Drag
Touch and hold an
item on the screen.
Slide it to a different
location and release
your nger.
Status Bar Icons
The Status Bar is located at the very top of your
screen. The displayed icons give you information
about the status of your Fairphone’s various
functions.
Battery Charge
Displays the percentage of remaining battery charge.
Wi-Fi
Indicates that you are connected to a Wi-Fi network.
Signal Strength
Displays signal strength of SIM1 and SIM2. If no SIM is
inserted a crossed out SIM card icon will appear.
H+, 4G
Signal Strength
Displays the strength of your data connection.
Airplane Mode
Indicates that Airplane Mode is switched on.
This means that all cellular/data/Wi-Fi/GPS
transmissions are deactivated.
Alarm Clock
Indicates that an alarm has been set.
Bluetooth
Indicates that Bluetooth is switched on. When it is on,
you can connect to other Bluetooth-enabled devices.
Vibrate
Indicates that vibration is switched on.
Silent
Indicates that silent mode is switched on.
GPS
Indicates that your location is switched on.
Buttons, Icons, Panels and
Menus
Buttons
Physical buttons
The Fairphone has only three physical buttons: the
volume button, on/off button and camera/shutter
button.
Navigation buttons
When your Fairphone is turned on, three navigation
buttons appear at the bottom of the screen:
Back: Go one step back
Home: Go to the Home panel
Open Apps: View all open apps
Panels
Fairphone’s operating system works with panels.
Thedots at the bottom of the screen show you how
many panels are active. Swipe left or right to
navigate between panels.
The three default panels are:
Home panel: Displays the Google search bar plus a
few additional Google services.
Recent Contacts: Displays your most recent
contacts, four most frequently used contacts, plus
access to your complete contact list.
Recent Apps: Displays ve recently used and ve
most used apps, plus access to All Apps .
Tip! Take me home: If you get lost while navigating
your new Fairphone, there’s no need to panic. Just
tap the Home button to go back to the Home
panel.
Edge Swipe Menu
From your Home panel, edge swipe from the right
or left side of your screen to access the Edge
Swipe Menu. This menu gives you quick access to
All Apps
and four of your favorite apps. Three
quick access icons are preinstalled: Browser,
Phone and Message.
To customize the pre-installed menu:
•Open the Edge Swipe Menu
•Keep your nger pressed down and drag to Edit
•Drag apps from Edit Favorites to the Edge
Swipe Menu.
SIM 1 slot
microSD
slot
SIM 2 slot
On/off
button
Turns your
Fairphone
on and off
Volume
button
Regulates
the volume
Camera/
shutter
button
Allows you
to take
pictures
Camera
Swipe left
to take a
photo
Phone
Swipe right
to call
Panels
Indicates
the
number
of active
panels
BackHomeOpen Apps
Remove battery before
inserting SIM cards and
releasing screen
Unlock screen
& Home panel
Swipe to unlock
11:30
11:30
Chrome
Phone
All Apps
Messaging
Add app
EDIT
Basic Tasks
Phone Calls
Call a new phone number
From the Home panel
•Open the Edge Swipe Menu and tap Phone
•Tap the numbers icon at the bottom of the
screen.
•Enter the number you want to call
•Tap the phone icon to start making a call
Call one of your contacts
From the Home panel
•Open the Edge Swipe Menu and tap Phone
•Tap Contacts in the menu at the top right
•Tap a contact from the list
•Tap the phone icon to start making a call
Messages (SMS)
Send a SMS
From the Home panel
•Open the Edge Swipe Menu and tap All Apps
•Tap the Messaging icon
•Tap the new message icon at the bottom left
•Select the recipient(s): Enter the name(s) or
phone number(s) in the top eld.
•Type your message in the eld that says:
“Type message”.
•Tap the send message icon
To learn more about using the Dual SIM
functionality for Messages, go to page 19.
Camera
Take a picture
•Press and hold the physical camera button on
the right side of your phone to open the camera
app.
•Press the camera button to take a picture
View your pictures
•Open the Edge Swipe Menu and tap All Apps
•Tap on Photos to see an overview of your
pictures.
•Short press a picture to enlarge it
•Long press a picture to access functions like
share, edit, delete and more.
Internet
You can connect to the internet using either a
mobile data connection (SIM card) or wireless
network (Wi-Fi).
Search the web
•Go to the Edge Swipe Menu and open the
Chrome app .
•If it is your rst time using Chrome, you will be
asked to accept the Terms of Service and
Privacy Notice and conrm additional
information.
•Tap Search or enter a website address
•Tap the website you want to visit
Mobile data
A mobile data connection is provided by your operator
(via your SIM card) and can be accessed anywhere
you have signal coverage. The following icons show
you the speed of your data connection:
Mobile data is often included in your service
contract, but ensure you understand the related
costs – it can be expensive if you’re traveling
abroad. If you are outside your regular coverage
zone, your phone will display the roaming icon .
You can disable your mobile data connection under
Settings in Wireless & Networks.
Wi-Fi
Wi-Fi is the most common way to access the
internet at home, work or a public space like a café.
Toconnect to Wi-Fi:
•Go to the Edge Swipe Menu and open All Apps
•Tap Settings
•Tap Wi-Fi in the Wireless & Networks menu
•Tap on the on/off icon at the top right if Wi-Fi
isn’t switched on yet.
•You will see a list of all available Wi-Fi networks
•Tap the one you would like to connect to
•If it is a secure network , enter the password
and tap Connect. It may take a few minutes to
establish the connection.
Contacts
Open Recent Contacts
•Open Recent Contacts by swiping the Home
panel to the right.
•This panel displays the last person you
contacted as well as your four most frequently
used contacts.
•Tap the contacts icon to display your full
contact list.
Add a new contact
•Tap the add new contact icon at the bottom
right of the screen.
•Enter the contact details in the relevant elds
•Tap the save icon at the top left to save
Edit contact
•Tap the contact you want to edit
•Tap edit contact on the top right of the screen
•Update the information in the relevant elds
•Tap the save icon at the top left to save
Delete a contact
•Tap the contact you want to delete
•Tap the menu icon at the top right of the screen
•Tap Delete and OK (or Cancel if you’ve changed
your mind)
Apps and Widgets
Open an app
•Open All Apps using the Edge Swipe Menu
•Tap the app you want to open
Tip! Close your Apps regularly! If you have been
using the phone for a while, you will have apps
running in the background. To speed up your device
and save battery, close your apps using the
instructions below.
Close an app
•Tap the Open Apps button to see a list of all
your open apps.
•Scroll through the list and nd the app you want
to close.
•Swipe the app to the side to close it
Download and install an app
•First, make sure you are connected to the
internet.
•Tap the Google PlayTM store on your Home
panel. If you are using the Google Play store for
the rst time, you must provide your Google
account details (account name and password).
•Search for the app you want, and then tap it to
download it.
•Tap Install , and then Accept at
the bottom right of your screen.
•The download progress is displayed in the
middle of your screen. It may take several
minutes to complete. Once it is successfully
installed, the app will appear on both your Home
panel and under All Apps.
Tip! You can also use other services for
downloading apps. We recommend you check our
support website or nd them online.
Add apps to your Home panel
For easy access, you may want to add your favorite
apps to your Home panel.
•Open All Apps using the Edge Swipe Menu
•Long press the app you want to move to your
Home panel. Your Home panel will appear
automatically.
•Drag the app to the preferred location and
release your nger.
Add folders on your Home panel
Organize the apps on your Home panel by placing
them in a folder. To create a new folder:
•Long press an app
•Drag it onto another App
•Release your nger. A new folder is
automatically created. You can rename it if you
wish.
Remove an app from your Home Panel
•Long press the app you would like to remove
•Drag it to the remove icon at the top of your
screen.
•Release your nger
Note: By removing the app from your Home panel,
you are simply deleting the shortcut. You can still
nd the app under All Apps .
Add additional panels
Your Home panel has room for 16 apps and/or
folders. If you try to add more, a new panel will be
created automatically to give you more space.
Uninstall an app
•Open All Apps using the Edge Swipe Menu
•Long press the app you want to uninstall
•Drag the app to the uninstall icon
•Release your nger
Tip! Widgets! Besides apps, Android also oers
you the possibility of using the so-called widgets.
These are small ‘boxes’ that you can place in the
Home panel to display information or a specic
function of an app without having to open the app
itself.
Do you want to see the weather at a glance, or your
schedule for the day? There are multiple widgets
available for every app. Discover them when long
pressing the Home Panel and tapping on ‘widgets’.
Accounts
An account contains login information for specic
services and apps. Some examples include email
accounts or accounts for photo or contact storage.
If you don’t already have one, we recommend
creating or setting a Google account in order to
access the Google Play store, back-up your data
(mail, contacts, calendar, etc.) to the cloud (online
storage) and allow multiple devices (laptop, tablet,
etc.) to access your account.
To congure your Google account,
•Open All Apps
using the Edge Swipe Menu
•Tap Settings
•Tap Accounts under the Personal section of
the menu
•Tap Add account
•Tap Google
•Tap Enter your email and enter your Gmail
address
•Tap Next
Change the Language
•Open the Edge Swipe Menu and select All Apps
•Tap Settings
•Tap Language & input under the Personal section
of the menu
•Tap Language
•Scroll to nd your preferred language and tap to
activate it
Dual SIM functionality
Are you using two SIM cards? Then you should look
into your SIM card settings. To do this, go to
Settings and tap on SIM Cards. Here you can
enable or disable a SIM card. You can also choose
which SIM card will be used by default when you
make Calls, send SMS messages or use Mobile
data.
Tip! Are you planning to use your Fairphone 2 for
business and private purposes? Then you probably
want to have dierent settings for both lifestyles.
With the Fairphone 2 you can create multiple
proles for dierent user or purposes.
Within each prole you can choose specic apps,
create specic settings and determine which SIM
card you want to use by default. To create a new
prole go to the Settings menu and tap on Users.
Updates and DIY Repairs
Software Updates
When updates are available, they will appear in the
Notication Bar under the Pull-down Menu.
You can also:
•Open All Apps using the Edge Swipe Menu
•Tap the Updater app
•Tap the Install update icon
Note: Downloading and installing software updates
can take several minutes. You can only do this over
a Wi-Fi connection. Please ensure your phone is
fully charged or connected while updating.
Replace your Screen
The Fairphone 2 is designed to help extend the
phone’s usable life. The design should make do-it-
yourself repairs more accessible, but you will still
need to be careful. When opening the device make
sure you use a flat surface with enough space to
lay the device on and that your hands and
surroundings are free from dirt and dust.
These are just the basic instructions. Before you
make a repair consult our video tutorials online at
www.fairphone.com/support or call us!
We are happy to help.
The screen is one of the most commonly damaged
components on a smartphone. If you crack your
screen, you can order a replacement in Fairphone’s
online shop and repair it yourself:
•Slide both blue clips at the bottom of the phone
to the outside (away from each other)
•Replace the battery and the back cover
•Turn on your Fairphone using the on/off button
Tip! Repair other parts: Besides the screen, you
can order additional spare parts and replacement
modules in Fairphone’s online shop. For tutorials
and assistance with other DIY repairs, please visit
www.fairphone.com/support
We’re here to help
For additional questions and customer support,
visit our forum or submit a request at
www.fairphone.com/support.
You can also call us at +31 (0)20 788 4401.
Fairphone BV
Jollemanhof 17, 1019 GW
Amsterdam, The Netherlands
Fairphone BV is registered in the Chamber of
Commerce of The Netherlands.
Registration number: 55901964
VAT number: NL851904270B01.
Google, Google Play and Android are trademarks
of Google Inc.
1
12
2
13
3
14
4
15
5
16
6
17
7
18
8
19
9
20
10
2122
11
Settings Shortcuts
The Settings Shortcuts provides quick access to
your Fairphone’s basic settings. Swipe your nger
down from the top of the screen twice to open the
Settings Shortcuts.
FR
DE
NL
Need help? Post your question in this forum.
Report abuse
Libble takes abuse of its services very seriously. We're committed to dealing with such abuse according to the laws in your country of residence. When you submit a report, we'll investigate it and take the appropriate action. We'll get back to you only if we require additional details or have more information to share.
Product:
Forumrules
To achieve meaningful questions, we apply the following rules:
First, read the manual;
Check if your question has been asked previously;
Try to ask your question as clearly as possible;
Did you already try to solve the problem? Please mention this;
Is your problem solved by a visitor then let him/her know in this forum;
To give a response to a question or answer, do not use this form but click on the button 'reply to this question';
Your question will be posted here and emailed to our subscribers. Therefore, avoid filling in personal details.
Register
Register getting emails for Fairphone FP2 at:
new questions and answers
new manuals
You will receive an email to register for one or both of the options.
Get your user manual by e-mail
Enter your email address to receive the manual of Fairphone FP2 in the language / languages: English as an attachment in your email.
The manual is 0,29 mb in size.
You will receive the manual in your email within minutes. If you have not received an email, then probably have entered the wrong email address or your mailbox is too full. In addition, it may be that your ISP may have a maximum size for emails to receive.
If you have not received an email with the manual within fifteen minutes, it may be that you have a entered a wrong email address or that your ISP has set a maximum size to receive email that is smaller than the size of the manual.
The email address you have provided is not correct.
Please check the email address and correct it.
Your question is posted on this page
Would you like to receive an email when new answers and questions are posted? Please enter your email address.