702582
29
Zoom out
Zoom in
Previous page
1/68
Next page
29
Die Montage geht wie folgt:
- Befestigen Sie den Bügel mit den 3 mitgelieferten Schrauben.
- Setzen Sie das Verbindungsstück oben auf den Reinigungskopf. Der
Reinigungskopf hat 2 Löcher; die Stiftschraube muss durch das große Loch.
- Drehen Sie den Reinigungskopf um und drücken Sie den Spinner an die
Innenseite des Verbindungsstücks: das Röhrchen in das dafür vorgesehene Loch
in der Stiftschraube stecken. Schrauben Sie jetzt die Drehkupplung fest auf das
Gewindeende.
- Das Verbindungsstück passt auf die Spritzlanze. Die Spritzlanze passt mit einem
Adapter auf die mitgelieferte Spritzpistole.
In Betrieb nehmen
Stellen Sie den Hochdruckreiniger auf eine stabile flache und horizontale
Unterlage.
Stecken Sie den Stecker in die Steckdose.
Keine Spritzlanze montieren!
Vor der Nutzung das Gerät folgendermaßen entlüften:
- Betätigen Sie den Ein-/Aus-Schalter auf „on“ (ein).
- Entriegeln Sie den Sicherheitsgriff der Spritzpistole
- Betätigen Sie in den Griff der Spritzpistole, um das Gerät in Betrieb zu setzen.
- Lassen Sie das Gerät (max. 2 Minuten) laufen, bis das Wasser ohne
Luftbläschen aus der Spritzpistole kommt.
- Lassen Sie den Griff der Spritzpistole los.
- Verriegeln Sie den Sicherheitsgriff der Spritzpistole
Funktionsweise
Achtung: Ein Trockenlauf von mehr als 2 Minuten verursacht Schäden an der
Hochdruckpumpe. Wenn das Gerät innerhalb von 2 Minuten keinen
Druck aufbaut, schalten Sie es aus und halten sich an die Anleitungen
im Kapitel ‚Probleme und deren Behebung‘.
Achtung: Beachten Sie bei der Nutzung des Jets, einen Mindestabstand von
30 cm zum Reinigen gestrichener Oberflächen einzuhalten, um Schäden
zu vermeiden.
Achtung: Sorgen Sie dafür, dass der Ein-/Aus-Schalter in Position „Off“ steht und
stecken Sie den Stecker in eine korrekt installierte Steckdose.
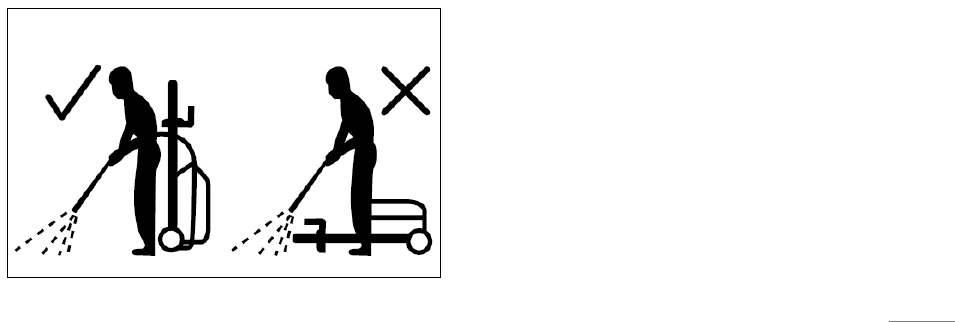
Achtung: Der Hochdruckreiniger muss auf einem sicheren und stabilen
Untergrund in aufrechter Position genutzt werden (siehe Abbildung)
29


Need help? Post your question in this forum.

Forumrules


Report abuse

Libble takes abuse of its services very seriously. We're committed to dealing with such abuse according to the laws in your country of residence. When you submit a report, we'll investigate it and take the appropriate action. We'll get back to you only if we require additional details or have more information to share.

Product:

For example, Anti-Semitic content, racist content, or material that could result in a violent physical act.

For example, a credit card number, a personal identification number, or an unlisted home address. Note that email addresses and full names are not considered private information.

Forumrules

To achieve meaningful questions, we apply the following rules:

Register

Register getting emails for Eurom Force 3000 IND at:


You will receive an email to register for one or both of the options.


Get your user manual by e-mail

Enter your email address to receive the manual of Eurom Force 3000 IND in the language / languages: English, German, Dutch, French as an attachment in your email.

The manual is 1,43 mb in size.


You will receive the manual in your email within minutes. If you have not received an email, then probably have entered the wrong email address or your mailbox is too full. In addition, it may be that your ISP may have a maximum size for emails to receive.

The manual is sent by email. Check your email

If you have not received an email with the manual within fifteen minutes, it may be that you have a entered a wrong email address or that your ISP has set a maximum size to receive email that is smaller than the size of the manual.

The email address you have provided is not correct.

Please check the email address and correct it.

Your question is posted on this page

Would you like to receive an email when new answers and questions are posted? Please enter your email address.


Info