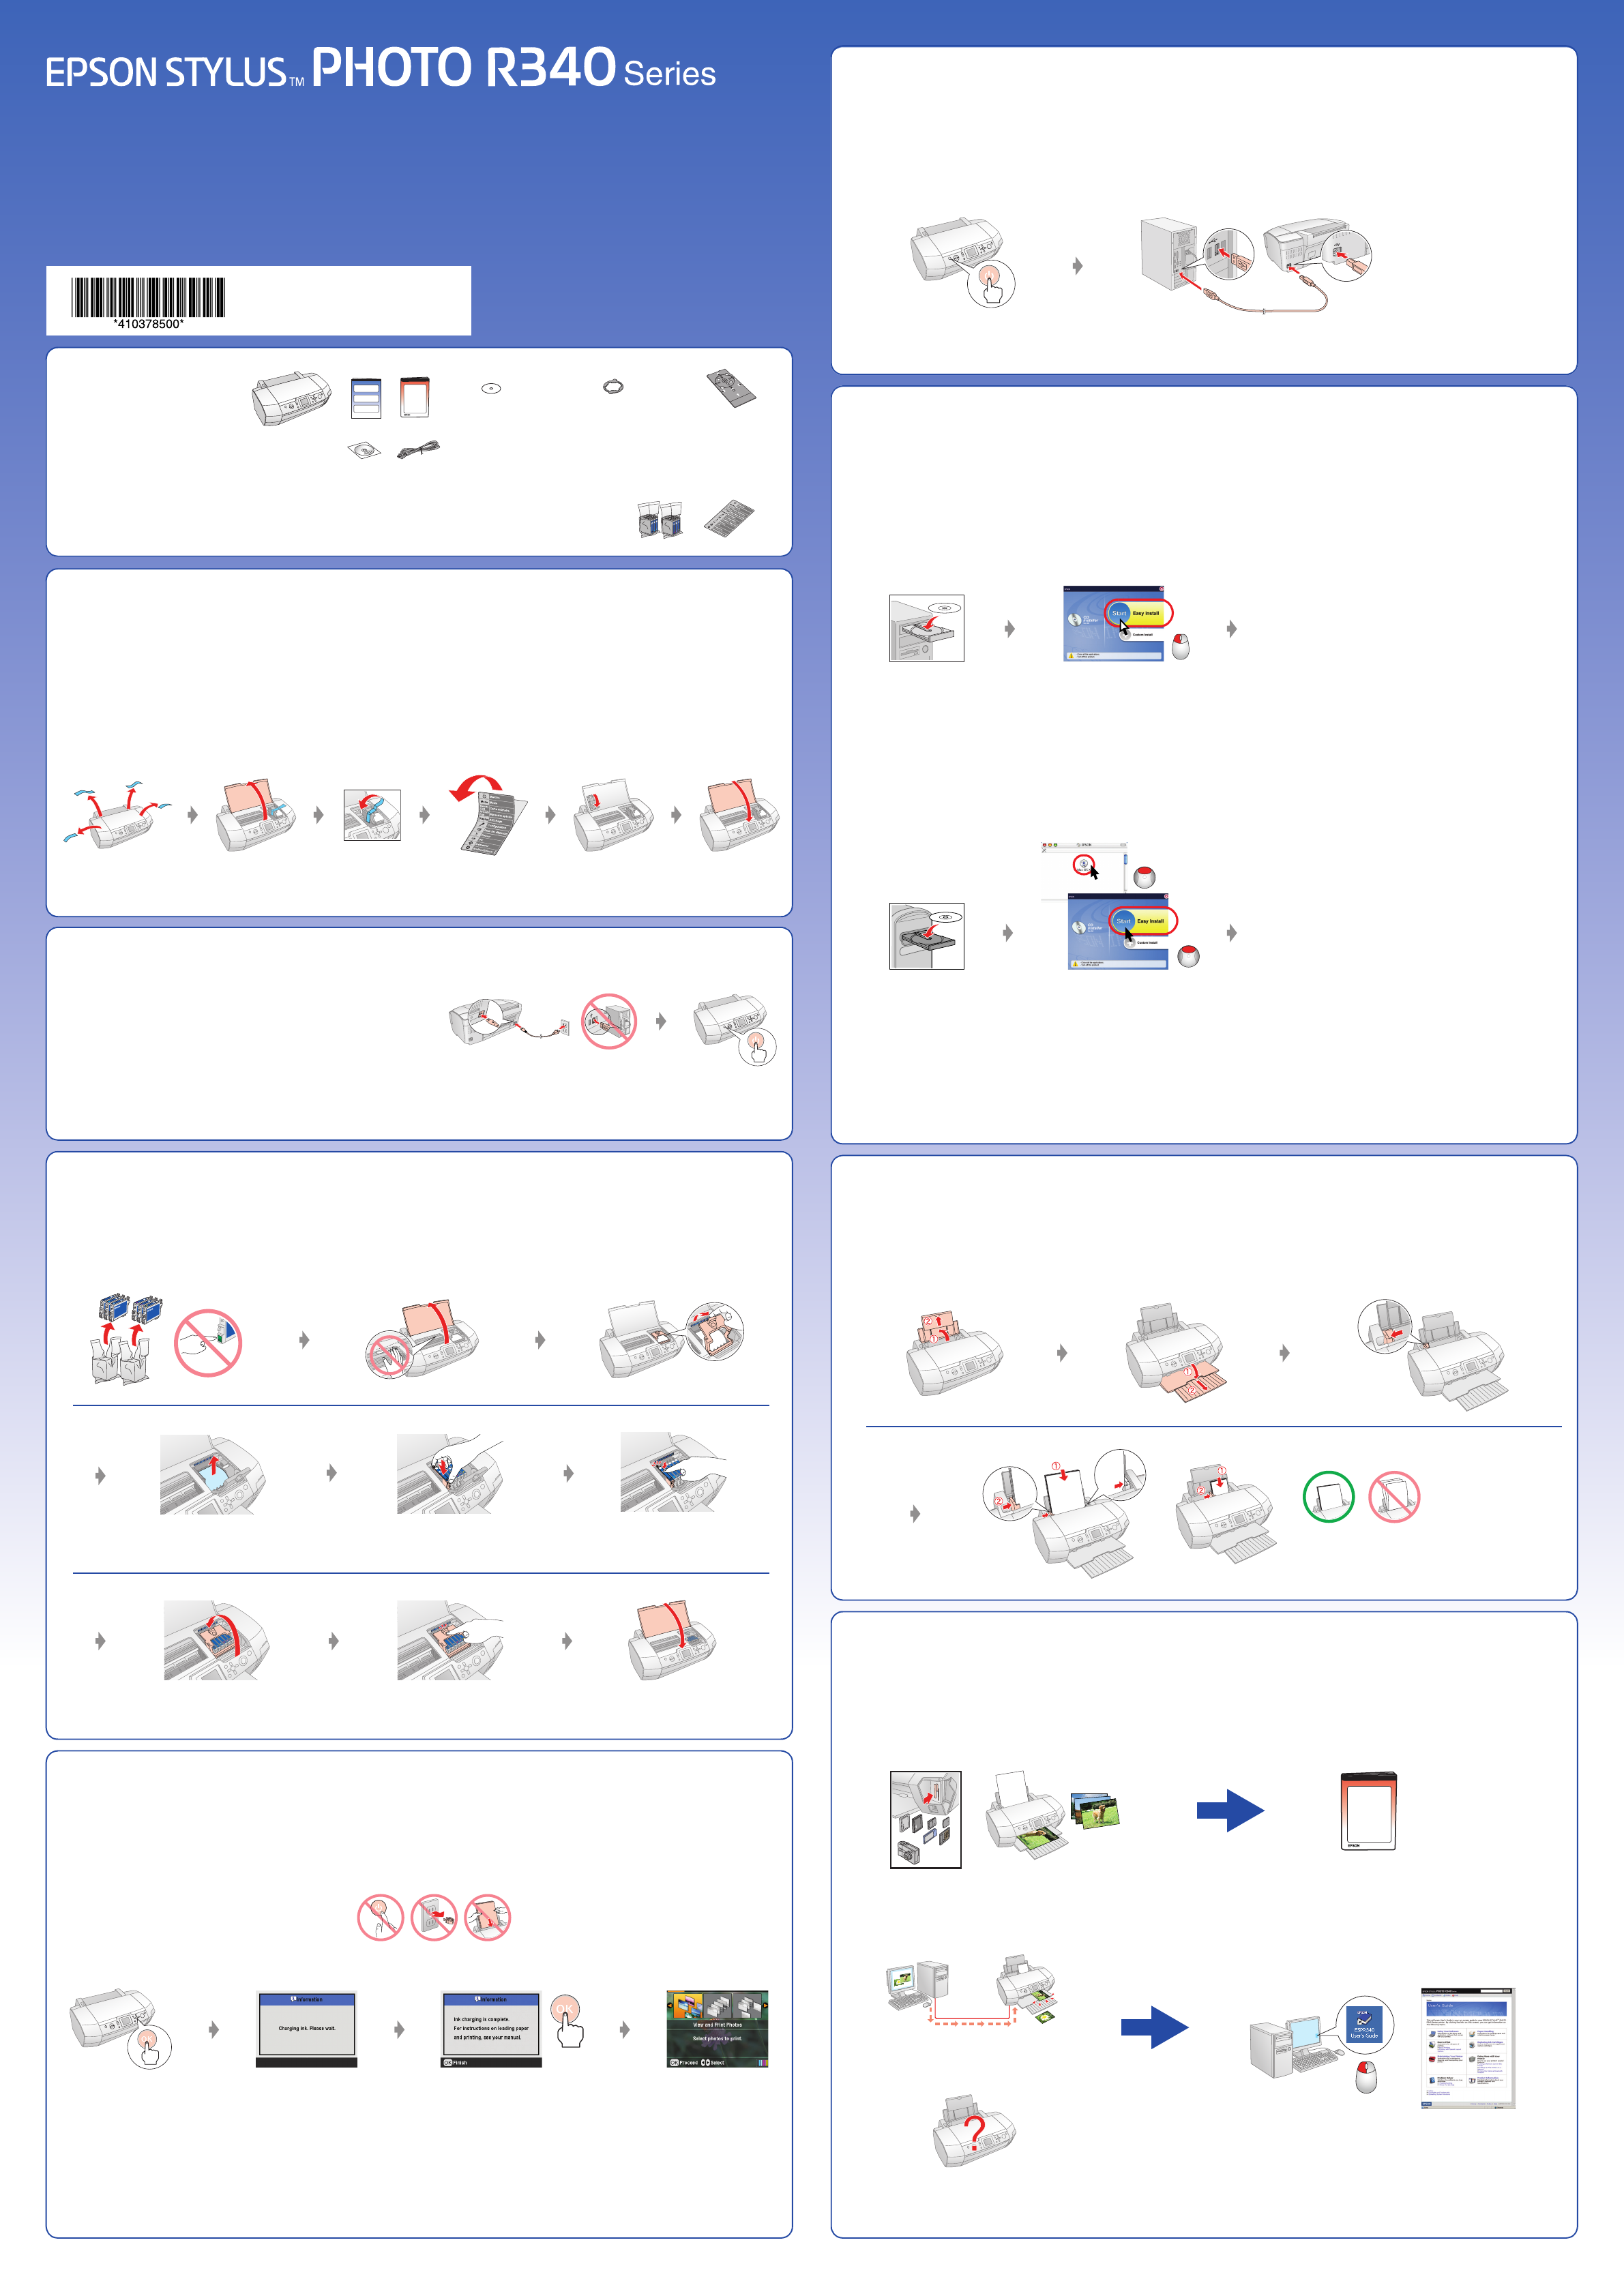
2.Removing Protective Tape and Affixing Panel Sticker
Dépose du ruban de protection et apposition de l’autocollant
du panneau
Schutzstreifen entfernen und Bedienfeld-Aufkleber anbringen
Tape verwijderen en sticker op paneel aanbrengen
3.Plugging in the Printer
Branchement sur l’imprimante
Drucker an Netzsteckdose
anschließen
Aansluiten op lichtnet
4.Installing the Ink Cartridge
Installation de la cartouche d’encre
Tintenpatrone einsetzen
Cartridges installeren
5.Ink Charging
Chargement de l’encre
Tintenbefüllung
Inkt laden
CD/DVD Print Position
Check Sheet
Feuille de vérification de la
position d’impression du
CD/DVD
Kontrollblatt für CD/DVD-
Druckposition
Vel voor controle van de
afdrukpositie op cd's/
dvd's
8-cm CD/DVD
Attachment
Accessoire pour CD/DVD
de 8 cm
Adapter für 8-cm-CD/DVD
Adapter voor cd's/dvd's
van 8 cm
CD/DVD Tray
Plateau CD/DVD
CD/DVD-Träger
Hulpstuk voor
cd's/dvd's
Turn On
Mettez sous tension
Einschalten
Aanzetten
Click
Cliquez
Einrasten
Klikken
Close
Fermez
Schließen
Sluiten
Click
Cliquez
Einrasten
Klikken
About 1.5 min
Environ une minute et demie
Ca. 1,5 Min.
Circa 1,5 min.
Note:
The ink cartridges first installed in your printer will partly be used
to charge the print head. Subsequent ink cartridges will last for
their full rated life.
Remarque :
Lors de la première installation de cartouches d’encre dans
l’imprimante, l’encre est partiellement utilisée pour charger la
tête d’impression. Les cartouches d’encre installées par la suite
sont intégralement utilisées dans le cadre de l’impression.
Hinweis:
Die zuerst in den Drucker eingesetzten Tintenpatronen werden
zum Teil zum Befüllen des Druckkopfs genutzt. Anschließend
eingesetzte Tintenpatronen halten über die gesamte
angegebene Nutzdauer.
Opmerking:
De eerste cartridges die u in de printer installeert, worden deels
verbruikt om de printkop te vullen met inkt. De daaropvolgende
cartridges hebben wel de volledige levensduur.
6.Connecting to a Computer with a USB Cable
Connexion à un ordinateur à l’aide d’un câble USB
Mit einem USB-Kabel an einen Computer anschließen
Aansluiten op een computer met een USB-kabel
7.Installing the Software
Installation du logiciel
Software installieren
De software installeren
❏No dialog box? & Double-click CD-ROM icon.
❏Pas de boîte de dialogue ? & Double-cliquez sur l’icône du CD-ROM.
❏Kein Dialogfeld? & Doppelklicken Sie auf das CD-ROM-Symbol.
❏Geen dialoogvenster? & Dubbelklik op het cd-rompictogram.
❏For Mac OS 9, download the driver. & http://www.epson.com
❏Sous Mac OS 9, téléchargez le pilote. & http://www.epson.com
❏Laden Sie für Mac OS 9 den Treiber herunter. & http://www.epson.com
❏Voor Mac OS 9 downloadt u zelf de driver. & http://www.epson.com
8.Loading Paper
Chargement du papier
Papier einlegen
Papier laden
9.Getting More Information
Pour plus d’informations
Weitere Informationen erhalten
Meer informatie
Turn Off
Mettez hors tension
Ausschalten
Uitzetten
Follow the instructions
Suivez les instructions.
Anweisungen ausführen
Volg de instructies
Insert
Insérez
Einlegen
Plaatsen
Click
Cliquez
Klicken
Klikken
For Windows
Pour Windows
Windows
Voor Windows
Insert
Insérez
Einlegen
Plaatsen
Click
Cliquez
Klicken
Klikken
Follow the instructions
Suivez les instructions.
Anweisungen ausführen
Volg de instructies
For Mac OS X
Pour Mac OS X
Mac OS X
Voor Mac OS X
Click
Cliquez
Klicken
Klikken
Fit
Insérez
Anpassen
Aanschuiven
Basic Operation Guide
Guide des opérations de base
Benutzerhandbuch - Grundlagen
Basishandleiding
Memory Card Printing
Impression à partir de la carte mémoire
Speicherkartendruck
Afdrukken vanaf een geheugenkaart
Troubleshooting
Dépannage
Fehlerbehebung
Problemen oplossen
User’s Guide
Guide d’utilisation
Benutzerhandbuch
Gebruikershandleiding
Printing from a computer
Impression à partir d’un ordinateur
Von Computer drucken
Afdrukken vanaf een computer
Maschinenlärminformations-Verordnung 3. GPSGV: Der höchste Schalldruckpegel beträgt 70 dB(A) oder weniger gemäss EN ISO 7779.
4103785Rev.0
1-FBK
4103785Rev.0
1-FY
4103785Rev.0
1-FM
4103785Rev.0
1-FC
Need help? Post your question in this forum.
Report abuse
Libble takes abuse of its services very seriously. We're committed to dealing with such abuse according to the laws in your country of residence. When you submit a report, we'll investigate it and take the appropriate action. We'll get back to you only if we require additional details or have more information to share.
Product:
Forumrules
To achieve meaningful questions, we apply the following rules:
First, read the manual;
Check if your question has been asked previously;
Try to ask your question as clearly as possible;
Did you already try to solve the problem? Please mention this;
Is your problem solved by a visitor then let him/her know in this forum;
To give a response to a question or answer, do not use this form but click on the button 'reply to this question';
Your question will be posted here and emailed to our subscribers. Therefore, avoid filling in personal details.
Register
Register getting emails for Epson StylusPhotoR340 at:
new questions and answers
new manuals
You will receive an email to register for one or both of the options.
Get your user manual by e-mail
Enter your email address to receive the manual of Epson StylusPhotoR340 in the language / languages: English, German, Dutch, French as an attachment in your email.
The manual is 2,6 mb in size.
You will receive the manual in your email within minutes. If you have not received an email, then probably have entered the wrong email address or your mailbox is too full. In addition, it may be that your ISP may have a maximum size for emails to receive.
If you have not received an email with the manual within fifteen minutes, it may be that you have a entered a wrong email address or that your ISP has set a maximum size to receive email that is smaller than the size of the manual.
The email address you have provided is not correct.
Please check the email address and correct it.
Your question is posted on this page
Would you like to receive an email when new answers and questions are posted? Please enter your email address.