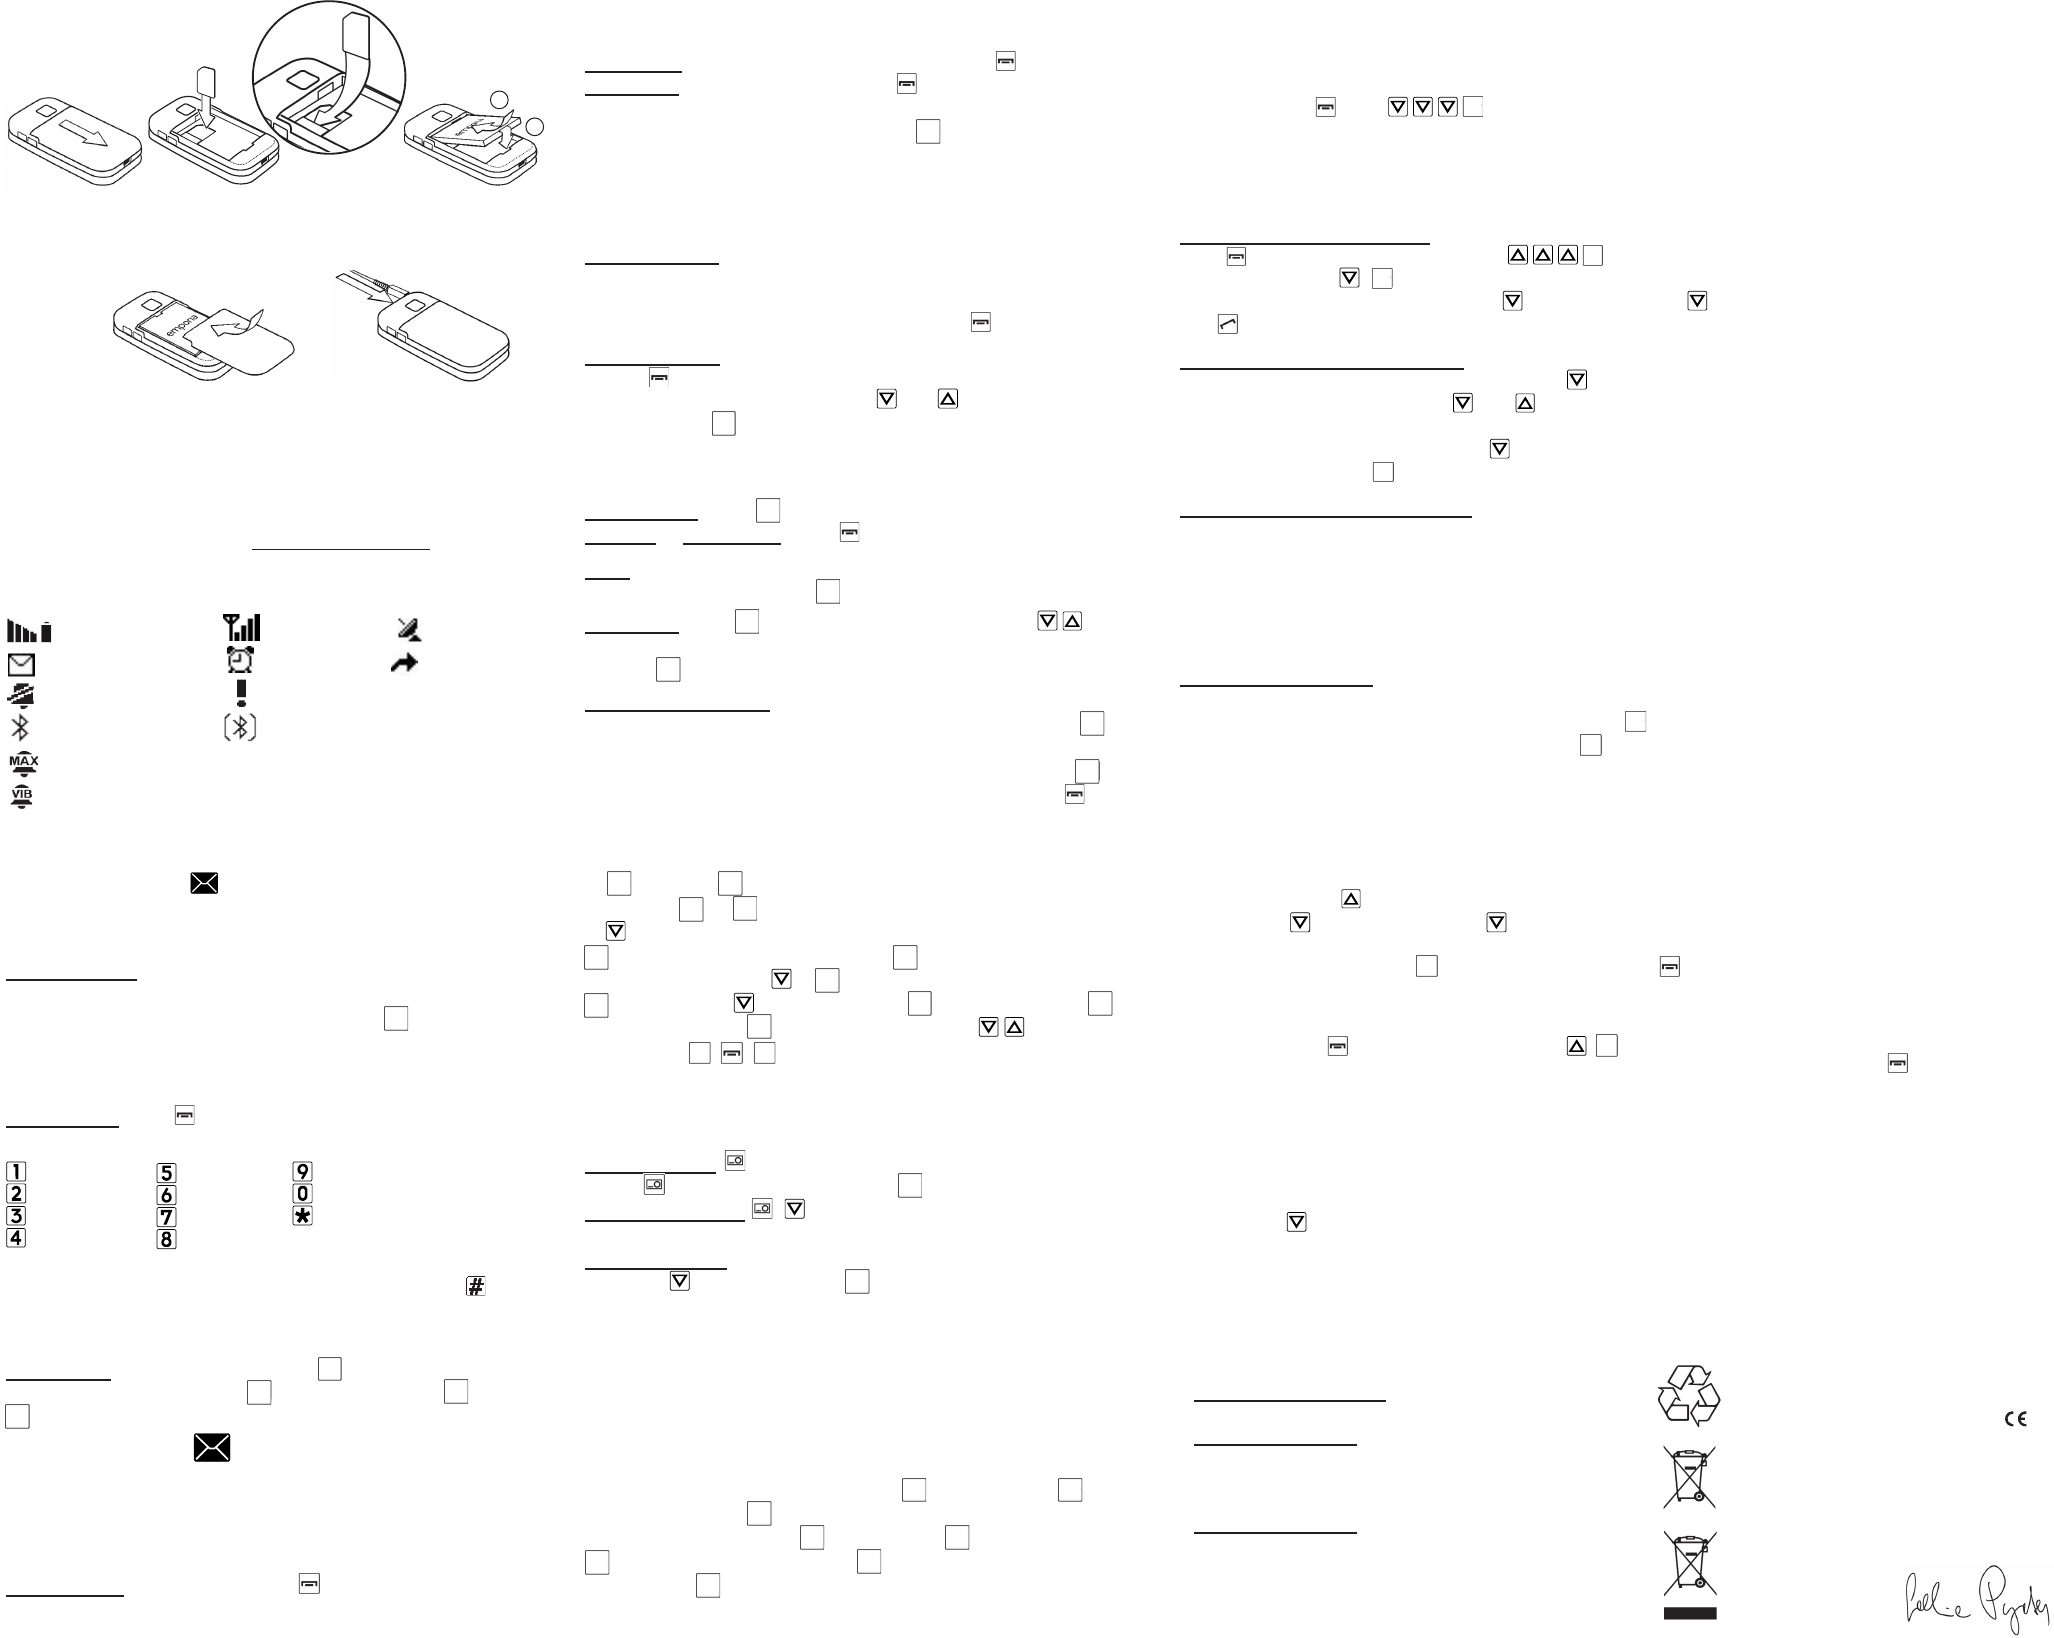
Fig. 1: Remove battery cover (as shown).
Fig. 2: Slide SIM card in with the gold contact facing down.
3 INSERT BA
Fig 2 Fig 3 Fig 1
• Fig. 3: Insert battery (gold contacts on right front side).
•
•
•
are moving and the LED on the upper side of the closed phone is on.
• Full battery: Bars in upper right display corner are solid.
Note: Charge battery for at least 2 hours before rst use!
4 DISPLA
5 FIRST STEPS
Switch on the for 2 sec.
Switch off by pressing power on/off for 2 seconds again.
When
Identication Number) and conrm with .
PIN-Code: The PIN-Code is a 4-digit number combination
preventing others from switching on your mobile phone.
• Switch off your PIN-Code: In menu: Settings à Security
Settings à PIN à PIN off.
Standby mode:
In
(calling, messaging, etc.)
when you are e.g. in the settings menu, press repeatedly
Entering Menu:
• Press - key
• Scroll through menu points: with and .
• Conrm: with .
Note: due to inactivity phone lights and screen turn off after a
while. T
Pick up call: Press - key
End call or Reject call: Press - key
Dial: Enter the
code with 0) - start call with .
Redial list: press - key
dialled, missed and received calls), select a number and start
call with .
Handsfree Speaking: T
ear
Handsfree.
Note: if you stay at a menu point without confirming ( ),
a help text with explanations pops up. T .
1. (Edit) à Add number: phone
book entry à .
2. to Subject (this will be the headline of the message) à
(Edit) à Insert message text à (Done).
3. Edit content: 1x à (Edit) à or
(Options) à to Add picture: à phone:
à photos: à àchoose
picture with
[ok
[ok
(done).
If
your operator to check MMS settings.
10 CAMERA:
T press camera-button to start camera à
press to take picture, store with .
Camera settings: , :
balance
Picture gallery: à select Pictures, -
ture with and view with 2x .
• à Option: V-
ground, Use for contact, (choose the phone book entry
[note: ].
Calls
the display), Rename, Delete, Delete all pictures.
1
Bluetooth:
• à Settings à Bluetooth à
Bluetooth on/off .
• Settings à Bluetooth à Connections
à Search for new device à select
want . Next
will start automatically
12 OTHER FUNCTIONS IN SETTINGS
Enter menu with à continue to Settings: , à
• T
congure your personal settings.
• Y and
to get a notication about an incoming call while having a
phone talk.
• Choose automatic
network) or manual selection (select a network manually).
• Favorites : your favorite functions pressing 1 button
•
• VChange the voicemail number
• settings: Activate, deactivate or change PIN
and phonecode
• Reset the phone to factory settings.
14 FREQUENTL
• shows “Insert SIM card! Only emergency call
1 Check the direction of the SIM card
• call failed: Check the selected telephone number and
area code again for accuracy (area code entered?).
•
is in energy saving mode (press any key) or it is switched
off (press for 2 seconds to switch on).
• The mobile phone does not react: Remove battery re-
insert
refer to the service centre.
• The charging procedure does not begin:
several minutes. If there is no reaction after 10 minutes,
refer phone to service centre.
15 DECLARA
We, Emporia
declare that the design of the device conforms to the relevant EU
directives described below
Item Description: Dual Band Mobile Phone Item Number: V32
Relevant EU Directives for Radio /T
R & TTE Directive 1999/5/EC
• 13 DISPOSAL
• Disposal of packaging: Packaging materials are
recyclable and shall enter the recycling process.
• Disposal of battery: Do not insert battery into
household waste for disposal! Y
return used batteries. These can be handed into local
collection areas or to specialty shops.
• Disposal of Device: T
When this product is taken out of service, do not
throw it into the household waste, but dispose of it,
where old devices are accepted and brought into an
eco-friendly disposal/recycling procedure.
Write SMS: With Enter menu: à Messages à SMS
à Write new SMS: The text entry is done by the keypad.
Switch between different entry methods by pressing
abc: only small; Abc: ABC:
123: Numbers
Send SMS: Select Send with 2x and enter number or
select from , select contact ). Press
. to send SMS.
9 MMS MESSAGES
MMS (Multimedia Message Service) are messages incl.
pictures, audio, etc.
First time use: Menu àMMS àMMS Settings àMMS
account à choose operator
Send MMS: enter Menu with Messages à MMS à
Create new MMS:
6 PHONE BOOK
Save
+44
chapter , , , , à Menu-Points: Search
name,
(add, delete, on/ofQuick dial keys, Copy
All, Edit Contact, Delete, Send contact by SMS, SMS in
PhoneBK, Settings;
Storing phone book entries Enter
with à Phone book: , , , à
to Add contact: , àEnter via keypad
chapter 8 Write SMS for text entry) , à Enter number
and to Save .
Searching phone book entries:
In standby mode: open the phone book with :
• Scroll through the entries with and or:
• Search names:
via through ). When
name is shown, press to start a call.
Add phone book entry via SMS:
In menu phonebook à SMS in PhoneBK to turn function
to receive phonebook entries via SMS message on/off, or
specify only phone book contacts can send entries to
you. will be saved automatically in your
phone book when you receive a SMS with the following
content: #name#number# e.g.: #T
Buttons M1, M2, M3:
Store or à Phone
book à Quick Dial keys à à (Ok).
T (Search) to
access
Delete and enter new name and number
7 EMERGENCY FUNCTION
Y can store a total of 5 emergency numbers (family
neighbours, friends, emergency services). In case of
emergency these preselected numbers will be dialled
automatically in a sequence, if the emergency key on the
back of the phone gets pressed and held.
A
during
the emergency! If the rst number cannot be reached, the
second number will be called automatically
If the
be called. (max. 3 rotations of the 5 numbers).
Note: T avoid getting caught on a mailbox, the reached
person has to conrm your emergency by calling back.
If
expired or you have no access to a foreign network (e.g.
roaming not permitted), 1
Saving emergency numbers: Enter Menu à Phone book
à Emergency numbers à Add à choose
Emergency à
help à pick contact à done
Note: select emergency number: private number (has to
conrm
ambulance, police, etc. (no conrmation call required).
Switch Settings à
Emergency numbers à On/Off.
Note: If you want to save numbers from ofcial services,
police, re department, etc. as emergency numbers, you
have to clarify this with these institutions. No liability will be
assumed for possible costs incurred if you dial accidentally
8 SMS MESSAGES
SMS (Short Message Service) are written messages with a
maximum of 160 characters.
Receive SMS:
the display
Read or see a list of
messages which à
Messages à SMS à Received SMS.
. , ! ? ‘
a b c 2 ä æ å à
d e f 3 è è ê
g h i 4 ì
j k l 5 £
m n o 6 ö
p q r s 7 $
t u v 8 ü
w x y z 9
space; 0
“
1313
Harmonised EN Professional and Basic
Standards:
The item corresponds to the following norms:
Health: EN50360 :2001
Radio: ETSI EN 300 328 V1.7.1. (2006-10)
Signed:
Eveline Pupeter
General Manager
Issue date: 01.07.201
Area of Issue: Linz/Austria
Safety: EN 60950-1 :2006 +A1
EMV: ETSI EN 301 489-17 V2.1.1. (2009-05)
ETSI EN 301 489-7 V1.3.1. (2005-1
ETSI EN 301 489-1 V1.8.1. (2008-04)
2 INSERT SIM CARD
1
2
battery
strength
newSMS
ringtoneoff
signalstrength roamingmode
alarmon calldiversion
missedcall earphone
BluetoothON Bluetoothheadsetconnected
profile„maximum“ON(ringtonevolumeveryloud)
profile„Meeting“ON
battery
strength
newSMS
ringtoneoff
signalstrength roamingmode
alarmon calldiversion
missedcall earphone
BluetoothON Bluetoothheadsetconnected
profile„maximum“ON(ringtonevolumeveryloud)
profile„Meeting“ON
battery
strength
newSMS
ringtoneoff
signalstrength roamingmode
alarmon calldiversion
missedcall earphone
BluetoothON Bluetoothheadsetconnected
profile„maximum“ON(ringtonevolumeveryloud)
profile„Meeting“ON
battery
strength
newSMS
ringtoneoff
signalstrength roamingmode
alarmon calldiversion
missedcall earphone
BluetoothON Bluetoothheadsetconnected
profile„maximum“ON(ringtonevolumeveryloud)
profile„Meeting“ON
battery
strength
newSMS
ringtoneoff
roamingmode
alarmon calldiversion
missedcall earphone
BluetoothON Bluetoothheadsetconnected
profile„maximum“ON(ringtonevolumeveryloud)
profile„Meeting“ON
battery strength
new SMS
ringtone off
Bluetooth on
signal strength
alarm on
missed call
roaming mode
call diversion
Bluetooth headset connected
prole ”maximum“ ON (ringtone volume very loud)
prole ”Meeting“ ON
Alarm:
Standby à Status
on or off à , Time: set the time, , Repeat: set
(once, daily
If the to
reactivate the alarm after 1 minute.
[ok
[ok
[ok
[ok
[ok
[ok
[ok
[ok
[ok [ok
[ok
[ok
[ok
[ok
[ok
[ok
[ok
[ok
[ok
[ok
[ok
[ok
[ok
[ok
[ok
[ok
[ok
[ok
[ok
[ok
[ok
[ok
[ok
[ok
[ok
[ok
[ok
[ok
[ok
[ok
[ok
[ok
Fig 5Fig 4