Belangrijk: Lees voor montage deze gebruiksaanwijzing door, en tref de nodige veiligheidsvoorzieningen. Schakel altijd de stroom uit alovorens u begint,
en installeer buiten niet bij regenachtig weer! Laat bij twijfel de LED Floodlight door een erkend specialist installeren. Pas Op verblindend licht. Let op, gevaar voor elektrische schokken
De lichtbron en het glas van de LED Floodlight armatuur zijn niet te vervangen, bij breuk de gehele LED Floodlight vervangen.
EN
Important: Before installing, read these operating instructions and take the necessary safety precautions. Always turn off the power from the mains you start,
And do not install outside in rainy weather! In case of doubt, install the Floodlight LED by a qualified specialist. Caution, risk of electric shock. When Floodlight is opened, expires the warranty.
The light source and the front glass of this luminaire are not replaceable, in case of, replace the total LED Floodlight Do not stare at the operating light source.
DE
Wichtig: Lesen Sie vor der Installation diese Anleitung sorgfältig für die notwendigen Sicherheitsvorkehrungen. Schalten Sie immer den Hauptschalter aus, bevor Sie beginnen.
und installieren Sie außen nicht bei Regenwetter! Im Zweifel LED-Scheinwerfer vom qualifizierten Fachmann installieren lassen. Bei Öffnen des Gerätes erlischt die Garantie.
Die Lichtquelle und das Frontglas dieser Leuchte sind nicht austauschbar. Nicht direkt in die eingeschaltete Lichtquelle schauen. Vorsicht! Gefahr eines elektrischen Schlags.
FR
Important: Veuillez lire ce manuel d'installation attentivement, et prendre les précautions de sécurité nécessaires. Mettez toujours hors tension alovorens début, et installer à l'extérieur pas
en cas de pluie! En cas de doute, LED installé par Floodlight un spécialiste qualifié. Attention, risque d'électrocution. Ne regardez pas la source de lumière de fonctionnement.
La source lumineuse et le verre avant de ce luminaire ne sont pas remplaçables. Ne regardez pas la source de lumière de fonctionnement.
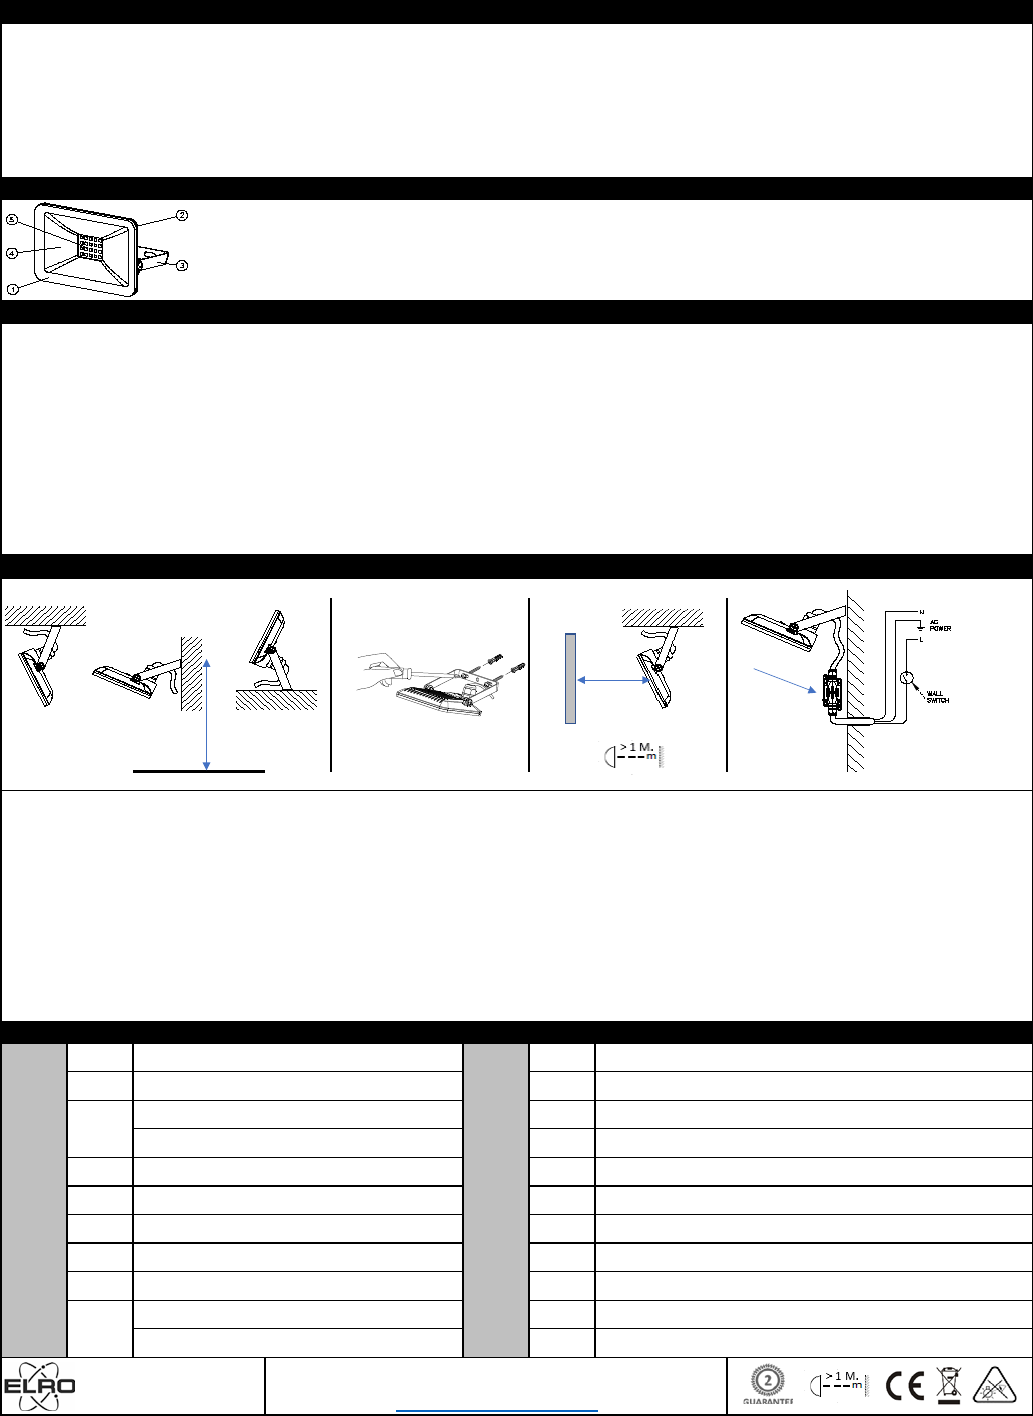
NLWaarschuwing: Schakel allereerst de stroom uit! Plaats een schakelaar tussen de voeding en de Led Floodlight. Gebruik buiten een IP54 montagedoos.
Demonteer de vooraf geinstalleerde kabel NIET, maar gebruik deze om de LED Floodlight aan te sluiten. Sluit de bruine draad op de (aanbevolen)
schakelaar aan, de blauwe draad op de Nul, en de Geel/Groene op de aarde aansluiting. Schakel de stroom weer in, en controleer de werking van de LED Floodlight.
EN
Warning: Turn off the power first! Insert a switch between the power supply and the Led Floodlight. Use outside of an IP54 mounting box.
DO NOT disassemble the pre-installed cable, but use it to connect the Floodlight LED. Connect the brown wire to the (recommended)
Switch, blue wire to zero, and yellow / green to ground connection. Turn on the power again and check the operation of the Floodlight LED.
DE
Achtung: zuerst den Strom abschalten! Setzen Sie einen Schalter zwischen Stromversorgung und LED-Scheinwerfer. Im Außenbereich eine IP54 Abzweigdose verwenden.
Entfernen Sie das vorinstallierte Kabel nicht, sondern verwenden sie es, um den LED-Scheinwerfer anzuschließen. Schließen Sie den braunen Draht (L) an den (empfohlen)
Schalter an, den blauen Draht (N) an den Nullleiter und den gelb-grünen an den Schutzleiter (PE). Schalten Sie den Strom an und prüfen Sie den Betrieb des Scheinwerfers.
FR
Avertissement: Mettez l'appareil hors tension! Placer un interrupteur entre l'alimentation et Projecteur à LED. Utiliser l'extérieur d'un boîtier de montage IP54.
Retirez le câble préinstallée pas, mais l'utiliser pour connecter le projecteur à LED. Connectez le fil marron à la (recommandé)
passer au fil bleu sur le zéro et le jaune / vert sur la borne de terre. Mettez l'appareil sous tension et vérifier le bon fonctionnement du projecteur LED.
Uitgebreide handleiding, Big Manual, Detaillierte Anleitung, Des instructions détaillées
Vertical 90°
> 750 lm LF501011(white) LF501012(black)
>1500 lm LF502011(white) LF502012(black)1 Years
CE ( EMC/LVD )、RoHS、ErP
1,8 <> 2,4 M.
POWER
BOX
> 1 M.
> IP54
Need help? Post your question in this forum.
Report abuse
Libble takes abuse of its services very seriously. We're committed to dealing with such abuse according to the laws in your country of residence. When you submit a report, we'll investigate it and take the appropriate action. We'll get back to you only if we require additional details or have more information to share.
Product:
Forumrules
To achieve meaningful questions, we apply the following rules:
First, read the manual;
Check if your question has been asked previously;
Try to ask your question as clearly as possible;
Did you already try to solve the problem? Please mention this;
Is your problem solved by a visitor then let him/her know in this forum;
To give a response to a question or answer, do not use this form but click on the button 'reply to this question';
Your question will be posted here and emailed to our subscribers. Therefore, avoid filling in personal details.
Register
Register getting emails for Elro LF 501012 at:
new questions and answers
new manuals
You will receive an email to register for one or both of the options.
Get your user manual by e-mail
Enter your email address to receive the manual of Elro LF 501012 in the language / languages: English, German, Dutch, French as an attachment in your email.
The manual is 0,32 mb in size.
You will receive the manual in your email within minutes. If you have not received an email, then probably have entered the wrong email address or your mailbox is too full. In addition, it may be that your ISP may have a maximum size for emails to receive.
The manual is sent by email. Check your email
If you have not received an email with the manual within fifteen minutes, it may be that you have a entered a wrong email address or that your ISP has set a maximum size to receive email that is smaller than the size of the manual.
The email address you have provided is not correct.
Please check the email address and correct it.
Your question is posted on this page
Would you like to receive an email when new answers and questions are posted? Please enter your email address.