Кварцовий радіатор ідеально підходить для обігрівання патіо.
Після увімкнення радіатор швидко генерує інфрачервоні
промені.
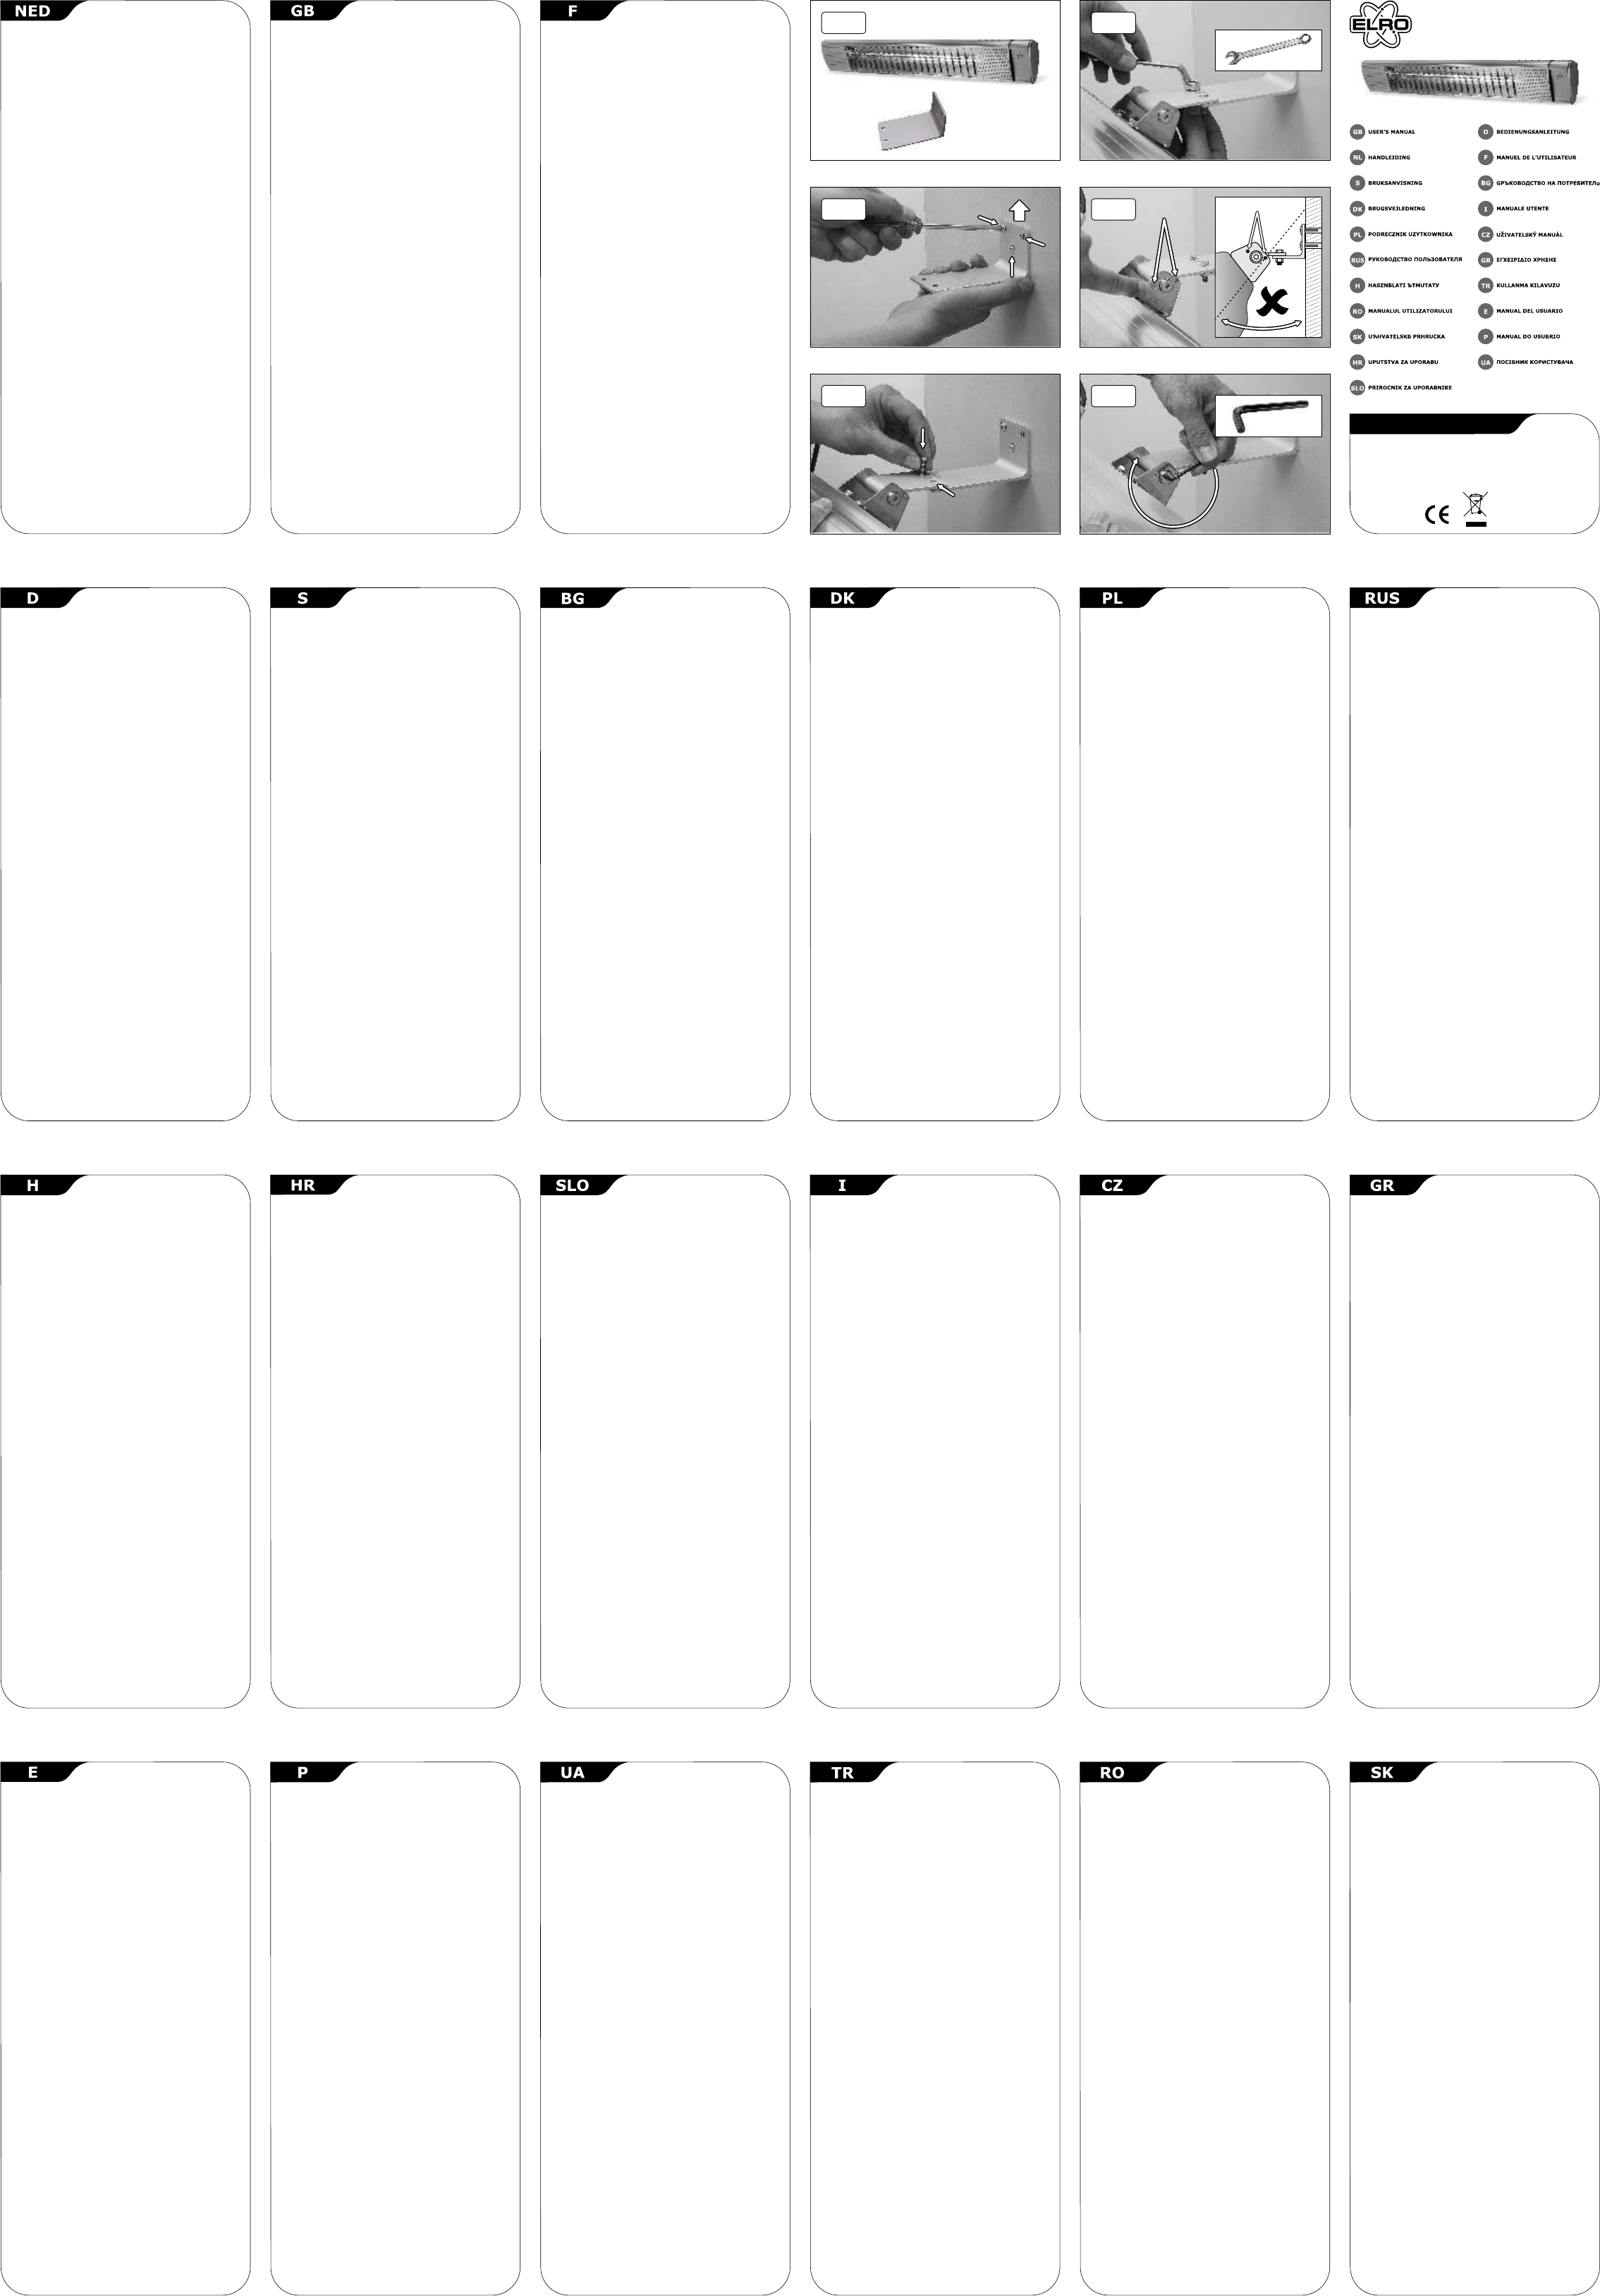
Вміст (1)
a. Радіатор
b. Монтажний кронштейн
ВСТАНОВЛЕННЯ І ВИКОРИСТАННЯ
Лише для горизонтального монтування на стіні. Для цього
використовуйте настінний кронштейн, який додається (1b).
Спершу прикріпіть кронштейн на стіні (2), а тоді радіатор до
кронштейна (3a) і зафіксуйте гвинтами, які додаються (3b).
Упевніться, що кронштейн прикріплено правильно (4), а не
догори низом. Налаштуйте потрібний кут і затягніть гвинти
гайковим ключем (5). Вставте штекер у розетку.
КАБЕЛЬ/ЕЛЕМЕНТ ДЛЯ ЗАМІНИ
Роботи з заміни кабелю/елемента нагрівання може проводити
тільки кваліфікований електрик.
ПІДКАЗКА
- Перед чищенням дайте лампі охолонути щонайменше 20
хвилин.Використовуйте м'яку ганчірку, не застосовуючи
сильні засоби для чищення.
ЗАСТЕРЕЖЕННЯ
Lütfen cihazı takmadan evvel aşağıdaki talimatları dikkatle
okuyunuz.
- Cihazı doğrudan duvar dibindeki pirizeyerleştirmeyiniz/
kurmayınız.
-Cihazı çocukların veya anlamayan kişilerin kullanmasına izin
vermeyiniz.
- Isıtıcının etrafında yeterli bir boşluk bırakınız; üstten ve
kenarlardan en az 50 cm, önden ise 100 cm boluk olmalıdır.
- Isıtıcı sadece duvara yatay olarak monte edilmelidir.
- Cihazın içine herhangi bir nesne koymayınız.
- Cihazın çalışacağı ceryan miktarının evinizin şehir ceryanıyla aynı
miktarda olmasına dikkat ediniz.
- Cihazı sadece belirtilen konumuyla kurunuz.
-Cihazı bir duvara kuracaksanız, sabit bir zemin olmasını
sağlayınız.
- Cihazı elbise kurutmak için kullanmayınız.
-Aşırıısınmanın önüne geçmek için hava alış ve hava çıkış yerlerini
kapatmayınız.
- Cihazın bakımı esnasında veya kullandıktan sonra, fişi pirizden
çekiniz.
- Güç kablosunu degistirirken aslina benzer bir kablo kullaniniz.
- Cihazı perdelere yakın kullanmayınız.
- Bu cihazın çocuklaca kullanılması sakıncalıdır.
GENEL
Bu kuartz isitici açik mekanlari isitmak için idealdir. Isıtıcı
çalıştırıldıktan sonra hızlı bir şekilde ısı üretir.
İçerik (1)
a. Isıtıcı
b. Montaj bağlantı parçası.
KURULUM VE KULLANIM
Yalnizca yatay olarak duvara montaj içindir. Birlikte verilen
baglanti dirsegini kullanin (1b) Önce baglanti dirsegini duvara
sabitleyin (2) ve ardindan isiticiyi baglanti dirsegine yerlestirin
(3a) ve birlikte verilen vidalarla sabitleyin (3b). Baglanti
dirsegini dogru olarak taktiginizdan emin olun (4). Istediginiz
açiya ayarlayin ve allen anahtari ile sabitleyin (5). Fisi uygun bir
duvar prizine takin.
KABLO/PARÇA DEĞİŞTİRME
Kablo ve ısıtma parçaları sadece yetkili ve uzman bir elektrikçi
tarafından değiştirilmelidir.
İPUCU
- Temizlikten önce lambanın 20 dakika soğumasını bekleyiniz.
Yumuşak bir bez kullanınız, aşındırıcı veya kimyasal temizlik
maddeleri kullanmayınız.
EMNİYET TEDBİRLERİ
Vã rugãm sã citiţi cu atenţie instrucţiunile înainte de a
conecta aparatul.
-Nu plasaţi/instalaţi aparatul direct sub prizã.
-Nu lãsaţi la îndemâna copiilor sau a persoanelor necalificate.
-Lãsaţi suficient spaţiu liber în jurul radiatorului; minimum 50 cm
deasupra şi lateral, respectiv 100 cm în faţã.
-Radiatorul este proiectat numai pentru montare orizontală pe
perete.
-Nu introduceţi obiecte în aparat.
-Verificaţi dacã voltajul specificat pe eticheta acestui model
corespunde cu cel pe care îl aveţi la priza de acasã.
-Folosiţi radiatorul doar în poziţia indicatã.
-Daca Dacã îl instalaţi pe perete, aveţi grijã sa sã fie într-o poziţie
stabilã.
-Nu folosiţi aparatul pentru uscarea rufelor.
-Nu blocaţi fantele de ventilaţie pentru a evita
supraîncalzireasupraîncãlzirea.
-În timpul operaţiilor de întreţinere sau şi dupã folosire, scoateţi
aparatul din prizaprizã.
-Când înlocuiti cablul de alimentare, folositi unul identic cu cel
instalat.
-Nu plasaţi radiatorul lângã perdele.
-Radiatorul nu este recomandat copiilor.
GENERALITĂŢI
Acest radiator cu cuarţ este ideal pentru încălzirea curţilor
interioare. După ce este pornit, radiatorul degajă imediat căldură.
Conţinut (1)
a. Radiator
b. Colier de montare
INSTALARE ŞI UTILIZARE
Numai pentru montarea pe pereţi orizontali. Folosiţi consola de
montare furnizată (1b) în acest scop. Montaţi mai întâi consola
pe perete (2) şi apoi caloriferul pe consolă (3a) şi apoi şi apoi
strângeţi şuruburile din dotare (3b). Asiguraţi-vă că aţi montat
consola corect (4) şi nu invers. Efectuaţi ajustări până când
obţineţi unghiul dorit şi strângeţi cu o cheie imbus hexagonală
(5). Introduceţi ştecărul în priză.
ÎNLOCUIREA ELEMENTULUI/CABLULUI
Cablul/elementul de încălzire poate fi înlocuit numai de către un
electrician calificat.
INDICAŢIE
- Înainte de curăţare, lăsaţi lampa să se răcească mai întâi
pentru 20 minute. Folosiţi o cârpă moale, fără agenţi chimici
sau agresivi de curăţare.
MÃSURI DE SIGURANŢÃ
Pre zapojením zariadenia si dôkladne prečítajte nasledujúce
odporúčania.
- Zariadenie nedávajte/nemontujte priamo pod sieťovú zásuvku.
-Udržiavajte ho mimo dosahu detí a nekvalifikovaných osôb.
- Okolo žiariča ponechajte dostatok voľného priestoru – minimálne
50 cm zvrchu a po bokoch a 100 cm spredu.
- Radiátor je vhodný len na horizontálne upevnenie na stenu.
- Do žiariča nestrkajte žiadne predmety.
- Skontrolujte, či sa napätie uvedené na typovom štítku zhoduje s
napájaním vo vašom dome.
- Žiarič používajte len v uvedenej polohe.
-Pri montáži na stenu zabezpečte stabilné upevnenie.
- Zariadenie nepoužívajte na sušenie bielizne.
-Neblokujte štrbiny na privádzanie a odvádzanie vzduchu, aby ste
zabránili prehriatiu.
- Počas údržby a po použití zariadenia vytiahnite zástrčku zo
zásuvky.
- Pri výmene napájacieho kábla použite kábel identický s
pôvodným káblom.
- Žiarič nedávajte do blízkosti záclon.
- Tento žiarič nie je vhodný pre deti.
VŠEOBECNÉ
Tento kremíkový radiátor je ideálny na vyhrievanie terasy. Rýchlo
produkuje teplo hneď po zapnutí.
Obsah (1)
a. Radiátor
b. Upevňovacia konzola.
INŠTALÁCIA A POUŽÍVANIE
Smie sa montovat na stenu iba v horizontálnom smere. Pri
montáži použite dodanú montážnu konzolu (1b). Najprv upevnite
konzolu na stenu (2) a potom ohrievac na konzolu (3a) a
utiahnite ho dodanými skrutkami (3b). Skontrolujte, ci je konzola
namontovaná správnym smerom (4) a nie naopak. Upravte
požadovaný uhol a utiahnite imbusovým klúcom (5). Zástrcku
zapojte do sietovej zásuvky.
VÝMENA KÁBLOV/ČLÁNKU
Káble a vykurovací článok smú vymieňať iba kvalifikovaní
elektrikári.
TIP
- Pred čistením nechajte žiarovku na 20 minút vychladnúť.
Použite suchú handričku a neagresívne alebo chemické čistiace
prostriedky.
BEZPEČNOSTNÉ OPATRENIA
Voltage: 230V ~ 50Hz.
Heat Output: 2000W
Water Proof: IP65
Class: I
SPECIFICATIONS
SAFETY PRECAUTIONS
Please read the following recommendations carefully
before connecting the device:
-Do not place/install the device directly underneath a wall
socket.
- Keep out of reach of children or unqualified individuals.
- Leave enough free space around the heater; a minimum of
50cm at the top and sides, and 100 cm at the front.
- Radiator is only suitable for horizontal wall mounting.
- Do not insert objects into the heater.
- Check whether the voltage stated on the type tag matches the
power current in your home.
- Only use the heater in the indicated position.
- When mounting on a wall, ensure a stable installation.
- Do not use the device for drying laundry.
- Do not block intake and outlet air vents to prevent
overheating.
- During maintenance and after using the device, pull the plug
out of the socket.
- When replacing the power cord, use a cord similar to the one
installed.
- Do not place the heater near curtains.
- This heater is not suitable for children.
GENERAL
This quartz radiator is ideal for heating patio. The radiator quickly
generates radiant heat after being switched on.
CONTENT (1)
a.Radiator
b.Mounting bracket
INSTALLATION AND USE
Only for horizontal wall mounting. Use the supplied mounting
bracket (1b) for this. First fasten the bracket to the wall (2) and
then heater to the bracket (3a) and fasten it with the supplied
screws (3b). Be sure the bracket is mounted the right way (4)
and not up sight down.Adjust to the desired angle and tighten
with an allen key (5). Insert the plug into the wall socket.
CABLE / ELEMENT REPLACEMENT
The cable / heating element can only be replaced by a qualified
electrician.
TIPS
- Let the lamp cool down first for 20 minutes before cleaning.
- Use a soft cloth, no aggressive or chemical cleaning agents.
(2)(4)
(3b)(1)
(3a)(5)
Angle stopAngle stopAngle stopAngle stop
a
b
Wrench
Allen key
UPUP
Need help? Post your question in this forum.
Report abuse
Libble takes abuse of its services very seriously. We're committed to dealing with such abuse according to the laws in your country of residence. When you submit a report, we'll investigate it and take the appropriate action. We'll get back to you only if we require additional details or have more information to share.
Product:
Forumrules
To achieve meaningful questions, we apply the following rules:
First, read the manual;
Check if your question has been asked previously;
Try to ask your question as clearly as possible;
Did you already try to solve the problem? Please mention this;
Is your problem solved by a visitor then let him/her know in this forum;
To give a response to a question or answer, do not use this form but click on the button 'reply to this question';
Your question will be posted here and emailed to our subscribers. Therefore, avoid filling in personal details.
Register
Register getting emails for Elro IH2000 at:
new questions and answers
new manuals
You will receive an email to register for one or both of the options.
Get your user manual by e-mail
Enter your email address to receive the manual of Elro IH2000 in the language / languages: English, German, Dutch, Danish, French, Italian, Polish, Portuguese, Swedish, Turkish, Spanish as an attachment in your email.
The manual is 0,26 mb in size.
You will receive the manual in your email within minutes. If you have not received an email, then probably have entered the wrong email address or your mailbox is too full. In addition, it may be that your ISP may have a maximum size for emails to receive.
The manual is sent by email. Check your email
If you have not received an email with the manual within fifteen minutes, it may be that you have a entered a wrong email address or that your ISP has set a maximum size to receive email that is smaller than the size of the manual.
The email address you have provided is not correct.
Please check the email address and correct it.
Your question is posted on this page
Would you like to receive an email when new answers and questions are posted? Please enter your email address.