HIS20IS ,HIS20S alarm merkeziniz ile birleştirilerek
çalıştırılabilecek kablosuz bir alıcıdır.. Güvenliğiniz
için, sistem aydınlatmayı otomatik olarak aktif konuma
getirebilir.
ALICININ KAYDEDİLMESİ
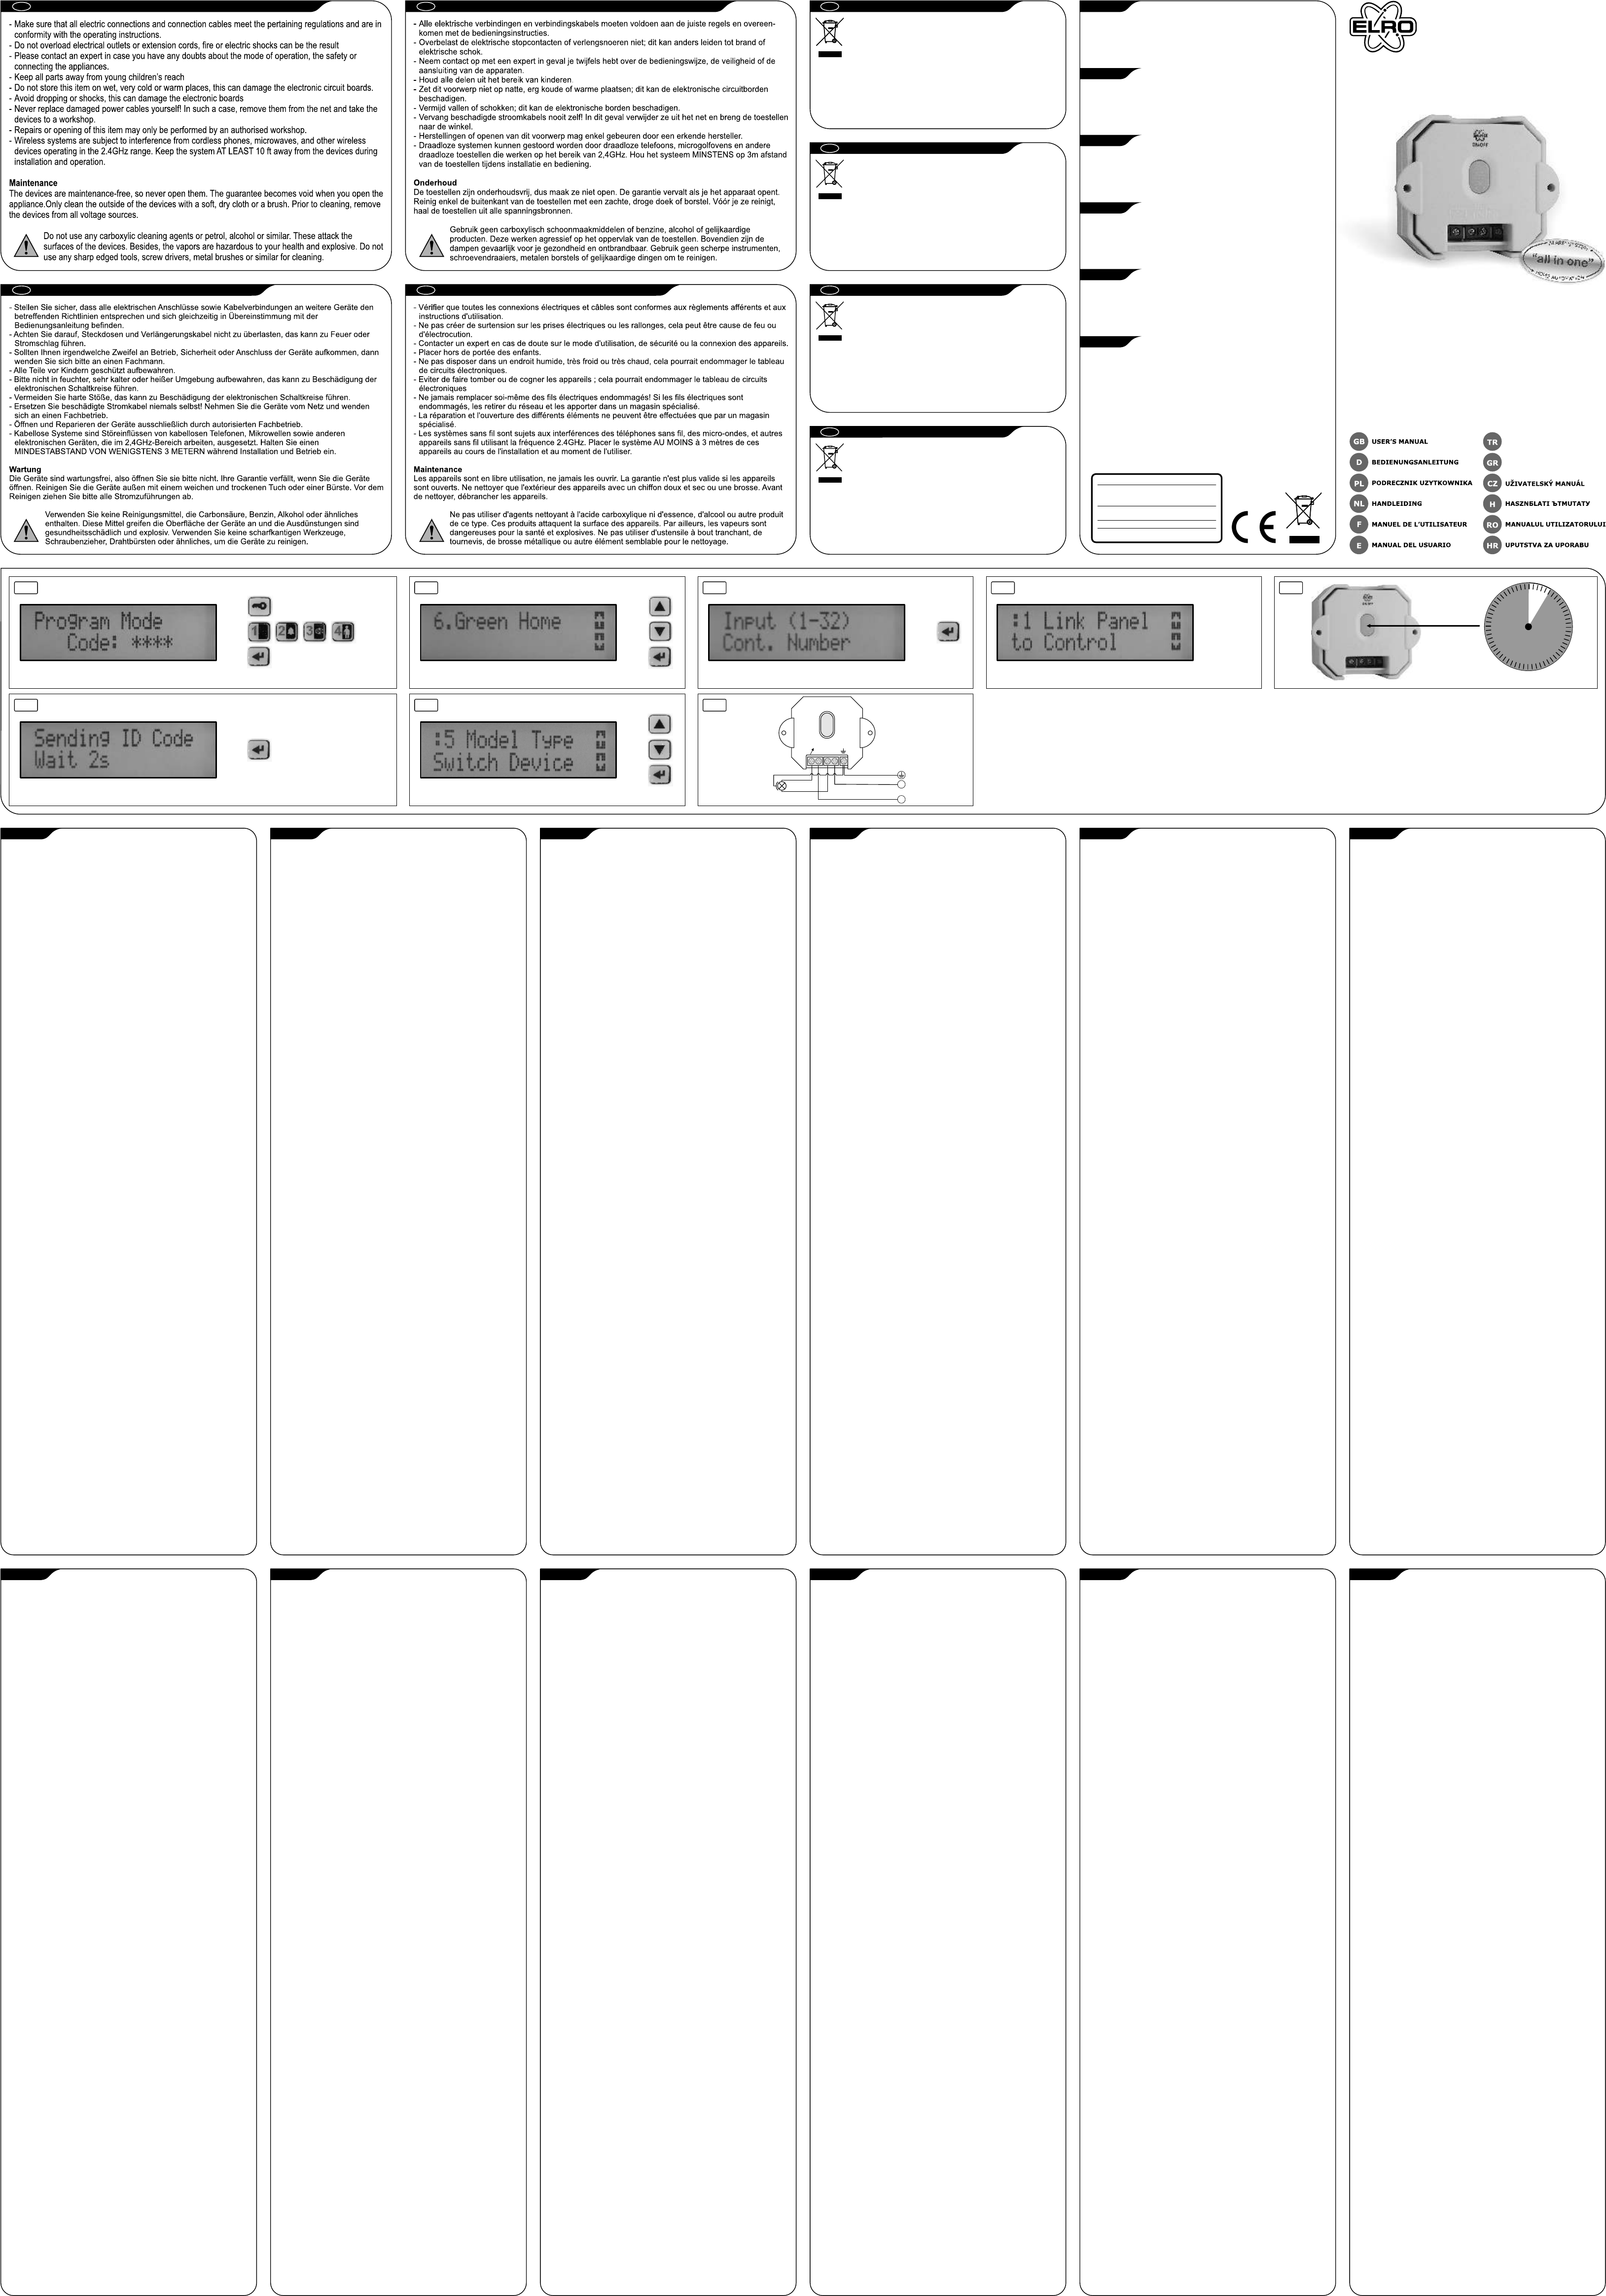
- Anahtar - pinkod (varsayılan 1-2-3-4) girişini kullanarak
HIS20S'in menüsünü açın- (1).
- Ok işaretli tuşlarla 6.Yeşil Ev'e kadar tarayın ve iki kez
enter'a basın (2).
- Sayı tuşlarını kullanarak alıcıyı kaydetmek istediğiniz
bölgeyi seçin. Bu (3) 1 ile 32 arasında bir sayı olmalıdır.
Ardından enter'a basın. Not: Her alıcı kendine ait bir sayı
alacaktır. Görüldüğü gibi: 1 Bağlantı Paneli Kontrole (4).
- Şimdi alıcının düğmesine basıp 5 saniye boyunca basılı
tutarak alıcıyı öğrenme moduna çevirin. (5).
- Alıcı öğrenme modundayken, enter'a basın. Ekran
Gönderilen ID 2 saniye bekleyin ibaresini gösterecektir
(6).
- Ardından ışık alıcının düzgünce kaydedildiğini onaylamak
için yanıp sönecektir.
- :1 Bağlantı Paneli Kontrol paneline yazısını tekrar
gördüğünüzde, ok tuşları ile :5 Model Tipi'ne gelin, ve
enter'a basın.
Seçiminizi yapmak için ok tuşlarını kullanın
Cihazı (ünite AÇIK/KAPALI) konuma getirip enter'a basın
(7).
- Ekranda Durdur çıkana kadar ESC'ye basarak merkezin
menüsünden çıkın.
- Kullanım için lütfen HIS20S kullanıcı kılavuzuna başvurun.
BAĞLANMASI
- Çizimde gösterildiği üzere güç kaynağını ve aydınlatmayı
bağlayın (8).
ALICININ SİLİNMESİ
Bir alıcıyı merkezden silmek için, anahtar - pinkod - seçin ve
girin, 6.Yeşil Ev, burada silmek istediğiniz bölge numarasını
seçin, :7 Cont. Sil'e gelin, ve silmek için enter'a basıp * 'ı
seçin.
ALICIYI SIFIRLAMA
Alıcı ayarlarını sıfırlamak için, öğrenme düğmesine 6 saniye
boyunca basın ve ardından bırakın. Ve yine 6 saniye boyunca
basın. Eğer alıcının hafızası boş ise, kırmızı LED yavaşça
yanacaktır.
HIS20IS icm HIS20S
HIS20IS je bežični prijemnik koji se može kombinirati
s HIS20S alarmnim centrom. Radi vaše sigurnosti,
sustav može automatski uključiti osvjetljenje.
REGISTRIRIANJE PRIJEMNIKA
- Otvorite izbornik HIS20S pomoću ključa – pina (zadano 1-
2-3-4) – unos (1).
- Koristite tipke strelica za pomicanje do 6. Zeleni početak i
pritisnite enter dva puta (2).
- Koristite tipke brojeva za odabir zone za koju želite
registrirati prijemnik. Ovo mora biti broj izmeðu (3) 1 i 32.
Zatim pritisnite enter. Napomena: Svaki prijemnik dobiva
vlastiti broj. Vidjet ćete: 1 Poveži ploču s upravljanjem
(4).
- Sada prebacite prijemnik u režim učenja, tako da
pritisnete i držite gumb prijemnika na 5 sekundi (5).
- Kad je prijemnik u režimu učenja, pritisnite enter. Na
zaslonu će se prikazati Slanje ID koda, pričekajte 2
sekunde (6).
- Zatim će se svjetlo uključiti i isključiti radi potvrde da je
prijemnik ispravno registriran.
- Kad se ponovno prikaže : 1 veza ploče na upravljačku
ploču , pregledajte tipkama strelica do: 5 Vrsta modela i
pritisnite unos.
Koristite tipke sa strelicama za odabir
Ureðaj sklopke (ureðaj za uključivanje/isključivanje) i
pritisnite unos (7).
- Zatvorite izbornik centra tako da pritisnete ESC dok se na
zaslonu ne prikaže Deaktiviranje.
- U vezi rukovanja pogledajte korisnički priručnik za HIS20S.
SPAJANJE
- Spojite izvor napajanja i osvjetljenje kao što je prikazano
na shemi (8).
DEREGISTRIRIANJE PRIJEMNIKA
Za deregistriranje prijemnika iz centra, uzastopno odabirite
tipku – pin kod – unos, 6. Zeleni početak, ovdje odaberite
broj zone koji želite ukloniti, pregledajte do: 7 Nastavi
brisanje, pritisnite unos i odaberite * za uklanjanje.
RESETIRANJE PRIJEMNIKA
Za resetiranje prijemnika, pritisnite gumb za učenje na 6
sekundi i zatim ga otpustite. Zatim ga ponovno pritisnite na
6 sekundi. Ako je memorija prijemnika prazna, LED će sporo
treptati.
HIS20IS icm HIS20S
HIS20IS este un receptor fãrã fir care poate fi
combinat cu sistemul dumneavoastrã de alarmã
HIS20S. Pentru siguranţa dumneavoastrã, sistemul
poate porni lumina automat.
ÎNREGISTRAREA RECEPTORULUI
-Deschideţi meniul lui HIS20S utilizând tasta – cod pin
(implicit 1-2-3-4) – tasta enter (1).
-Rãsfoiţi cu ajutorul tastelor sãgeţi pânã la 6.Green Home şi
apãsaţi de 2 ori tasta enter (2).
-Utilizaţi tastele numere pentru a selecta zona în care vreţi
sã înregistraţi receptorul. Acesta trebuie sã fie un numãr
între (3) 1 şi 32. Apoi apãsaţi tasta enter. Observaţie:
Fiecare receptor va avea propriul numãr. Veţi vedea: 1 Link
Panel to Control (4).
- Acum porniţi receptorul în modul de învãţare apãsând
butonul receptorului şi ţinându-l apãsat aproximativ 5
secunde (5).
- Când receptorul se aflã în mod de învãţare, apãsaţi tasta
enter. Pe ecran va apãrea Sending ID code wait 2 sec (6).
- Apoi, lumina va porni şi se va opri pentru a confirma faptul
cã receptorul este înregistrat cum se cuvine.
- Când veţi vedea din nou: 1 Link Panel to Control panel,
rãsfoiţi cu tastele sãgeţi pânã la: 5 Model Type, şi apãsaţi
tasta enter.
Utilizaţi tastele cu sãgeţi pentru a face o selecţie
Porniţi dispozitivul (din unitatea PORNIT/OPRIT) şi apãsaţi
tasta enter (7).
-Ieşiţi din meniu apãsând tasta ESC pânã când Disarm va
apãrea pe ecran.
-Vã rugãm sã consultaţi manualul utilizatorului de HIS20S
pentru aceastã operaţiune.
CONECTAREA
- Conectaţi sursa de alimentare şi lumina , conform schiţei
(8).
ŞTERGEREA ÎNREGISTRÃRII RECEPTORULUI
Pentru a reseta receptorul, apãsaţi succesiv tasta – pincode -
enter, 6.Green Home, selectaţi aici numãrul zonei pe care
vreţi sa îl ştergeţi, rãsfoiţi pânã la :7 Cont. Delete, apãsaţi
enter şi selectaţi * pentru a şterge.
RESETAREA RECEPTORULUI
Pentru a reseta receptorul, apãsaţi butonul de învãţare timp
de 6 secunde şi apoi eliberaţi. Apoi apãsaţi iar timp de 6
secunde. Dacã memoria receptorului este goalã, led-ul roşu
va lumina încet.
HIS20IS icm HIS20S
A HIS20IS egy vezeték nélküli vevőkészülék, ami
kombinálható a HIS20S riasztóközponttal. A
biztonsága érdekében a rendszer automatikusan be
tudja kapcsolni a világítást.
A VEVŐKÉSZÜLÉK REGISZTRÁLÁSA
- Nyissa meg a HIS20S menüjét a kulcs - pin kód
(alapértelmezett: 1-2-3-4) – bevitel gomb (1)
segítségével.
- Ugorjon a nyíl gombokkal a 6. Green Home elemre, és
nyomja meg 2x a bevitel gombot (2).
- A számgombok segítségével válassza ki a zónát,
amelyikhez regisztrálni szeretné a vevőkészüléket. Ennek
(3) 1 és 32 közötti számnak kell lennie. Ezután nyomja
meg a bevitel gombot. Megjegyzés: Minden egyes
vevőkészülék saját számot kap. Amit lát :1 Link Panel to
Control (4).
- Most kapcsolja a vevőkészüléket tanulás üzemmódba a
vevőkészüléken lévő gomb megnyomásával és 5
másodpercig nyomva tartásával (5).
- Amikor a vevőkészülék tanulás üzemmódban van, nyomja
meg a bevitel gombot. A képernyőn megjelenik a Sending
ID code wait 2 sec (6) felirat.
- A fény be- és kikapcsol, így megerősítve a vevőkészülék
megfelelő regisztrálását.
- Amikor újra látja az :1 Link Panel to Control panel feliratot,
ugorjon a nyílgombokkal az :5 Model Type elemre, és
nyomja meg a bevitel gombot.
A nyíl gombokkal hajtsa végre a kiválasztást
Kapcsolja a készüléket (BE-/KI KAPCSOLÓ egység), és
nyomja meg a bevitel gombot (7).
- Lépje ki a központ menüjéből az ESC gomb
megnyomásával, amíg meg nem jelenik a Disarm felirat a
kijelzőn.
- A használathoz lásd a HIS20S felhasználói kézikönyvét.
CSATLAKOZTATÁS
- Csatlakoztassa az áramforrást és a világítást az ábrán
látható módon (8).
A VEVŐKÉSZÜLÉK REGISZTRÁCIÓJÁNAK TÖRLÉSE
Egy vevőkészülék központból való törléséhez egymás után
válassza a kulcs - pin kód – bevitel gomb, 6. Green Home
elemet, válassza ki a törlendő zóna számát, ugorjon a :7
Cont. Delete elemre, nyomja meg a bevitel gombot, és
válassza a * gombot a törléshez.
A VEVŐKÉSZÜLÉK VISSZAÁLLÍTÁSA
A vevőkészülék visszaállításához nyomja meg a tanulás
gombot körülbelül 6 másodpercig, majd engedje fel. Ezután
nyomja meg újra 6 másodpercre. Ha a vevőkészülék
memóriája üres, a piros LED lassan villogni fog.
Need help? Post your question in this forum.
Report abuse
Libble takes abuse of its services very seriously. We're committed to dealing with such abuse according to the laws in your country of residence. When you submit a report, we'll investigate it and take the appropriate action. We'll get back to you only if we require additional details or have more information to share.
Product:
Forumrules
To achieve meaningful questions, we apply the following rules:
First, read the manual;
Check if your question has been asked previously;
Try to ask your question as clearly as possible;
Did you already try to solve the problem? Please mention this;
Is your problem solved by a visitor then let him/her know in this forum;
To give a response to a question or answer, do not use this form but click on the button 'reply to this question';
Your question will be posted here and emailed to our subscribers. Therefore, avoid filling in personal details.
Register
Register getting emails for Elro HIS20IS at:
new questions and answers
new manuals
You will receive an email to register for one or both of the options.
Get your user manual by e-mail
Enter your email address to receive the manual of Elro HIS20IS in the language / languages: English, German, Dutch, French, Polish, Turkish, Spanish as an attachment in your email.
The manual is 1,93 mb in size.
You will receive the manual in your email within minutes. If you have not received an email, then probably have entered the wrong email address or your mailbox is too full. In addition, it may be that your ISP may have a maximum size for emails to receive.
The manual is sent by email. Check your email
If you have not received an email with the manual within fifteen minutes, it may be that you have a entered a wrong email address or that your ISP has set a maximum size to receive email that is smaller than the size of the manual.
The email address you have provided is not correct.
Please check the email address and correct it.
Your question is posted on this page
Would you like to receive an email when new answers and questions are posted? Please enter your email address.