való megjelenítésére, illetve az interneten keresztül egy
webböngészo segítségével való megtekintésére. A kamera
éjszakai üzemmódját beépített LED-ek teszik lehetové.
Kérjük, alaposan tekintse át ezt a kézikönyvet és – szükség
esetén – olvassa el a CD-n található teljes kézikönyvet.
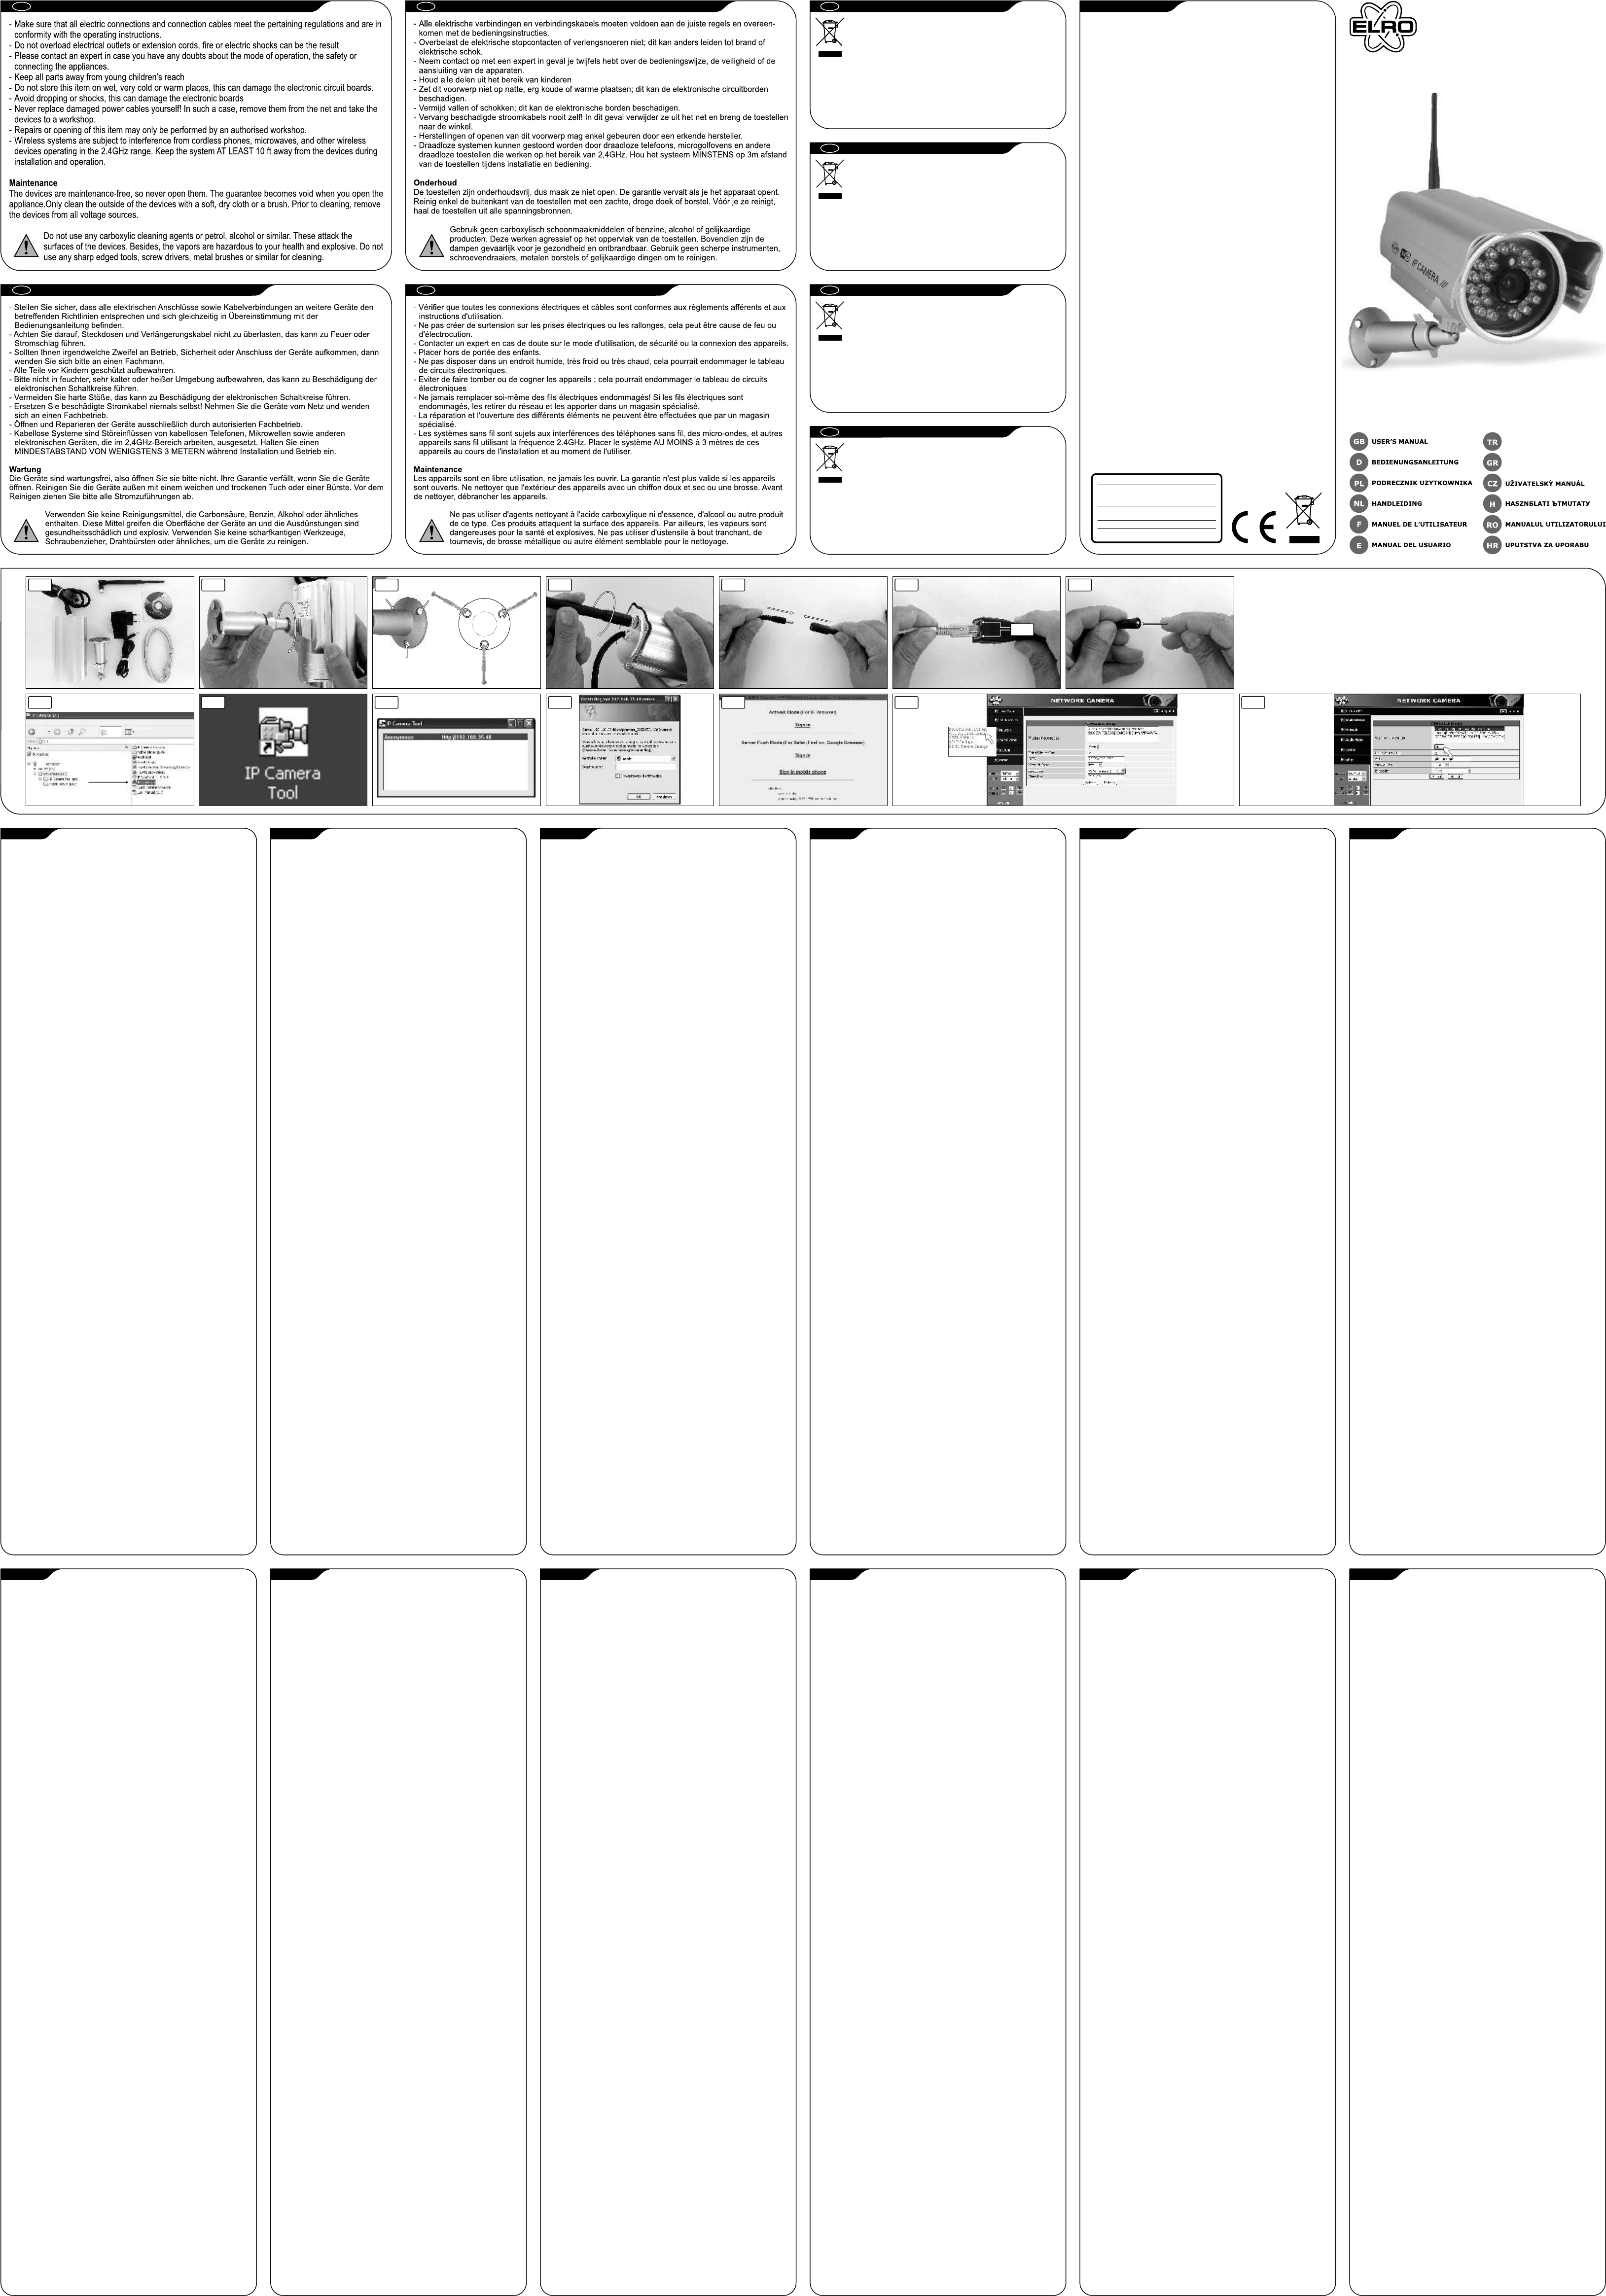
A CSOMAG TARTALMA (1)
a.vezeték nélküli IP-kamera talppal
b.egyenáramú tápegység
c. hálózati kábel
d.antenna
e.szoftver
KAMERA ÜZEMBE HELYEZÉSE
- Tekerje be a talpat az IP-kamera alján található menetes furatba
(2a). A kameratalp (1a) alján három furat található, ami
lehetové teszi a készülék biztonságos rögzítését a plafonra,
illetve bármilyen falra (2b).
- Az IP-kamera hátoldalán tekerje be a készülékhez melléklet külso
antennát (1d) az antenna csatlakozó aljzatába (3).
- Helyezze be a külso egyenáramú tápegység (1b) dugaszát a
csatlakoztató kábel végén található aljzatba (4), majd
csatlakoztassa a tápegységet a hálózati áramellátásra.
- Helyezze be a hálózati kábelt (1c) a csatlakoztató kábel végén
található hálózati aljzatba (5), majd csatlakoztassa a
routerhez/kapcsolóhoz. Az áramellátás meglétét a sárga LED-izzó
felgyulladása jelzi, a villogó zöld LED-izzó pedig az adatátvitelt
mutatja (5a).
- A készülék gyári alapértelmezett beállításait a RESET
(visszaállítás) gomb 15 mp-ig tartó folyamatos lenyomásával
állíthatja vissza (6).
SZOFTVER TELEPÍTÉSE
- Helyezze be a mellékelt CD-t a számítógép lemezmeghajtójába.
- Futassa az „IPCamSetup.exe” fájlt (7), majd kattintson kétszer a
„Tovább” gombra. A szoftver telepítése befejezodött.
A SZOFTVER HASZNÁLATA
- Kattintson kétszer az Asztalon megjelent „IP kamera eszköz”
ikonra. A szoftver automatikusan megkeresi a kamerát a
hálózaton (8a).
- Kattintson kétszer a listán található kamerára (8b). Ekkor az IP-
cím automatikusan megjelenik az alapértelmezett
webböngészoben. Az alapértelmezett felhasználónév „admin”,
jelszó nincs (9).
- Válassza ki a megfelelo belépési módot. ActiveX Internet
Explorerhez. Server Push Mode (kiszolgáló leküldési üzemmód)
egyéb webböngészok esetében, illetve Mobile phone
(mobiltelefon) mobilkészülékek esetében (10). (Ehhez kézi
csatlakoztatás szükséges.)
Megjegyzés:teljes funkcionalitás Internet Explorer alatti futtatás
esetén érheto el.
VEZETÉK NÉLKÜLI KONFIGURÁCIÓ
- Kattintson a „Hálózat” lehetoségre a webböngészojében és
válassza ki a „Vezeték nélküli hálózati beállítások” opció (11)
- Gyozodjön meg róla, hogy a router vezeték nélküli router.
Gondoskodjon róla, hogy adott esetben rendelkezzen a
csatlakozáshoz szükséges jelszóval.
- Kattintson a „Keresés” gombra kétszer A program az összes
elérheto vezeték nélküli (WLAN) hálózatot megmutatja. Válassza
ki saját hálózatát (12).
- Amennyiben nincs titkosítás, kattintson a „Küldés” lehetoségre.
Titkosítás esetén adja meg a megosztási azonosítót, majd
kattintson a „Küldés” lehetoségre.
- Várjon 30 másodpercet. A kamera újraindul. Ezt követoen húzza
ki a hálózati kábelt.
JÓ TANÁCSOK
- A csatlakoztatást beltérben végezze.
- A kamera éjszaka nem lát át az üvegen az infravörös LED-ek
visszatükrözodése miatt.
- A vezeték nélküli hálózat hatótávolsága kiterjesztheto
hatótávolság-növelo készülékkel.
TOVÁBBI RÉSZLETEKÉRT LÁSD A CD-N TALÁLHATÓ TELJES
FELHASZNÁLÓI ÚTMUTATÓT.
CAMERA VIDEO DE RETEA C903IP PLUG & PLAY WIFI
Camera video IP ofera un mod usor si rapid de a viziona
imaginea dorita pe orice PC din reteaua de intranet sau pe
internet prin intermediul unui browser web. Camera video
asigura vedere de noapte prin LED-uri IR incorporate. Va
rugam sa cititi cu atentie acest manual, iar daca este cazul,
cititi întregul manual de pe CD-ul oferit.
CONTINUTUL PACHETULUI (1)
a.Camera video IP fara fir cu suport
b.Sursa de alimentare curent continuu
c. Cablu retea
d.Antena
e.Software
INSTALAREA CAMEREI
- Fixati orificiul aflat la baza camerei video IP (2a) pe suport.
Sunt trei orificii la baza suportului camerei (1a) care permit
montarea în siguranta a camerei video pe tavan sau pe perete
(2b).
- Din spatele panoului camerei video IP, însurubati antena externa
(1d) la conectorul de antena (3).
- Atasati sursa de alimentare de curent continuu (1b) la borna de
intrare a sursei amplasata la capatul cablului de conectare (4) si
apoi conectati-o la sursa dumneavoastra de alimentare.
- Conectati cablul de retea (1c) la borna de retea amplasata la
capatul cablului de conectare (5) si apoi conectati-l la
router/întrerupator. LED-ul galben se aprinde atunci când este
conectat la sursa de curent, LED-ul verde se aprinde intermitent
atunci când sunt transferate datele (5a).
- Resetati camera video prin apasarea continua timp de
15 secunde a butonului de resetare, apoi camera video este
resetata la setarile initiale (6).
INSTALARE SOFTWARE
- Introduceti CD-ul în unitatea de disc a calculatorului
dumneavostra.
- Executati fisierul “IPCamSetup.exe” (7) si dati clic pe butonul
“Next” de doua ori. Software-ul este acum instalat.
OPERARE SOFTWARE
- Dati dublu clic pe pictograma “IP Camera Tool” de pe desktop.
Software-ul cauta automat reteaua pentru camera video (8a).
- Executati dublu clic pe camera video din lista (8b). Adresa IP se
va deschide automat în browser-ul dumneavoastra implicit.
Numele implicit de utilizator este ´admin´ si nu exista parola
(9).
- Alegeti modul de conectare corespunzator. ActiveX pentru
Internet Explorer, Server Push Mode pentru alte browsere sau
Mobile phone pentru aparate mobile (10) (Acesta necesita
conectare manuala).
Observatie:aparatul functioneaza la capacitate maxima atunci când
este utilizat în Internet Explorer.
CONFIGURARE WIRELESS
- Dati clic pe “Network” în programul browser-ului si selectati
“Wireless Lan Settings” (11).
- Asigurati-va ca router-ul este un router wireless/fara fir.
Asigurati-va ca stiti parola daca aceasta exista.
- Dati clic pe butonul “Scan” de doua ori. Programul va afisa toate
retelele WLAN disponibile.Alegeti reteaua (12).
- Daca nu exista criptare, dati click pe Submit. Daca exista
criptare, introduceti cheia de conectare apoi dati clic pe Submit.
- Asteptati aproximativ 30 de secunde. Camera video reporneste.
Apoi deconectati cablul de retea.
RECOMANDARI
- Conectarea trebuie efectuata în interior.
- Camera video nu poate înregistra prin sticla în tipul noptii din
cauza reflectiei LED-urilor IR.
- Puteti prelungi raza retelei wireless prin folosirea unui prelungitor
de distanta.
PENTRU MAI MULTE INFORMATII VA RUGAM
SA CONSULTATI GHIDUL COMPLET
AL UTILIZATORULUI DE PE CD
C903IP PLUG & PLAY WIFI MREŽNA KAMERA
IP kamera pruža brz i jednostavan nacin za pregled željene
slike na bilo kojem racunalu u vašem intranetu ili preko
interneta putem web preglednika. Kamera osigurava nocno
gledanje putem ugradenih IC LED svjetala. Molimo pažljivo
procitajte ovaj prirucnik i ako je potrebno procitajte kompletni
prirucnik na isporucenom CD-u.
SADRŽAJ PAKETA (1)
a.Bežicna IP kamera sa stalkom
b.DC izvor napajanja
c. Mrežni kabel
d.Antena
e.Softver
POSTAVLJANJE KAMERE
- Spojite rupu za vijak s donje strane IP kamere (2a) na stalak.
Na podnožju stalka za kameru (1a) nalaze se tri rupe koje
omogucuju cvrsto montiranje kamere na strop ili bilo koji zid
(2b).
- Na stražnjoj ploci bežicne IP kamere, pritegnite vanjsku antenu
(1d) koju ste dobili s kamerom na prikljucak za antenu (3).
- Prikljucite vanjsko DC napajanje (1b) na DC ulaz koji se nalazi na
kraju spojnog kabela (4), a zatim na zidnu uticnicu.
- Spojite mrežni kabel (1c) na mrežni ulaz koji se nalazi na kraju
spojnog kabela (5), a zatim ga spojite na usmjerivac /
preklopnik. Žuto LED svjetlo ce zasvijetliti kad je ostvarena veza
s napajanjem, zeleno LED svjetlo ce treptati kad se podaci
prebace (5a).
- Resetirajte kameru tako da pritisnete gumb reset neprekidno na
15 sekundi, kamera ce se resetirati na tvornicki zadane postavke
(6).
INSTALACIJA SOFTVERA
- Umetnite priloženi instalacijski CD u pogon optickog diska
racunala.
- Pokrenite datoteku „IPCamSetup.exe“ (7) i kliknite gumb „Dalje“
dva puta. Softver je sada instaliran.
SOFTVERSKI RAD
- Dvostruko kliknite ikonu „IP Camera Tool“ na radnoj površini.
Softver automatski traži mrežu za kameru (8a).
- Dvostruko kliknite na kameru na popisu (8b). IP adresa ce se
automatski otvoriti u vašem zadanom pregledniku. Zadano
korisnicko ime je „admin“ i nema lozinke (9).
- Odaberite odgovarajucu prijavu. ActiveX za Internet Explorer,
režim Server Push za ostale preglednike ili Mobile phone za
mobilne uredaje (10) (Za ovo je potrebno rucno povezivanje).
Zapamtite:punu funkcionalnost cete imati samo kad je pokrenut
Internet Explorer.
KONFIGURACIJA BEŽICNE MREŽE
- Kliknite „Mreža“ u pregledniku i odaberite „Postavke bežicne LAN
mreže“ (11).
- Pobrinite se da imate bežicni usmjerivac. Pobrinite se da znate
lozinku ako je postavljena.
- Kliknite gumb „Skeniraj“ dva puta. Program ce prikazati sve
dostupne WLAN mreže. Odaberite vlastitu mrežu (12).
- Ako nema enkripcije kliknite „Podnesi“. Ako postoji enkripcija
molimo unesite kljuc i zatim kliknite „Podnesi“.
- Pricekajte oko 30 sekundi. Kamera ce se ponovno pokrenuti.
Zatim iskopcajte mrežni kabel.
SAVJETI
- Kamera se mora postaviti u zatvorenom prostoru.
- Kamera ne može vidjeti kroz staklo po noci zbog refleksije IC LED
svjetala.
- Možete proširiti domet vaše bežicne mreže korištenjem
proširivaca dometa.
ZA VIŠE INFORMACIJA POGLEDAJTE KOMPLETNI
KORISNICKI PRIRUCNIK NA CD-U
Need help? Post your question in this forum.
Report abuse
Libble takes abuse of its services very seriously. We're committed to dealing with such abuse according to the laws in your country of residence. When you submit a report, we'll investigate it and take the appropriate action. We'll get back to you only if we require additional details or have more information to share.
Product:
Forumrules
To achieve meaningful questions, we apply the following rules:
First, read the manual;
Check if your question has been asked previously;
Try to ask your question as clearly as possible;
Did you already try to solve the problem? Please mention this;
Is your problem solved by a visitor then let him/her know in this forum;
To give a response to a question or answer, do not use this form but click on the button 'reply to this question';
Your question will be posted here and emailed to our subscribers. Therefore, avoid filling in personal details.
Register
Register getting emails for Elro C903IP at:
new questions and answers
new manuals
You will receive an email to register for one or both of the options.
Get your user manual by e-mail
Enter your email address to receive the manual of Elro C903IP in the language / languages: English, German, Dutch, French, Polish, Turkish, Spanish as an attachment in your email.
The manual is 1,93 mb in size.
You will receive the manual in your email within minutes. If you have not received an email, then probably have entered the wrong email address or your mailbox is too full. In addition, it may be that your ISP may have a maximum size for emails to receive.
If you have not received an email with the manual within fifteen minutes, it may be that you have a entered a wrong email address or that your ISP has set a maximum size to receive email that is smaller than the size of the manual.
The email address you have provided is not correct.
Please check the email address and correct it.
Your question is posted on this page
Would you like to receive an email when new answers and questions are posted? Please enter your email address.