44268
3
Zoom out
Zoom in
Previous page
1/5
Next page
INTRODUCTION
To ensure satisfactory and economical operation, it is essential that
the refrigerator is installed as directed in the Electrolux Installation
Instructions, and is used in accordance with these instructions. The
ventilation openings for air circulation over the cooling unit must
not be reduced in size or obstructed in any way otherwise the performance of the
cooling unit may be impaired and consumption
increased.
When the caravan is on tow, the refrigerator should be operated electrically, i.e.
from the 12V battery in the towing vehicle,
and not by means of bottled gas.
WARNING
Because of the hazards associated with the use of continuously
operating bottled-gas appliances with open-flame burners in
difficult-to-ventilate confined spaces, and other considerations,
Electrolux do not recommend the installation of their bottled-gas
caravan refrigerators on boats, and refrigerators so installed will
not be covered by the Company's guarantee.
If, however, a boat installation is planned for the refrigerator,
reference should be made to British Standard 5482, Part 3, 1979
and to the Thames Water Authority "Launch Digest" and "Launch
Specification". Also, current Guide Lines published by local Water
Authorities, or the Ship and Boat Builders' National Federation.
It should be noted that special Marine Refrigerators are available
from Electrolux for use on boats.
LEVEL
When the refrigerator is operating, refrigerant trickles through the
cooling unit under the influence of gravity. To enable a satisfactory
flow to take place, the unit must be level in both directions, other
wise refrigerant can accumulate in pockets and the cooling process
impaired.
A continuous rolling and pitching motion as occurs in a caravan
on tow will not normally affect operation, but when the caravan is
at rest for more than about half an hour it must be levelled, in both
directions, so that the ice-tray shelf inside the frozen food storage
compartment is level. (This can be checked with a small spirit level
placed on the ice-tray shelf). If it is not convenient to level the
vehicle and it is to stand out of level for more than half an hour, the
refrigerator should be temporarily turned off.
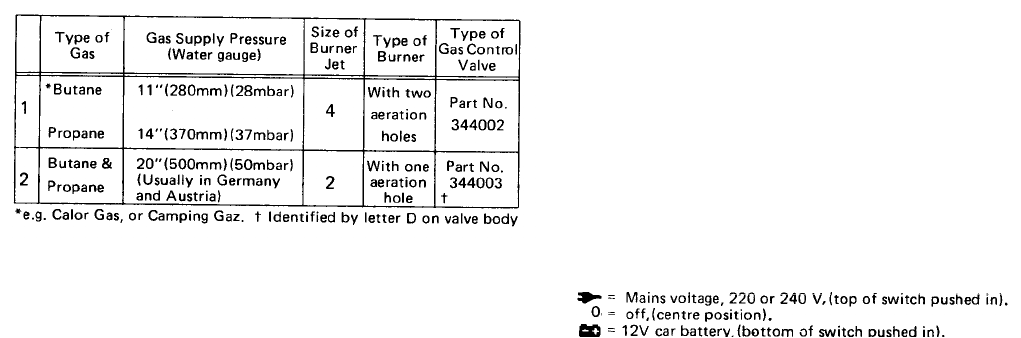
GAS PRESSURE, BURNER, JET, AND GAS
CONTROL VALVE
The combined gas control valve and flame failure device (5, fig.2),
and jet and burner (9 & 10, fig. 4), must be of the correct type or
size for the gas and gas pressure which you use. The gas pressure
is determined by the type of regulator fitted to your gas bottle, and
this may vary according to the Standard adopted in the country
concerned. In the United Kingdom, and most of Europe, the
standard pressures used for butane and propane are as shown in
section 1 of the table below. In Germany and Austria, the higher
pressure shown in section 2 of the table usually applies.
It is essential that a reliable pressure regulator, set to deliver no
more than the appropriate pressure shown in the table, is fitted
directly to the gas bottle. Needle valve operated gas control taps
are NOT suitable for use with this refrigerator and must not be
used as a substitute for a pressure regulator.
Before using the refrigerator, check from the label attached to it
that the gas equipment is correct for the gas and gas pressure to be
used. If it is not, the burner, jet, and combined gas control valve
and flame failure device must be changed for the correct size or type
in accordance with the table below. For future reference, any
chan
g
es made should be recorded on or beside the data label.
STARTING THE REFRIGERATOR (see fig.2)
Before using your refrigerator for the first time, it is advisable to wash
the interior and its accessories as described later under 'Cleaning'.
The bottled gas equipment includes a
Piezo
crystal lighting device
which creates a spark over the burner when the button (4) is pushed
in fully. No batteries or flints are required to operate this lighter.
Before starting the refrigerator, always check that the alternative
method of operation is off as the refrigerator should not be operated
by both means at the same time. If the caravan is to be stationary
for a period, check that the refrigerator is level.
Bottled Gas O
p
eration - Li
g
htin
g
the burner
1. See that the voltage selector switch (7) is set to '0', i.e. is in its
centre position. Ensure that gas is available from the bottle and
turn on any taps in the supply to the refrigerator.
2. Turn the gas control knob (5) so that '3' is opposite the indicator
mark.
3. Push in fully the gas control knob (5) for about 5 seconds to allow
air to clear from the pipe line. (When starting initially, or after
changing a gas bottle, it may be necessary to push in the knob appre
ciably longer to clear all the air. Do not, however, allow too much gas
to accumulate around the burner as an over-rich gas/air mixture may
be difficult to ignite).
4. Still pressing in the knob (5), push in the button (4) which operates
the Piezo igniter, several times in quick succession. (A click should be
heard each time the button is pushed in). Continue to press in the
gas control knob (5) for a further 15 seconds to allow time for the
thermocouple tip (over the burner) to heat up.
5. Release the gas control knob then check that the burner is alight by
looking directly through the flame viewer located inside the cabinet
at the rear left-hand lower corner. If the burner has not lit, repeat
the lighting procedure.
Note:- The refrigerator has a flame failure device which will automati
cally shut off the gas to the burner if the flame is blown out. While
the knob (5) is being pressed in, this device is temporarily inoperative.
Electric operation
The dual voltage electric equipment is for operation from the main
12 volt battery in the car when the caravan is on tow, or from mains
voltage electricity when a 220 to 240V a.c. supply, with satisfactory
earthing, is available on a site. Before using the refrigerator on electricity
make sure that the electricity supply is suitable for the refrigerator.
It is important to understand that 12 volt operation is only intended
to be used while the car engine is running and is charging the battery,
otherwise the battery may be discharged to a point where it will not
restart the engine. (The current drain at 12V is 8 amps minimum). When
at rest for more than a short period, the caravan should be levelled and
the refrigerator switched over to mains voltage, if available, or the 12V
supply switched off and the refrigerator started up on bottled gas.
Before connecting to a mains voltage supply, it is important to
make certain that the circuit to, and in, the caravan is properly and
effectively earthed.
When operating on mains voltage, the temperature in the refrigerator
is thermostatically controlled and can be adjusted by means of the
knob (6) of the thermostat. The 12V circuit is not thermostatically
controlled and the cooling unit will operate all the time the refrigerator
is connected to 12V and switched on. 12V operation is, therefore,
only intended to be used for relatively short periods, i.e. when the
caravan is on tow. It is not intended for extended periods of use from
a continuous 12V supply, otherwise the fresh food compartment may
become too cold for the satisfactory storage of fresh foods and drinks.
For connection to the 12V supply, a two-way terminal block is
located behind the right-hand end of the control panel (1, fig 1) at the
top of the refrigerator.
For connection to a 220-240V electricity supply, the refrigerator
is provided with a 3-core mains lead which is intended for connection
to a properly earthed plug and socket outlet. In the United Kingdom,
the following plug connection instructions must be observed.
IMPORTANT: The wires in the mains lead of this appliance are
coloured in accordance with the following code.
GREEN-AND-YELLOW : EARTH,
BLUE : NEUTRAL, BROWN : LIVE
As the colours of the wires may not correspond with the coloured
markings identifying the terminals in your plug, proceed as follows :
The wire which is coloured GREEN-AND-YELLOW must be con
nected to the terminal in the plug which is marked with the letter E
or by the earth symbol -=L- or coloured green or green-and-yellow.
The wire which is coloured BLUE must be connected to the terminal
which is marked with the letter N or coloured black.
The wire which is coloured BROWN must be connected to the
terminal which is marked with the letter L or coloured red.
WARNING -THIS APPLIANCE MUST BE EARTHED.
In the United Kingdom, the plug or circuit to the refrigerator must
be fitted with a fuse not greater than 5 amps. If a 13 amp. (B.S.1363)
fused-plug is used, it should be fitted with a 3 amp fuse. In other
countries, the fuse rating will depend on local practice.
During installation, a suitable socket outlet for the mains voltage
supply should have been fitted in the caravan, near the refrigerator,
in a position readily accessible to the user. In the United Kingdom,
all mains voltage wiring in the caravan must be installed in accord
ance with I.E.E. regulations, including the use of an outlet and coupler
to BS 4343/CE E17.
Voltage Selector Switch
The voltage selector switch (7) can be set to three different positions,
identified by the following symbols :
To start the refrigerator on electricity, see that the gas control knob (5)
is at '0' (off), set the voltage selector switch (7) to the voltage required,
then connect the refrigerator to the appropriate voltage supply.
If on mains voltage (220-240), turn the thermostat knob (6) to
setting No. 3
or
4.
3


Need help? Post your question in this forum.

Forumrules


Report abuse

Libble takes abuse of its services very seriously. We're committed to dealing with such abuse according to the laws in your country of residence. When you submit a report, we'll investigate it and take the appropriate action. We'll get back to you only if we require additional details or have more information to share.

Product:

For example, Anti-Semitic content, racist content, or material that could result in a violent physical act.

For example, a credit card number, a personal identification number, or an unlisted home address. Note that email addresses and full names are not considered private information.

Forumrules

To achieve meaningful questions, we apply the following rules:

Register

Register getting emails for Electrolux RM212 at:


You will receive an email to register for one or both of the options.


Get your user manual by e-mail

Enter your email address to receive the manual of Electrolux RM212 in the language / languages: English as an attachment in your email.

The manual is 0,11 mb in size.


You will receive the manual in your email within minutes. If you have not received an email, then probably have entered the wrong email address or your mailbox is too full. In addition, it may be that your ISP may have a maximum size for emails to receive.

Others manual(s) of Electrolux RM212

Electrolux RM212 User Manual - English - 2 pages

Electrolux RM212 User Manual - German - 6 pages

Electrolux RM212 User Manual - French - 5 pages


The manual is sent by email. Check your email

If you have not received an email with the manual within fifteen minutes, it may be that you have a entered a wrong email address or that your ISP has set a maximum size to receive email that is smaller than the size of the manual.

The email address you have provided is not correct.

Please check the email address and correct it.

Your question is posted on this page

Would you like to receive an email when new answers and questions are posted? Please enter your email address.


Info