•If a key is not depressed within 15 seconds, the display will return
to its initial state – Current time.
•When setting the time with the keys 2 or 3, the setting speed is
accelerated when the key is kept depressed.
•Up to three preset times can be set and activated on this Mini-
Clock. Each preset time is deactivated after the heating period,
and it must be newly activated for each new heating period – see
activate / deactivate the preset time.
Setting functions on the Mini-Clock
Setting-up for the first time:
After connection to the power supply all symbols on the display will
start to flash. The heater cannot be turned on in this state. The
current time has to be set first.
Press key 1: The clock time flashes. Set the time with key 2 or 3.
Press key 1: The time is displayed; the colon flashes.
Setting the time:
Press key 1 for more than 3 seconds: The time flashes. Set the time
with key 2 or 3. Press key 1 within 5 seconds: The time is displayed
and the colon flashes.
Note:
If, after the time has been set, key 1 is not pressed within 5 seconds,
the Mini-Clock will be transferred to the mode “Setting the Heating
Time”.
Setting the heating time:
Press key 1 for more than 3 seconds: The time flashes. The Mini-
Clock is automatically transferred to the mode “Setting the Heating
Time” if no key is pressed for 5 seconds.
The heating symbol is displayed, and the heating time flashes.
Set the heating time (10 to 120 minutes) with key 2 or 3.
Press key 1: The time is displayed once again and the colon flashes.
Setting the preset time:
Press key 1 once, twice or three times to call the preset time 1, 2
or 3. The display will then indicate the preset time, for instance 1
and symbol 1. Set the preset time with key 2 or 3. The preset time
is activated or deactivated with key 4. The “ON” symbol is displayed
when the preset time has been activated.
Symbol 1, 2 or 3 is displayed when the preset time is activated.
Operating functions of the Mini-Clock
Switching on the heater:
Press key 4. The heating duration is … minutes.
The display indicates the remaining heating time and symbol 7.
Switching off the heater:
Press key 4. The heating continues for approx. 3 minutes.
The display indicates the current time.
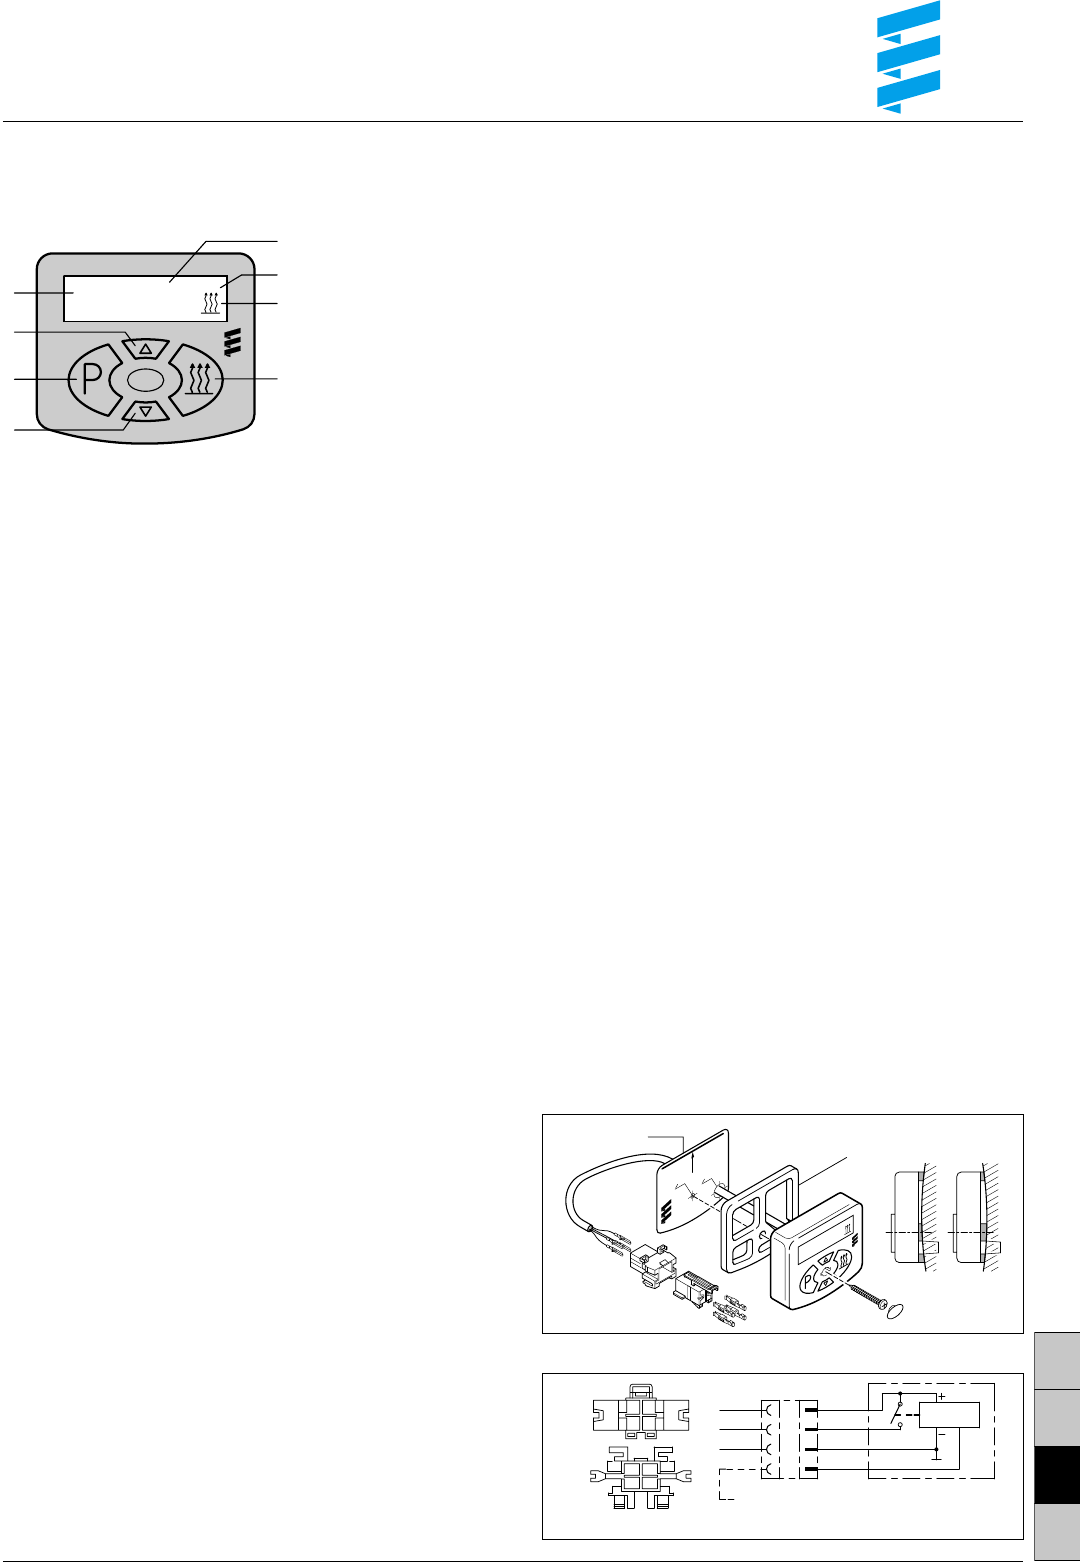
1Key to activate the setting capabilities
2 / 3Time setting keys forwards / backwards
4ON / OFF key to activate / deactivate the preset time
5Current time, preset time and heating time
6Symbol for activated preset time
7Symbol for heater operation
8Symbol for preset time 1, 2 or 3
Continuous operation:
Press key 3 and keep it depressed while pressing key 4. The
heater will now remain switched on until key 4 (switching off the
heater) is pressed again.
Preset time – Activate / deactivate:
Press key 1 to select the preset time 1, 2 or 3. Activate or deacti-
vate the preset time with key 4.
The “ON” symbol is displayed when the preset time is activated.
Symbol 1, 2 or 3 is displayed when the preset time is activated.
Special functions only in conjunction
with the TP41 / TP41i remote control
Programming the receiver to recognize the transmitter:
Press key 2 and keep it depressed while pressing key 4.
The display indicates 2 horizontal lines.
The display returns to its initial state when the receiver has been
successfully programmed. The display automatically returns to the
initial status after 35 seconds if the transmitter is not recognized. In
this case repeat the above procedure once again.
Installing and connecting the Mini-Clock
Follow the drawing to install the Mini-Clock.
The drilling template (can be peeled off and is self-adhesive)
is applied on the front.
Follow the diagram to connect the Mini-Clock.
Note:
Do not press the display and control panel when installing the Mini-
Clock.
Connecting diagram
1
2
3
ON
20
:05
o 7,5
o 2,5
E
b
e
r
s
p
ä
c
h
e
r
Mounting drawing
4
2
3
1
2
4
1
3
13
24
B1 S1
88:88
ge
br
bl
rt
0,5 br
0,5 ge
0,5 rt
4 3 2 1
B1
S1
Drilling template
Resilient base
for uneven mounting surfaces
Connection for TP41 / TP41i remote control
Plug and socket case are shown from the line entry side.
Need help? Post your question in this forum.
Report abuse
Libble takes abuse of its services very seriously. We're committed to dealing with such abuse according to the laws in your country of residence. When you submit a report, we'll investigate it and take the appropriate action. We'll get back to you only if we require additional details or have more information to share.
Product:
Forumrules
To achieve meaningful questions, we apply the following rules:
First, read the manual;
Check if your question has been asked previously;
Try to ask your question as clearly as possible;
Did you already try to solve the problem? Please mention this;
Is your problem solved by a visitor then let him/her know in this forum;
To give a response to a question or answer, do not use this form but click on the button 'reply to this question';
Your question will be posted here and emailed to our subscribers. Therefore, avoid filling in personal details.
Register
Register getting emails for Eberspacher Mini-Clock at:
new questions and answers
new manuals
You will receive an email to register for one or both of the options.
Get your user manual by e-mail
Enter your email address to receive the manual of Eberspacher Mini-Clock in the language / languages: English as an attachment in your email.
The manual is 0,14 mb in size.
You will receive the manual in your email within minutes. If you have not received an email, then probably have entered the wrong email address or your mailbox is too full. In addition, it may be that your ISP may have a maximum size for emails to receive.
The manual is sent by email. Check your email
If you have not received an email with the manual within fifteen minutes, it may be that you have a entered a wrong email address or that your ISP has set a maximum size to receive email that is smaller than the size of the manual.
The email address you have provided is not correct.
Please check the email address and correct it.
Your question is posted on this page
Would you like to receive an email when new answers and questions are posted? Please enter your email address.