• Master/slave: if the master develops a fault, the slaves are
switched to the ‘comfort’ operating mode.
• At the end of a power failure affecting the transmitter or re-
ceiver, normal operation is restored.
• In difficult local conditions, the radio link between transmitter
and receiver may be inadequate (for instance if the receiver is
in a metal casing that inhibits the transmission of radio signals.
Check whether repositioning the transmitter yields a better re-
sult. To test the range of the radio link, see Item 4.2. If neces-
sary, use the device with an additional antenna.
4.8 Connection of thermal actuators normally open
As delivered, the device is intended for thermal actuators that are
closed when the power is shut off. The appropriate pump logic is
retained. To use thermal actuators normally open:
Press the MODE button until ‘In 0’ is displayed.
OK activates the function; 0 will flash.
Press +/- to change the effective direction:
“In 0” = closed when not energised.
“In 1” = open when not energised.
Press OK to confirm the change.
4.9 Pump logic
Up to 7 transmitters each control one channel (channels 1...7) for
heating/cooling ON/OFF.
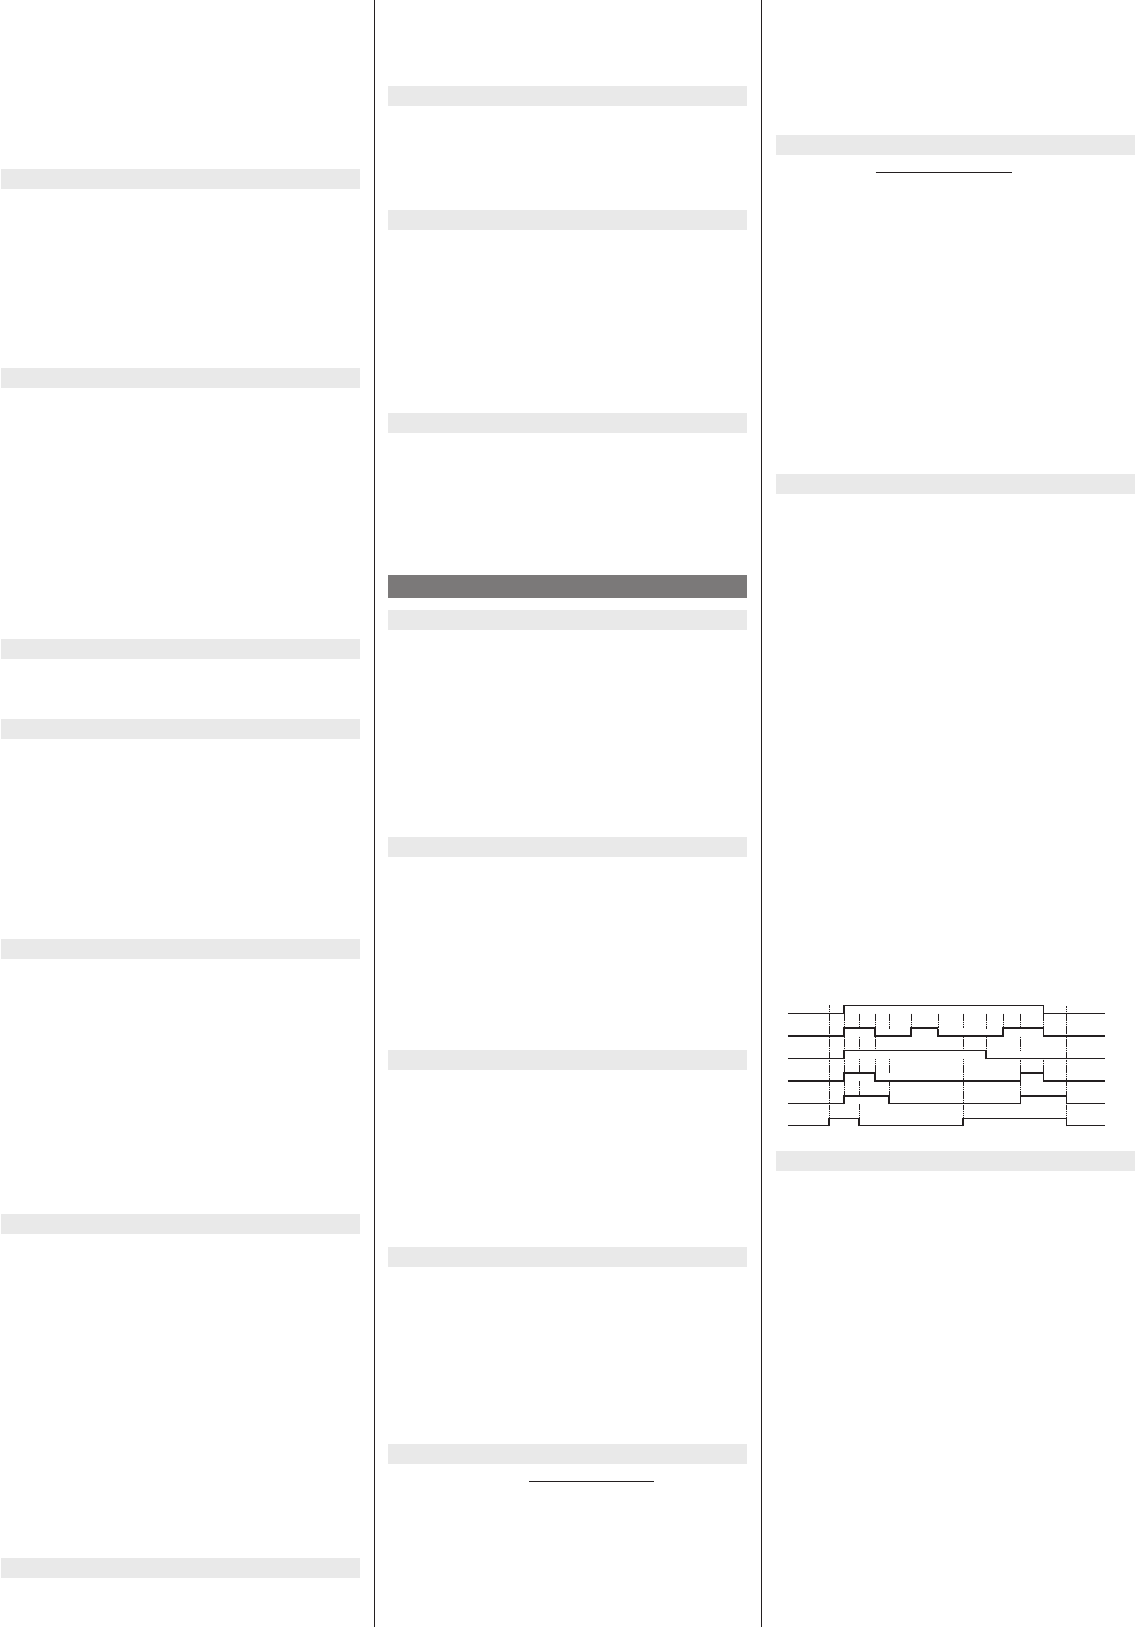
The channel 8 output serves as common pump logic, Fig. 4.
The pump is shut down and the ‘Room 8’ lamp goes out if none of
the connected transmitters calls for additional heat. The pump is
switched by terminals 3-4 of channel 8 (normally-closed relay).
By wiring the channel 8 outputs in parallel, the pump logic can be
extended to cover several groups of receivers; see Figs. 5, 6).
The pump logic functions in the correct way for heating/cooling
changeover and for dew-point shutdown.
Pump logic switch-off is delayed by ~10 minutes.
The pump logic is always activated if channel 8 has not ‘learned’ a
transmitter. To re-activate the pump logic, erase channel 8;
see 4.3 “Deleting radio links”.
4.10 Valve protection
If this function is switched on, the valves are opened once a day in
summer as well. This is a transmitter function; see the details pro-
vided there.
4.11 Valve test
To test the valves, all the outputs can be energised.
At the end of the test, the standard operating mode is automati-
cally restored.
Press the MODE button until “A oF” is displayed.
OK activates the function; oF flashes.
Press +/- to switch on or off:
“oF” = all outputs off.
“on” = all outputs on.
Press MODE to return to the standard status.
The function is terminated automatically after 5 minutes.
4.12 Heating/cooling changeover
P
With the aid of this function, the INSTAT 6-a8U can be used for
heating and cooling, for instance with a central heat pump,
Figs. 7, 8.
The switching pattern is reversed at all outputs (if the pump logic
is activated, it remains unchanged if appropriate).
Note: transmitters must not be reset to “Cooling”.
For cooling (summer operation):
activated by applying mains voltage to the “Heat/cool” terminals.
When cooling is active, this is shown by the arrow against symbol
P
.
Note: In the cooling mode, there is no increased temperature
setting; the timer is not used for this.
For heating (winter operation)
No mains voltage at the “Heat/cool” terminals.
4.13 Excluding rooms from cooling
With this function, certain rooms, for instance the bathroom, can
be excluded from cooling.
No cooling takes place in these rooms even if the “Cooling” mode
is in use. Press the MODE button until -> “Co:OF” or “Co:ON” is
displayed.
OK Activates the function;
the arrow against room 1 on the display flashes.
+/- Selects a room
(the arrow on the display moves on each day);
the status of the room is displayed.
OK Activates this room; Co:xx flashes.
+/- Changes between ON / OFF
(ON for cooling activated, OF for no cooling)
OK To save the setting;
the next day flashes.
+/- See above
OK See above
MODE Interrupts the current level; setting is not saved.
4.14 Dew-point shutdown
By applying a mains voltage to “HYG” in the cooling mode, all
channels and the pump are shut down (Fig. 9). This signal can for
example be transmitted by an external hygrostat.
Dew-point shutdown is also possible if sensor TS 193 683 is con-
nected to the “TAU” (“DEW”) terminals (Fig. 10).
Note: Use either HYG or TAU, but not both. When HYG or TAU is
active, an arrow appears against the
®
symbol.
Note: transmitters must not be set to “Cooling”.
4.15 Power failure
If there is a power failure affecting either the transmitter or the
receiver, no data are lost. Operation continues as before when
the power supply is restored. The timer continues to operate if
there is a power failure (but with no display). The channels are
switched on again when they receive a radio signal; this can take
up to 10 minutes.
4.16 Reset
The following are reset:
All rooms to profile 1
Profile 6 to the manufacturer’s setting; see 5.7
Holiday and party times = 0
All functions are interrupted
The alarm function is re-activated if it was previously switched
off; see 4.6
The radio links and the timer are not affected.
Activating the function:
First press reset and hold it in by inserting a pointed implement
into the hole between - and +), then press OK briefly.
4.17 Lamp functions
If the round lamp is on, the power supply is present (fuse). The
rectangular lamps provide the following information on the
various channels/rooms
• Heating/cooling ON/OFF Comes on during heating/cooling
• Faults Flashes; see 4.7
• Learning mode see 4.1
• Valve test On for 5 minutes; see 4.11
• Radio link range test Flashes; see 4.2
Description of timer
5.1 Settings
Press the MODE button the number of times stated below to
reach the following functions:
Press once: Display and change year and day of week
Press twice: Display and change month and day
Press 3 times: Display and change real time
Press 4 times: Display and change “Party” time
Press 5 times: Display and change “Holiday” period
Press 6 times: Display and change room and time profile
Press 7 times: Display and change freely selectable profile 6
If no button is pressed for 1 minute, the function change is termi-
nated. By pressing MODE, functions can be interrupted without
saving them.
5.2 Setting year and day of week
Press the MODE button once; the selected year will be displayed
(e.g. 2007).
To change the setting:
Press OK The “units” digit of the year display flashes.
Press +/- to change the figure.
Press OK The “tens” digit of the year display flashes.
Press +/- to change the figure.
Press OK The arrow against the day of the week flashes.
Press +/- to change the figure.
Press OK to confirm the new setting.
The menu returns to the standard status.
5.3 Setting the month and day
Press the MODE button twice; the month and day are displayed in
DD.MM format (e.g. December 24th = 24.12).
Press OK The month flashes.
Press +/- to change the figure.
Press OK The “tens” digit of the day display flashes.
Press +/- to change the figure.
Press OK The “units” figure of the day display flashes.
Press +/- to change the figure.
Press OK to confirm the new setting.
The menu returns to the standard status.
5.4 Setting the time
Press the MODE button three times; the real time appears on the
display (e.g. twenty-five minutes past one = 13:25).
Press OK The hour figures flash.
Press +/- to change the figures.
Press OK The “tens” digit of the minutes display flashes.
Press +/- to change the figure.
Press OK The “units” figure of the minutes display flashes.
Press +/- to change the figure.
Press OK to confirm the new setting.
The menu returns to the standard status.
5.5 Setting the party time function
l
The rooms are set to the ‘comfort’ temperature settings on their
thermostats for a predetermined period (1 – 23 hours).
Press the MODE button four times; the number of hours for the
party time function will be displayed. The arrow is against the
l
.
symbol.
Press OK The hours display flashes.
Press +/- to change the figure.
Press OK to confirm the new setting.
The menu returns to the standard status.
When PARTY is active, the arrow can be seen against
l
.
After the preset time has elapsed, automatic operation is re-
stored and the selected program goes back into operation.
To end the party function: select a party time of 00 hours.
Master and slaves respond to their own party time settings, not
the one selected here. The function is continued after a power
failure.
Note: this function has no effect in the “Cooling” mode; the tem-
perature is not reduced.
5.6 Setting the holiday function
ßß
The rooms can be reduced in temperature to the figure selected
at their thermostats for a predetermined period (max. 199 days).
Press the MODE button five times; the display will show the num-
ber of days (e.g. 0000d), The arrow is against the
ß
symbol.
Press OK The number of days flashes.
Press +/- to change the figure.
Press OK to confirm the new setting.
The menu returns to the standard status.
If the holiday function is active, the arrow can be seen against the
ß
symbol. At midnight on the last day of the holiday period, au-
tomatic operation is selected again and the preset program goes
back into operation. (If for example 1 day is selected as the holi-
day period, the automatic function is restored at midnight on
that day. To de-activate the function, select 000d.
Master and slaves comply with their own holiday periods, not the
one selected here.
The function continues after a power failure.
Note: this function has no effect in the “Cooling” mode; the tem-
perature is not raised.
5.7 Setting time profiles for individual rooms
When the device leaves the factory, profile 1 is set for all rooms
and all days of the week.
TO CHANGE THESE SETTINGS:
Press the MODE button 6 times; the display will read r1P1 (room
1, program 1). The arrow will be against 1 = Monday.
Press OK The room number (e.g. r 1) will flash.
Press +/- to change the setting.
Press OK The arrow pointing to the day will flash.
Press +/- to change the setting.
Groups of days: Monday to Friday, Saturday and
Sunday or every day can be selected, so that spe-
cific days can have the same settings.
Press OK The number of the time profile will flash, e.g. P1
Press +/- to change the setting.
Press OK to confirm the new setting.
Repeat the above steps for other rooms.
Press MODE to return to the standard status.
The following time profiles are available:
Profile 1: Reduced-temperature period from 22 h to 6 h
Profile 2: Reduced-temperature periods from 22 h to 6 h,
10 h to 12 h noon and 15 h to 18 h.
Profile 3: Reduced-temperature period from 17 h to 6 h.
Profile 4: Reduced-temperature periods from 22 h to 6 h
and 10 h to 19 h.
Profile 5: Reduced-temperature periods from 23 h to 6 h
and 11 h to 19 h.
Profile 6: Reduced-temperature periods from 23 h to 5 h
and 9 h to 16 h. Profile 6 can be changed.
5.8 Setting profile No. 6
The manufacturer’s settings for profile 6 are stated above.
To change them, press the MODE button 7 times; a time (e.g.
05:00) will be displayed.
Press OK The time (e.g. 05:00) will flash.
The arrow points to
H
= start of ‘comfort’
period 1.
Press +/- to change this setting.
Press OK The time will flash (e.g. 09:00).
The arrow points to
Ñ
= start of reduced-tempera-
ture period 1
Press +/- to change this setting.
Press OK The time will flash (e.g. 16:00).
The arrow points to
H
= start of ‘comfort’ period 2.
Press +/- to change this setting.
Press OK The time will flash (e.g. 23:00).
The arrow points to
Ñ
= start of reduced-tempera-
ture period 2
Press +/- to change this setting.
Press OK to confirm the new settings.
The menu returns to the standard status.
Times can be set at 10-minute intervals.
Note: the last switching time of the day must be used to lower
the temperature and must not be later than 23:50 (11.50 p.m.).
The first switching time of the day must be used to raise the tem-
perature and can be from midnight (0:00) onwards.
No temperature-raising period must extend over midnight, but
lowering the temperature at 11.50 p.m. and raising it again at
midnight (0:00) is permitted.