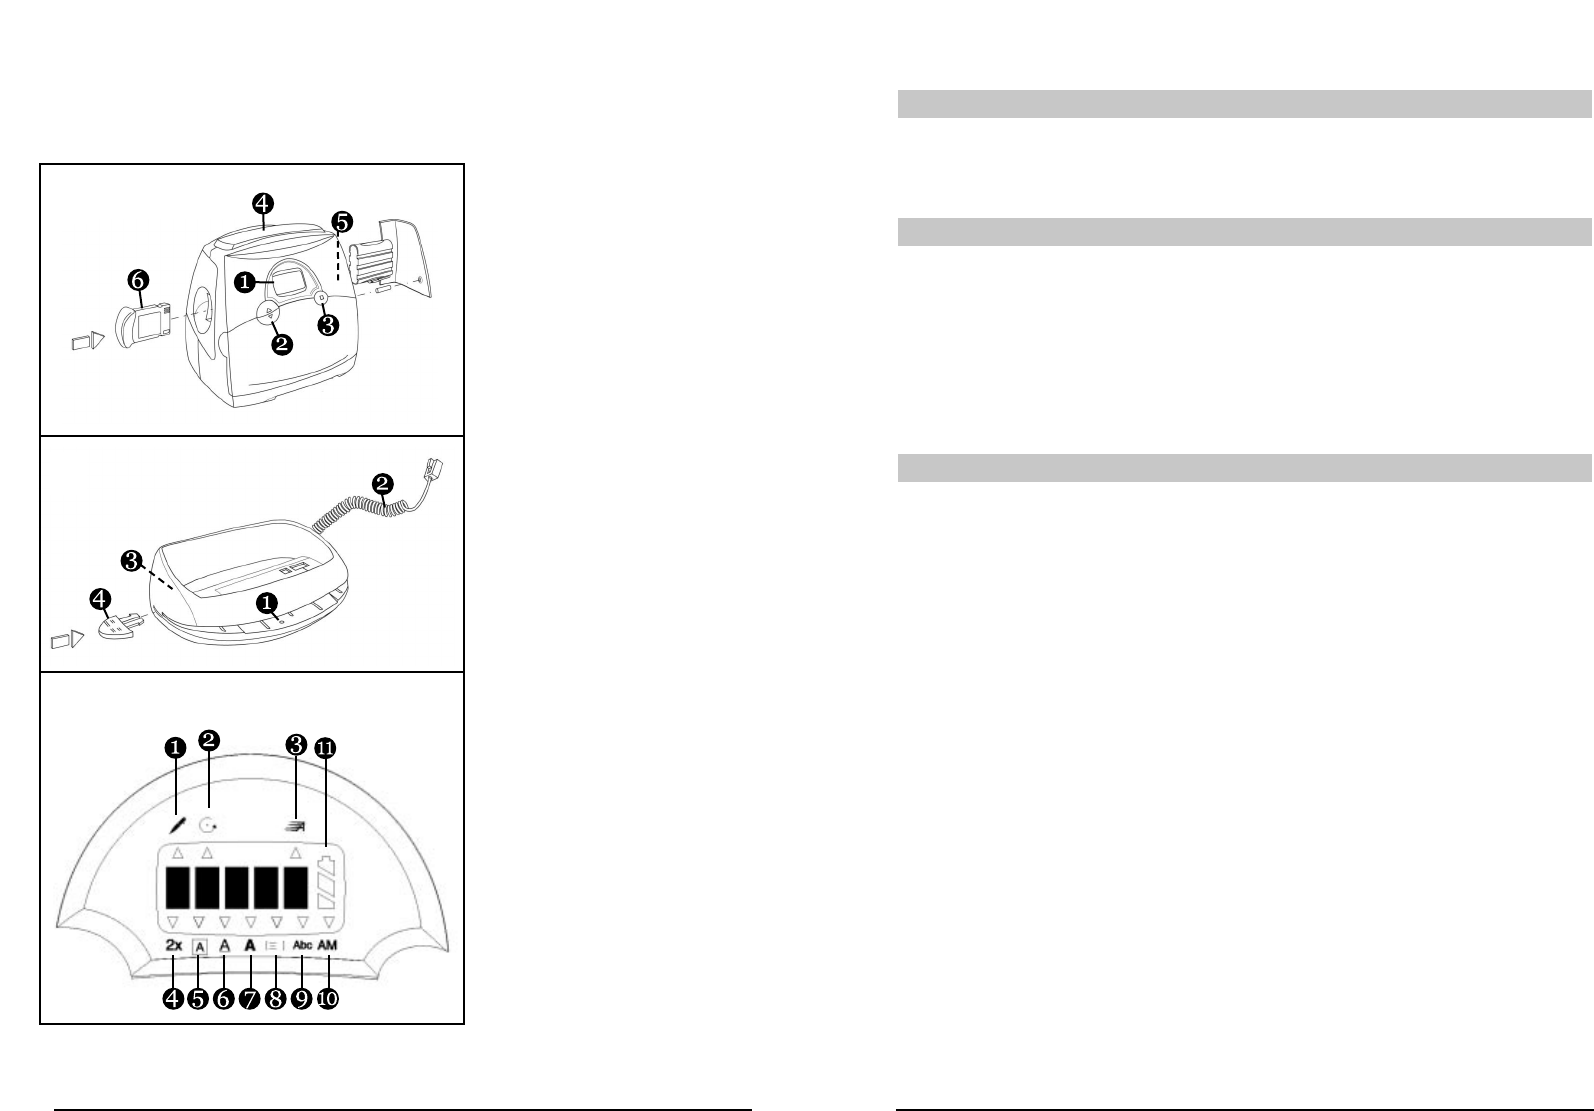
Getting to know your StampManager
The Stamp Manager consists of two parts:
the printer (A) and the base station (B).
A Printer
A1 LCD Screen
A2 UP or DOWN Keys
A3 ENTER Key
A4 PRINT Bar
A5 Printer Status light
A6 Memory Card
B Base station
B1 ‘Power On’ Light
B2 StampManager cable
B3 socket for adaptor power
cord to power outlet
B4 Paper guide
C Display –
LCD screen
Top row
C1 (pen) Personal text
programming symbol
C2 (timer) Auto Print symbol
C3 Fast Print icon
Bottom row
C4 Scale symbol
C5 Box symbol
C6 Underlined symbol
C7 Bold symbol
C8 Print position symbol
C9 Abc symbol
(highlighted if month to
be printed in letter format)
C10 AM symbol
(highlighted
if time is a.m.)
C11 Charge level display
4
Your first stamp in five easy steps
STEP ONE - Switch on
Once you have unpacked your StampManager, plug the adaptor into the socket on the
base station (B3), and plug the adaptor plug into the power supply. The base station’s
light (B1) will come on. Plug the StampManager cable (B2) into the socket on the printer.
STEP TWO - Select your language
The first time you use your StampManager, you will have to set the language.
An abbreviation of the language will appear on the screen (UK, US, F, D, SW, etc).
1. Press repeatedly the UP or DOWN key (A2) to scroll through the list of languages.
2. When the language you want to use appears on the screen, press the
ENTER key (A3).
3. The language is then permanently stored. (to change it you will have to reset
the StampManager: see page 15).
4. The date - in two groups of two digits - will then automatically appear.
STEP THREE - Set the date and time
Setting the date
1. The first two digits (the day*) will keep blinking.
2. Press repeatedly the UP or DOWN key (A2) to adjust the date, and press
ENTER (A3) when the correct date appears.
3. The third and fourth digits (the month*) will now start to blink.
4. Press repeatedly the UP or DOWN key (A2) to adjust the month, and press
ENTER (A3) when the correct month appears.
5. Four digits (the year) will now appear (2 0 0 1). It is possible to change the last two
digits of this number, so as to set the year. You will see the third digit is blinking.
6. Press repeatedly the UP or DOWN key (A2) to adjust the third digit of the year,
and press ENTER (A3) when the correct digit appears.
7. Repeat Step 6 to set the correct digit in the fourth position.
8. Once you confirm the last digit, the date will be set.
9. The LCD display will now show Abc or 123.You can toggle between these two
options using the UP or DOWN key (A2). Abc means the month will appear in
letters (e.g. 19 Feb 2001), while 123 means the month will appear as a number
(e.g. 19-02-2001). Make your choice and choose ENTER (A3) to confirm. If you
choose Abc, the Abc symbol on the panel will be highlighted by an arrowhead.
10. The date appears on the screen in the following format: DD-MM.
11. The time will automatically appear on the screen.
*(If you have chosen US settings for the language, the date will appear as MM-DD).
Setting the time
1. The first two digits (the hour) will blink.
2. Press repeatedly the UP or DOWN key (A2) to adjust the hour (use the 24
hour clock when setting the StampManager), and press ENTER (A3) when the
correct hour appears.
3. The third and fourth digits (the minutes) will now start to blink.
5
A
B
C