ATTENTION!
WARNING!
Service hotline
In the case of technical problems, contact our Service hotline. Switzerland:
Tel. 0900 00 1675 (national charges, Swisscom at time of going to print:
CHF2.60/min).Inthecaseofclaimsunderthetermsofguarantee,contact
your sales outlet.
Maintenance
Cleanthesurfaceofthehousingwithasoft,uff-freecloth.Donotuseany
cleaning agents or solvents.
Guarantee
Dexford equipment is produced and tested according to the latest produc-
tion methods. The implementation of carefully chosen materials and highly
developed technologies ensure trouble-free functioning and a long service
life. The terms of guarantee do not apply to the batteries or power packs
usedintheproducts.Theperiodofguaranteeis24monthsfromthedate
ofpurchase.Alldecienciesrelatedtomaterialormanufacturingerrors
withintheperiodofguaranteewillberedressedfreeofcharge.Rightsto
claims under the terms of guarantee are annulled following tampering by
the purchaser or third parties. Damage caused as the result of improper
handling or operation, normal wear and tear, incorrect positioning or
storage, improper connection or installation or Acts of God and other
externalinuencesareexcludedfromthetermsofguarantee.Inthecase
of complaints, we reserve the right to repair defective parts, replace them
orreplacetheentiredevice.Replacedpartsordevicesbecomeourpro-
perty.Rightstocompensationinthecaseofdamageareexcludedwhere
there is no evidence of intent or gross negligence by the manufacturer. If
your device does show signs of a defect within the period of guarantee,
please contact the sales outlet where you purchased the Dexford device,
producing the purchase receipt as evidence. All claims under the terms
of guarantee in accordance with this agreement can only be asserted at
the sales outlet. No claims under the terms of guarantee can be asserted
after a period of two years from the date of purchase and hand-over of the
product.
Disposal
In order to dispose of your device, take it to a collection point provided by
yourlocalpublicwasteauthorities(e.g.recyclingcentre).According
to the laws on the disposal of electronic and electrical devices,
owners are obliged to dispose of old electronic and electrical devices
in a separate waste container. The adjacent symbol indicates that
the device must not be disposed of in normal domestic waste!
Youarelegallyobligedtodisposeofpowerpacksandbatteries
at the point of sale or in the corresponding containers provided at
collection points by local public waste authorities. Disposal is free
of charge. The symbols indicate that the batteries must not be
disposed of in normal domestic waste and that they must be brought
to collection points provided by local public waste authorities. Packaging
materials must be disposed of according to local regulations.
Declaration of Conformity
ThisdevicefullstherequirementsstipulatedintheDirective1999/5/EC
on radio equipment and telecommunications terminal equipment and the
mutualrecognitionoftheirconformity.Conformitywiththeabove
mentioneddirectiveisconrmedbytheCEmarkonthedevice.To
viewthecompleteDeclarationofConformity,pleaserefertothe
free download available on our web site www.dexford.com.
ENGLISH
WSRC 2256
Weather Station with wireless-thermometer
and radio clock
Operating Instructions
Please read and observe the following information and keep the
operating manual nearby for future reference!
Safety information
Onlyusebatteriesofthesametype!
Always treat batteries with due care and attention and only use
batteries as described.
Never use standard and rechargeable batteries together. Never use
rechargeable batteries or standard batteries with different capacities or
charge statuses together. Never use standard or rechargeable batteries
which are damaged.
Riskofsuffocationthroughsmallobjects,packagingandprotectivefoil!
Keep children away from the product and its packaging!
Riskstohealthandtheenvironmentfrombatteries!
Never open, damage or swallow batteries or allow them to pollute the
environment. They could contain toxic and ecologically harmful heavy
metals.
Preventexposuretoenvironmentalinuences,e.g.smoke,dust,
vibration, chemicals, moisture, heat and direct sunlight.
Onlyallowrepairstobecompletedbyqualiedpersonnel.
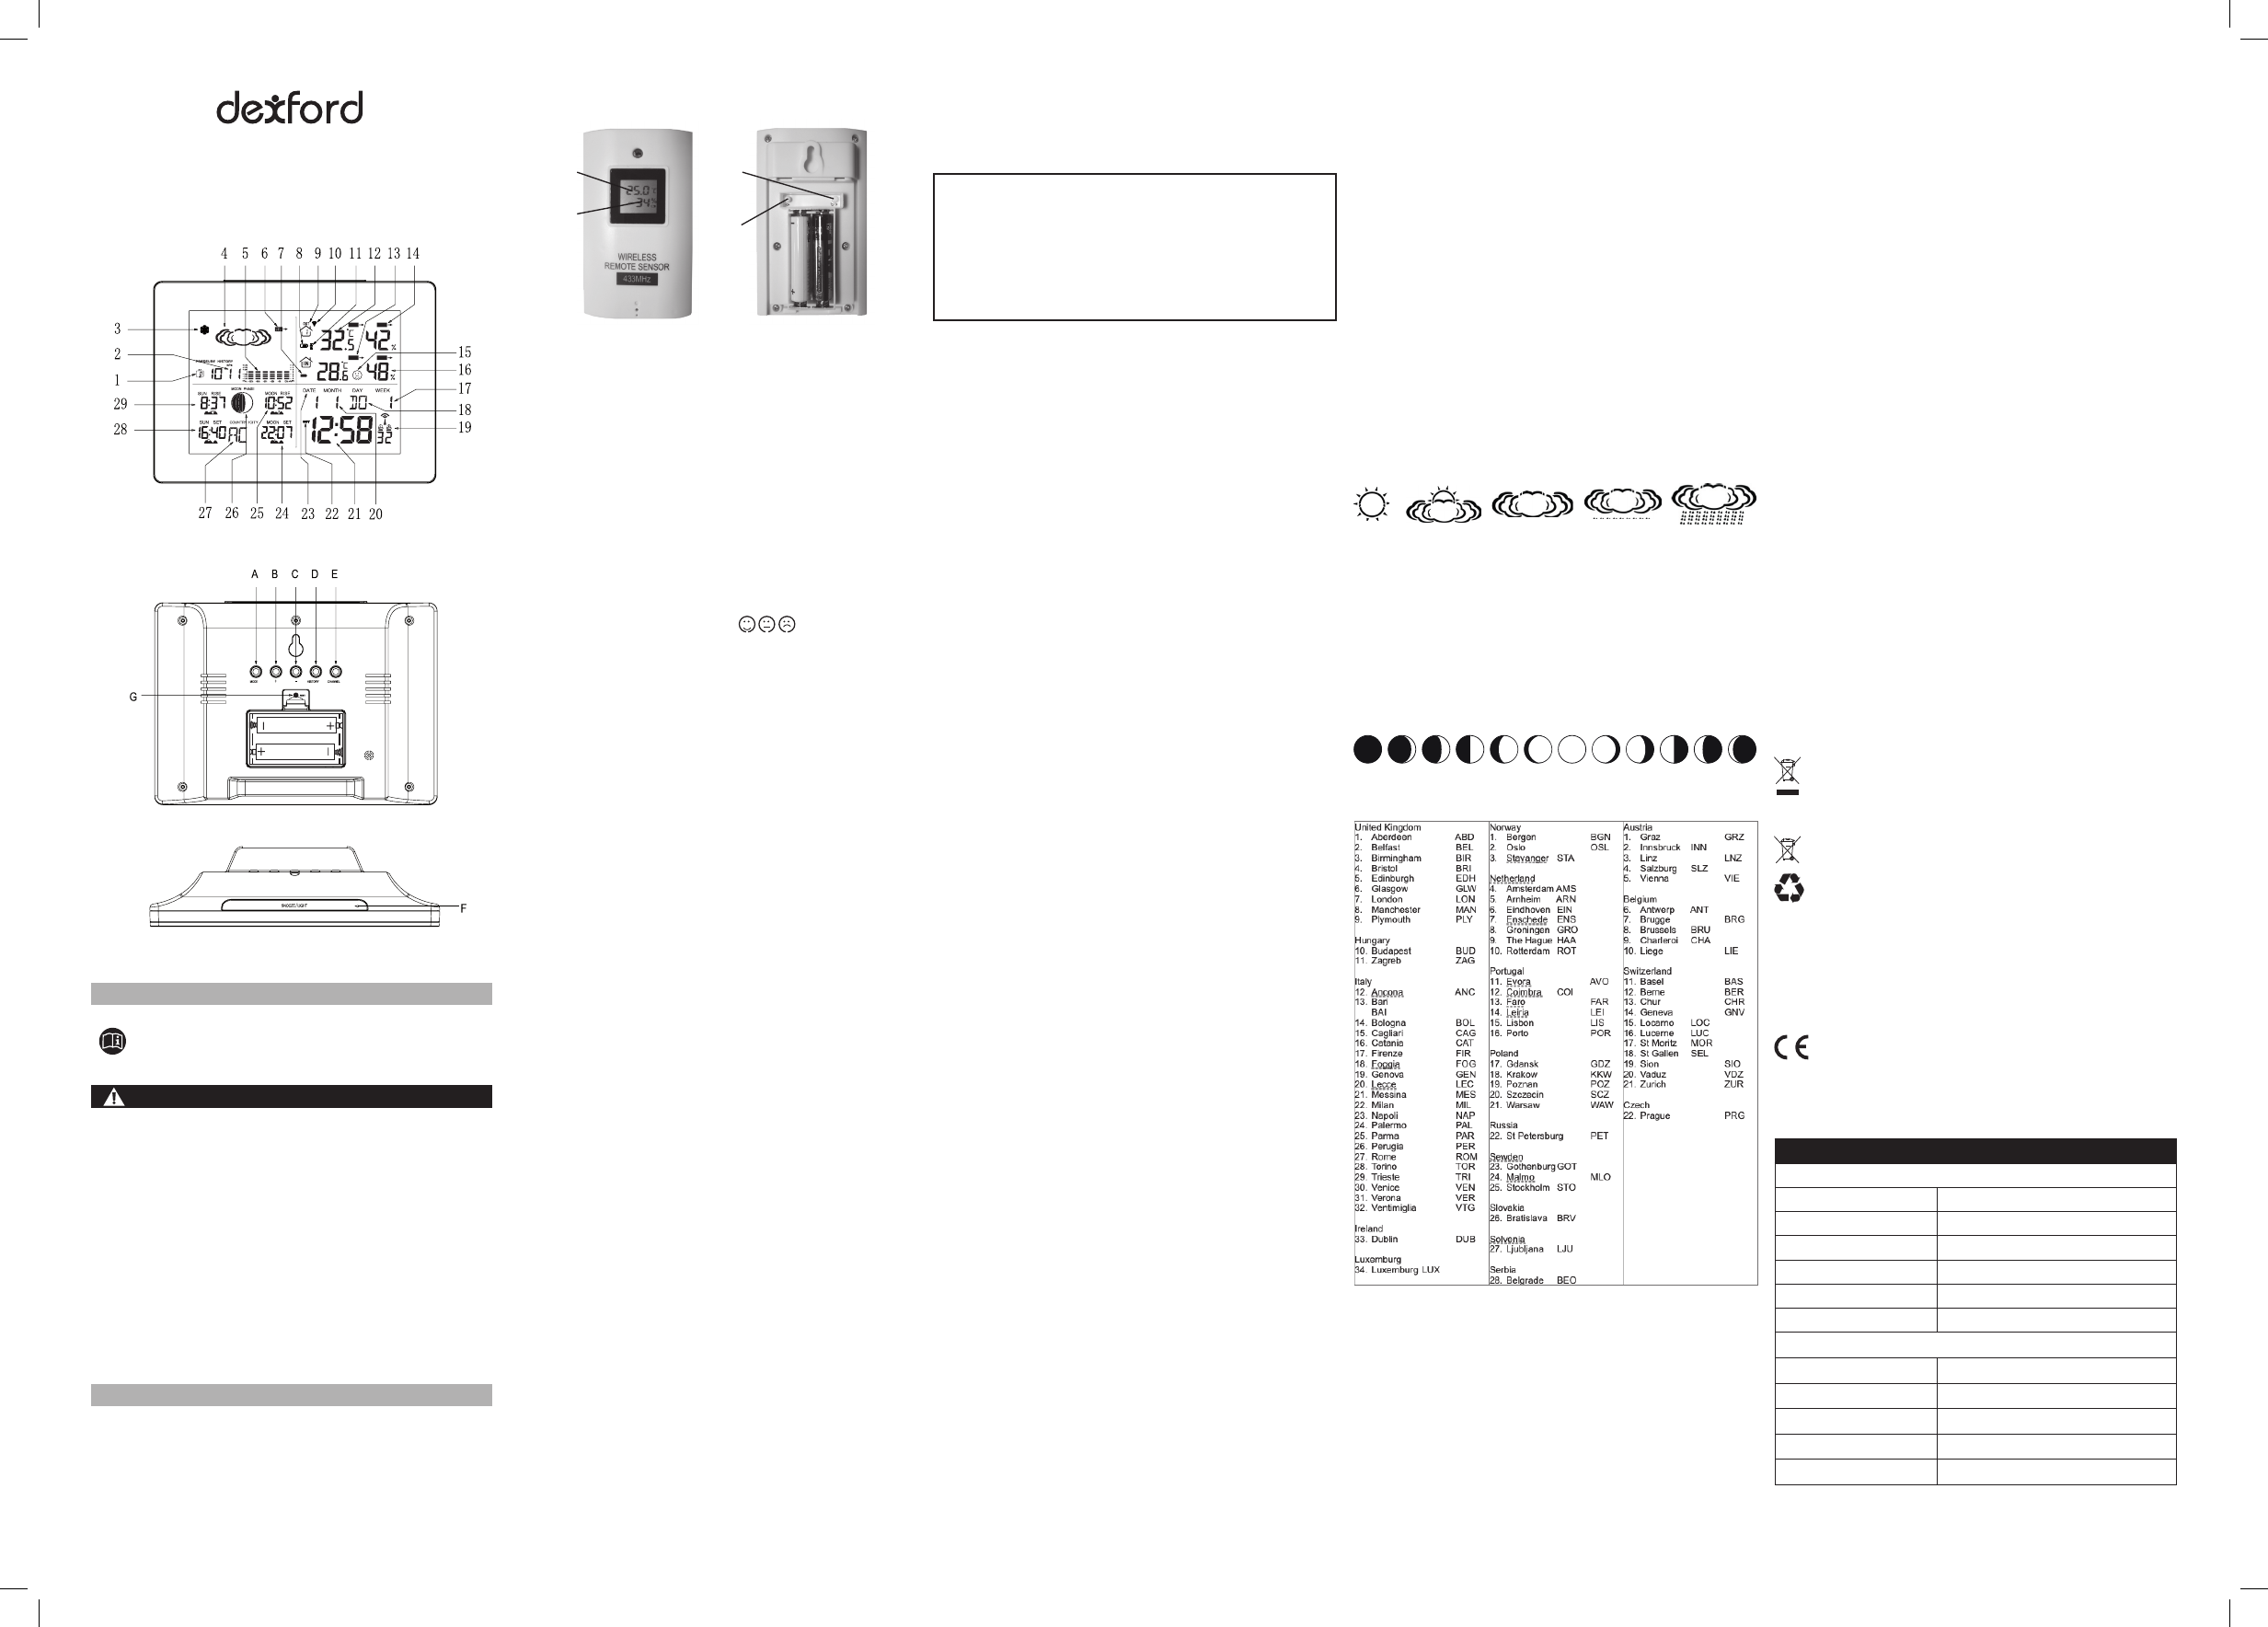
Display icons and operating elements
1 12hourhistoryofpressure
2 Airpressuredata
3 Freeze
4 Weather
5 Bar of air pressure
6 Air pressure trend, ➙ ➚ ➘
7 Indoor low battery
8 Outdoorlowbattery
9 Channel
10 RFsymbol
11 Temperature alert
12 Outdoortemperature(Pressthekey“-“toswitchbetween°Cor°F)
13 Indoor temperature trend, ➙ ➚ ➘
14 Outdoorhumiditytrend,➙ ➚ ➘
15 Livingface(Comfortable,dry,humid)
16 Indoor humidity
17 Week
18 Day of Week
19 Alarm
20 Month
21 Time
22 Summertime
23 Date
24 Moonset
25 MoonRise
26 MoonPhase
27 Citiestodeterminetheriseandsettimes
28 Sunset
29 Sunrise
30 Outdoortemperature
31 Outdoorhumidity
A MODE
B +
C -
D HISTORY
E CHANNEL
F SNOOZE/LIGHT
G RESET
a Changefrom°C/°F
b Changechannel
MANUAL SET-UP
(The clock automatically changes from set-up mode to time display mode if
nokeysarepressedfor20seconds.)
Pressandholdkey“MODE“for3seconds.
Thedisplayfortheyearisashing.Use“+“and“-“toselecttheyear.
Press“MODE“toconrm.
Thedisplayforthemonthisashing.Use“+“and“-“toselectthe
month.
Press“MODE“toconrm.
Thedisplayforthedateisashing.Use“+“and“-“toselectthedate.
Press“MODE“toconrm.
Thedisplayforthetimezoneisashing.Use“+“and“-“toselectthe
timezone(-12to+12).
Press“MODE“toconrm.
Thelanguageselectionforthedisplayoftheweekdaysisashing.Use
“+“and“-“toselectthelanguage.
Press“MODE“toconrm.
The12/24hourashing.Use“+“and“-“toselect
Press“MODE“toconrm.
Thedisplayforthehourisashing.Use“+“and“-“toselectthehour.
Press“MODE“toconrm.
Thedisplayfortheminutesisashing.Use“+“and“-“toselectthe
minutes..
Press“MODE“toconrm.
Thedisplayforcountry/cityisashing,Use“+“and“-“toselectthecity
ofSunrise/SunsetandMoonrise/Moonset.(Alistcanbefoundatthe
endofthemanual)
Press“MODE“toconrm
Daily alarm set-up
Press“MODE“toswitchfromtimedisplaytoA1display
Pressandholdthekey“MODE“for3seconds,theashingalarmtime
areshown.Thehourdisplayofthealarmtimeisashing.Use“+“und
“-“toselectthehour.
Press“MODE“toconrm.
Thenfollowtheminutes.Use“+“und“-“toselecttheminutes,
Press“MODE“toconrm.
Thenpress“MODE“toswitchfromA1displaytoA2display
The same setting as for A1.
Daily alarm on/off
WhenshowingA1alarmtime,press“-“toactivatethealarm1with
alarm symbol showing.
Press“-”againcancelthealarm
WhenshowingA2alarmtime,press“-“toactivatethealarm2with
alarm symbol showing.
Press“-”againcancelthealarm
A1foralarmfromMo.toFr.,A2foralarmfromSa.toSu.
Snooze function
Pressthekey“SNOOZE/LIGHT“,whilethealarmsounds,toactivate
the snooze function. If the snooze function is activated, alarm symbol is
ashing.Thealarmrepeatafter5minutes.
The snooze function can be stopped by pressing any key.
Max./ Min. for the indoor/outdoor temperature and humidity
Press“+”fordisplayingofindoor/outdoormax./min.oftemperatureand
humidity,hold“+“formorethan3secondstoclearupthemax./min.
Temperature alert set-up
As an example this allows to get a frost damage warning. The main unit will
give an alarm signal when the set temperature limit is reached.
Press“Channel”toselectthechannel(1,2,3)
Pressandholdthekey“-”intheareaofoutdoor(9),selectON/OF
whenashing.
Press“MODE”,theupperlimittemperatureisashing,use“+”,“-“to
set the maximum alert temperature.
Press“MODE“,thelowerlimittemperatureisashing,use“+”,“-“to
set the minimum alert temperature. When the alert is activated, the alert
symbol(11)willbeshown.
The set-up process cannot be completed if the maximum temperature
selected is lower than the minimum selected temperature.
Theminimumtemperatureselectedmustatleastbe1°Cbelowthemaxi-
mum selected temperature.
Temperature alert on/off
Pressandholdthekey“-“tosetthetemperaturealertonoroff.
Alerton:Temperaturealertsymbol(9)shownindisplay
Alertoff:Temperaturealertsymbol(9)goesout.
Illumination
Pressthekey“SNOOZE/LIGHT“toactivatethedisplayilluminationfor
5 seconds.
WEATHER FORECAST
Sunny Slightly Sunny Cloudy Rainy Storm
Theweatherstationanalyzestheweatherpatternsfromthepast24hours
todeterminetheforecastforthenext12–24hours.Theweatherforecast
is only for reference and domestic use. Accuracy rate might be lower in
extreme conditions.
History for the past 12 hour of air press.
Pressthekey“HISTORY“tocheckthepast12hours(1)
Moon phase display
The weather station uses saved data to determine the moon phases. So it
isnotnecessarytomanuallyenterdata.Thereare12moonphasesappear.
Country / City list
The radio signal sender (DCF) coverage up to 1500km distance to
Frankfurt/Main. If, due to bad reception,or no RCC automatic time
reception is possible, follow the steps below manually.
ATTENTION: Please note all other clock / weather station settings
seize to function when the clock is in RCC synchronization mode.
The most important is to quit the receiption of radio controlled
signal by holding together “+ “and“-” for 3 seconds in case of the
“radio tower”symbol ashing before set-up
Package contents
Weatherstationmainunit,Thermo-hygrosensor,Operatingmanual
Thermo-hygrosensor(WRS)
a
b
30
31
STARTING UP
Afterinsertingthebatteries,thealtitude(2)isashing,plsuse“+“,“-“to
setthealtitudeofyourposition,thenpress“HISTORY”,theweather
symbol(4)isashing,plsuse“+“,“-“tochoosetheweather
Thestationisnowconnectingtotheoutdoorsensor(WRS).Thispro-
cess takes about 3 minutes. Then the display shows the outdoor
temperature and humidity. In case of failure of reception, pls
press“CHANNEL“(E)formorethan3secondstoreceiveagain.
The weather station is capable of receiving up to 3 different channels.
Selectthechannelnumber(1,2,or3)bypressingthe“b”switch.
The weather station will scan the 3 channels automatically.
Selectthechannelnumber(1,2,or3)bypressingthe“Channel”button
(E)onweatherstation.
TheautomaticreceivingoftheDCFradiosignal(DCF77,Timesignal
frequency77,5kHz)beginsafter3minutesofoutdoorWRSreception.
ThisDCFreceptionprocessisgoingon,theashingsymbol“radio
tower“appearsinthetimedisplayareaatthesametime.
Onceradiosignalreceivingissuccessful,thedisplayshowsthesymbol
“radiotower“continuously.Noashing.Onesynchronisationper
dayissufcienttokeepthetimedisplayaccuracyat1second.
NOTE:IftheclockreceivestheDCFsignal,butyourlocationisina
different time zone, the clock can be adjusted manually with the
function„TimeZone“.If,e.g.yourtimeis1houraheadoftheGerman
Feature Value
WSRC2256
W x H x D 169x120x48mm
Weight 320g(withoutbattery)
Signal frequency 433MHz
Power 2x1,5VAA,notincluded
Temperature range -20~+50°C
Humidity range 20~95%
Thermo-hygrosensor(WRS)max.30metersinopenarea
W x H x D 60x100x25mm
Weight 52g(withoutbattery)
Power 2x1,5VAAA,notincluded
Temperature range -20~+60°C
Humidity range 20~95%
Technical data(Allrightsreserved)
time,setthetimezonedisplayto+01.TheclockisnowDCFcontrolled
but the time is one hour ahead.
Pleaseobserveaminimaldistanceof2.5mtosourcesofinterference
such as televisions or computer screens.