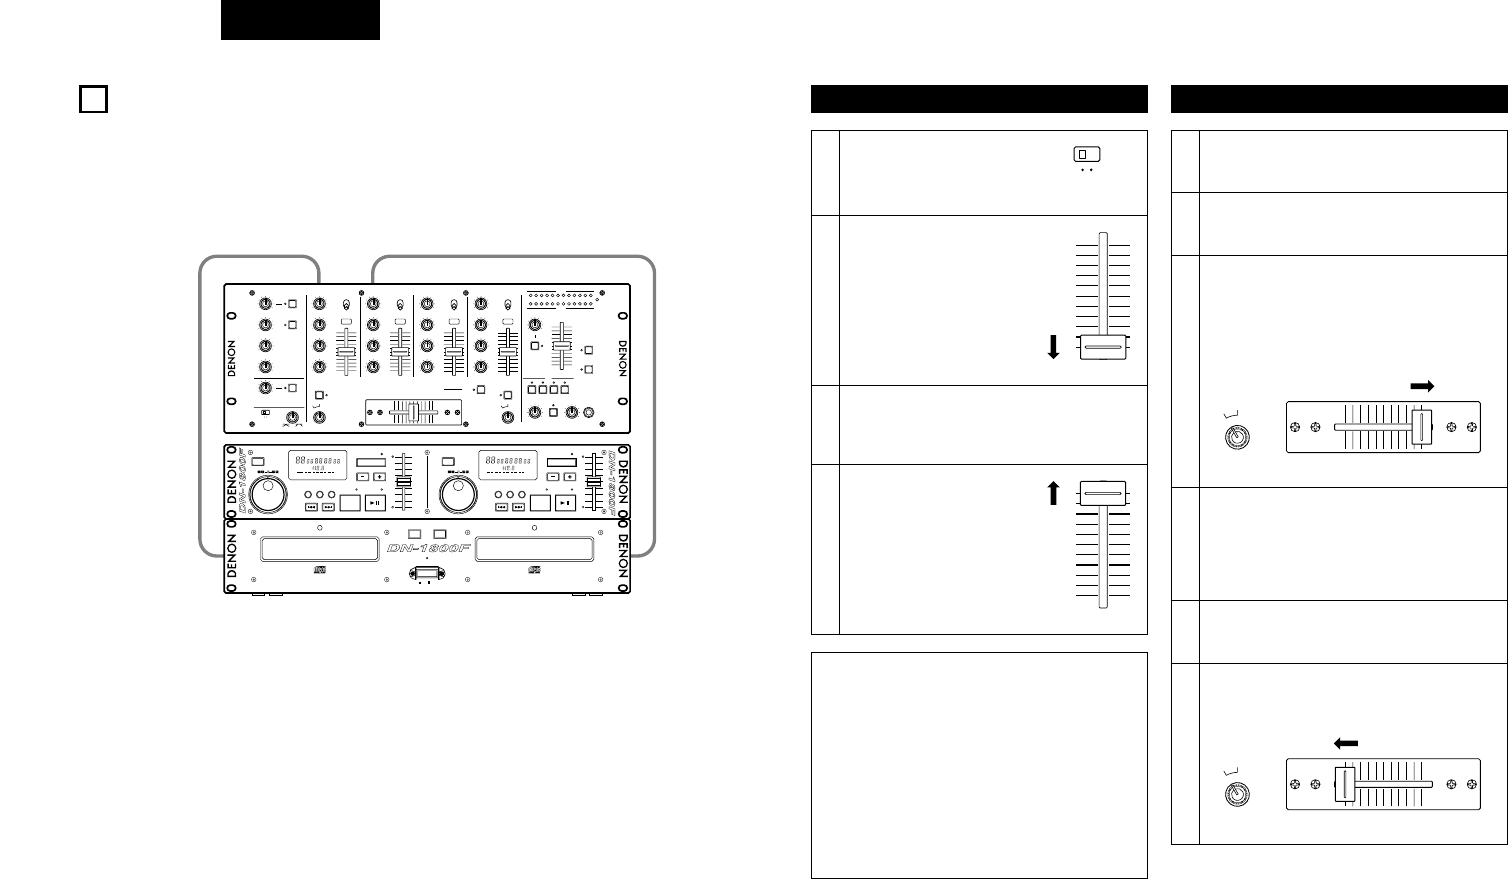
614634
18
Zoom out
Zoom in
Previous page
1/35
Next page
18
FRANÇAIS
Lorsque le crossfader est positionné dans la
direction opposée, par exemple, sur ”1”, la
lecture de CD pourra commencer.
6
F/S
ASSIGN A
OFF
3
2
1
4
AB
5
DEMARRAGE DU FADER
Si les lecteurs DN-1800F, DN-2100F, et DN-2600F (vendus séparément) sont connectés à CH-1 ou à CH-2, ils
peuvent être mis en route à l’aide du fader d’entrée de source (CH. Fader) ou du Crossfader, à condition que les
mini-cordons stéréo de 3.5 mm soient connectés.
Démarrage du Fader de Canal
Activez la touche Ch. Fader
Start.
Faites descendre jusqu’en
bas le fader d’entrée de
source (Ch. fader) de la
commande CH-1 ou CH-2.
DN-1800F
Placez le point de repère sur l’un des lecteur.
DN-2100F et DN-2600F
Placez le point A-1 ou A-2 sur l’un des lecteur.
Lorsque vous souhaitez
mettre le lecteur en marche,
déplacez le fader de la
source vers le haut (Ch.
Fader) et le lecteur de CD
commencera la lecture.
REMARQUES:
Les canaux sélectionnés à l’aide des
commutateurs Crossfader Assign A, B et des
boutons Crossfader Start A, B ne peuvent pas
être mis en marche avec le fader d’entrée de
source (Ch. Fader).
Si le démarrage du Fader de canal et le
démarrage du Crossfader sont associés à la
même source, ils ne fonctionneront pas
simultanément. Vous devez en choisir un. Si les
commandes du Ch. Fader et du Crossfader sont
toutes deux placées sur ON, le crossfader aura
priorité.
1
2
3
4
A l’aide des commandes Crossfader Assign A
B, choisissez un canal (CH-1 ou CH-2) auquel
le lecteur de CD est connecté.
Appuyez sur les touches Crossfader Start A,
B du canal connecté au lecteur de Cd et que
vous souhaitez contrôler.
Faites glisser entièrement le crossfader dans
la direction opposée par rapport à la source
que vous souhaitez lancer. (Dans l’exemple
suivant, la mise en marche est effectué avec
le lecteur de CD connecté à CH-1 et réglé sur
Assign A.)
DN-1800F
Placez le point de repère sur le lecteur
gauche.
DN-2100F et DN-2600F
Placez le point A-1 ou A-2 sur le lecteur
gauche.
1
2
3
4
Démarrage du Crossfader
Utilisez la commande Crossfader Contour afin
de contrôler la courbe de mise en marche du
crossfader.
5
CONTINUE
ELAPSED
T.
REMAIN
SINGLE
CONTINUE
ELAPSED
T.
REMAIN
SINGLE
SFMTRACK SFMTRACK
POWER
OPEN/CLOSE OPEN/CLOSE
1 2
PITCH
CUE CUE
PITCH
2
21
1
SCAN
CLOSE
SEARCH
OPEN/
JOG
MODE
0%
PITCH
PITCH BEND
CUE PLAY/PAUSE
TRACK
CONT./
SINGLE TIME
PITCH%
REMOTE CONTROL UNIT RC-47
JOG
MODE
CONT./
SINGLE
PITCH%
SCANSEARCH
CUE
OPEN/
CLOSE
TRACK
TIME
0%
PITCH
PLAY/PAUSE
PITCH BEND
OFFON
4321
DN-X400
DN-X400
DIGITAL OUT
L/CUE
CUE
10
8
6
2
4
0
R/PGM
CH FADER START
LINE8LINE6LINE2
MIC
MAIN
MAX
10
8
4
6
+10dB
+10dB
0
2
+10dB
MIN
HI
-26dB
-26dB
-26dB
LOW
MID
GAINGAIN
MAX
8
10
6
4
HI
MID
MIN
-26dB
-26dB
+10dB
+10dB
2
0
LOW
-26dB
+10dB
LINE4
10
8
4
6
MAXMIN
GAIN
HI
MID
-26dB
-26dB
+10dB
+10dB
0
2
LOW
-26dB
+10dB
+12dB-12dB
+12dB-12dB
+12dB-12dB -26dB
+10dB
-26dB
+10dB
CH FADER START
+10dB
F/S F/S
METER
ON/OFF
MIC POST
-26dB
ON OFF
CH FADER START
CROSSFADER
ASSIGN B
CONTOUR
ON/OFF
ASSIGN A
OFF
3
2
1
4
PWR
CH 4CH 3CH 2CH 1
ON/OFF
10
8
6
4
2
0
LEVEL
100
CUE/PGM
100
LEVEL
L-CUE
R-PGM
PGM
PAN
CUE
STEREO
MONO
3
2
1
4OFF
MAXMIN
GAIN
10
8
6
HI
4
2
0
LOW
MID
100
LEVEL
100
LEVEL
+8+5+3+10-1-3-5-7-10-15-20
HI
MID
LOW
AB
PHONO2/LINE7PHONO1/LINE5
LINE1 LINE3
START A
FADER
CROSS
MARK
TRACK
CROSS
FADER
START B
EFFECT
LOOP
/ZONE
BOOTH
PHONES
MASTER
MAIN MIC
AUX MIC
mini-cordon
stéréo 3.5 mm
Prise Fader
CH-1
Prise Fader
CH-2
Prise Fader
CD1
Prise Fader
CD2
mini-cordon
stéréo 3.5 mm
ON OFF
CH FADER START
10
8
6
4
2
0
CH FADER START
10
8
6
4
2
0
CH FADER START
F/S
ASSIGN A
OFF
3
2
1
4
AB
DN-X400
DN-1800F
18


Need help? Post your question in this forum.

Forumrules


Report abuse

Libble takes abuse of its services very seriously. We're committed to dealing with such abuse according to the laws in your country of residence. When you submit a report, we'll investigate it and take the appropriate action. We'll get back to you only if we require additional details or have more information to share.

Product:

For example, Anti-Semitic content, racist content, or material that could result in a violent physical act.

For example, a credit card number, a personal identification number, or an unlisted home address. Note that email addresses and full names are not considered private information.

Forumrules

To achieve meaningful questions, we apply the following rules:

Register

Register getting emails for Denon DN-X400 at:


You will receive an email to register for one or both of the options.


Get your user manual by e-mail

Enter your email address to receive the manual of Denon DN-X400 in the language / languages: English, German, Dutch, French, Swedish, Spanish as an attachment in your email.

The manual is 3,25 mb in size.


You will receive the manual in your email within minutes. If you have not received an email, then probably have entered the wrong email address or your mailbox is too full. In addition, it may be that your ISP may have a maximum size for emails to receive.

The manual is sent by email. Check your email

If you have not received an email with the manual within fifteen minutes, it may be that you have a entered a wrong email address or that your ISP has set a maximum size to receive email that is smaller than the size of the manual.

The email address you have provided is not correct.

Please check the email address and correct it.

Your question is posted on this page

Would you like to receive an email when new answers and questions are posted? Please enter your email address.


Info