465755
3
Zoom out
Zoom in
Previous page
1/11
Next page
Vorbereitung zum Gebrauch
KLIMATISIERUNG MIT FESTINSTALLATION
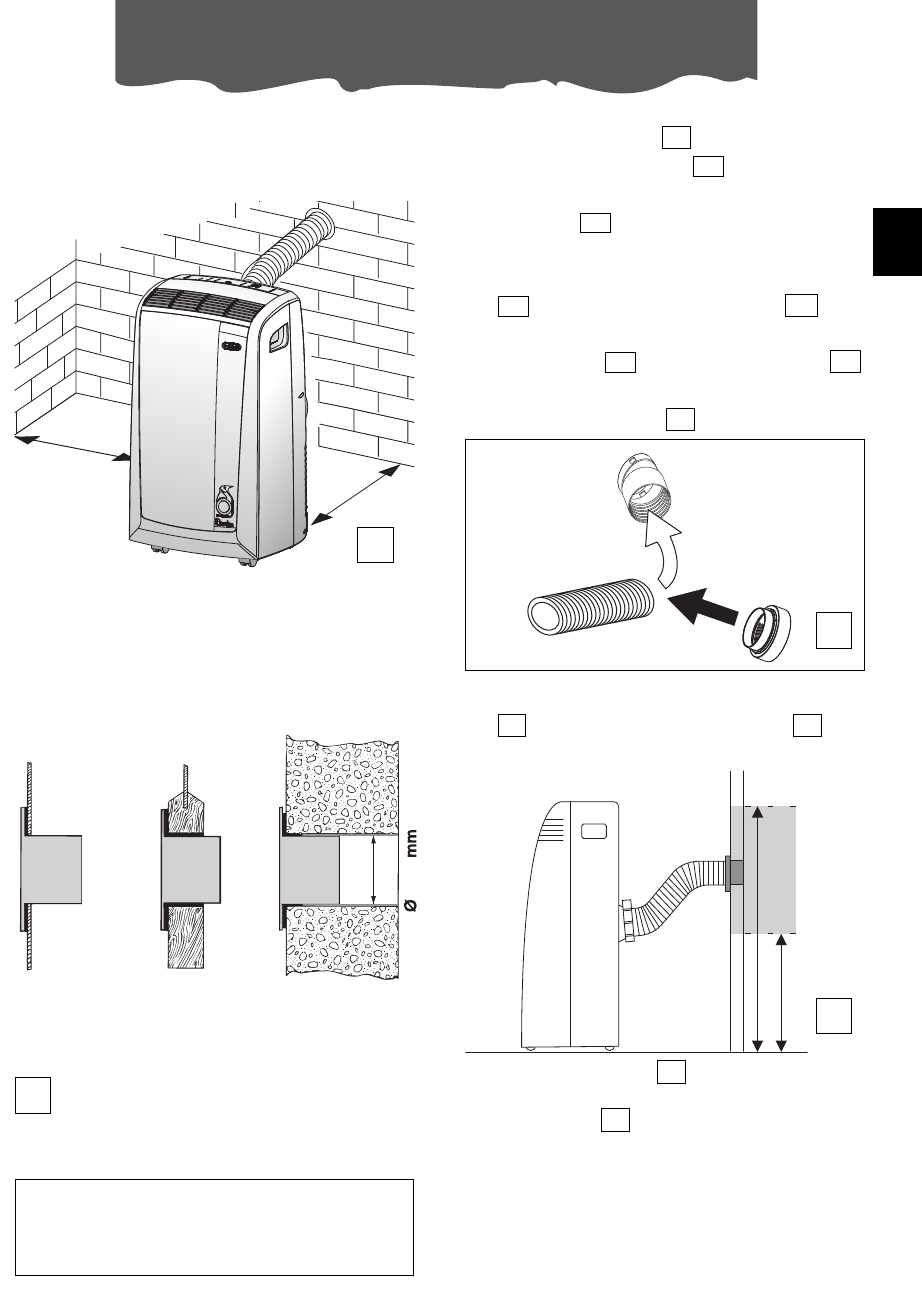
Wenn Sie wünschen, können Sie Ihr Gerät
auch nur zeitweilig festinstallieren (Abb. D).
Bringen sie den als Zubehörteil mitgelieferten
Verbindungsflansch in der Öffnung an.
Das Verbindungsstück in die dafür vor-
gesehene Einstecköffnung für den Abluft-
schlauch , die sich auf der Geräterück-
seite befindet, stecken (siehe Abb.A).
Das Zubehörteil für die Mauerbefestigung
mit dem Abluftschlauch ver-
schrauben oder falls notwendig, Verbin-
dungsstück vom Abluftschlauch
abschrauben und durch das Endstück für die
Mauerbefestigung ersetzen (Abb. F).
Stecken Sie das andere Schlauchende
auf den Verbindungsflansch , wie
auf Abbildung G gezeigt.
14
12
13
12
14
7
13
1112
11
In diesem Fall gehen Sie wie folgt vor:
Bohren Sie eine Öffnung (ø134mm) in eine
an den Außenbereich angrenzende
Wand oder durch die Scheibe eines Fens-
ters. Halten Sie sich dabei an die in Abbil-
dung E angegebenen Höhenabstände
und Abmessungen der Öffnung.
134
MAX100 cm
MIN 35 cm
Wenn der Schlauch nicht angeschlossen
ist, kann die Öffnung mit dem Stöpsel des
Anschlussstücks verschlossen werden.
HINWEIS
Wenn Sie eine zeitweilige Festinstallation vor-
nehmen, empfehlen wir Ihnen, eine Tür einen
Spalt offen zu lassen (1 cm genügt völlig),
damit der richtige Luftaustausch gewährleis-
tet ist.
11
12
In der Fenster-
scheibe
In der Wand: Wir
empfehlen Ihnen,
den Wandab-
schnitt mit einem
geeigneten Isolier-
material zu isolie-
ren.
Im Holzrah-
men der Bal-
kontür
E
Begrenzen Sie auf ein Minimum die
Länge und die Biegungen der Luftschläu-
che, damit jegliche Drosselstellen vermie-
den werden können.
30 cm
30 cm
D
1
2
F
G
39
DE
3


Need help? Post your question in this forum.

Forumrules


Report abuse

Libble takes abuse of its services very seriously. We're committed to dealing with such abuse according to the laws in your country of residence. When you submit a report, we'll investigate it and take the appropriate action. We'll get back to you only if we require additional details or have more information to share.

Product:

For example, Anti-Semitic content, racist content, or material that could result in a violent physical act.

For example, a credit card number, a personal identification number, or an unlisted home address. Note that email addresses and full names are not considered private information.

Forumrules

To achieve meaningful questions, we apply the following rules:

Register

Register getting emails for DeLonghi PACN80.1 PINGUINO at:


You will receive an email to register for one or both of the options.


Get your user manual by e-mail

Enter your email address to receive the manual of DeLonghi PACN80.1 PINGUINO in the language / languages: German as an attachment in your email.

The manual is 0,86 mb in size.


You will receive the manual in your email within minutes. If you have not received an email, then probably have entered the wrong email address or your mailbox is too full. In addition, it may be that your ISP may have a maximum size for emails to receive.

Others manual(s) of DeLonghi PACN80.1 PINGUINO

DeLonghi PACN80.1 PINGUINO User Manual - English - 11 pages

DeLonghi PACN80.1 PINGUINO User Manual - Dutch - 11 pages


The manual is sent by email. Check your email

If you have not received an email with the manual within fifteen minutes, it may be that you have a entered a wrong email address or that your ISP has set a maximum size to receive email that is smaller than the size of the manual.

The email address you have provided is not correct.

Please check the email address and correct it.

Your question is posted on this page

Would you like to receive an email when new answers and questions are posted? Please enter your email address.


Info