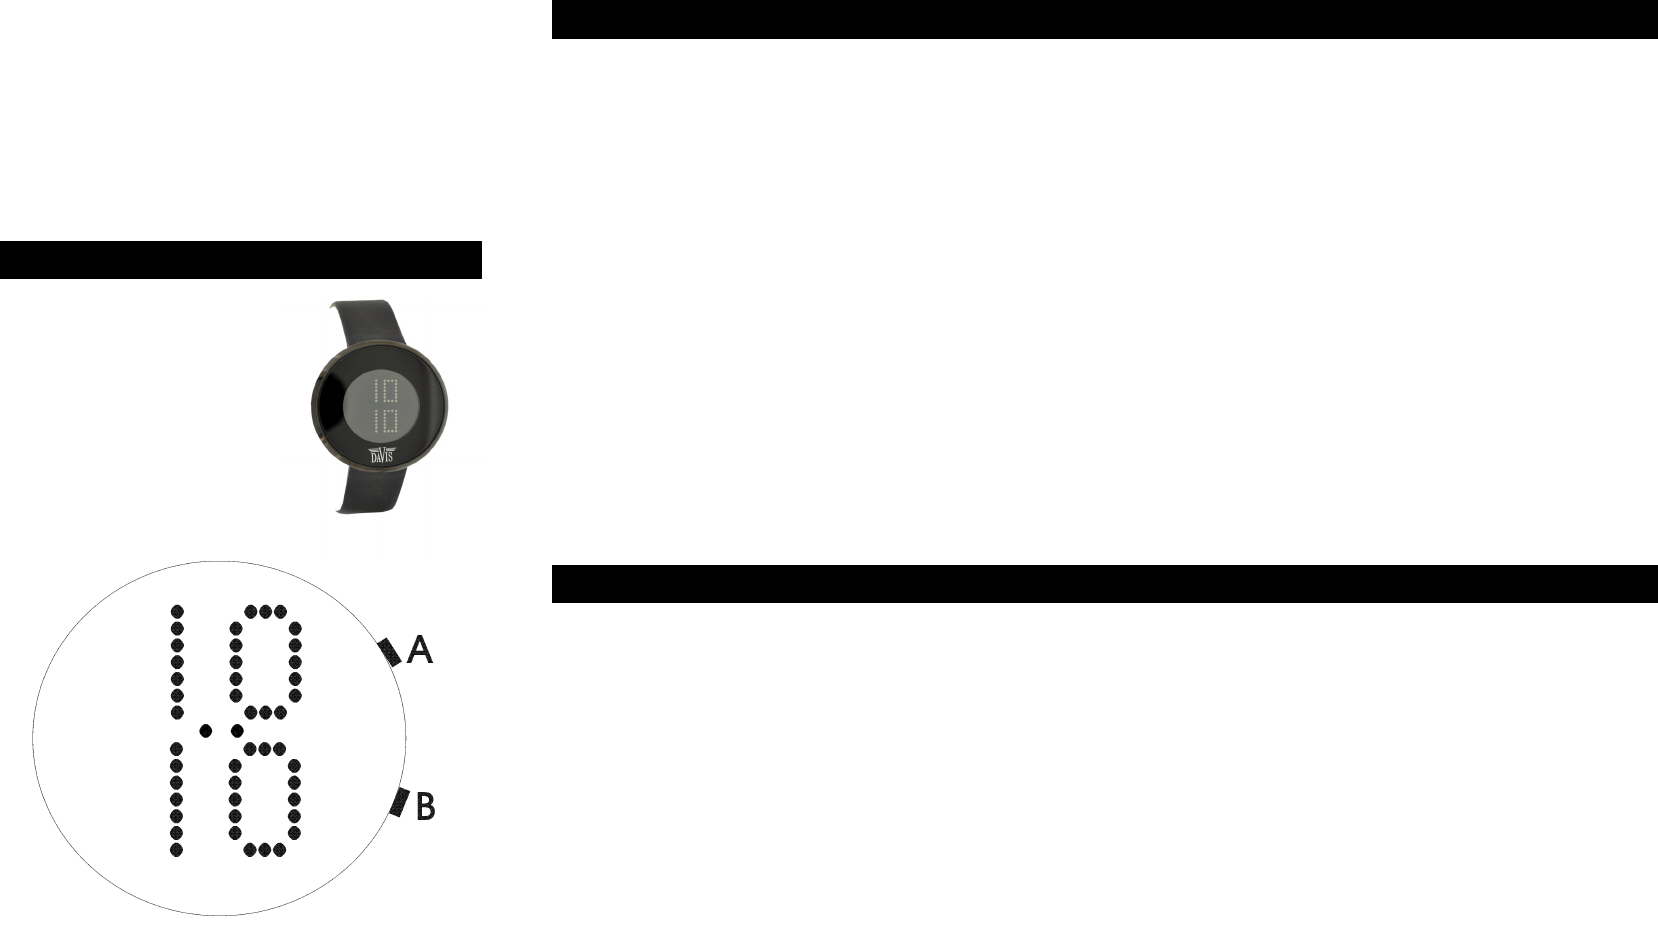
Push 1x on button (A) to display the date. When no other button in pushed, the display will automatically return to
the normal time display after 8-10 seconds. Or push 2x on button (A) to return to the normal time display.
Display the seconds
Push 2x on button (A) to display the seconds. Push again on button (A) to return to the normal time display.
Setting the time
Push 1x on button (B). The top digit flash (= hours). Push on button (A) to change the hour digits. When setting
the time there will be a “P” or “A” shown. Use the “A” when it is between 12 at night and 12 in the afternoon. After
12 o’clock you must use the “P”.
Push again on button (B) and the minutes will flash. Push on button (A) to change the minute digits. Then push
3x on button (B) to return to the normal time setting.
Setting the date
Push 3x on button (B). The month digit will flash. Push on button (A) to change the month digit. Push again on
button (B). The day digit will flash. Push on button (A) to change the day digit. Push again on button (B) to return
to the normal time display.
Affichage de la date
Appuyer une fois sur le bouton A pour afficher la date. Au bout d’environ 15 secondes, la montre va se remettre
en mode normal. Vous pouvez également appuyer deux fois sur le bouton A pour revenir directement à
l’affichage de l’heure.
Affichage des secondes
Appuyer deux fois sur le bouton A. Les secondes vont s’afficher. Pour revenir au mode normal appuyer une
nouvelle fois sur le bouton A.
Réglage de l’heure
Appuyer une fois sur le bouton B. Les heures vont se mettre à clignoter. Appuyer sur le bouton A pour les régler.
Un A ou un P vont apparaître en bas. Le A correspond aux heures entre minuit et midi et le P aux heures entre
midi et minuit.
Appuyer une nouvelle fois sur le bouton B et les minutes vont se mettre à clignoter. Appuyer sur le bouton A pour
les régler. Appuyer deux fois sur le bouton B pour revenir au mode d’affichage normal ou suivez l’étape suivante
pour le réglage de la date
Réglage de la date
Appuyer 3 fois sur le bouton B. Les mois vont se mettre à clignoter. Appuyer sur le bouton A pour les régler.
Appuyer une nouvelle fois sur le bouton B. La date va se mettre à clignoter. Appuyer sur le bouton A pour la
régler.
Appuyer une nouvelle fois sur le bouton B pour revenir au mode de l’affichage de l’heure.
Weergave van de datum
Druk eenmaal op knop (A) om de datum weer te geven. Als er op geen andere knop gedrukt wordt dan zal het
display automatisch na 8-10 seconden terugspringen naar de normale tijd weergave. Of druk twee maal op knop
(A) om sneller terug te keren naar de normale tijd weergave.
Weergave van de seconden
Druk twee maal op knop (A) om de seconde weer te geven. Druk nogmaals op knop (A) om terug te keren naar
de normale tijd weergave.
Het instellen van de tijd
Druk eenmaal op knop (B). Het bovenste cijfer (= uren) knippert. Druk op knop (A) om deze te verzetten. Bij het
instellen van de uren zal "P" of "A" verschijnen onder het cijfer. U moet “A” gebruiken als de huidige tijd tussen
12 uur ’s nachts en 12 uur ’s middags is. Na 12 uur ’s middags moet u de “P” gebruiken.
Druk nogmaals op knop (B) en de minuten zullen nu knipperen. Druk op knop (A) om deze te verzetten. Druk
daarna drie maal op knop (B) om terug te keren naar de normale tijd weergave.
Het instellen van de datum
Druk drie maal op knop (B). De maand knippert. Druk op knop (A) om deze te verzetten. Druk nogmaals op knop
(B). De dag knippert nu. Druk op knop (A) om deze te verzetten. Druk daarna nogmaals op knop (B) om terug te
keren naar de normale tijd weergave.
1710
Need help? Post your question in this forum.
Report abuse
Libble takes abuse of its services very seriously. We're committed to dealing with such abuse according to the laws in your country of residence. When you submit a report, we'll investigate it and take the appropriate action. We'll get back to you only if we require additional details or have more information to share.
Product:
Forumrules
To achieve meaningful questions, we apply the following rules:
First, read the manual;
Check if your question has been asked previously;
Try to ask your question as clearly as possible;
Did you already try to solve the problem? Please mention this;
Is your problem solved by a visitor then let him/her know in this forum;
To give a response to a question or answer, do not use this form but click on the button 'reply to this question';
Your question will be posted here and emailed to our subscribers. Therefore, avoid filling in personal details.
Register
Register getting emails for Davis 1710 at:
new questions and answers
new manuals
You will receive an email to register for one or both of the options.
Get your user manual by e-mail
Enter your email address to receive the manual of Davis 1710 in the language / languages: English, German, Dutch, French as an attachment in your email.
The manual is 0,08 mb in size.
You will receive the manual in your email within minutes. If you have not received an email, then probably have entered the wrong email address or your mailbox is too full. In addition, it may be that your ISP may have a maximum size for emails to receive.
The manual is sent by email. Check your email
If you have not received an email with the manual within fifteen minutes, it may be that you have a entered a wrong email address or that your ISP has set a maximum size to receive email that is smaller than the size of the manual.
The email address you have provided is not correct.
Please check the email address and correct it.
Your question is posted on this page
Would you like to receive an email when new answers and questions are posted? Please enter your email address.