Please do not adjust the date between 22.00 and 02.00 o'clock
Setting the time and the 24-hour indicator
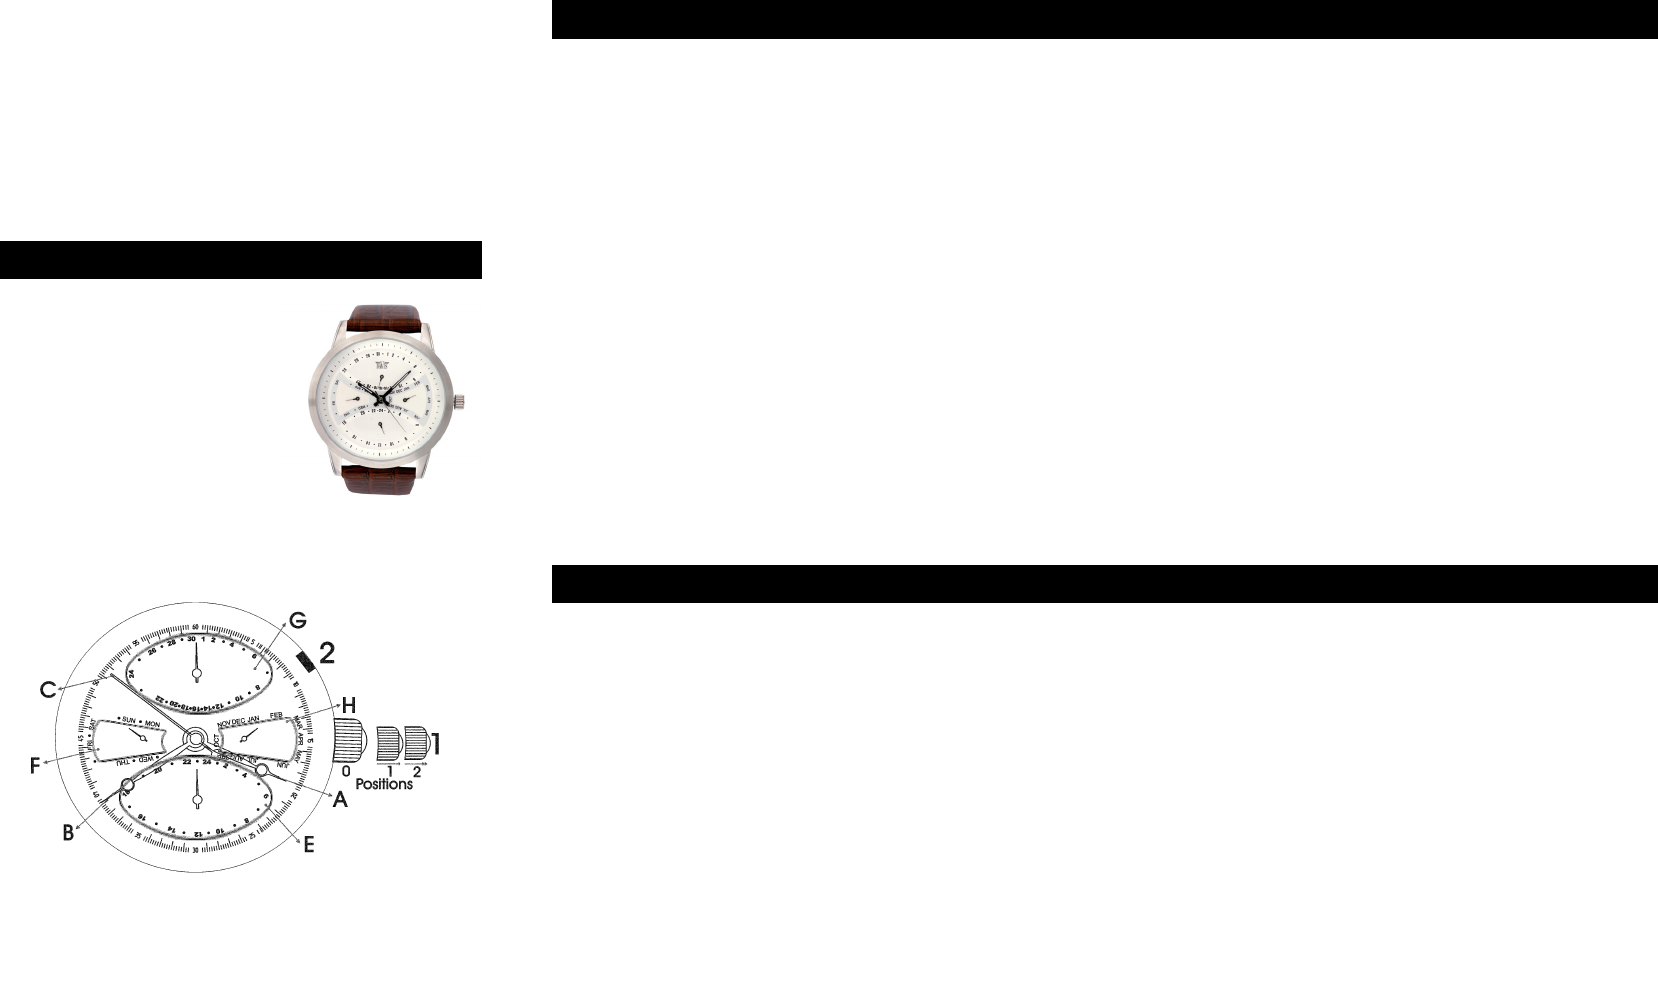
Pull out the crown (1) to position 2. Turn the crown (1) clockwise until the hour (A) and the
minute (B) hands show the correct time. Be careful and check if the 24-hour indicator shows
the right 24-hour time. Push back the crown (1) to position 0.
Setting the day
Pull out the crown (1) to position 2. Turn the crown (1) clockwise until the day indicator
(D) shows the correct day. Push back the crown (1) to position 0.
Setting the date
Pull out the crown (1) to position 1. Turn the crown (1) counter clockwise until the date
indicator (G) shows the correct date. Push back the crown (1) the position 0.
Setting the month
Push (for example with a pen) the month setter (2) until the month indicator (H) shows the
right month
1. Couronne
2. Réglage du mois
A. Aiguille des heures
B. Aiguille des minutes
C. Aiguille des secondes
E. Cadran des 24 heures
F. Cadran des jours
G. Cadran de la date
H. Cadran des mois
Il ne faut jamais changer la date entre 22.00 et 02.00 heures
Réglage de l'heure et cadran des 24 heures
Tirez la couronne (1) en position 2. Tournez la couronne (1) dans le sens des aiguilles d'une
montre jusqu'à ce que les aiguilles (A) (B) indiquent l'heure correcte. Attention, lorsque vous
effectuez le réglage du jour il faut vérifier que le cadran (E) soit à la bonne heure. Repoussez
la couronne (1) à la position 0.
Réglage du jour
Tirez la couronne (1) en position 2. Tournez la couronne (1) dans le sens des aiguilles d'ne
montre jusqu'à ce que l'aiguille du cadran des jours (F) indique le jour correct. Repoussez la
couronne (1) en position 0.
Réglage de la date
Tirez la couronne (1) en position 1. Tournez la couronne (1) contre le sens des aiguilles d'une
montre jusqu'à ce que la indication de la date indiquent la date exacte. Repoussez la
couronne (1) en position 0.
Réglage du mois
Appuyer sur le bouton 2 à l'aide d'une pointe afin de régler le mois (H) correct.
1. Krone
2. Drücker für Monat
A. Stundenzeiger
B. Minutenzeiger
C. Sekundenzeiger
E. 24-Stunden Andeutung
F. Tage Zeiger
G. Datumfenster
H. Monat zeiger
Bitte niemals zwischen 22.00 und 02.00 Uhr das Datum einstellen.
Einstellen der Uhrzeit und 24 Stunden Andeutung
Ziehen Sie die Krone (1) bis zum zweiten Einrasten heraus und drehen Sie sie um
Uhrzeigersinn bis die richtige Zeit angezeigt wird (der kleine Zeiger (E) unten die richtige
24-Std. Andeutung angibt). Zum Schluss drücken Sie die Krone (1) wieder zurück nach
Position 0.
Einstellen des Tages
Ziehen Sie die Krone (1) bis zum zweiten Einrasten heraus und drehen Sie sie im
Uhrzeigersinn bis der kleine Zeiger an der linken Seite den richtigen Tag Anzeigt. Zum
Schluss drücken Sie die Krone (1) wieder nach Position 0.
Einstellen des Datums
Ziehen Sie die Krone (1) bis zum ersten Einrasten aus und drehen Sie gegen Uhrzeigersinn bis
das gewünschte Datum im Datumfenster (G) erscheint. Zum Schluss drücken Sie die Krone
(1) wieder nach Position 0.
Einstellen des Monat
Drucken Sie (zB. Mit Kugelschreiber) den Drucker bis dag gewünschte Monat erscheint.
1. Kroon
2. Maand indicatie zetter
A. Uurwijzer
B. Minuutwijzer
C. Secondewijzer
E. 24-uur indicator
F. Dag indicator
G. Datum indicator
H. Maand indicator
Alstublieft nooit de datum instellen tussen 22.00 en 02.00 uur.
Het instellen van de tijd en de 24-uur indicator
Trek de kroon (1) uit naar positie 2. Draai de kroon (1) met de klok mee totdat de uur (A)
en minuut (B) wijzers de juiste tijd weergeven. Let daarbij op of de 24-uur indicator (E) de
juiste 24-uur tijd weergeeft. Druk daarna de kroon (1) terug naar positie 0
Het instellen van de dag
Trek de kroon (1) uit naar positie 2. Draai de kroon (1) met de klok mee totdat de dag
indicator (D) de juiste dag weergeeft. Druk daarna de kroon (1) terug naar positie 0.
Het instellen van de datum
Trek de kroon (1) uit naar positie 1. Draai de kroon (1) tegen de klok in totdat de datum
indicator (G) de juiste datum weergeeft. Druk daarna de kroon (1) terug naar positie 0.
Het instellen van de maand
Druk (bijvoorbeeld met een pen) de maand indicatie zetter (2) totdat de maand indicator (H)
de juiste maand weergeeft.
0921
Need help? Post your question in this forum.
Report abuse
Libble takes abuse of its services very seriously. We're committed to dealing with such abuse according to the laws in your country of residence. When you submit a report, we'll investigate it and take the appropriate action. We'll get back to you only if we require additional details or have more information to share.
Product:
Forumrules
To achieve meaningful questions, we apply the following rules:
First, read the manual;
Check if your question has been asked previously;
Try to ask your question as clearly as possible;
Did you already try to solve the problem? Please mention this;
Is your problem solved by a visitor then let him/her know in this forum;
To give a response to a question or answer, do not use this form but click on the button 'reply to this question';
Your question will be posted here and emailed to our subscribers. Therefore, avoid filling in personal details.
Register
Register getting emails for Davis 0921 at:
new questions and answers
new manuals
You will receive an email to register for one or both of the options.
Get your user manual by e-mail
Enter your email address to receive the manual of Davis 0921 in the language / languages: English, German, Dutch, French as an attachment in your email.
The manual is 0,12 mb in size.
You will receive the manual in your email within minutes. If you have not received an email, then probably have entered the wrong email address or your mailbox is too full. In addition, it may be that your ISP may have a maximum size for emails to receive.
The manual is sent by email. Check your email
If you have not received an email with the manual within fifteen minutes, it may be that you have a entered a wrong email address or that your ISP has set a maximum size to receive email that is smaller than the size of the manual.
The email address you have provided is not correct.
Please check the email address and correct it.
Your question is posted on this page
Would you like to receive an email when new answers and questions are posted? Please enter your email address.