Please do not adjust the date between 22.00 and 02.00 o' clock. This is very important! At that
moment the movement is turning the date itself and you would damage the date mechanism.
You have bought an automatic watch. So there is no battery inside your watch. Before you
wear the watch the first time, you have to wind up the movement entirely. You can do this by
turning the crown around about 15 times. You now have loaded the power-reserve of the
movement. As long as you continue to wear the watch, you do not have to wind the watch
again. By the motion of your wrist the movement will keep the powerreserve loaded. When
you have not worn the watch for a few days, the powerreserve is used up and the watch will
stop. You have to wind the watch again and adjust the time and the date. It's important not to
adjust the date between 22.00 and 02.00 o'clock. In that time the movement is turning the
date itself and you would damage the date mechanism.
Setting the date
First continue turning the hands clockwise until the movement turns the date itself, then
continue turning the hands for the right time .
Step 1: Unscrew the serrated button (2) all the way . The button will come out.
Step 2: Push the serrated button (2) until display (G) shows the right date.
Step 3: Screw up (lock) the serrated button (2) again. This way the button will be locked and
will prevent unwanted pushes on the button.
This movement has extremely big date-numbers, because this movement has two different
date-rings with numbers, one with decimals (1.2 & 3) and one with units ( 0 -9). Therefor this
date turns till 39. That is why you have to change the date yourself from the 31th to the 1th. A
single date-ring with 31 dates on it moves from 31 to 1, but has 31 different numbers on it's
date-ring and then the numbers can only be small.
Setting the month (Manual adjustment)
Step 1: Unscrew the serrated button (2) all the way . The button will come out.
Step 2: Push the serrated button (3) until display (H) shows the right month.
Step 3: Screw up (lock) the serrated button (2) again. This way the button will be locked and
will prevent unwanted pushes on the button.
Setting the day of the week
Press button (4) until display (F) shows the right day of the week.
Setting the time
Pull out the crown (1). And turn the crown until the hands are on the right time.
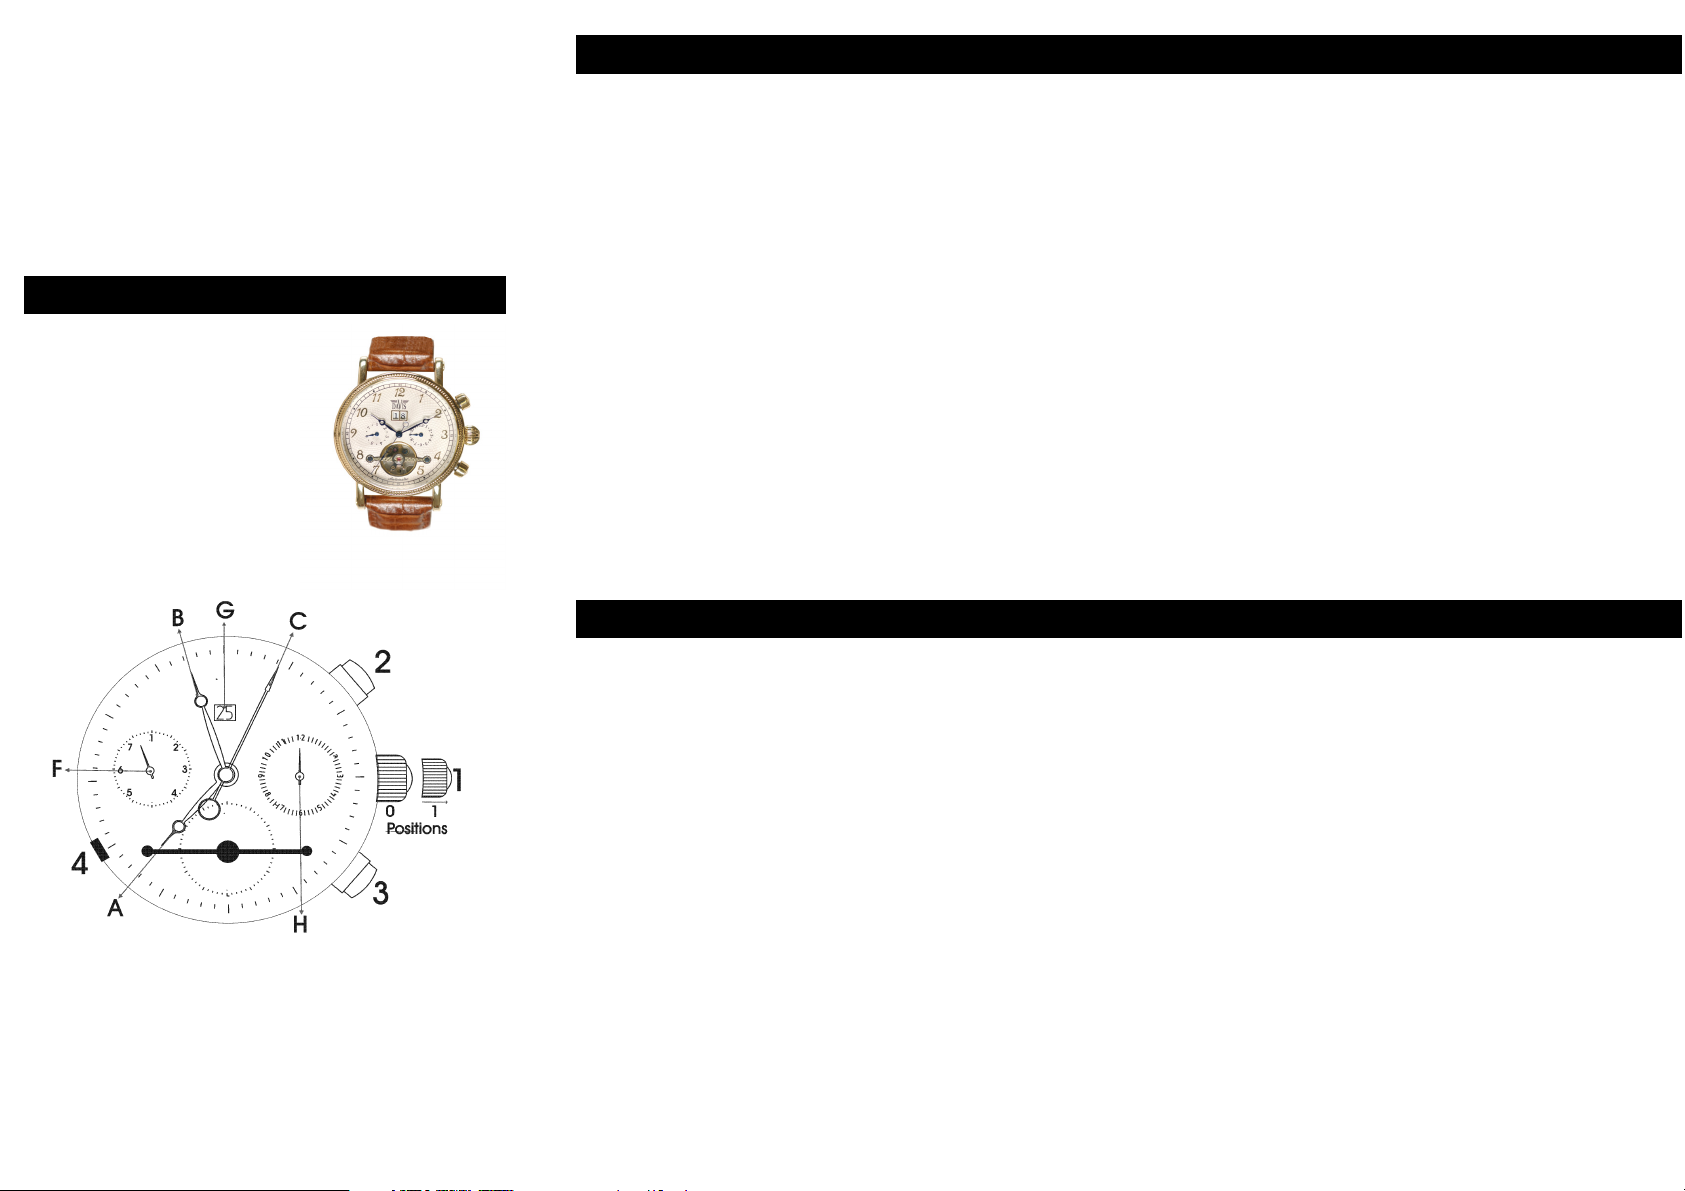
1. Remontoir A. Aiguille des heures
2. Réglage de la date B. Aiguille des minutes
3. Réglage du mois C. Aiguilles des secondes
4. Réglage du jour F. Indicateur du jour de la semaine
G. Indicateur de la date
H. Indicateur du mois (manual adjustment)
Veuillez ne pas ajuster la date entre 22.00 et 02.00 heures du matin. Ceci est très important!
Vous venez d'acquérir une montre automatique. Ce qui veut dire qu'elle fonctionne sans pile.
Lorsque vous utilisez votre montre pour la première fois, vous devez remonter le mouvement
au maximum. Pour cela, tournez le remontoir dans le sens des aiguilles d'une montre jusqu'à
sentir une résistance. Le mouvement de votre montre est maintenant complètement chargé.
Tant que vous portez votre montre, vous n'avez pas besoin de la remonter. Par le mouvement
de votre poignet, elle se recharge automatiquement. Lorque vous n'avez pas porté votre
montre depuis quelques jours, elle s'arrête. Vous devez donc remonter la montre une
nouvelle fois et régler l'heure et la date. Important : ne pas régler votre montre entre 22h et
2h du matin ! Durant cette période, le mouvement change lui-même la date et vous casseriez
le mécanisme.
Réglage de la date
Étape 1 : Tournez le bouton dentelé (2) dans le sens inverse des aiguilles d'une montre. Le
bouton sortira.
Étape 2 : Appuyez le bouton dentelé (2) jusqu'à ce que la fenêtre (G) affiche la bonne date.
Étape 3 : Tournez le bouton dentelé (2) dans le sens des aiguilles d'une montre. Ainsi, le
bouton sera bloqué et la date ne pourra pas être involontairement modifiée.
bloqué et ceci empêche non désiré poussant le bouton.
Vous devez effectuer le changement de date vous-même entre le 31 du mois et le 1 er du mois
suivant.
Réglage du mois (ajustement manuel)
Étape 1 : Tournez le bouton dentelé (3) dans le sens inverse des aiguilles d'une montre. Le
bouton sortira.
Étape 2 : Appuyez sur le bouton dentelé (3) jusqu'à ce que la lunette (H) affiche le bon mois.
Étape 3 : Tournez le bouton dentelé (3) dans le sens des aiguilles d'une montre. Ainsi, le
bouton sera bloqué et la date ne pourra pas être involontairement modifiée.
bloqué et ceci empêche non désiré poussant le bouton.
Réglage du jour de la semaine
Appuyez sur le bouton (4) jusqu'à ce que le jour exacte s'affiche.
Réglage de l'heure
Tirez le remontoir (1) en position 0 et tournez jusqu'à ce que les aiguilles (A) et (B) affichent
l'heure exacte
1. Krone A. Stundenzeiger
2. Drücker für Datum B. Minutenzeiger
3. Drücker für Monat C. Sekundenzeiger
4. Drücker für Tag F. Anzeige Tag
G. Anzeige Datum
H. Anzeige Monat (manuelle Einstellung)
Sehr wichtig: Bitte das Datum niemals zwischen 22:00 und 02:00 Uhr einstellen!
Sie habeneine Automatik Uhr gekauft. Das heisst das sich in Ihrer Uhr keine Batterie befindet.
Wenn Sie die Uhr zu ersten Mal tragen müssen sie das Uhrwerk aufziehen. Dazu müssen Sie
die Krone (1) im Uhrzeigersinn solange drehen bis Sie mehr Widerstand bemerken. Sie haben
nun die Gangreserve des Uhrwerks aufgeladen.
Solange Sie die Uhr tragen müssen Sie sie nicht aufziehen. Mit der Bewegung Ihres
Handgelenkes wird die Gangreserve ständig aufgeladen. Wenn Sie die Uhr für einige Tage
nicht tragen ist Gangreserve aufgebraucht.
Sie müssen die Uhr wieder aufziehen und Datum und Uhrzeit neu einstellen.
Wichtig: Niemals zwischen 22.00 und 02.00 Uhr das Datum einstellen. In diesem Zeitraum
dreht das Uhrwerk selber das Datum und Sie würden den Datumsmechanismus brechen.
Das Datum einstellen
1. Die gerändelte Hülse des Drückers (2) bis zum Anschlag nach links drehen.
2. Den Drücker (2) betätigen, bis im Fenster (G) das korrekte Datum angezeigt wird.
3. Die Hülse des Drückers (2) bis zum Anschlag nach rechts drehen. Dadurch wird der
Drücker gegen versehentliches Betätigen gesichert.
Am Monatsanfang muss evtl. das Datum manuell nachgestellt werden.
Den Monat einstellen (manuell)
1. Die gerändelte Hülse des Drückers (3) bis zum Anschlag nach links drehen.
2. Den Drücker (3) betätigen, bis in der Skale (H) der korrekte Monat angezeigt wird.
3. Die Hülse des Drückers (3) bis zum Anschlag nach rechts drehen. Dadurch wird der
Drücker
gegen versehentliches Betätigen gesichert.
Den Wochentag einstellen
1. Den Drücker (4) mit einem spitzen Gegenstand betätigen, bis der korrekte Tag angezeigt
wird.
Die Zeit einstellen
1. Die Krone (1) bis zur Rastung herausziehen. Die Krone (1) gegen den Uhrzeigersinn
drehen, um die Zeiger (A+B) auf die aktuelle Tageszeit einzustellen.
2. Die Krone (1) wieder eindrücken.
1. Kroon A. Urenwijzer
2. Datum indicatie pusher (zetter) B. Minuten wijzer
3. Maand indicatie pusher ( zetter) C. Secondewijzer
4. Dag indicatie zetter F. Dag van de week
G. Datum
H. Maand (moet handmatig versteld worden)
Verander de datum nooit 's-nachts tussen 22.00 en 02.00 uur. Dit vernield datum-radar !!!
Het uurwerk is dan namelijk zelf bezig de datum te verstellen.
U heeft een automatisch horloge gekocht. Er zit dus geen batterij in uw horloge.
Wanneer u het horloge voor het eerst gaat dragen, moet u het uurwerk eerst helemaal
opwinden. Dit kunt u doen door de kroon met de klok mee op te winden +/- 15 slagen.
U heeft nu de gangreserve van het uurwerk opgeladen. Zolang u het horloge blijft dragen,
hoeft u het horloge niet opnieuw op te winden. Door de bewegingen van uw pols houdt het
uurwerk de gangreserve in opgeladen toestand. Heeft u het horloge een paar dagen niet
gedragen, dan is de gangreserve verbruikt en staat het horloge stil. U moet dan wederom
het horloge opwinden. U kunt dan ook de tijd en de datum goed zetten. Let hierbij goed op
dat u dit niet tussen 22.00 uur en 02.00 uur doet. Dan is het uurwerk zelfde datum aan het
verzetten en u zou dan het datum mechanisme beschadigen.
Het instellen van de datum
Draai eerst de wijzers zolang door tot uurwerk de datum verzet heeft, vervolgens doordraaien
tot de juiste tijd overdag.
Stap 1: de (gekartelde) knop (2) geheel naar links (los)draaien. Het knopje komt dan los.
Stap 2: de knop (2) indrukken totdat venster G de juiste datum weergeeft.
Stap 3: de knop (2) weer naar rechts draaien. Hierdoor wordt de knop geblokkeerd
en dit voorkomt ongewenst indrukken.
U moet zelf na de 31ste de datum verzetten naar 1ste. Dit komt doordat het hier een extreem
grote datum betreft ; het uurwerk heeft namelijk 2 aparte datumringen, een met tientallen de
ander met eenheden, vandaar dat hij doortelt tot de 39. Een kleine datum ring met 31 data erop
gaat door naar 1, maar heeft daardoor veel kleinere datum cijfers.
Het instellen van de maand. (handmatig verstellen)
Stap 1: de gekartelde knop (3) geheel naar links draaien. Het knopje komt dan naar buiten.
Stap 2: de gehele knop (3) indrukken totdat oog H de juiste maand weergeeft.
Stap 3: De gekartelde knop (3) weer naar rechts draaien. Hierdoor wordt de knop geblokkeerd
en dit voorkomt ongewenst indrukken.
Het instellen van de dag :
Druk op knop (4) totdat de juiste dag wordt weergegeven.
Het instellen van de tijd :
Trek de kroon (1) uit. Draai de kroon naar u toe totdat de juiste tijd wordt weergegeven.
0532
Need help? Post your question in this forum.
Report abuse
Libble takes abuse of its services very seriously. We're committed to dealing with such abuse according to the laws in your country of residence. When you submit a report, we'll investigate it and take the appropriate action. We'll get back to you only if we require additional details or have more information to share.
Product:
Forumrules
To achieve meaningful questions, we apply the following rules:
First, read the manual;
Check if your question has been asked previously;
Try to ask your question as clearly as possible;
Did you already try to solve the problem? Please mention this;
Is your problem solved by a visitor then let him/her know in this forum;
To give a response to a question or answer, do not use this form but click on the button 'reply to this question';
Your question will be posted here and emailed to our subscribers. Therefore, avoid filling in personal details.
Register
Register getting emails for Davis 0532 at:
new questions and answers
new manuals
You will receive an email to register for one or both of the options.
Get your user manual by e-mail
Enter your email address to receive the manual of Davis 0532 in the language / languages: English, German, Dutch, French as an attachment in your email.
The manual is 0,12 mb in size.
You will receive the manual in your email within minutes. If you have not received an email, then probably have entered the wrong email address or your mailbox is too full. In addition, it may be that your ISP may have a maximum size for emails to receive.
The manual is sent by email. Check your email
If you have not received an email with the manual within fifteen minutes, it may be that you have a entered a wrong email address or that your ISP has set a maximum size to receive email that is smaller than the size of the manual.
The email address you have provided is not correct.
Please check the email address and correct it.
Your question is posted on this page
Would you like to receive an email when new answers and questions are posted? Please enter your email address.