A car audio amplifier is generally mounted in the rear trunk area but can be mounted in any convenient area such as beneath a seat. Please be sure to
locate this unit where you have reasonable air circulation and protection from moisture. When considering the mounting location you should minimize
the length of the power and speaker leads. Minimizing both leads will yield a more reliable installation. It is also important to ensure that the heat sink
fins are not against a panel or a surface, preventing air circulation. Do not install the amplifier on a subwoofer box or on vibrating parts of the vehicle,
since the vibrations can cause damage to the amplifiers electrical components.
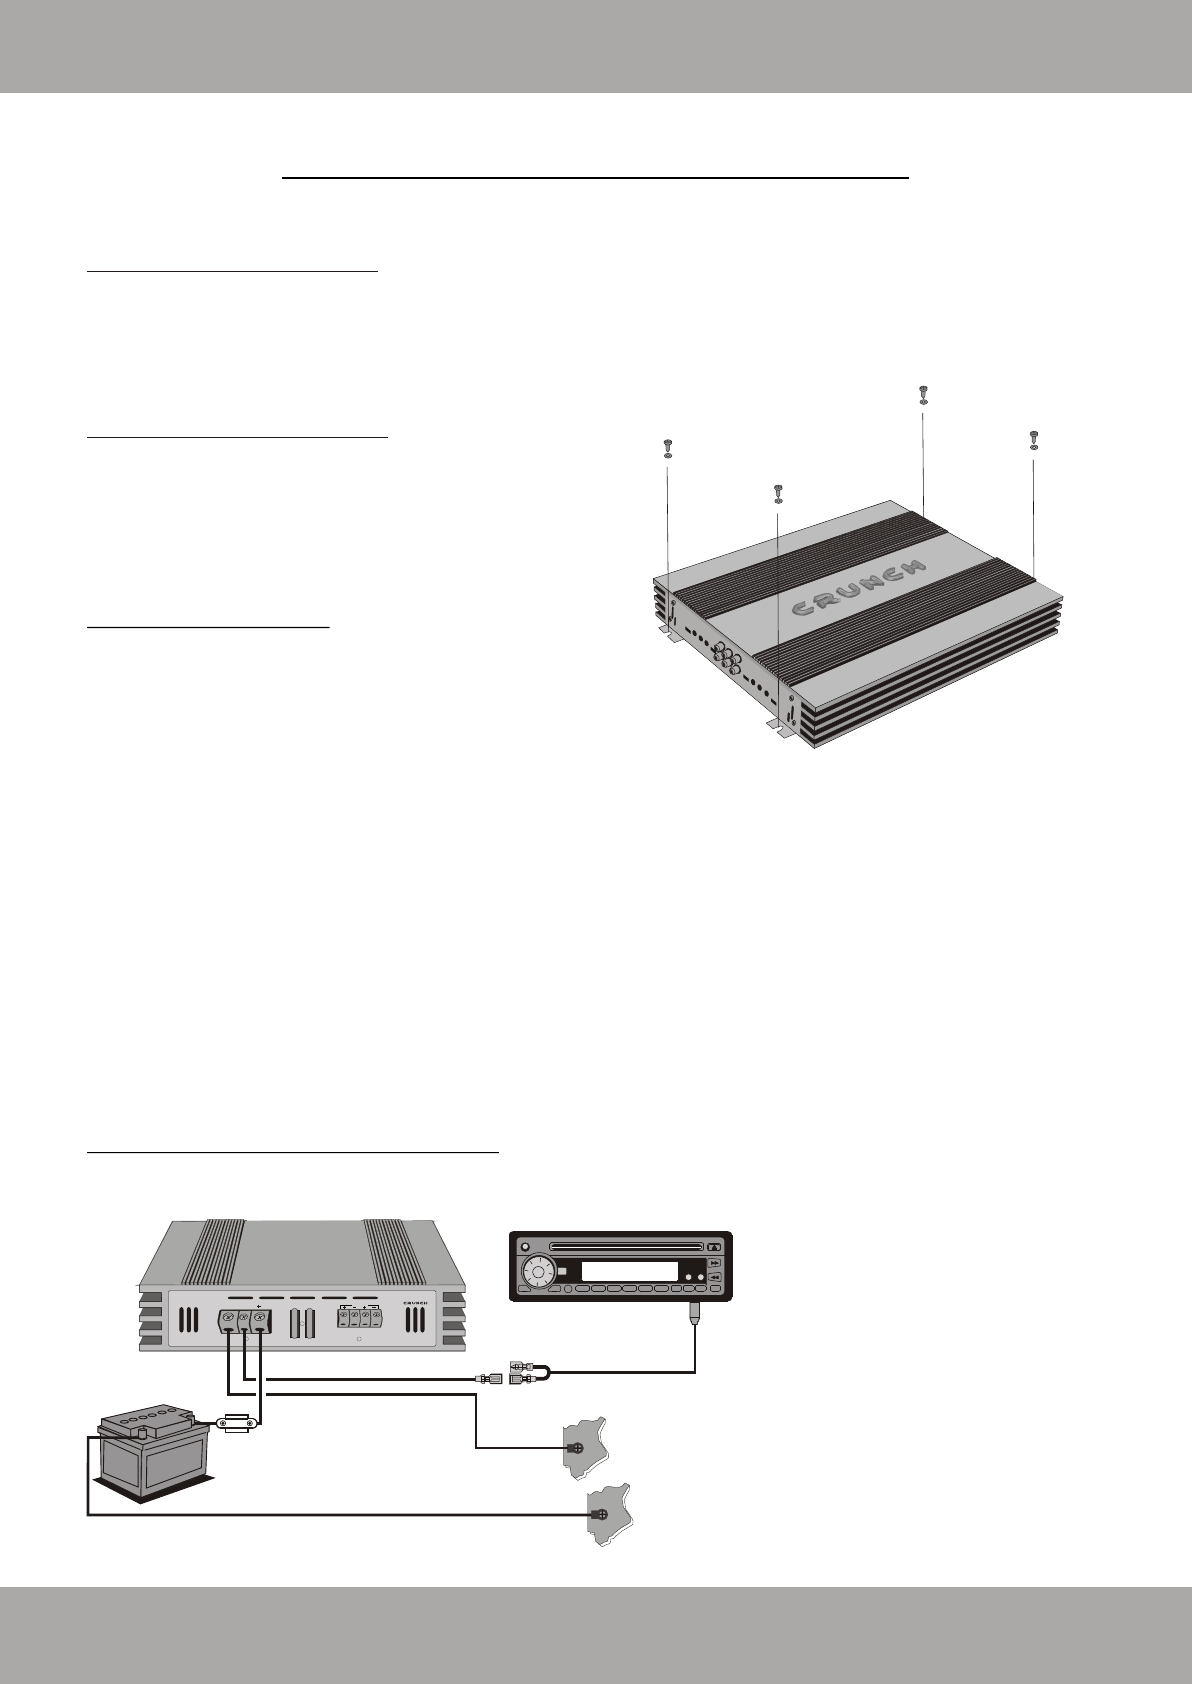
Installation of the Amplifier
Mark the location for the mounting screw holes by using the amplifier as a
template. Drill holes at the marked locations and firmly fasten the amplifier
in place with the mounting screws supplied in the accessory kit. Before drilling
or cutting any holes, investigate the layout of your automobile thoroughly:
Take care when working near the gas lines or hydraulic lines and
electrical wiring of your car.
Electrical Connection
Ground (GND)
This wire is the electrical ground and must be fastened securely to the vehicle chassis.
The best method is to use a threading sheet metal screw since the threads cut into
bare metal. Ensure that all paint or other insulation is remove from around the hole area,
and using self tapping screw, securely affix the bare wire ends to the vehicle chassis. Use
as short a piece of cable as possible - use the same gauge as was used for the +12V cable.
Make sure that the connection is safe, a loose connection may result in amplifier noise and fault condition.
Remote (REM)
Many music sources have an output terminal for connection of the remote turn-on of the power amplifier. If a radio doesn't have a remote turn-on
feature, then you can use the antenna relay wire, which activates the antenna motor. Please note, if the power antenna retracts when the radio is
operating, then you cannot use the antenna relay wire to operate the remote turn-on.
Battery Connection (+12V)
This wire is usually connected directly to the positive battery terminal. Ensure that the + power supply wire is fused via an assigned fuse in line with the
+ power supply wire. Please use a sufficient gauge for the installed amplifiers (min 16-25 mm). This connection must be completed using spade lug
with insulating sleeve.
Fuses
The integrated amplifier fuses protect the units from short circuit and overload. The fuse rating is for 4 Ohm loads (impedance) of the speakers, for
2 Ohm loads the fuses may have to get increased in case of higher power consumption.
Libble takes abuse of its services very seriously. We're committed to dealing with such abuse according to the laws in your country of residence. When you submit a report, we'll investigate it and take the appropriate action. We'll get back to you only if we require additional details or have more information to share.
Product:
Forumrules
To achieve meaningful questions, we apply the following rules:
First, read the manual;
Check if your question has been asked previously;
Try to ask your question as clearly as possible;
Did you already try to solve the problem? Please mention this;
Is your problem solved by a visitor then let him/her know in this forum;
To give a response to a question or answer, do not use this form but click on the button 'reply to this question';
Your question will be posted here and emailed to our subscribers. Therefore, avoid filling in personal details.
Register
Register getting emails for Crunch GTR620.2 at:
new questions and answers
new manuals
You will receive an email to register for one or both of the options.
Get your user manual by e-mail
Enter your email address to receive the manual of Crunch GTR620.2 in the language / languages: English, German as an attachment in your email.
The manual is 3,99 mb in size.
You will receive the manual in your email within minutes. If you have not received an email, then probably have entered the wrong email address or your mailbox is too full. In addition, it may be that your ISP may have a maximum size for emails to receive.
The manual is sent by email. Check your email
If you have not received an email with the manual within fifteen minutes, it may be that you have a entered a wrong email address or that your ISP has set a maximum size to receive email that is smaller than the size of the manual.
The email address you have provided is not correct.
Please check the email address and correct it.
Your question is posted on this page
Would you like to receive an email when new answers and questions are posted? Please enter your email address.