Bedienelemente/Oper
1
1
1
4
5
6
3
7
2
1
1
9
1 8
A C
B D
E
DE
1. LIEFERUMFANG
1 x Sender
Über die beiliegende Bestellkarte können Sie Ersatzteile für den Empfänger
und den Sender erwerben.
Bitte ver
Haftung bei Sach- oder Personenschäden übernommen. In diesem Fall erlischt jeder
Garantieanspruch.
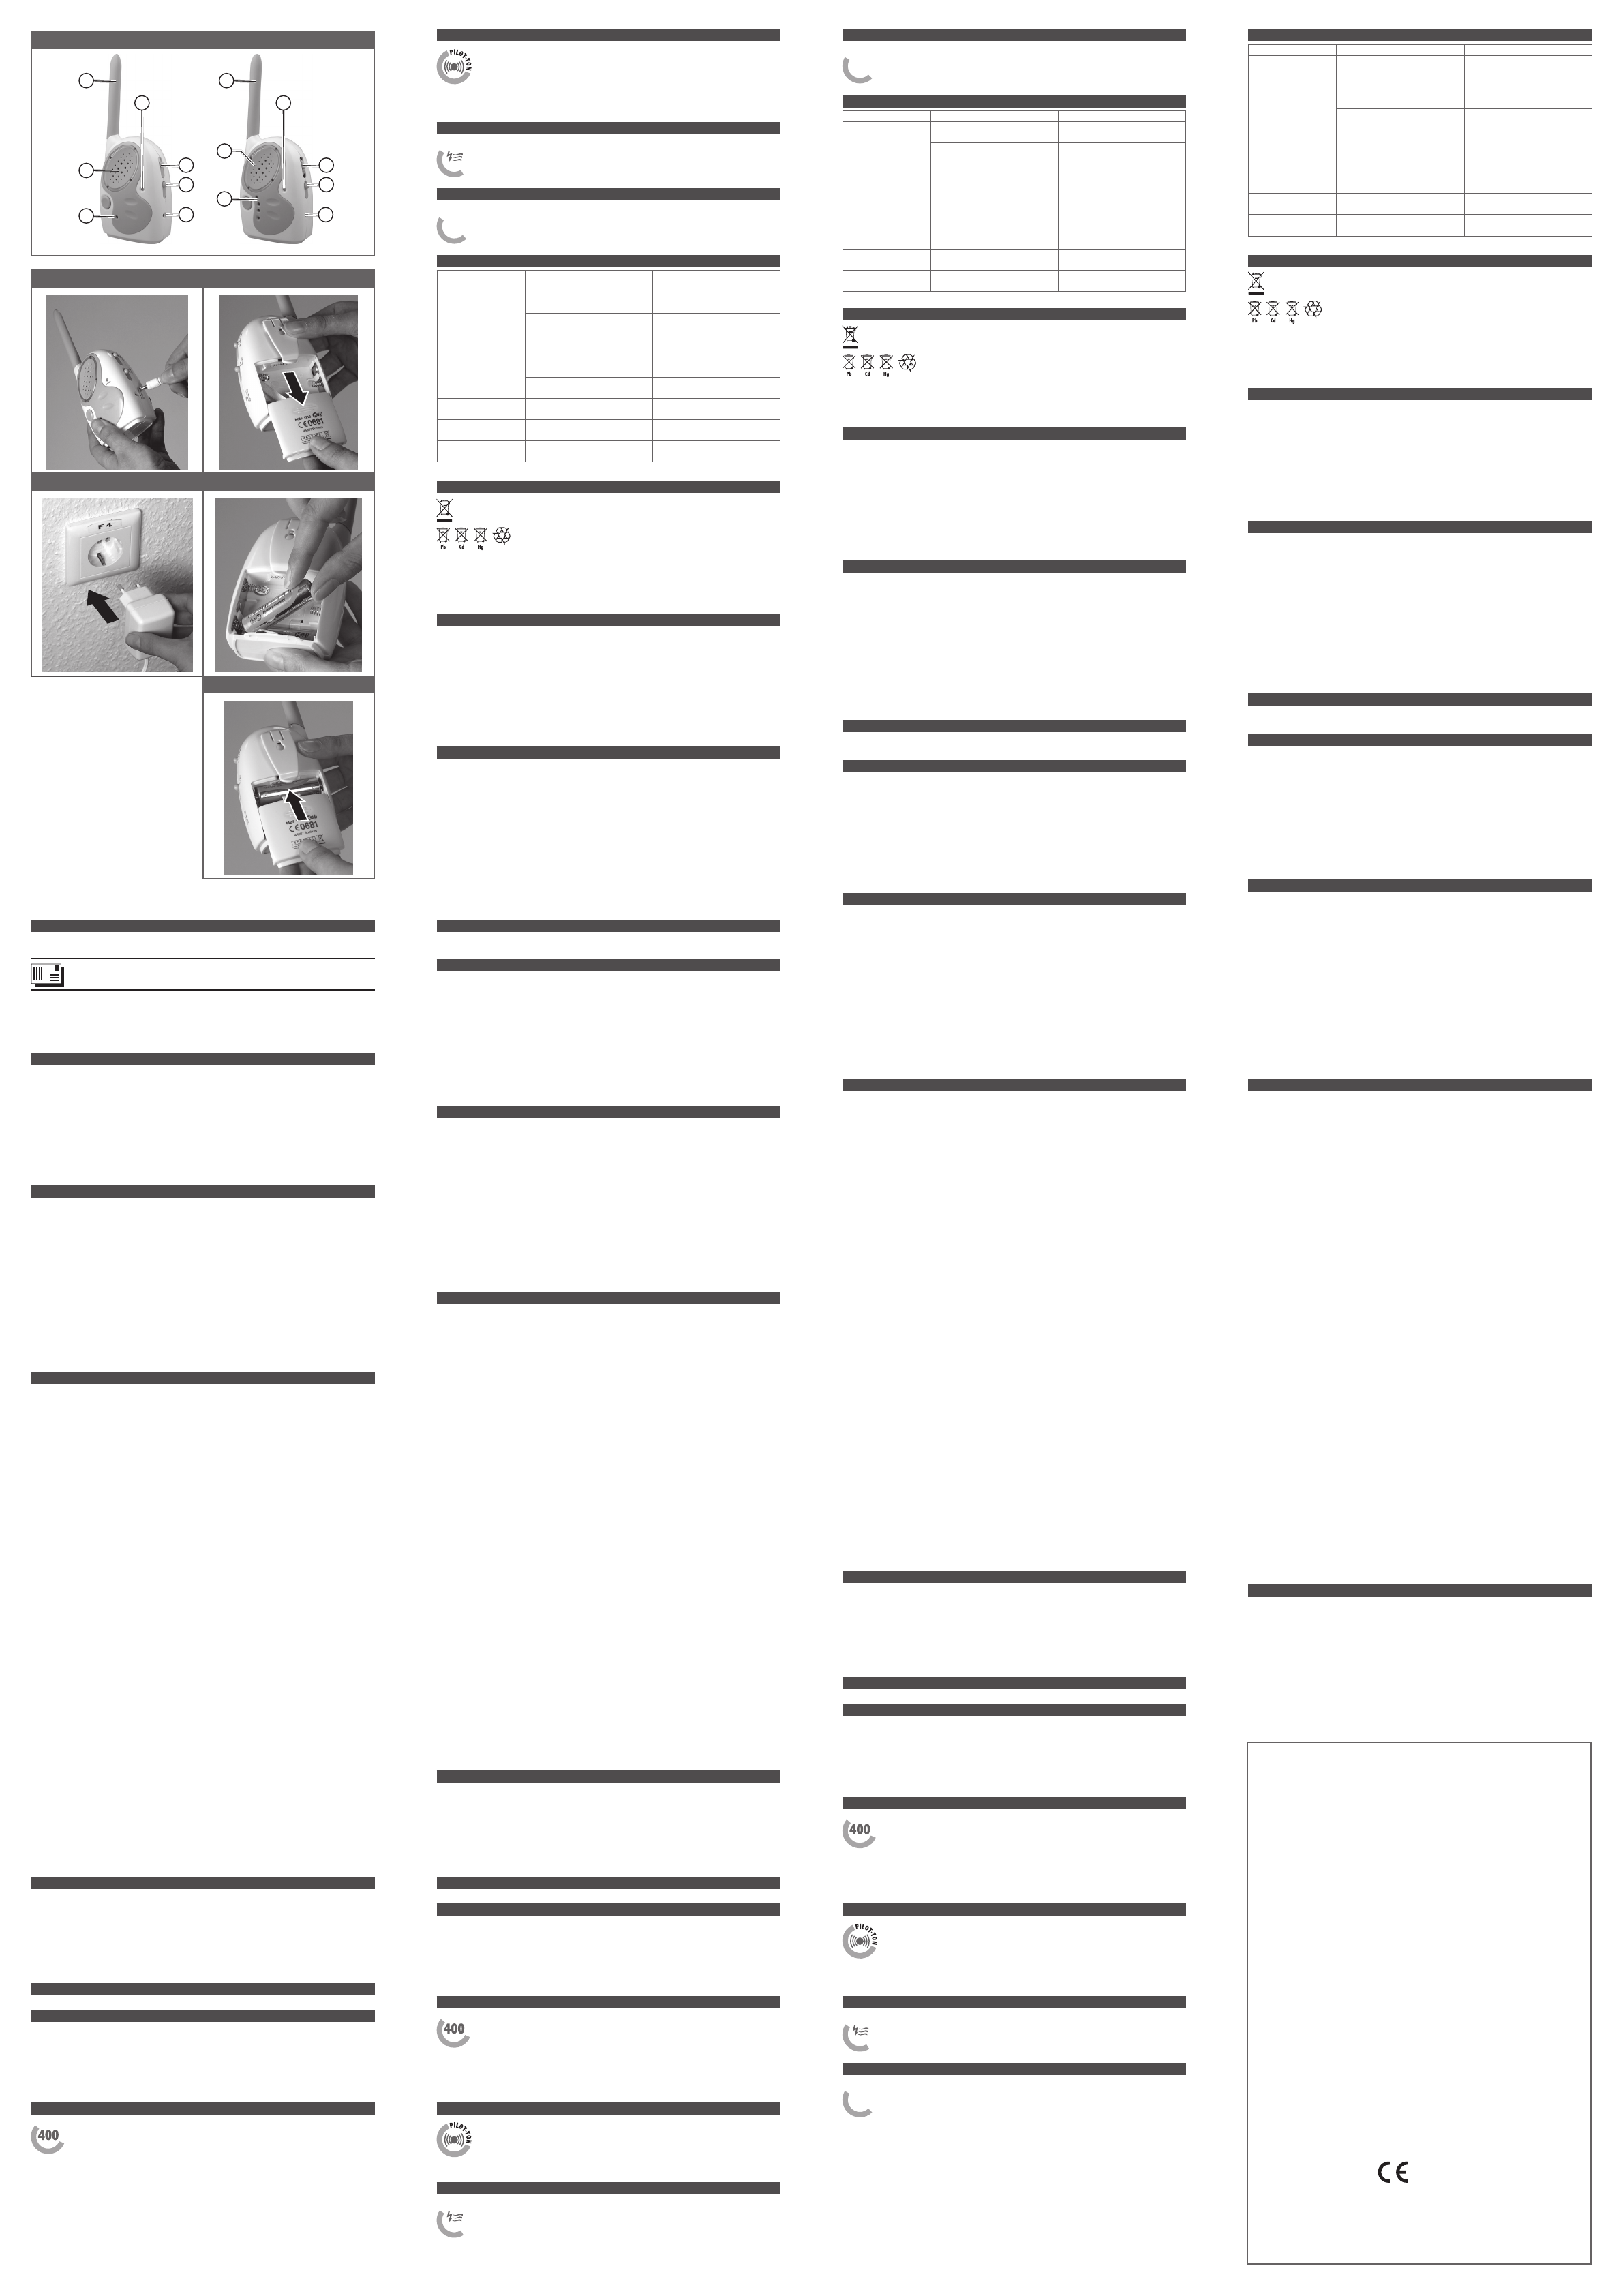
2. BEDIENELEMENTE
Sender
1. Antenne
2. Mikrofon
3. Sendeanzeige
4. Betriebsanzeige
5. Ein/Aus/Empfindlichkeits-Schalter
6. Kanalwahl-Schalter
7 Netzbuchse
Empfänger
8. Antenne
9. Lautsprecher
1 Optische Empfangsanzeige
1 Betriebsanzeige
1 Ein/Aus/Lautstärke-Schalter
1 Kanalwahl-Schalter
1 Netzbuchse
3. WICHTIGE HINWEISE
•VorGebrauchdesGerätesdieBedienungsanleitunglesen!
•VermeidenSieeinestarkemechanischeBeanspruchungdesPr
•Set
starkenVibrationenoderNässeaus.
•LassenSiedasVerpackungsmaterialnichtachtlosliegen,denneskönntefürKin-
derzueinemgefähr
•Plat
•StellenSiedieGeräteimmeraußerhalbderReichweitevonkleinenKindernauf.
•EinsichererBetriebistnichtmehrgewährleistet,wenndasGer-
denaufweistodernichtmehrordnungsgemäßfunktionier
•War
F
4. INBETRIEBNAHME
1. Sender senkr
Hinweise! Aus Sicherheitsgründen und zur optimalen Geräuschübertragung emp-
fehlen wir Ihnen, einen Abstand von 1 Meter zwischen Sender und Baby nicht zu un-
terschreiten. L
Laufgitter!
2. Steckernetzteil mit dem Sender und einer Steckdose verbinden, die möglichst
weit vom Baby entfernt ist (siehe Abb. A und B).
3. Schalten Sie nun den Sender mit dem Schiebeschalter ein. Die Betriebsber
schaft wird Ihnen dur
Der Schalter verfügt über drei P
AUS – Das Gerät ist ausgeschaltet.
LOW –
HI – Der Sender ist aktiviert und auf hohe Empfindlichkeit eingestellt.
Empfindlichkeit bezeichnet die Ansprechschwelle des Sender
duell den örtlichen Gegebenheiten angepasst sein.
4. Mit dem Kanalwahlschalter auf der r
gungskanäle gewählt. In der Stellung 1 überträgt das Ger
Stellung 2 auf Kanal 2.
5. Empfänger in einem ander
6. Das zweite Steckernetzteil mit dem Empfänger und einer Steckdose verbinden
(siehe Abb. A und B).
7. Mit dem Kanalwahlschalter wählen Sie den Übertr
Grundsätzlich müssen Sender und Empfänger für den Betrieb auf den gleichen
Kanal (1 oder 2) eingestellt wer
8. Durch Dr
Nach dem Einschalten leuchtet die LED auf und zeigt Ihnen die Betriebsbereit-
schaft an.
9. Die Übertragung beginnt automatisch, sobald der Sender dur
aktiviert wird. Sobald ein Ger
akustisch wahr
das empfangene Geräusch ist, umso mehr Dioden leuchten auf.
1 Um das Babyüber
überprüfen, stellen Sie Ihren Sender in den gewünschten Raum auf und schalten
z. B. ein Radio auf Zimmerlautstärke ein.
1 Gehen Sie mit Ihrem Empfänger einmal dur
gewünschte Lautstärke über den Lautstärkeregler ein.
5. EINLEGEN DER BA
1. Zum Einlegen bzw
auf der Rückseite von Sender und Empfänger (siehe Abb. C).
2. Legen Sie nun aufgeladene Akkus oder neue Batterien unter Beachtung der Po-
larität (+/-) in die dafür vorgesehenen Mulden (siehe Gehäusepr
3. Schließen Sie nun das Batteriefach, indem Sie den Batteriefachdeckel wieder auf
das Gehäuse schieben (Abb. E).
6. FUNKTIONSBESCHREIBUNG
6.1 BA
Wenn bei Batterie-/Akkubetrieb die Batteriespannung nicht mehr ausreichend ist,
wird Ihnen das sowohl am Sender als auch am Empfänger angezeigt.
Bei zu geringer Betriebsspannung wechselt die Farbe der Betriebsanzeige beim Sen-
der und beim Empfänger von grün auf rot.
Wichtig: Akkus können nicht in den Geräten geladen werden!
6.2 REICHWEITE
R
E
I
C
H
W
E
I
T
E
Meter
Aufgrund der physikalischen Ausbreitungsbedingungen von Funkwel-
len müssen Sie die Reichweite Ihres Babyüberwachungsger
Umgebung durch Auspr
erzielen Sie eine Reichweite bis zu 400 m. Die tatsächliche Reichweite hängt aber
im Wesentlichen von den örtlichen Verhältnissen ab. Hier sind z. B. der Standort des
Senders, die Art der Bebauung oder die atmosphärischen Bedingungen zu berück-
sichtigen.
6.3 PILOTTON
Die Funksicherheit und die Störfreiheit dieses Babyüberwachungsgerätes
werden dur
lotton zusätzlich verbessert. Dieser Pilotton bewirkt, dass der Empfänger
sich nur dann einschaltet, wenn Geräusche vom eigenen Sender
wachenden Baby
6.4 ELEKTRO-SMOG-REDUZIERUNG
E
L
E
K
T
R
O
-
S
M
O
G
reduziert
Die bei Erzeugung von Funkwellen entstehenden elektromagnetischen
Felder wer
6.5 ÜBERTRAGUNGSTECHNIK
F
U
N
K
-
T
E
C
H
N
I
K
MHz
40
Die 40-MHz-Funk-T
drahtlos per Funk zu übertr
7. TIPPS UND TRICKS FÜR DEN ST
Pr Ursache Lösungsvorschlag
keine Übertragung/
kein Empfang
unterschiedliche K
Sender und Empfänger ein-
gestellt
Stellen Sie Sender und Emp-
fänger auf den gleichen Ka-
nal ein
Empfänger ist außerhalb der
Reichweite
Distanz zwischen Sender und
Empfänger verringern
Akku/Batterien entleert oder
Stromver
chen
wenn Sender oder Empfänger
keine Funktion haben, bitte
einmal die Stromver
überprüfen
Mikrofonempfindlichkeit am
Sender zu gering eingestellt
erhöhen Sie die Empfindlich-
keit am Sender
lauter Pfeifton/
Rückkopplung
Empfänger ist zu nah am
Sender
Distanz zwischen Sender und
Empfänger vergr
Übertragung leiser
Geräusche
Mikrofonempfindlichkeit am
Sender zu hoch eingestellt
verringern Sie die Empfind-
lichkeit am Sender
Störungen während
der Übertragung
Fremdsender verur
ferenzen
wechseln Sie den Kanal bei
Sender und Empfänger
8. ENTSORGUNGSHINWEIS
Altgeräte, die mit dem abgebildeten Symbol gekennzeichnet sind, dürfen nicht
mit dem Hausmüll entsorgt wer
Verbrauchte Batterien und Akkumulator
der abgebildeten Symbole gekennzeichnet sind, dürfen nicht mit
dem Hausmüll entsorgt wer
Sie müssen sie bei einer Sammelstelle für Altgeräte, Altbatte
formieren Sie sich bitte bei Ihr
gekauft haben, abgeben.
9. PFLEGE UND GE
T
und verwenden Sie bitte keine aggressiven Reiniger
Das Gerät wur
Grund zu einer Beanstandung haben, senden Sie uns das Gerät mit der K
ein. W
Für Schäden, die durch falsche Handhabung, unsachgemäße Nutzung oder Ver-
schleiß verursacht wur
T
1TECHNISCHE DA
T
T
Betriebsspannung (Sender und Empfänger): 6 V DC mit vier Mignonbatterien/-akkus
(AA) oder mit Netzteil
max. Reichweite: 400 Meter je nach örtlichen Gegebenheiten
Steckernetzteil: 9 V DC, 1
Aktuelle Pr
www
GB
1. SCOPE OF DELIVERY
1 x transmitter
2. OPERA
Tr
1. Antenna
2. Microphone
3. Sending display
4. Operating display
5. On/off/sensitivity switch
6. Channel Selector
7 Power jack
Receiver
8. Antenna
9. Loudspeaker
1 Optical notice of receipt
1 Operating display
1 On/off/volume switch
1 Channel Selector
1 Power jack
3. IMPORT
•Readtheoperatinginstructionsbeforeusingtheequipment!
•Avoidexer
•Donotexposetheproducttohightemperatur
or moisture.
•Donotleavethepackagingmateriallyingaround.Itcouldbecomeadanger
forchildren.
•Donotplacethetransmitterintoababy’scotorplaypen.
•Alwaysplacetheequipmentoutofreachofsmallchildren.
•Safeoperationisnolongerguaranteediftheequipmenthasvisibledamageorisno
longerfunctioningcorrectly
•Maintenance,adaptationandrepairworkmayonlybecarriedoutbyanauthorised
specialist.
4. INITIAL OPERA
1. Place the transmitter vertically to the per
Please Note! For safety reasons and for optimum sound transmission we r
that you keep the transmitter at least 1 metre from the baby. Never place it in the ba-
by’s cot, bed or playpen!
2. Connect the wall plug transformer with the tr
ed as far away from the baby as possible (see figur
3. Now use the slide switch to turn the transmitter on. A gr
when the device is ready to be used.
The switch has three positions:
AUS – The device is off.
LOW –
HI – The transmitter is activated and set to high sensitivity
Sensitivity is used to describe the responsiveness of the tr
be adjusted to the specific conditions of the location in question.
4. On the right-hand side of the channel selector
tion channels. The device transmits channel 1 at position 1
sition 2.
5. Place the r
6. Connect the second wall plug transformer with the r
ures A and B).
7. W
the transmitter and r
tion.
8. Switch on the alarm unit by rotating volume contr
switched on LED lights up and indicates that the unit is ready for oper
9. T
sound. As soon as a sound is transmitted you will notice this not only acoustically
but also visually on the LED strip. The louder the sound received, the mor
light up.
1 To check the function of the baby monitor befor
your transmitter in the desir
ume.
1 Walk through your house with your r
volume regulator
5. INSERTION OF BA
1. In order to insert or change batteries, open the battery compartment on the back
of the transmitter and r
2. Now insert charged r
ed, making a note of the polarity (+/-) (see marking on housing). (see figure D).
3. Now close the battery compar
back onto the housing (see figure E).
6. FUNCTION DESCRIPTION
6.1 MONITORING OF BA
When the battery/storage battery voltage falls too low (in the event that the device
is being battery operated), this will be displayed on both tr
the operating voltage is insufficient, the colour of the oper
green to r
Important: storage batteries cannot be recharged in the device itself!
6.2 RANGE
R
E
I
C
H
W
E
I
T
E
Meter
Because of the physical conditions necessary for the spread of r
waves you will need to determine the range of your baby monitor by test-
ing it in your surroundings. In optimum conditions a r
be achieved. The actual range depends mainly on local conditions. F
location of the transmitter
taken into account.
6.3 PILOT REFERENCE
The safety and reliability of your baby monitor ar
pilot refer
This pilot refer
are r
6.4 REDUCTION OF ELECTRIC SMOG
E
L
E
K
T
R
O
-
S
M
O
G
reduziert
The electromagnetic fields that occur when r
reduced as far as possible by the automatic switch-off system.
6.5 TRANSMISSION TECHNOLOGY
F
U
N
K
-
T
E
C
H
N
I
K
MHz
40
The 40-MHz radio technology enables the tr
noises wirelessly by r
7. TROUBLESHOOTING TIPS AND TRICKS
Pr Cause Suggestedsolution
no transmission/no
reception
different channels set on
transmitter and r
set the transmitter and the
receiver to the same channel
receiver is outside r reduce the distance between
receiver and tr
batteries/storage batteries
empty or no power supply
if the transmitter or r
does not function, check the
electricity supply initially
microphone sensitivity on
transmitter set too low
increase the sensitivity on the
transmitter
loud whistling
sound/back
coupling
receiver is too close to
transmitter
increase the distance between
receiver and tr
quiet noises are
transmitted
microphone sensitivity on
transmitter set too high
reduce the sensitivity on the
transmitter
interference during
transmission
third party tr
interference
change the channel on
transmitter and r
8. NOTES ON DISPOSAL
Old units, marked with the symbol as illustrated, may not be disposed of in the
household rubbish.
Used rechar
marked with one of the symbols illustrated may not be disposed
of in the household rubbish.
You must take them to a collection point for old units, old batteries or special waste
(enquire at your local authority) or the dealer fr
9. CARE AND WARRANTY
Before cleaning the unit, disconnect it if necessary from other components; do not
use aggressive cleaning agents.
The unit has been carefully checked for defects. If nevertheless you do have cause
for complaint, please send us the unit with your proof of pur
warranty fr
We are not liable for damage arising fr
and tear
We reserve the right to make technical modifications.
1TECHNICAL DA
Channel 1 – carrier frequency: 40.665 MHz
Channel 2 – carrier frequency: 40.695 MHz
Operating voltage (tr
pack
max. range: 400 metr
Wall power supply: secondary – 9 V DC, 1
You can find up-to-date product information on our website www
FR
1. CONTENU DE LA LIVRAISON
1 x émetteur
2. ÉLÉMENTS DE COMMANDE
Émetteur
1. Antenne
2. Microphone
3. Indicateur d’émission
4. Indicateur d’exploitation
5. Interrupteur on/off/sensibilité
6. Interrupteur de sélection des canaux
7 Douille réseau
Récepteur
8. Antenne
9. Haut-parleur
1 Indicateur optique de réception
1 Indicateur d’exploitation
1 Interrupteur on/off/volume
1 Interrupteur de sélection des canaux
1 Douille réseau
3. INDICA
•Lisezlemoded’emploiavanttouteutilisationdel’appareil!
•Évitezdesoumet
•Nesoumet
soleil,àdefortesvibrationsniàl’humidité.
•Nelaissezpasl’emballageposésanssur-
gerpourlesenfants.
•Neplacezpasl’émet
•Assurez-vousquel’appareilr
•Lefonctionnemententoutesécuritén’estplusgarantilorsquel’appar
desdégâtsvisiblesounefonctionnepluscorrectement.
•Lestravauxdemaintenance,der
queparunatelieragréé.
4. MISE EN SERVICE
1. Installez l’émetteur verticalement par rapport à la personne à surveiller (votr
bébé par exemple).
Conseils ! Pour des raisons de sécurité et pour une émission optimale du bruit, nous
vous recommandons de ne pas dépasser une distance de 1 mètre entr
le bébé. Ne placez jamais l’émetteur dans le lit du bébé, de l’enfant ou dans le parc !
2. Branchez le bloc d’alimentation avec l’émetteur à une prise aussi éloignée que
possible du bébé (voir les figures A et B).
3. Allumer maintenant l’émetteur grâce à l’interrupteur coulissant. Un indicateur à
LED qui s’allume vert vous indique que l’appareil est pr
L
AUS – L
LOW –
HI – L
La sensibilité décrit le seuil de l’émetteur
locales.
4. L
deux canaux de transmission. En position 1 l’appar
en position 2 sur le canal 2
5. Installez le r
6. Branchez le deuxième bloc d’alimentation avec le r
les figures A et B).
7. Avec l’interrupteur de sélection des canaux, choisir le canal de tr
ou 2). En principe l’émetteur et le récepteur sont à pr
nal pour permettre une exploitation (1 ou 2).
8. En tournant le r
Lorsque la diode luminescente LED s’allume, l’appar
9. Le transfert démarr
qu’un son est transfér
acoustique mais également visuelle grâce aux voyants lumineux. Plus le son émis
est fort, plus le nombre de diodes allumées est élevé.
1 Afin de vérifier le bon état de fonctionnement du baby-sitter électronique, instal-
lez votre émetteur dans la pièce à surveiller et allumez, par exemple, une r
sourdine.
1 P
ce dernier au volume souhaité à l’aide du régleur de volume.
5. INTRODUIRE LES PILES (OPTIONNEL)
1. Pour intr
rière de l’émetteur et du r
2. Introduir
rité (+/-) dans l’endroit pr
3. Fermer le compartiment à piles en glissant simplement le couver
(voir figure E).
6. DESCRIPTION DES FONCTIONS
6.1 SURVEILLANCE DE L
Lorsque la tension n‘est plus suffisante en mode accu ou pile, un voyant vous le si-
gnale sur l‘émetteur comme sur le récepteur
trop faible, les voyants de fonctionnement changent sur l‘émetteur et sur le r
de vert à rouge.
Important : les accus ne peuvent pas être chargés dans l‘appareil !
6.2 PORTÉE
R
E
I
C
H
W
E
I
T
E
Meter
En raison des conditions de pr
déterminer la portée de votre baby phone dans votr
faisant des essais. Dans des conditions optimales, vous pouvez attendre
une portée allant jusqu’à 400 m. La portée ef
conditions locales. Il s’agit, par exemple, du lieu où se trouve l’émetteur
banisation ou les conditions atmosphériques.
6.3 CODAGE NUMÉRIQUE
La sécurité radio et le bon fonctionnement du babyphone sont amélior
par un codage numérique inaudible pour vous et éprouvé dans la pr
tique. Ce codage numérique permet au récepteur de ne s’enclencher que
si les sons émis, par exemple par le bébé surveillé, sont émis par son propre émet-
teur
6.4 RÉDUCTION DU SMOG ÉLECTRIQUE
E
L
E
K
T
R
O
-
S
M
O
G
reduziert
Les champs magnétiques résultants de la génér
tant que possible r
6.5 TECHNIQUE D’ÉMISSION
F
U
N
K
-
T
E
C
H
N
I
K
MHz
40
La technologie radio 40 MHz permet d’émettr
sans fil, par radio.
7. TRUCS ET ASTUCES EN CAS DE PANNE
Pr Origine Solutionproposée
aucune émission/
aucune réception
des canaux différents sont
réglés sur l’émetteur et le
récepteur
réglez l’émetteur et le
récepteur sur le même canal
le récepteur se tr
dehors de la zone de portée
réduisez la distance entr
l’émetteur et le récepteur
accu/piles sont vide ou
l‘alimentation est interrompue
lorsque l‘émetteur ou le
récepteur ne fonctionnent
pas, veuillez vérifier
l‘alimentation en électricité
la sensibilité de l’émetteur est
trop faible
augmentez la sensibilité sur
l’émetteur
fort sifflement/
rétr
le récepteur est tr
de l’émetteur
augmentez la distance entre
l’émetteur et le récepteur
émission de faibles
bruits
la sensibilité de l’émetteur est
trop élevée
réduisez la sensibilité sur
l’émetteur
problèmes dur
l’émission
un émetteur étranger
provoque des interfér
changez de canal sur
l’émetteur et le récepteur
8. CONSEILS POUR L
Les vieux appareils mar
être éliminés avec les or
Les piles et accumulateurs usés qui sont mar
symboles repr
dures ménagèr
Vous devez les apporter à un point de collecte pour vieux appareils, piles usées ou
déchets spéciaux (renseignez-vous aupr
commerçant où vous les avez achetés.
9. ENTRETIEN E
Avant de nettoyer l’appar
pas de détergent agr
L
néanmoins un motif de réclamation, r
tance d’achat. Nous offrons une gar
Nous n’acceptons aucune responsabilité pour des dégâts occasionnés par des er-
reur
Nous nous réservons le droit de pr
1DONNÉES TECHNIQUES
Fréquence porteuse canal 1 : 40,665 MHz
Fréquence porteuse canal 2 : 40,695 MHz
T
gnon (AA) ou bloc d’alimentation
Portée max. : 400 mètr
Adaptateur réseau : 9 V DC, 1
Vous pouvez trouver les informations pr
www
IT
1. DOT
1 trasmettitor
2. COMANDI
Unitàtrasmittente
1. Antenna
2. Microfono
3. Indicatore di tr
4. Indicatore di funzionamento
5. Interruttore on/off/ sensibilità
6. Interruttore per selezione canali
7 Pr
Unitàricevente
8. Antenna
9. Altoparlanti
1 Indicatore ottico di ricezione
1 Indicatore di stato
1 Interruttore on/off/volume
1 Interruttore per selezione canali
1 Pr
3. AVVERTENZE IMPORT
•Leggereleistruzioniprimadiutilizzar
•Evitaredisottoporreilpr
•Nonesporreilprodottoadaltetemper
umidità.
•Nonlasciareincustoditoilmaterialediimballaggio:potrebbecostituir
per i bambini.
•Nonposizionarel’unitàtrasmittentenellettinodelbambinoonellospaziodedicato
algattonamento.
•Tener
•Lasicurezzanonèpiùgarantitasel’appar
funzionarer
•Leoperazionidimanutenzione,adattamentoeriparazionedevonoesser
esclusivamentedauncentr
4. MESSA IN SERVIZIO
1. Posizionar
controllar
Attenzione! Per motivi di sicurezza e per una trasmissione ottimale dei rumori, consi-
gliamo di mantenere una distanza non inferiore a 1 metro tr
bambino. Non collocare mai l’unità tr
2. Collegar
sia il più lontano possibile dal bambino (vedere fig. A e B).
3. A questo punto attivar
l’apparecchio è pr
L
AUS – L
LOW –
HI – Il trasmettitor
Sensibilità indica la soglia di risposta del trasmettitor
guata individualmente alle condizioni locali.
4. Con l’interruttor
nali di trasmissione. Nella posizione 1
le 1 e nella posizione 2 attraver
5. Collocar
all’adulto.
6. Collegar
trica (vedere fig. A e B).
7. Sceglier
re e ricevitor
zionare.
8. Ruotar
volta accesso, il LED si illumina a conferma dello stato di operatività.
9. La trasmissione inizia automaticamente non appena l’unità tr
tivata da un rumore. Nel momento in cui viene tr
viene percepito solo tr
Più forte è il rumore ricevuto, maggior
1 Per verificar
lizzo, posizionare l’unità tr
esempio, la radio a un volume udibile nella camer
1 Spostarsi nelle varie stanze con l’unità ricevente ed impostar
to tramite l’apposito r
5. INSERIMENTO DELLE PILE (OPTIONAL)
1. Per inserir
trasmettitor
2. Inserir
gli appositi alloggiamenti (vedi la relativa indicazione) (veder
3. Ora chiuder
dell‘apparecchio (veder
CE-Konformitätserklärung
W
COMTEL AG
Rot
erklär
Babyüber
den Schutzanfor
des Rates zur Angleichung der Rechtsvorschriften der
Mitgliedsstaaten über die elektromagnetische Vertr
(1) festgelegt sind.
R&T
Z
EN 30
EN 30
EN 30
EN 30
Radio:60.850.8.003.0
EMC:60.850.8.003.0
Die P
BritishAppr
TÜV SÜD Gr
Notified body ID-No.:
0
T
CH-6362 Stansstad, 28. Januar 20