When is off:
When is on:
SET (on back)
S
MODE
Switches on/off
Moves between wheel
circumference and
Moves to the next function
Moves to the next function
Shifts Tm /Av /Mx data to
the upper display
Starts/stops measuring
Shifts Tm /Av /Mx data to the upper display
(How the display changes
by MODE button)
Tm
Av Mx
Dst1 Dst2 Odo
In Tm , Av and Dst(1, 2) display
SET (on back)
S
MODE
Completes setting Ready for measuring
Moves betw
Increases the figure by one
Rapidly increases the figure
Decreases the figure by one
Rapidly decreases the figure
SET (on back)
S
MODE
Completes setting
Ready for measuring
Increases the figure by one
Rapidly increases the figure
Moves from hour digits
to minute digits
SET (on back)
S MODE
Press all
the three buttons
simultaneously.
In Wheel Circumference Setting Display:
If SET button is pressed in Odo display (stop state),
wheel circumference setting display appears.
In Clock Time Setting Display:
If SET button is pressed in (stop state), clock time setting dis-
play appears.
In Measuring Functions:
When measuring, the speed scale flashes.
All Clear Operation
Precautions
• Don't pay too much attention to your computer functions while riding. Keep your eyes on
the road and pay attention to traffic conditions.
• Securely attach the magnet, sensor and bracket to your bicycle. Periodically check if the
screws and secure bands have loosened.
• Safely dispose of the old battery. Do not place it within children's reach. If swallowed by
mistake, consult a doctor immediately.
• Do not leave the main unit exposed to direct sunlight. Never disassemble the main unit.
• For cleaning, use neutral detergent on soft cloth, and wipe off with dry cloth. Do not
apply paint thinner, benzine or alcohol, to avoid damages on the surface.
• If there is mud, sand or the like clogged between the button and the body, button opera-
tion can become impaired. Softly wash away such objects with water.
• Before each ride, insure the computer is completely and securely mounted to the
bracket.
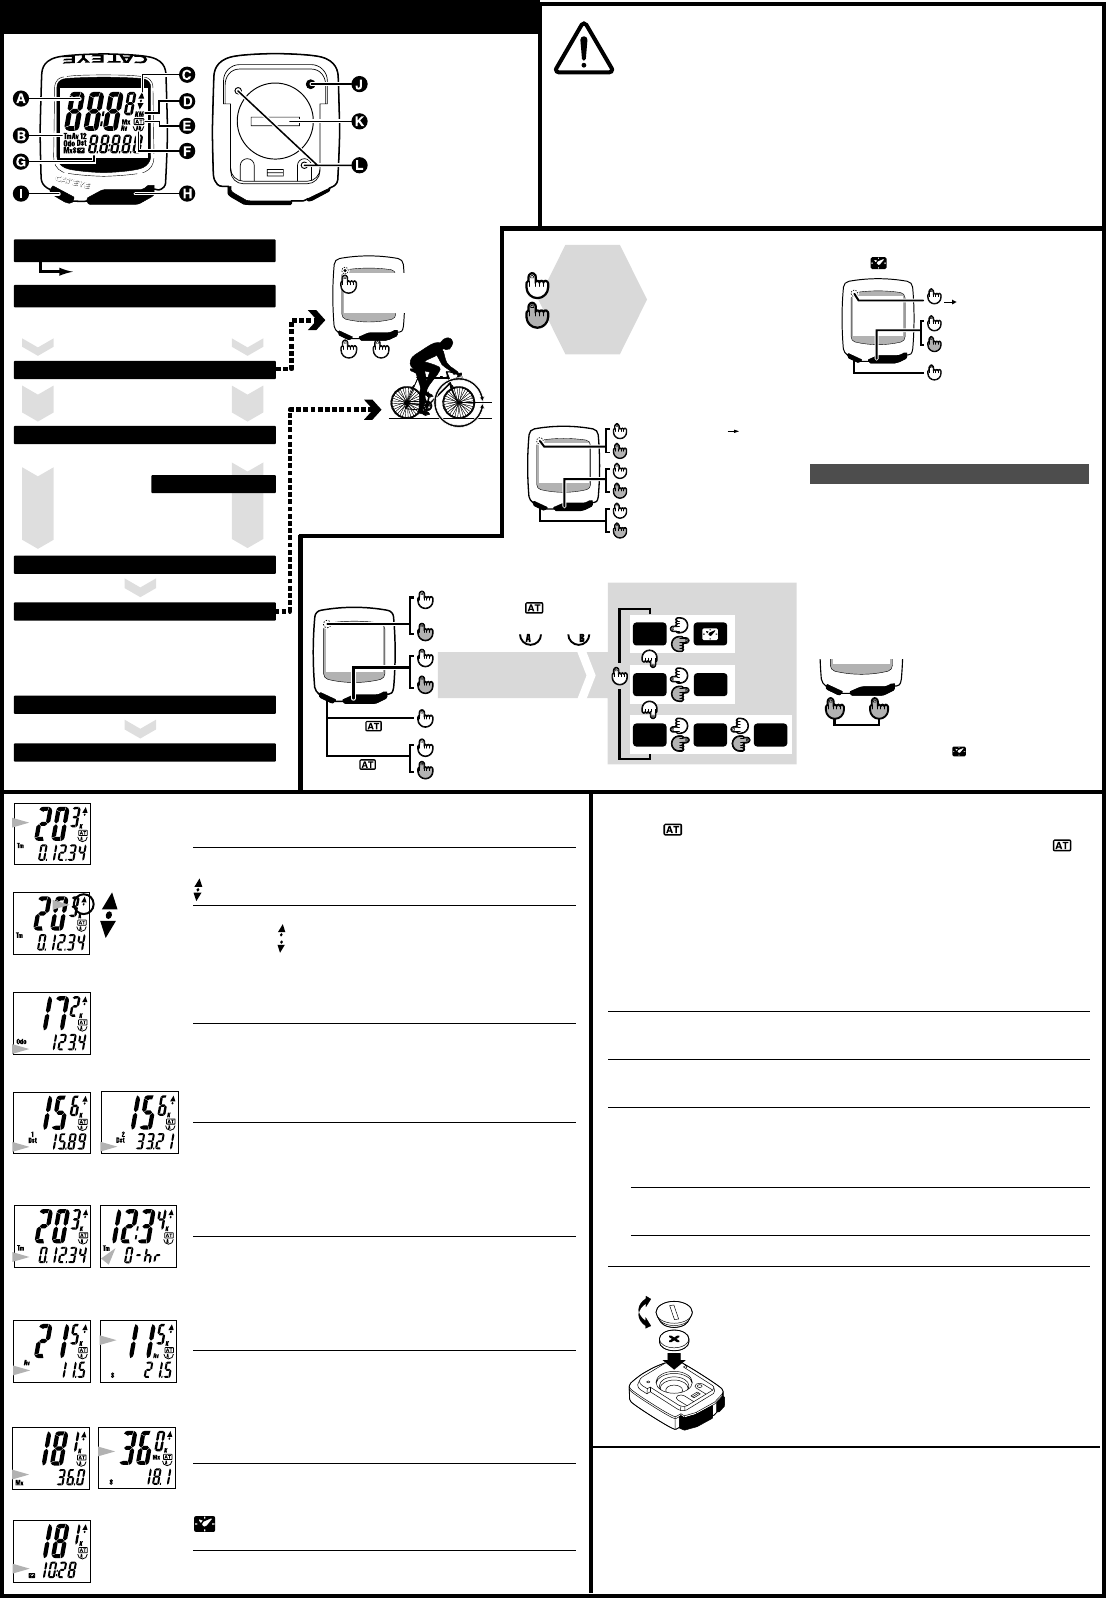
A. Upper Display
(Usually Current Speed)
B. Mode Symbol
C. Average Pace Arrow
D
E. Auto Mode Symbol
F Wheel Selection Symbol
G.
(Selected Function)
H. Mode Button
I. S Button (Start/Stop)
J. SET Button
K. Battery Cover
L. Contact
HOW TO A
All Clear Operation
Press all the three buttons simultaneously.
All displays illuminate, and then "K " symbol flashes.
Speed Scale Selection
Press MODE button and select "K"(=km) or "M"(=mile).
Wheel Circumfer
Input wheel circumference
by S button (– ) or MODE button (+).
For inputting wheel circumference B, hold down SET button;
the display changes to B. Input the figure in the same way.
Press S or SET button to fix it
Press SET button to fix it
Preparation Completed
Set the Clock time
Odo Data Input
Hold down MODE button to reach Odo input display.
Input the figure by MODE button.
Press S button to change the flickering digit.
Refer to the "Installation Manual".
MAIN UNIT PREP
Using this unit
for the first time
After
replacing battery
Spd Current Speed
Wheel A: 0.0(3.0)-65 mph ± 1 mph(under 31 mph)[0.0(4.0)-105km/h ± 1km/h]
Wheel B: 0.0(2.0)-65 mph ± 1 mph(under 31 mph)[0.0(2.5)-105km/h ± 1km/h]
Usually displayed on the upper display and updated once a second. When Av
or Mx data is shifted to the upper display, Spd shifts to the lower display.
Average Pace Arrow
Shows whether the current speed is faster or slower than the average
speed. ------ Faster than the average speed
------ Slower than the average speed
When the average speed is zero, or when in the stop state, no pacer
symbol appears.
Odo Total Distance (Odometer)
0.0 - 9999.9 /10000 - 99999 mile[km] ± 0.1 mile[km]
Continuously measured until battery wears down. Displayed with 0.1
resolution up to 9999.9 km and with 1.0 resolution up to 99999 km. (With
all clear operation, it returns to zero; to continue accumulation of data,
input the previous Odo data after all clear operation.)
Dst(1, 2) Trip Distance(1, 2)
0.00 - 999.99 mile[km] ± 0.01 mile[km]
The trip distance from start to current point is displayed. Two different
start points can be set (Dst1 and Dst2). Dst2 is best for measuring a sec-
tional distance. With Reset operation, it returns to zero. [Reset of Dst1 is
always done with reset of Tm, Av and Mx all together. Reset of Dst2 is
done independently of the other reset and does not affect the other data.]
Tm Elapsed Time
0:00'00" - 9:59'59" ± 0.003 %
Elapsed time is measured from start to current point, in units of hours,
minutes and seconds. At 10 hours, it returns to zero and counting begins
anew. With the press of S button, Tm data shifts to the upper display. In
this case, the lower display shows the hour digits of Tm data (instead of
Spd). With Reset operation, it returns to zero.
Av Average Speed
0.0 - 65 mph [105 km/h] ± 0.3 mph [km/h]
The average speed from start to current point is displayed. If the elapsed
time exceeds 27 hours or Dst1 exceeds 999.99km, (.E) is displayed and
calculation ceases. With the press of S button, Av data shifts to the upper
display. In this case, Spd data is shifted to the lower display. With reset
operation, it returns to zero.
Mx Maximum Speed
0.0(3.0) - 65 mph [105 km/h] ± 1 mph [km/h]
Displays the highest recorded speed. With the press of S button, Mx data
shifts to the upper display. In this case, Spd data is shifted to the lower
display. With reset operation, it returns to zero.
Clock time
1:00' - 12:59' or 0:00' - 23:59' ± 0.003 %
If "M" is selected for speed scale, the clock time is in 12 hour. If "K", the
clock time is 24 hour.
Automatic Start/Stop Function
When the symbol is on, the unit automatically starts and stops measuring while a wheel
pulse is detected. (See the above “ In Measuring Functions” for how to switch on/off .)
Power Saving Function
When the main unit does not receive a signal, or a button has not been pressed for 60-70
minutes, the power supply is shut down and the main unit will only display the clock. By
pressing either MODE or S button, or by receiving signal, this function is released.
Maintenance
When the main unit or the contact gets wet, dry it off with a cloth; rust will cause functional
errors.
Trouble Shooting
No display.
Has the battery in the main unit worn out?
Replace it with a new one.
Incorrect data appears or the screen is frozen.
Do "All Clear" operation. (If possible, write down the Odo data before all clear opera-
tion, and input it again after the display returns normal.)
Current speed does not appear. (When current speed does not appear, first short-circuit the
contact on the back with metal; if the speed display appears, the main unit is normal and the
problem must be in the bracket or the sensor.)
Is there anything on the contact of the main unit or of the bracket?
Wipe the contact clean. DO NOT use abrasives, sandpaper, etc.
Is the distance between the sensor and the magnet too far?
Are the marking line of the sensor and the center of magnet aligned?
Adjust the position of the sensor and magnet again.
Is the wire broken?
Replace it with a new one.
When "M" (=Mile) was chosen for speed
scale, the clock time is in 12-hour. If "K"
(=Km), the clock time is 24-hour.
How to Replace Battery
Insert a new lithium battery (CR2032) with the (+) pole upward. Per-
form ALL CLEAR OPERATION after replacing the battery.
In order to continue accumulation of Odo data, write down the stored
Odo before replacing the battery.
Continuing Accumulation of Odo Data
Although the Odo data returns to zero by all clear operation, you can
continue accumulation of data by inputting the previous Odo data.
Be sure to write down the data before replacing the battery.
Specifications
Applicable Wheel Circumference --- 100cm - 300cm
Applicable Fork Diameter ------------ ED200; 1ø to 40ø (Sensor Band S: 1ø , Sensor Band L: 21-40ø )
---------------------------------------------- MT300; 1ø to 36ø (Sensor Band S: 1ø , Sensor Band L: 21-36ø )
Length of Wire -------------------------- 70cm
Power Supply ---------------------------- Lithium Battery (CR2032) x 1
Battery Life ------------------------------- Approx. 3 years
(The life of the first factory-loaded battery may be shorter than this period.)
Dimension/Weight ---------------------- 1-13/16” x 1-17/32” x 9/32” [46 x 39 x 17mm] / 0.92 oz [26 g]
* The specifications and design are subject to change without notice.
Wheel circumference setting is the
actual distance in centimeters on
the ground of one wheel revolution
measures. For the most accurate
settings, do this roll-out. Otherwise,
consult the Cross Reference T
for approximate setting.
Tm moves up as
Main Display
Av moves up as
Main Display
Mx moves up as
Main Display
SET
Dst1 Dst2
Just press
Hold down
(2 sec.)
Button Operation
Reset Operation
Data to be reset:
In Tm, and display:
---- Resets Tm, A and Dst1 data all together
In Dst2 display: -------------- Resets only Dst2 data
S MODE
Press S and MODE buttons
simultaneously for 1 second
L
Open
Close
OPERATING INSTRUCTIONS
E
Wheel Circumference A & B
(Can switch between A & B any time)
A: Best for road bikes and riding [Initial figure =210 cm]
B: Best for MTB riding and low speed sensitivity
[Initial figure =205 cm]
When MODE button and S button are pressed
simultaneously in Odo display
circumference value appears. If these buttons are
further held down for more than 3 seconds, the wheel
circumference moves between