•A sticker is affixed to the glass of this clock when you purchase it. Be sure to remove the sticker before using the
clock.
• Depending on the clock model, the configuration of your clock may differ somewhat from that shown in the
illustration.
•This product has a sweep second hand.
• (TQ-551) Pressing SNOOZE/LIGHT illuminates the face of the clock for about three seconds for easy reading of
the time in the dark.
• (TQ-551) This product has a luminous resin face that accumulates light for easier reading.
• (TQ-451) This product uses luminous paint for face markings and on its hands.
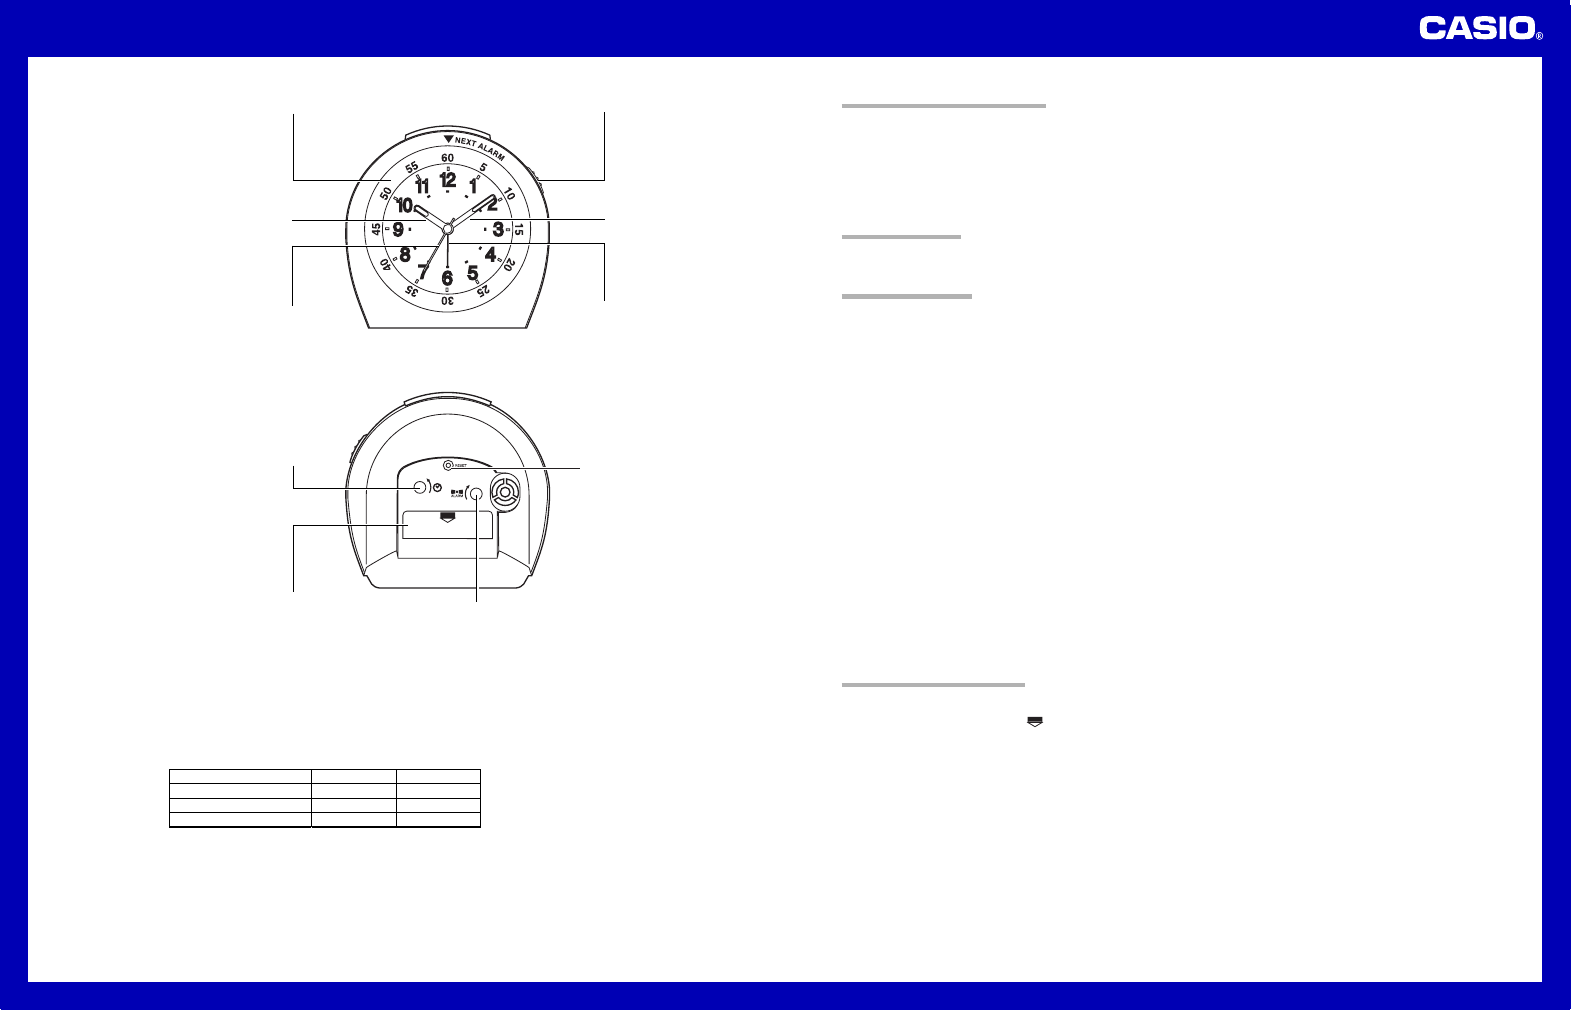
Next alarm dial
Alarm ON/OFF switch
Minutes Hand
Alarm Hand
Hour Hand
Seconds Hand
LIGHT
LUMINOUS RESIN
LUMINOUS PAINT
TQ-451
X
X
O
TQ-551
O
O
X
ABOUT THE LUMINOUS PAINT
When the face of the timepiece is exposed to fluorescent light, the luminous paint stores the light, which it then
emits to glow in the dark for easy reading.
•The luminous paint used by this product does not use any radioactive material. It is personally and ecologically
safe.
•The amount of time before the glow emitted from the luminous paint starts to weaken is about five hours. This
time, however, depends on the brightness and angle of the light to which it was originally exposed.
•Since ultraviolet light charges the luminous paint, you should use this timepiece in a room illuminated by
fluorescent light.
TO SET THE TIME
Rotate the Time setting dial to change the time setting.
• Be sure to always press RESET with a thin object after loading batteries.
USING THE ALARM
This clock has two alarms. The 1st Alarm is the alarm that sounds when the current time reaches the alarm time
you set. The Next Alarm sounds after passage of the time setting of the NEXT ALARM dial, starting from the point
that the 1st alarm begins to sound. The Next Alarm also has a snooze feature.
The alarm on/off setting affects both the 1st Alarm and the Next Alarm. You cannot turn the 1st Alarm and Next
Alarm on and off individually.
The Next Alarm sound is relatively louder than the 1st Alarm sound.
To set the alarm
1. Rotate the Alarm setting dial in the direction indicated by the arrow marked on clock to move the alarm hand to
the 1st Alarm time setting you want.
2. Rotate the NEXT ALARM dial from 1st Alarm to the Next Alarm setting you want to use.
•You can set the Next Alarm to any time from 5 to 60 minutes, in 5-minute steps.
3. Set the Alarm ON/OFF switch to ON.
• If the Alarm ON/OFF switch is already set to ON, always be sure to change its setting to OFF and then back to
ON again after making alarm time setting changes.
• Note that this clock does not distinguish between AM and PM times. If you set an alarm to wake up to in the
morning, the alarm will sound again at the same time in the evening if you leave the Alarm ON/OFF switch in the
ON position.
To use the alarm
The 1st Alarm starts to sound when the current time reaches the time indicated by the alarm hand. The 1st Alarm
stops sounding when you press SNOOZE (/LIGHT) or after it has sounded for about one minute. After the amount
of time set by the Next Alarm Dial passes, the Next Alarm starts to sound. Pressing SNOOZE (/LIGHT) stops the
Next Alarm sound for about five minutes, after which it starts to sound again. In all, the Next Alarm will sound seven
times.
If you do not press SNOOZE (/LIGHT) after the Next Alarm starts to sound, it will stop automatically after about one
minute.
To deactivate the snooze feature so the alarm will not sound again, change the Alarm ON/OFF switch setting to
OFF.
REPLACING THE BATTERY
Low battery power is indicated when timekeeping slows or stops completely. Should either of these symptoms
occur, replace the battery immediately. Do not leave a low or dead battery in the clock.
1. Pressing down at the point marked
on the battery compartment cover, slide the cover to remove it.
2. Remove the old battery.
3. Load a new battery. Make sure that its positive (+) and negative (–) ends are facing correctly. If you load the
battery incorrectly, it can burst and damage the clock.
4. Replace the battery compartment cover.
Battery precautions
•Keep batteries out of the reach of small children. If a battery is accidentally swallowed, contact your physician
immediately.
•Be sure to load the battery with its positive (+) and negative (–) ends facing correctly.
•Never charge the battery that comes with the clock.
•Should a battery ever leak while in the clock, wipe out the fluid with a cloth, taking care not to let any get onto
your skin.
•Replace the battery at least once a year, even if the current battery is working normally.
•The battery that comes with the clock loses some power during transport and storage.
Time setting dial
Battery compartment
Alarm setting dial
Need help? Post your question in this forum.
Report abuse
Libble takes abuse of its services very seriously. We're committed to dealing with such abuse according to the laws in your country of residence. When you submit a report, we'll investigate it and take the appropriate action. We'll get back to you only if we require additional details or have more information to share.
Product:
Forumrules
To achieve meaningful questions, we apply the following rules:
First, read the manual;
Check if your question has been asked previously;
Try to ask your question as clearly as possible;
Did you already try to solve the problem? Please mention this;
Is your problem solved by a visitor then let him/her know in this forum;
To give a response to a question or answer, do not use this form but click on the button 'reply to this question';
Your question will be posted here and emailed to our subscribers. Therefore, avoid filling in personal details.
Register
Register getting emails for Casio TQ-551 at:
new questions and answers
new manuals
You will receive an email to register for one or both of the options.
Get your user manual by e-mail
Enter your email address to receive the manual of Casio TQ-551 in the language / languages: English as an attachment in your email.
The manual is 0,07 mb in size.
You will receive the manual in your email within minutes. If you have not received an email, then probably have entered the wrong email address or your mailbox is too full. In addition, it may be that your ISP may have a maximum size for emails to receive.
The manual is sent by email. Check your email
If you have not received an email with the manual within fifteen minutes, it may be that you have a entered a wrong email address or that your ISP has set a maximum size to receive email that is smaller than the size of the manual.
The email address you have provided is not correct.
Please check the email address and correct it.
Your question is posted on this page
Would you like to receive an email when new answers and questions are posted? Please enter your email address.