Operation of Module 1817 is identical to that of Modules 1536/1636. The only difference
between these modules are the Module 1817 indicators, which are shown below. All
illustrations in this User’s Guide shows Modules 1536/1636 only.
TIMEKEEPING MODE
•In the Timekeeping Mode, press
CC
CC
C to switch between
the 12-hour and 24-hour formats.
•Day of the week is displayed as follows.
SU:SundayMO:MondayTU:Tuesday
WE:WednesdayTH:ThursdayFR:Friday
SA:Saturday
About the backlight
•Holding down
AA
AA
A at any time illuminates the display.
•The backlight of this watch employs an electrolumines-
cent (EL) light, which loses its illuminating power after
very long term use.
•Frequent use of the backlight shortens the battery life.
ALARM MODE
When the Daily Alarm is switched on, the alarm sounds
for 20 seconds at the preset time each day. When the
Hourly Time Signal is switched on, the watch beeps ev-
ery hour on the hour.
To set the alarm time
1.Hold down
AA
AA
A while in the Alarm Mode until the hour
digits start to flash on the display. The hour digits flash
because they are
selected
.
2.Press
AA
AA
A to change the selection in the following se-
quence.
•Once you reach the normal Alarm Mode, you have to hold down
AA
AA
A again until the
hour digits start to flash.
3.Press
CC
CC
C to increase the selected digits. Holding down
CC
CC
C changes the number at
high speed.
•The format (12-hour and 24-hour) of the alarm time matches the format you select
for normal timekeeping.
•When setting the alarm time using the 12-hour format, take care to set the time
correctly as morning or afternoon (PM).
4.After you set the alarm time, press
AA
AA
A to return to the Alarm Mode. At this time the
Daily Alarm is switched on automatically.
To stop the alarm
Press
AA
AA
A to stop the alarm after it starts to sound.
To switch the Daily Alarm and Hourly Time Signal on and off
Press
CC
CC
C while in the Alarm Mode to change the status of the Daily Alarm and Hourly
Time Signal in the following sequence.
To test the alarm
Hold down
CC
CC
C while in the Alarm Mode to sound the alarm.
Alarm on
indicator
Mode
indicator
Hourly time signal on
indicator
Hour
Minutes
Hour
Normal Alarm Mode (No digit flashes)
Minutes
Hourly Time
Signal only
Daily
Alarm only
Both offBoth on
(a) Elapsed time measurement
Start
StopRe-startStopClear
Start
SplitSplit releaseStopClear
Start
SplitStopSplit releaseClear
(b) Split time measurement
(c) Split time and 1st-2nd place times
First runner
finishes.
Second runner
finishes.
Record time of
first runner.
Record time of
second runner.
TIME SETTING MODE
To set the time and date
1.Use
BB
BB
B to enter the Time Setting Mode.
•The seconds digits flash because they are
selected.
2.Press
AA
AA
A to change the selection in the following se-
quence.
3.While the seconds digits are selected (flashing), press
CC
CC
C to reset the seconds to
“00”. If you press
CC
CC
C while the seconds count is in the range of 30 to 59, the sec-
onds are reset to “00” and 1 is added to the minutes. If the seconds count is in the
range of 00 to 29, the minutes count is unchanged.
4.While any other digits (besides seconds) are selected (flashing), press
CC
CC
C to in-
crease the number. While the day of the week is selected, pressing
CC
CC
C advances
to the next day. Holding down
CC
CC
C changes the current selection at high speed.
5.After you set the time and date, press
BB
BB
B to return to the Timekeeping Mode.
•If you do not operate any button for a few minutes while a selection is flashing, the
flashing stops and the watch goes back to the Timekeeping Mode automatically.
SecondsHour
Minutes
Day of WeekMonthDate
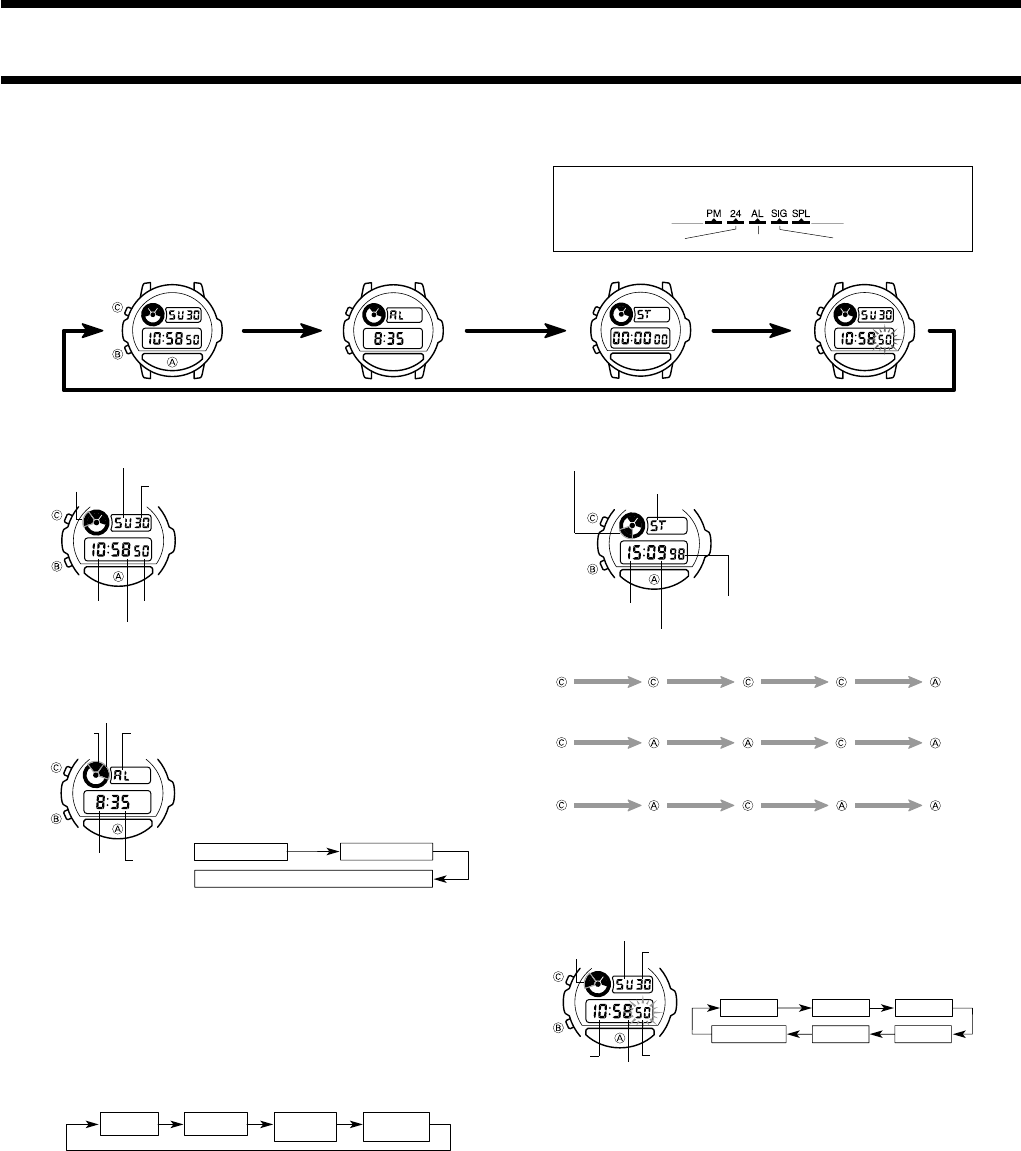
PM indicator
24-hour indicatorAlarm on indicator
Split indicator
Signal on indicator
Timekeeping Mode
Alarm Mode
Stopwatch Mode
Time Setting Mode
Date
Hour
Minutes
Seconds
PM indicator
Day of the week
1/100 second
Seconds
Mode Indicator
Split time indicator
Minutes
Seconds
Hour
Minutes
PM indicator
Day of the week
Date
•Press
BB
BB
B to change from mode to mode.
•After you perform an operation in any mode, pressing
BB
BB
B returns to the Timekeeping
Mode.
STOPWATCH MODE
The Stopwatch Mode lets you measure
elapsed time, split times, and two finishes.
The range of the stopwatch is 59 minutes,
59.99 seconds.
Need help? Post your question in this forum.
Report abuse
Libble takes abuse of its services very seriously. We're committed to dealing with such abuse according to the laws in your country of residence. When you submit a report, we'll investigate it and take the appropriate action. We'll get back to you only if we require additional details or have more information to share.
Product:
Forumrules
To achieve meaningful questions, we apply the following rules:
First, read the manual;
Check if your question has been asked previously;
Try to ask your question as clearly as possible;
Did you already try to solve the problem? Please mention this;
Is your problem solved by a visitor then let him/her know in this forum;
To give a response to a question or answer, do not use this form but click on the button 'reply to this question';
Your question will be posted here and emailed to our subscribers. Therefore, avoid filling in personal details.
Register
Register getting emails for Casio 1817 at:
new questions and answers
new manuals
You will receive an email to register for one or both of the options.
Get your user manual by e-mail
Enter your email address to receive the manual of Casio 1817 in the language / languages: English as an attachment in your email.
The manual is 0,06 mb in size.
You will receive the manual in your email within minutes. If you have not received an email, then probably have entered the wrong email address or your mailbox is too full. In addition, it may be that your ISP may have a maximum size for emails to receive.
If you have not received an email with the manual within fifteen minutes, it may be that you have a entered a wrong email address or that your ISP has set a maximum size to receive email that is smaller than the size of the manual.
The email address you have provided is not correct.
Please check the email address and correct it.
Your question is posted on this page
Would you like to receive an email when new answers and questions are posted? Please enter your email address.