331724
45
Zoom out
Zoom in
Previous page
1/46
Next page
MONTAGENLEITUNG FÜR DEN ANSCHLUß
DES ROHRSTUTZENS AN DIE MULDE
Diese Montageanleitung ist ausschlißlich für qualifiziertes Fachpersonal bestimmt,
welches laut geltenden Normen die Installation vornehmen muß. Jedweder Eingriff
in das Gerät ist bei abgeschalteter Stromversorgung vorzunehmen!
MONTAGE DER ROHRVERBINDUNGEN
Zur Montage der Rohrverbinungen brauchen Sie einen 17er und einer 23er
Sechskantschlüssel.
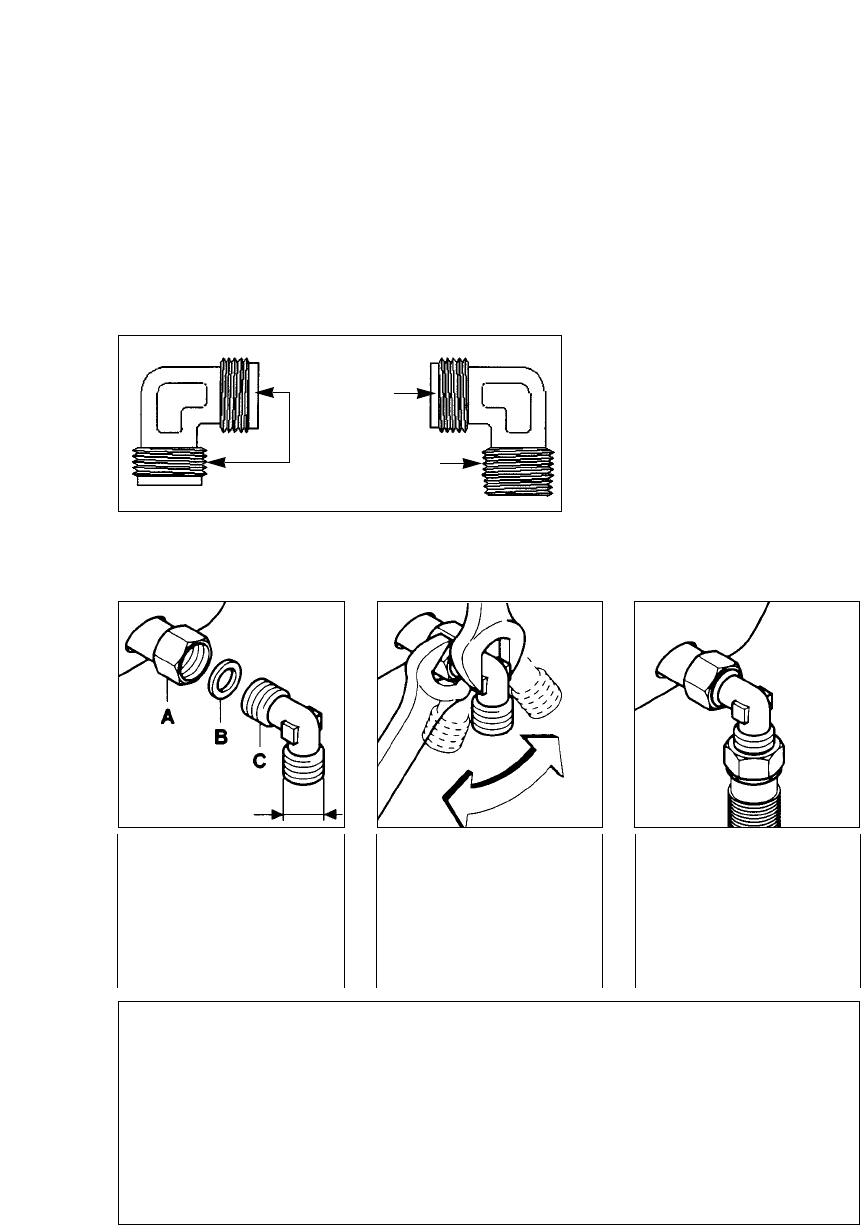
1) Montieren Sie die
Teile in der abgebilde-
ten Reihenfolge:
A) Leitungsrohr
B) Dichtung
C)
Bewegliches
Verbindungsstück
2) Schrauben Sie das
Verbindungsstück C
mit dem Sechskant-
schlüssel fest an.
Richten Sie dabei die
bewegliche Verbin-
dung in die gewün-
schte Position.
3) Verbinden Sie den
Rohrbogen C mit dem
Gasversorgungsnetz
entwerder mit einem
starren Rohr aus
Kupfer oder mit einem
biegsamen aus Stahl.
SEHR WICHTIG:
Um den Installationsvorgang zu erleichtern und um Undichtigkeiten am Gasrohr
zu vermeiden, empfiehlt es sich, den Anschluß des Gasversor-gungsrohres in
der untenstehenden Reihenfolge vorzunehmen:
Zuerst schließen Sie das Gasrohr an die Kochmulde an und erst dann an das
Versorgungsnetz!
Die Mißachtung dieser Reihenfolge könnte zu Undichtigkeiten im Anschluß zwi-
schen Gasrohr und Mulde führen.
NACH DER MONTAGE IST DIE INSTALLATION AUF EINWANDFREIE
DICHTIGKEIT MIT SEIFENWASSER ZU PRÜFEN.
44
ZYLINDRISCH
KEGELFÖRMIG
Bei einigen Modellen wird ein kegelförmiges Verbindungsstück mitgeliefert, das in
manchen Ländern vorschriftsmäßig zur Installation benutzt werden muss.
In den nachfolgenden Zeich-
nungen werden die unterschied-
lichen Verbindungsarten darge-
stellt. Auf jeden Fall muss das
zylindrische Teil des Verbin-
dungsstücks mit dem Kochfeld
angeschlossen werden
45


Need help? Post your question in this forum.

Forumrules


Report abuse

Libble takes abuse of its services very seriously. We're committed to dealing with such abuse according to the laws in your country of residence. When you submit a report, we'll investigate it and take the appropriate action. We'll get back to you only if we require additional details or have more information to share.

Product:

For example, Anti-Semitic content, racist content, or material that could result in a violent physical act.

For example, a credit card number, a personal identification number, or an unlisted home address. Note that email addresses and full names are not considered private information.

Forumrules

To achieve meaningful questions, we apply the following rules:

Register

Register getting emails for Candy plc 2200 at:


You will receive an email to register for one or both of the options.


Get your user manual by e-mail

Enter your email address to receive the manual of Candy plc 2200 in the language / languages: English, German, Dutch, French as an attachment in your email.

The manual is 0,39 mb in size.


You will receive the manual in your email within minutes. If you have not received an email, then probably have entered the wrong email address or your mailbox is too full. In addition, it may be that your ISP may have a maximum size for emails to receive.

The manual is sent by email. Check your email

If you have not received an email with the manual within fifteen minutes, it may be that you have a entered a wrong email address or that your ISP has set a maximum size to receive email that is smaller than the size of the manual.

The email address you have provided is not correct.

Please check the email address and correct it.

Your question is posted on this page

Would you like to receive an email when new answers and questions are posted? Please enter your email address.


Info