18
FR
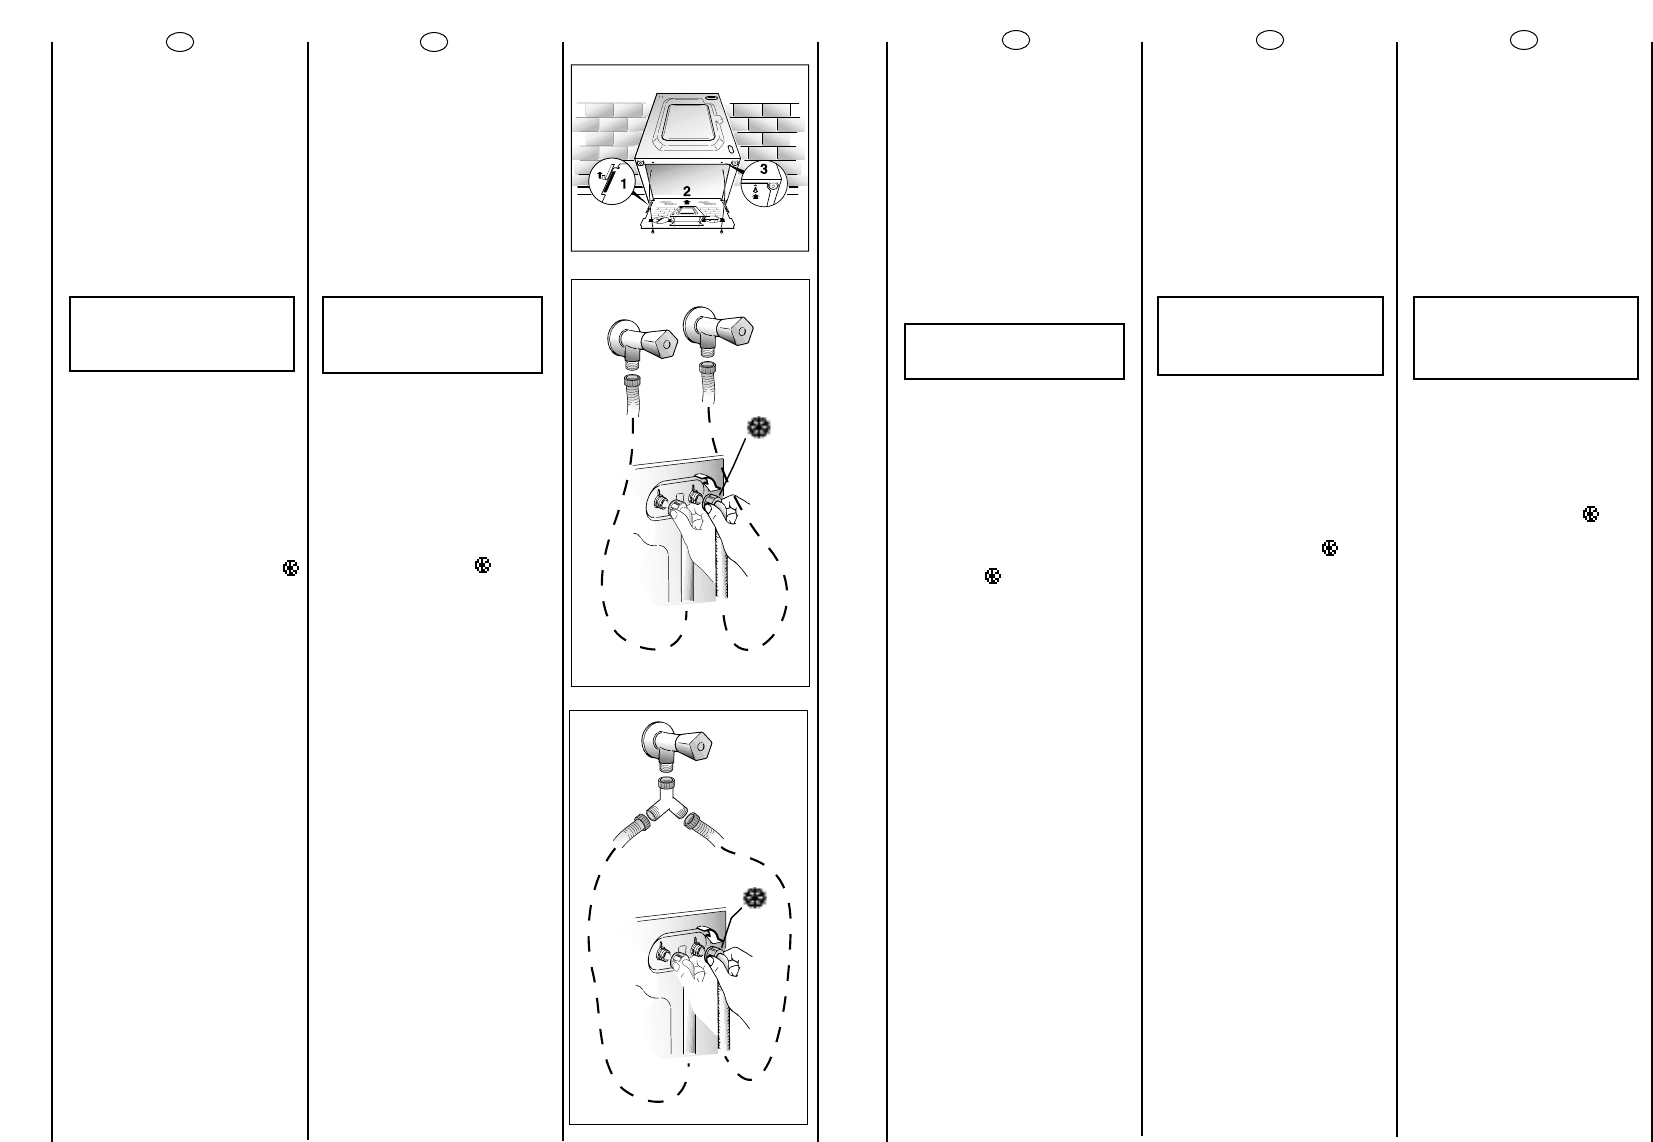
Appliquer la feuille
supplémentaire sur le fond
comme dans la figure.
L'appareil doit être relié à
l'arrivée d'eau exlusivement
avec les tuyaux fournis .
Ne pas réutiliser les anciens
tuyaux.
ATTENTION:
NE PAS OUVRIR LE
ROBINET
IMPORTANT:
Pour l’optimisation des
consommations
énergétiques, il est possible
d’alimenter ce lave-linge
directement en eau
chaude.
Reliez:
- le tuyau gris a l’eau froide
- le tuyau rouge a l’eau
chaude
Si vous n’en avez pas la
possibilité, utilisez
l’accessoire en forme de
“Y”, livré avec le lave-linge.
Suivez les indications du
dessin ci joint.
Approcher la machine
contre le mur en faisant
attention à ce que le tuyau
n’ait ni coudes ni
étranglements.
Raccorder le tuyau de
vidange au rebord de la
baignoire ou, mieux encore,
à un dispositif fixe
d’évacuation,hauteur mini.
50 cm et de diamètre
supérieur au tuyau de la
machine à laver.
En cas de besoin, utiliser le
coude rigide livré avec la
machine.
DE
EN
Befestigen Sie die gewellte
Bodenplatte wie in der
Abbildung dargestellt.
Das Gerät muß an die
Wasserversorgung mit
neuen Schläuchen
angeschlossen werden.
Alte Schläuche dürfen nicht
wiederverwendet werden.
ACHTUNG:
WASSERHAHN NOCH
NICHT ÖFFNEN.
WICHTIG:
Um den Stromverbrauch zu
senken, ist diese
Waschmaschine, zuzüglich
zum Kaltwasseranschluß, mit
einem Warmwasseranschluß
ausgestattet.
Der graue Schlauch ist an
den Kaltwasserhahn
anzuschließen, während der
rote Schlauch an den
Warmwasseranschluß zu
verbinden ist.
Falls keine
Warmwasserleitung
vorhanden sein sollte,ist das
mitgelieferte Y-förmige
Zubehörteil einzusetzen, wie
in der beigefügten
Abbildung aezeigt.
Die Waschmaschine an die
Wand rücken, darauf
achten, daß dabei der
Schlauch nicht verkrümmt
oder eingeengt wird.
Ablaufschlauch am
Wannenrand
befestigen, oder an einem
festen Abfluß von
mindestens 50 cm Höhe
anbringen, dessen
Durchmesser größer ist als
der des
Waschmaschinenschlauchs.
Falls erforderlich den
mitgelieferten starren
Rohrbogen benutzen.
Fix the sheet of corrugated
material on the bottom as
shown in picture.
The appliance must be
connected to the water
mains using new hose-sets.
The old hose-sets should not
be reused.
IMPORTANT:
DO NOT TURN THE TAP
ON AT THIS TIME.
IMPORTANT
This appliance is set to be
connected to hot and cold
water supply for improved
energy consumption.
The grey hose must be
attached to the cold
water tap and the red hose
must be attached to the hot
water tap.
Should the hot water supply
not be available, please, use
the “Y” attachement as per
diagram shown.
Position the washing
machine next to the wall.
Hook the outlet tube to the
edge of the bath tub,
paying attention that there
are no bends or
contractions along the tube.
It is better to connect the
discharge hose to a fixed
outlet of a diameter greater
than that of the outlet tube
and at a height of min. 50
cm. If is necessary to use the
plastic sleeve supplied.
19
IT
Applichi il foglio di polionda
sul fondo come mostrato in
figura.
L’apparecchio deve essere
connesso alla rete idrica
solo con i nuovi tubi di
carico forniti in dotazione. I
vecchi tubi di carico non
devono essere riutilizzati.
ATTENZIONE:
NON APRA
IL RUBINETTO
IMPORTANTE
Questa Lavabiancheria è
predisposta al
collegamento della rete
idrica con acqua calda e
acqua fredda per maggiore
risparmio energetico.
Il tubo grigio deve essere
collegato al rubinetto
dell’acqua fredda
mentre il tubo rosso deve
essere collegato al rubinetto
dell’acqua calda.
Nel caso non disponiate del
collegamento acqua calda
utilizzare l’accessorio a “Y” in
dotazione, come da
disegno allegato.
Accosti la lavatrice al muro
facendo attenzione che
non vi siano curve o
strozzature, allacci il tubo di
scarico al bordo della
vasca.
o meglio a uno scarico fisso;
altezza minima 50 cm, di
diametro superiore al tubo
della lavatrice.
In caso di necessità utilizzare
la curva rigida in dotazione.
ES
Aplique la lamina de
polionda como se muestra
en la figura.
El aparato debe ser
conectado a la red
hidraulica sólo con los
nuevos tubos de carga
disponibles en dotación.
Los viejos tubos de carga no
tienen que ser reutilizados.
ATENCIÓN:
NO ABRA EL GRIFO.
IMPORTANTE:
Esta lavadora permite ser
conectada a la red
hidraulica con agua
caliente y fría para un
mayor ahorro energético.
El tubo gris debe ser
conectado a la salida de
agua fría mientras que el
tubo rojo debe ser
conectado
al del agua caliente.
En el caso de no disponer
de conexión para el agua
caliente
utilizar el accesorio "Y"
suministrado en dotación,
segun el dibujo
adjunto.
Acerque la lavadora a la
pared procurando que no
se formen curvas o
estrangulamientos, fije el
tubo desagüe al borde de
la pila.
o mejor aún, a un desagüe
fijo, con un diámetro mayor
que el del tubo de la
lavadora, a una altura
mínima de 50 cm.
En caso necesario, utilice la
curva rígida adjunta.