FR PT
Mettre la machine à niveau
avec les pieds avant.
a) Tourner dans le sens des
aiguilles d’une montre
l’écrou de façon à
dévérouiller la vis du pied.
b) Tourner le pied et le faire
monter ou descendre
jusqu’à obtenir une parfaite
adhérence au sol.
c) Enfin bloquer le pied en
revissant l’écrou dans le sens
inverse des aiguilles d’une
montre et le faire adhérer au
fond de la machine.
Vérifier que le bouton
Marche/Arrêt (C) ne soit pas
enfoncé.
Vérifier que toutes les
manettes soient sur la
position “0” et que le hublot
soit fermé.
Brancher la prise.
Une fois l'appareil installé, la
prise électrique doit rester
accessible.
Appuyer sur la touche
Marche/Arrêt (C) pour
allumer la lampe-témoin de
fonctionnement courant
branché (N); si elle ne
s’allume pas se reporter à la
liste des recherches de
panne.
Nivele a máquina
regulando a altura dois pés
dianteiros.
a) Rode a porca no sentido
dos ponteiros do relógio
para soltar a rosca de
fixação do pé.
b) Rode a pé para o erguer
ou baixar até estar
firmemente assente no
chão.
c) Fixe o pé nessa posição
rodando a porca no sentido
contrário co dos ponteiros
do relógio até embater no
fundo da máquina.
Assegure-se de que a tecla
de ligar/desligar (C) não
esteja premida.
Assegure-se de que todos os
botões da máquina estejam
colocados na posição “0” e
de que a porta da máquina
esteja fechada.
Ligue a máquina à corrente,
inserindo a ficha do
respectivo cabo de
alimentação na tomada.
Depois da instalação, os
acessórios devem estar
posicionados, pelo que a
tomada deve estar num
local acessível.
Pressione a tecla de
ligar/desligar (C).O
indicador luminoso de que
a máquina está ligada (N)
iluminar-se-
-á. Se, porém, este indicador
luminoso não se acender
deverá consultar o capítulo
“Eliminação de Avarias”.
20
ES
EN
Nivele la máquina con las
patas delantares
a) Girar la tuerca en el
sentido de las agujas del
reloj para desbloquear el
tornillo del pie.
b) Girar el pie y hacerlo
bajar o subir hasta
conseguir su perfecta
adherencia al suelo.
c) Bloquear el pie girando la
tuerca en el sentido
contrario a las agujas del
reloj hasta que se adhiera al
fondo de la lavadora.
Asegúrese de que el botón
Marcha/Paro (C) no esté
pulsado.
Asegúrese de que todos los
mandos estén en posición
“0” y que el ojo de buey
esté cerrado.
Enchúfela.
El aparato tiene que ser
colocado de forma que el
enchufe sea accesible una
vez instalado.
A continuación pulse el
botón START (C) se
encenderá el piloto de
funcionamiento “conexión
de corriente efectuada” (N)
si no se enciende vea “
causas de averías”
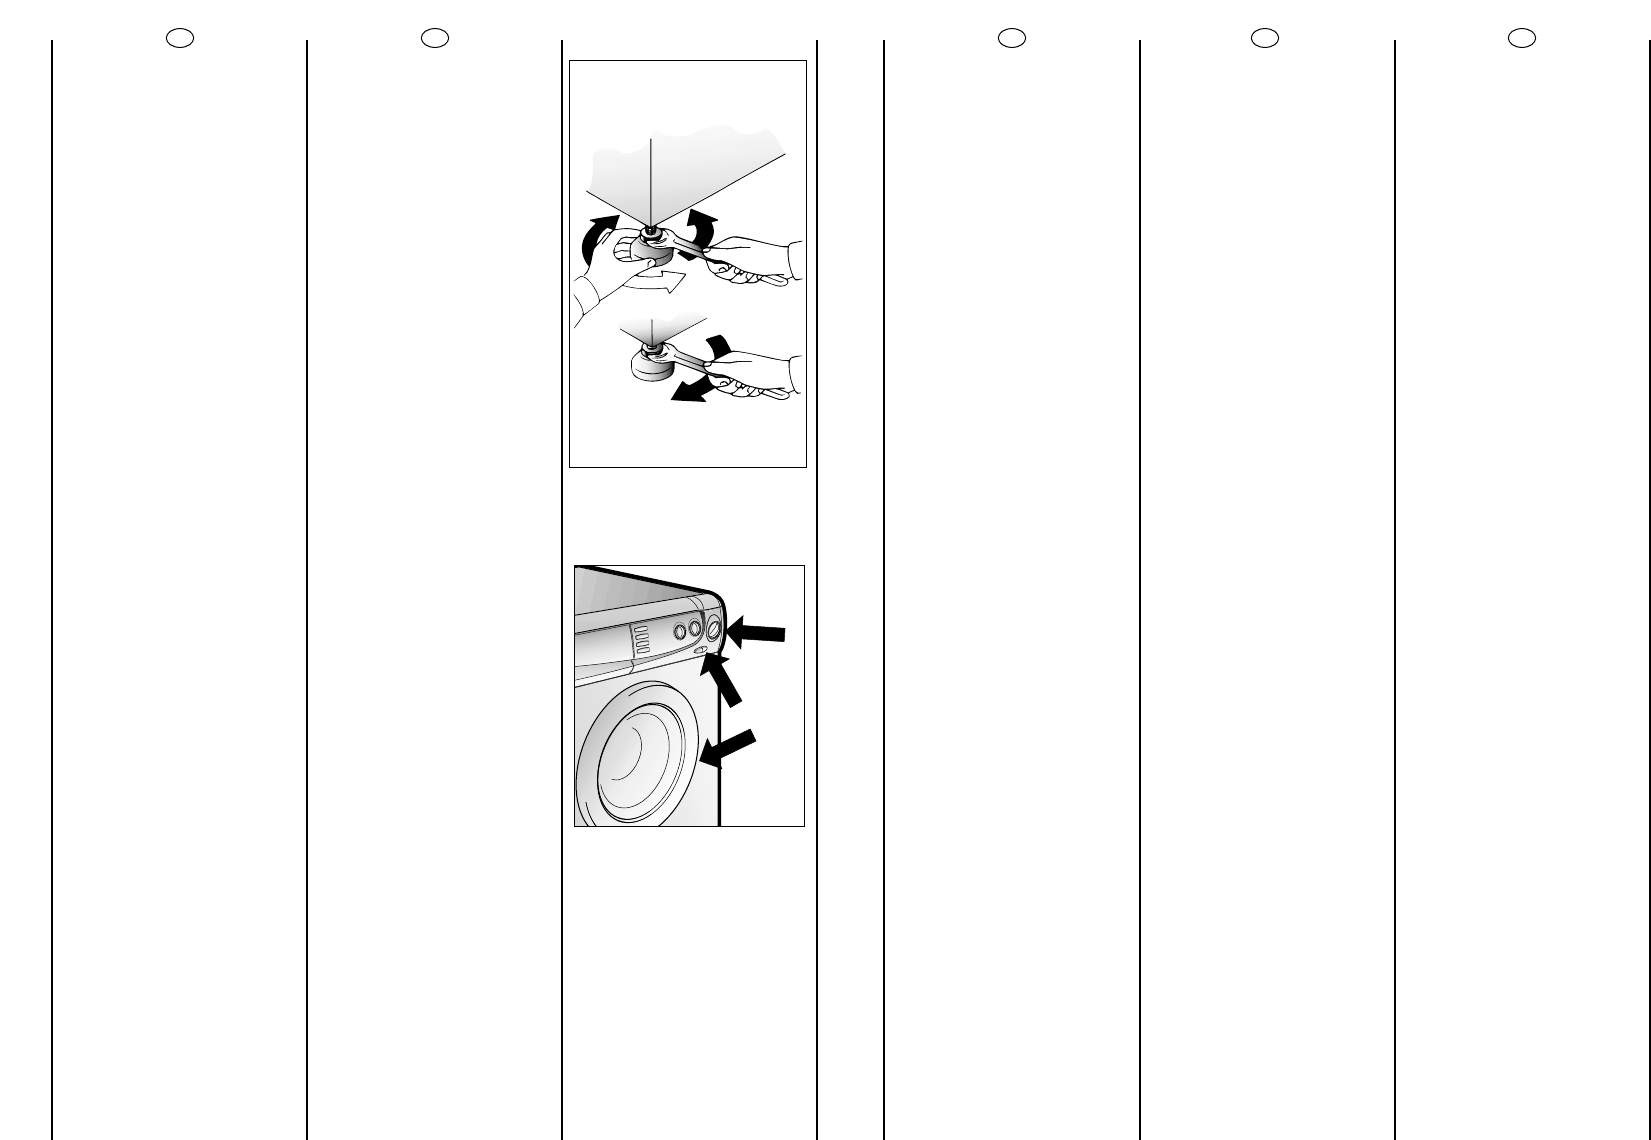
Use front feet to level the
machine with the floor.
a) Turn the nut clockwise to
release the screw adjuster of
the foot.
b) Rotate foot to raise or
lower it until it stands firmly
on the ground.
c) Lock the foot in position
by turning the nut anti-
clockwise until it comes up
against the bottom of the
machine.
Ensure that the Off/On
button (C) is not pressed.
Ensure that all the knobs are
on the “0” position and that
the door is closed.
Insert the plug.
After installation, the
appliance must be
positioned so that the plug is
accessible.
Press the START (C) button.
The power on (N) light will
light up.
If this does not light up see
faults search.
21
DE
Ausrichten der Maschine
über die vorderen
Verstellfüße
a) Kontermuttern im
Uhrzeigersinn lösen.
b) Standfuß einregulieren, bis
das Gerät genau
ausgerichtet ist (möglichst
mit der Wasserwaage
justieren!).
c) Kontermuttern (gegen
den Uhrzeigersinn) festziehen.
Wichtig: Sollte das Gerät auf
einen Sockel aufgestellt
werden,ist es durch eine
Sockelbefestigung zu sichern.
Erkundigen Sie sich bitte
hierfür im Fachhandel.
Der Hersteller haftet nicht für
unsachgemäße Aufstellung
und Installation.
Sicherstellen, daß die Start-
Stop-Taste (C) nicht gedrückt
ist.
Sicherstellen, daß alle
Schalter auf “0” stehen, und
das Bullauge geschlossen ist.
Stecker einstecken.
Nach der Installation muß der
Anschluß zugänglich sein.
Bei Betätigen der “START”
Taste leuchtet die
Leuchtanzeige auf. Sollte dies
nicht der Fall sein, bitte im
Kapitel “Fehlersuche”
nachsehen.