Please read this manual carefully before using this product for proper
installation and application of product.
Note the date of purchase, name of the store on the guarantee card.
1. It is difficult to setimate the actual distance since the camera uses
an optical lens.
(Check the actually distance by eyes when backing up the vehicle.)
2. Check occasionally if the camera is installed firmly.
3. Do not dissemble the camera in order to prevent water getting
inside.
4. Do not spray water directly with high pressure during a car-wash.
5. Noise on camera display can occur while FM signal is transmitted.
6. Clean the lens cover with a soft cloth occasionally for clear view
of camera.
7. When the headlight or sunlight is exposed to the camera lens for a
long time while the vehicle is stopped, afterimages can be formed.
INSTALLATION
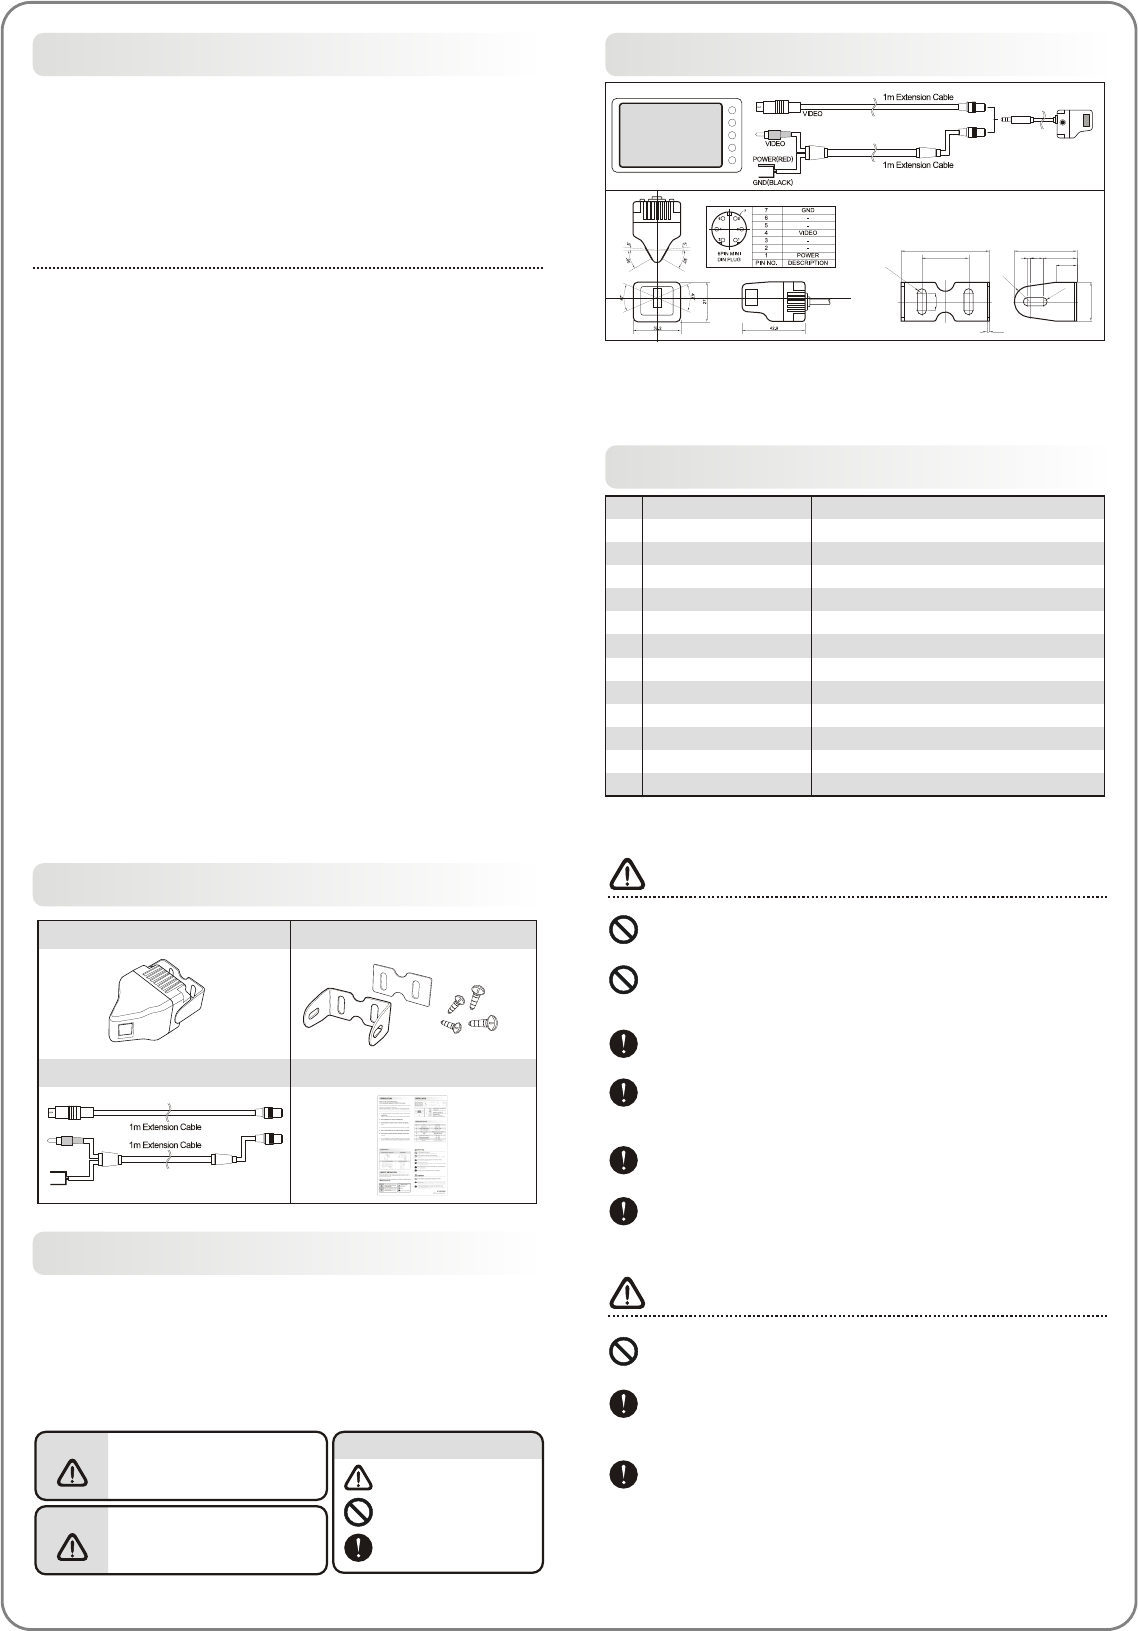
1. Install the camera on the braket for either front or rear view and fix the bracket on the vehicle
by using provided screws.
2. Test the wire connection.
3. When using the camera as rear view camera, the monitor should be able to switch to a MIRROR
MODE; (e.g. CAMOS CM-562 or CM-708.)
SPECIFICATION
CONTENTS
AccessoriesPrism Camera
Instruction manualExtension cable
SAFETY INSTRUCTION
Please pay attention to the warnings and cautions listed in order to
prevent the potential risks.
Warning
Warning
Warning and Caution symbols are divided according to the
different level of risk.
Do not dissemble the device.
- It may cause a fire or malfunction of device.
Do not use bolts or nuts from a parts for vehicle.
- Using bolts or nuts from steering column or break may cause an
accident.
Do not install the camera projected out from the vehicle.
- It may harm the pedestrians.
Properly wire the cables.
- It may cause a fire or an accident. Do not let the extension cable
pass through the seat rail.
After installing the camera, check if break lamp, head lamp and
wipe works properly.
Install this camera to the vehicle with DC 12V ÈGND.
Do not install the camera stand on the surface of glass.
- Use the screws to install the camera stand.
When the power cable cord touches a metal case, cover it with
a friction tape.
- Short circuit or disconnection of wire may cause a fire or accident.
Let professional engineers or the sale store install the camera.
- It require the experience and skills from professional engineers for
proper installation and wireing.
Caution
About signs
May cause bodily harm or even
death if users ignore warnings
in the safety rules.
May cause bodily harm or even
death if users ignore cautions
in the safety rules.
"Precautions"
"Do Not"
"Follow directions carefully"
Caution
Specifications
PAL
1/4" IT CCD 512(H) x 492(V)
4:3
450 TV lines at center
46dB(min.) at AGC off
F=2.8, f=3.44mm
68(H) x 47.2(V) degree ±3% (L/R +30º, -5º)
DC 6.0V ~ 15V(single supply voltage)
32.2(W) x 27(H) x 42.9(D)
Operating range -25 to 75
Storage -40 to 85
Less than 90%RH
Description
Camera system
Image pickup device
Image format
Horizontal resolution
S/N ratio
Optical lens
Viewing angle
Power source
Dimensions(mm)
Operating temperature
Storage temperature
Humidity
NO.
1
2
3
4
5
6
7
8
9
10
11
12
Screws
Bracket
Dual side adhesive tape
4m Cable
34
18
R1.
75
24
1
5
13
8
R
1 6
.
15
6.5
Design and specifications are subject to change without notice.
Need help? Post your question in this forum.
Report abuse
Libble takes abuse of its services very seriously. We're committed to dealing with such abuse according to the laws in your country of residence. When you submit a report, we'll investigate it and take the appropriate action. We'll get back to you only if we require additional details or have more information to share.
Product:
Forumrules
To achieve meaningful questions, we apply the following rules:
First, read the manual;
Check if your question has been asked previously;
Try to ask your question as clearly as possible;
Did you already try to solve the problem? Please mention this;
Is your problem solved by a visitor then let him/her know in this forum;
To give a response to a question or answer, do not use this form but click on the button 'reply to this question';
Your question will be posted here and emailed to our subscribers. Therefore, avoid filling in personal details.
Register
Register getting emails for Camos CM-45P at:
new questions and answers
new manuals
You will receive an email to register for one or both of the options.
Get your user manual by e-mail
Enter your email address to receive the manual of Camos CM-45P in the language / languages: English as an attachment in your email.
The manual is 0,16 mb in size.
You will receive the manual in your email within minutes. If you have not received an email, then probably have entered the wrong email address or your mailbox is too full. In addition, it may be that your ISP may have a maximum size for emails to receive.
If you have not received an email with the manual within fifteen minutes, it may be that you have a entered a wrong email address or that your ISP has set a maximum size to receive email that is smaller than the size of the manual.
The email address you have provided is not correct.
Please check the email address and correct it.
Your question is posted on this page
Would you like to receive an email when new answers and questions are posted? Please enter your email address.