Ons advies :
• Tijdens het eerste gebruik of wanneer u het strijkijzer een paar minuten niet heeft gebruikt, houdt u het strijkijzer weg van
de strijkplank en drukt u enkele malen op de stoomknop. Zo wordt koud water uit het stoomcircuit geblazen.
Instellen van de temperatuurregelaar van het strijkijzer :
• Begin met de stoffen die op een lage temperatuur worden gestreken (
●
) en strijk daarna de stoffen die een hogere
temperatuur verdragen (
●●
,
●●●
of max).
• Bij het strijken van een stof van gemengde vezels, stelt u de temperatuur in op de teerste stof.
• Indien u wollen kleding strijkt, druk dan met tussenpozen op de stoomknop zonder het strijkijzer op de stof te zetten.
U voorkomt zo het glimmen hiervan.
Instellen v
an de stoomhoeveelheid :
• Hoe dikker de stof, des te meer stoom heeft u nodig.
• Wanneer u met een lage temperatuur strijkt, stelt u de hoeveelheid stoom op de laagste stand in.
Indien u zonder stoom wilt strijken :
• Drukt u niet op de stoomknop die zich onder de handgreep bevindt.
• Indien u stijfsel gebruikt, dient u dit aan de achterzijde van de te strijken stof te verstuiven.
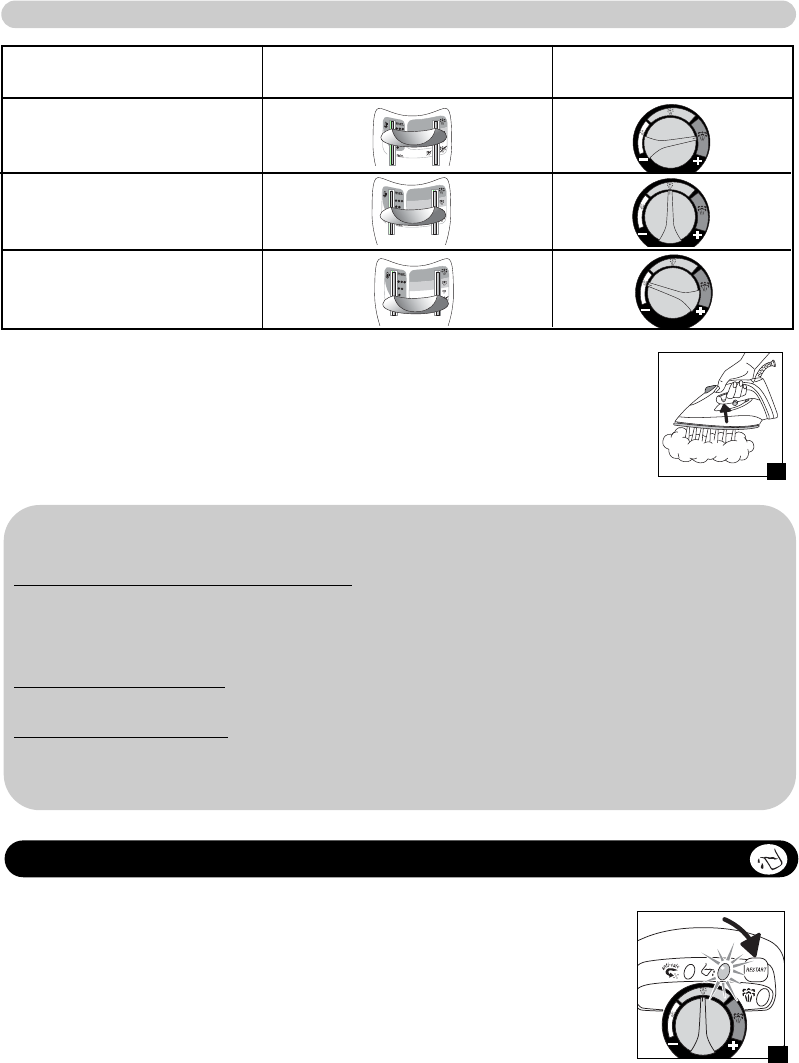
Textielsoort
Linnen
Katoen
● ● ●
Wol
Zijde, Viscose
● ●
Synthetische stoffen
Polyester, Acetaat,
Acryl, Polyamide
●
Instelling van de temperatuur-
regelaar van het strijkijzer
Instelling van de
stoomregelaar
Om stoom te verkrijgen, houdt u de stoomknop onder de handgreep van het
strijkijzer ingedrukt (11). Zodra u deze stoomknop loslaat, stopt de stoom.
Wij adviseren u te beginnen met textiel dat op een lage temperatuur dient te
worden gestreken : synthetische weefsels (
●
).
Gebruik de stoomknop onder de handgreep van het strijkijzer met mate bij het
strijken van kwetsbare stoffen (
●
), om waterdruppels te voorkomen.
DE TEMPERATUURREGELAAR EN DE STOOMREGELAAR INSTELLEN OP DE TE STRIJKEN TEXTIELSOORT :
11
12
7-
WANNEER HET RODE LAMPJE “RESERVOIR LEEG” BRANDT
U heeft geen stoom meer. Het afneembare waterreservoir is leeg (12).
1.Verwijder het afneembare waterreservoir met behulp van de handgrepen door dit in
horizontale richting weg te trekken en vul het.
2. Plaats het reservoir goed terug in de behuizing.
3. Druk op de toets « Restart » op het bedieningspaneel voor het opnieuw starten van de
stoomtank en om door te gaan met strijken.
synth.
synth.
synth.