This displays the root or title of the DVD playing. Use rotary volume knob for up/down, and Audio button to confirm.
Push this button to confirm the option you have selected.
AF stands for Alternative frequencies; the tuner will return to alternative frequencies whenever the reception signal is getting worse
OK
TA stands for Traffic announcement which means that it will give you information about the traffic (if broadcasted) no matter what mode you are in (CD,USB, etc.) it will
automatically interrupt the cd and give the information, after that it automatically switches back to the selected mode.
TA
AF
Sub-wWith this button you can adjust the subwoofer level (only applicable if a subwoofer is connected to the subwoofer line out)
Ix-Bass
When inserting a USB stick the unit will switch to USB mode. (Max 1000 tracks)
Remove the frontpanel to insert SD card. When inserting a SD card the unit will switch to SD mode. (Max 2GB card, max 1000 tracks)
Use a non-metallic pointed object to press and hold the reset button for 5 seconds. The unit will be set to factory default.
3,5mm A/V in JackTo connect an external audio/video system (digital camera/game console), also AV output possible (change setting in system menu -> AV jack)
SD card input
USB input
With this button you can select the BassBoost level
Mute
Display
Push this button to turn off the sound, push again to return to the last volume level.
With this button you can select the "image display" or "Big font display" interface.
PTY
2ZoneIf ON, Dual zone operation is activated. This will make it possible to select a different source for front and rear output.
The PTY function allows you to search for stations with a particular program type like NEWS group and POP group both of these groups are divided in different subjects.
Long press to move the radio frequency number up/down step by step.
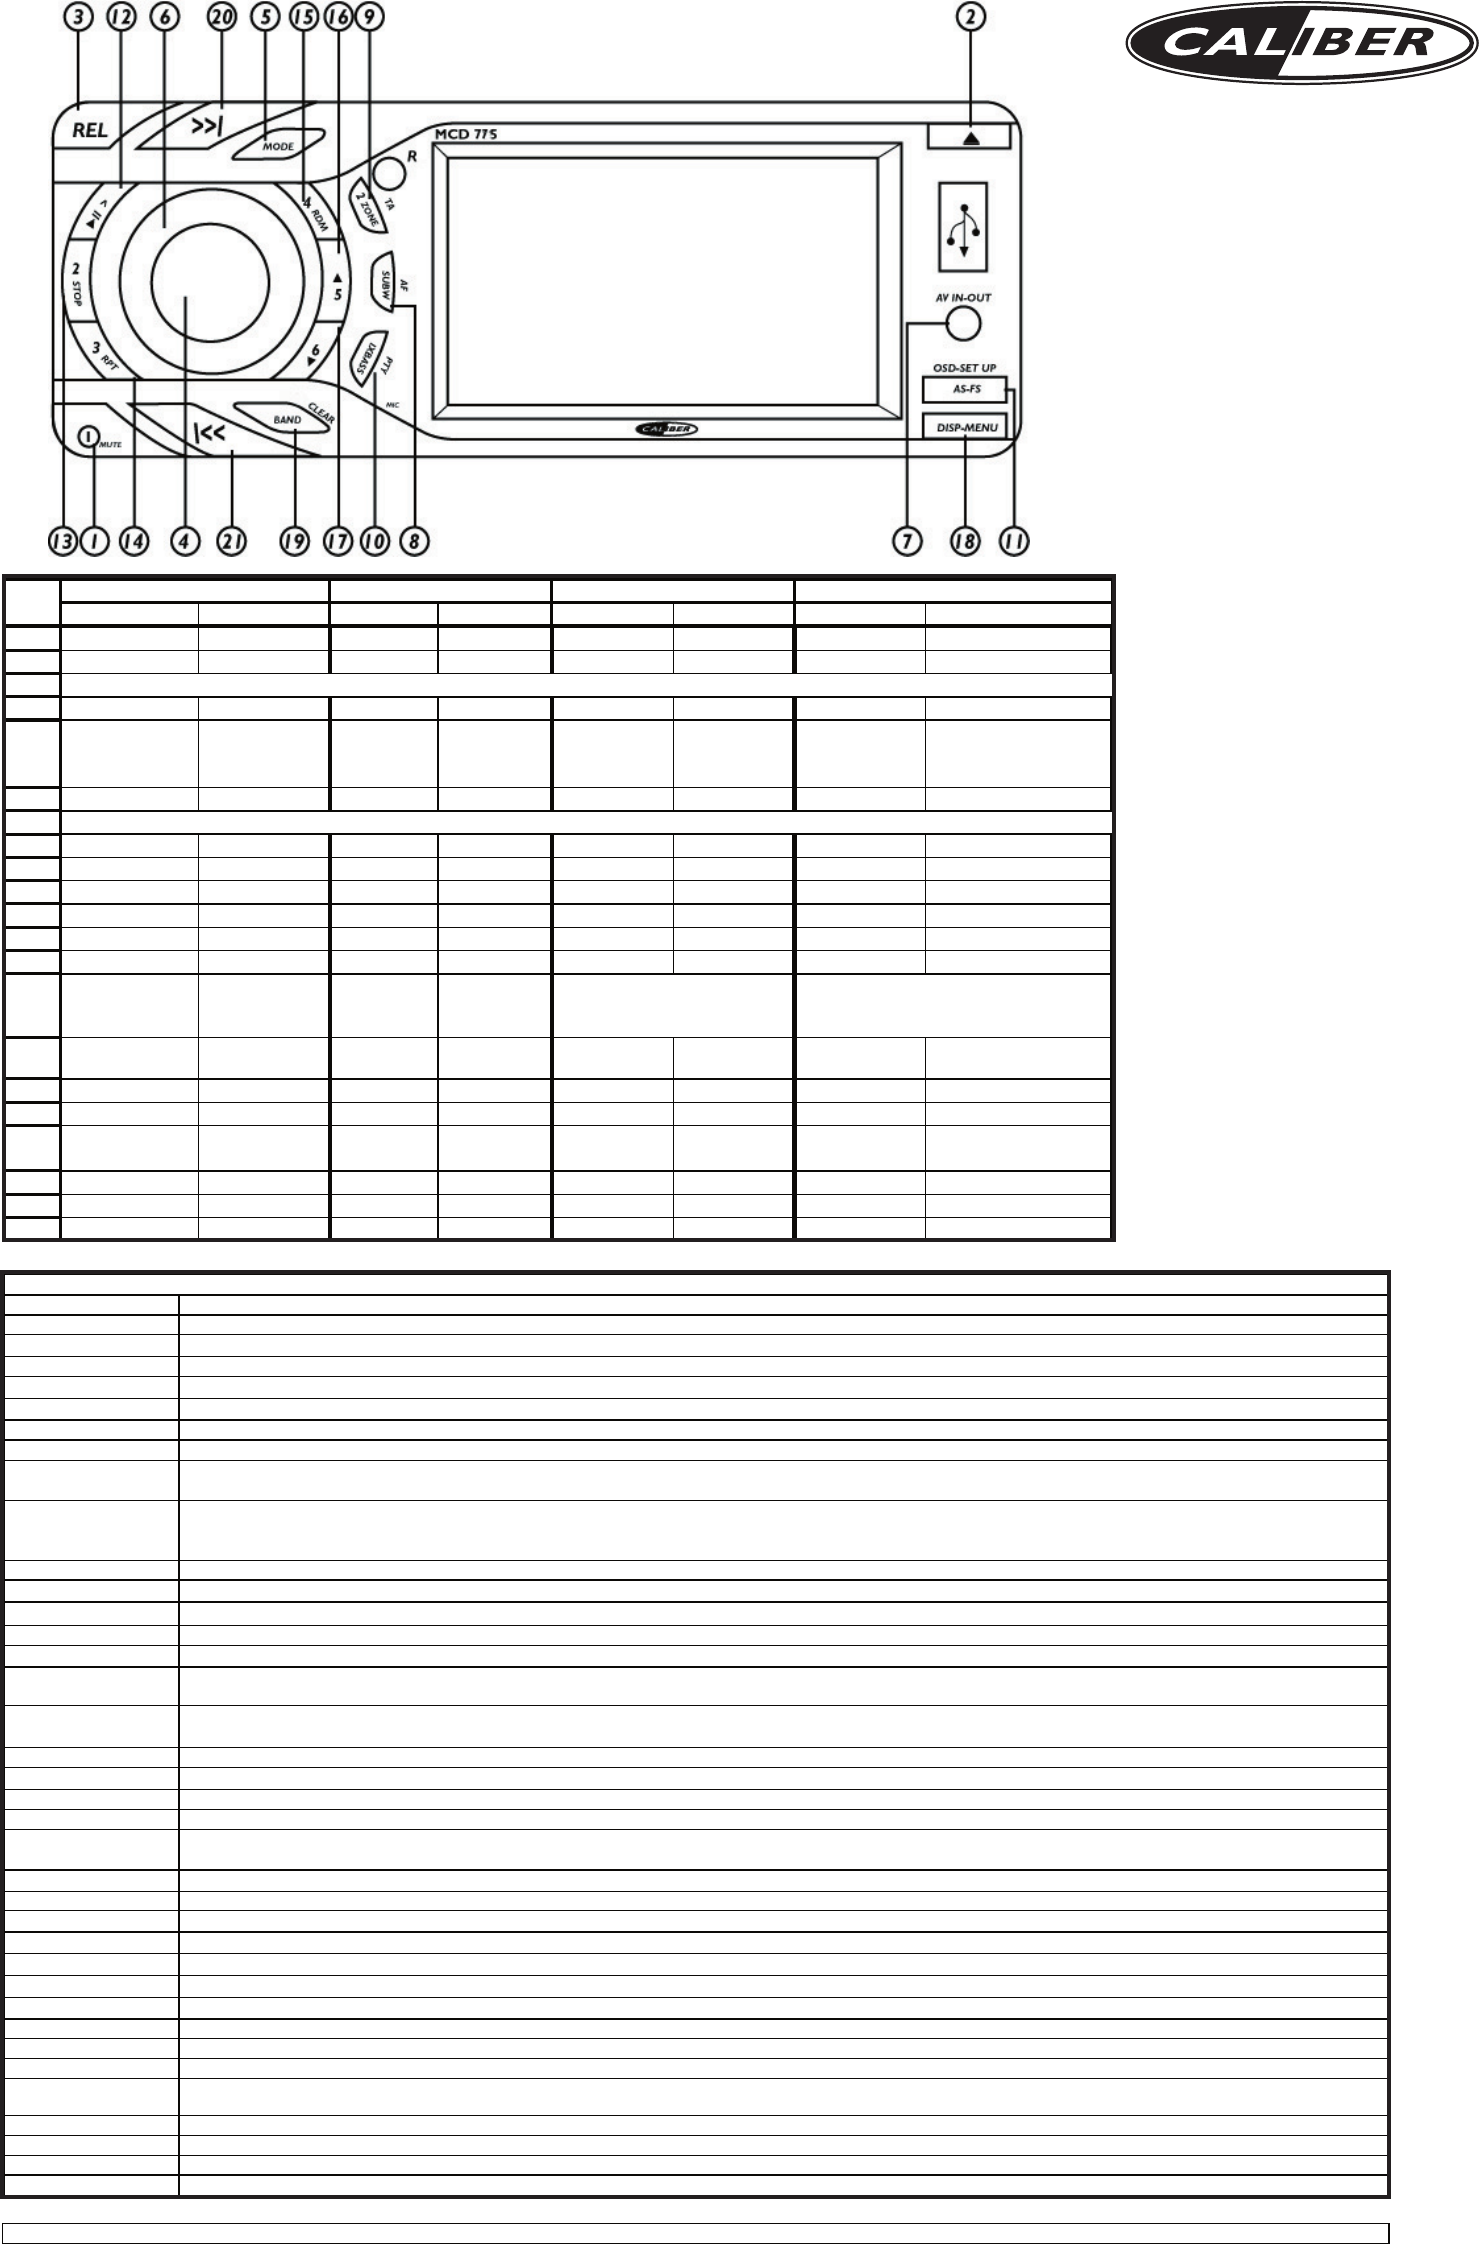
Description of the functions
Push this button to release the frontpanel
Push this button to slide down the frontpanel, so you can eject the CD out of the unit.
Band selection allows you to select different reception bands, f.i. FM1, FM2, FM3 and AMBand
Panel release
Open/close
Power function to activate or deactivate the unit. To deactive press and hold the power button for 3 secondsPower
Long press to change the audio language of a DVD during playback
These are the preset stations where you can store your favorite radio stations if in tuner mode
This button allows you in CD, USB or SD mode to play or to pause the music.
In MP3 mode press this button to go up or down one folder.
The mode button allows you to go from one source (f.i. CD) to another source (f.i. Tuner) by pushing the button as many times as needed.
AS stands for Autostore; in tuner mode it will automatically store the 6 strongest stations (M1-M6). Note: all previous stored stations are lost
This knob allows you to adjust the volume from minimum to maximum level. NOTE high sound levels may cause damage to your ears
PS stands for Preset stations this means that when you push this button in tuner mode it will automatically switches to the first preset (M1) if you push again it will go to
the next and so on.
Press OSD button once to display amount of time played and time remaining, twice to also display disc type, chapter/track, and total number of chapters/tracks. For DVD
more data will be displayed. Press a third time to make the OSD disappear.
Short press to move to the next station automatically
To stop playback, press again to resume. Press Stop twice to resume from start of disc.
Long press to fast forward to the CD, USB or SD
Shuffle
Scan
Tune up/down
Hold button for 3 seconds to enter the menu. In this menu you can adjust the settings of the unit; OSD language, video settings, rating settings, and back to default
settings.
The Audio menu button gives you the possibility to adjust your sound system with the following options Bass, Treble, Balance and Fader. These options can be used to
fine tune your sound.
Menu (system)
Set-up
Hold button for 3 seconds to open the menu. Press repeatedly to view menu items; viewing angle, contrast, brightness, color, date, clock, AV jack, camera, tuner settings,
beep tone, turn-on volume, rear speaker on/off, internal amplifier on/off. Adjust with the rotary volume knob.
PS
Rotary volume
Stop
Fast forward/backward
DVD Audio
Audio menu
Mode
AS
M1-M6
Pause/Play
DVD menu
File/track down/up
SYSTEM
TUNER
CD/MP3/WMA
reset (behind panel)
Shuffle will play all the songs random. Available in CD, USB and SD mode
Repeat will play a selected song or album continuously. Available in CD, USB and SD mode
Scan will play 10 seconds of each song on the CD, USB or SD. If the preferred song is playing, push again and it will play that song
OSD
Repeat
Seek up/down
Disconnect
TransferTo audio transfer from headunit back to the mobile phone. Long press the Transfer (MODE) button to transfer the audio back to your mobile
phone, to have a private conversation. LCD will display "CALL TRANSFER"
DVD
BLUETOOTH
Repeat Off
Repeat track
Repeat disc
Repeat Off
Repeat chapter
Repeat title
Panel release button
3.5mm A/V in Jack
KEY
Note! Do not operate the unit or look at the monitor while driving.
Reject incoming call
Open Bluetooth menu by pressing and holding "Disp-Menu" button for more than 3 seconds
When Pairing is displayed press the Audio button (to end pairing press Clear(BAND) button at any time) Activate BlueTooth on your
mobile phone, and search for available devices. Select "BT 60", password "1234". If succesfull "Pairing OK" is displayed, if not "Pairing Fail!" will
be displayed for 3 seconds. The unit will go back to the previous mode.
The unit will normally auto-reconnect. If a call is answered when the mobile phone is out of reach (>2meters) the headunit will not auto-reconnect
Reconnect manually by choosing Reconnect in the Menu.
Access into Menu -> RECONNECT mode, then rotate the volume knob to select the DISCONNECT mode. Press Audio button to confirm.
Press Clear (BAND) button if you not wish to answer the call, and return to normal playing mode.
This displays the root or title of the DVD playing. Use rotary volume knob for up/down, and Audio button to confirm.
Push this button to confirm the option you have selected.
AF stands for Alternative frequencies; the tuner will return to alternative frequencies whenever the reception signal is getting worse
OK
TA stands for Traffic announcement which means that it will give you information about the traffic (if broadcasted) no matter what mode you are in (CD,USB, etc.) it will
automatically interrupt the cd and give the information, after that it automatically switches back to the selected mode.
TA
AF
Sub-wWith this button you can adjust the subwoofer level (only applicable if a subwoofer is connected to the subwoofer line out)
Ix-Bass
When inserting a USB stick the unit will switch to USB mode. (Max 1000 tracks)
Remove the frontpanel to insert SD card. When inserting a SD card the unit will switch to SD mode. (Max 2GB card, max 1000 tracks)
Use a non-metallic pointed object to press and hold the reset button for 5 seconds. The unit will be set to factory default.
3,5mm A/V in JackTo connect an external audio/video system (digital camera/game console), also AV output possible (change setting in system menu -> AV jack)
SD card input
USB input
With this button you can select the BassBoost level
Mute
Display
Push this button to turn off the sound, push again to return to the last volume level.
With this button you can select the "image display" or "Big font display" interface.
PTY
2ZoneIf ON, Dual zone operation is activated. This will make it possible to select a different source for front and rear output.
The PTY function allows you to search for stations with a particular program type like NEWS group and POP group both of these groups are divided in different subjects.
Long press to move the radio frequency number up/down step by step.
Description of the functions
Push this button to release the frontpanel
Push this button to slide down the frontpanel, so you can eject the CD out of the unit.
Band selection allows you to select different reception bands, f.i. FM1, FM2, FM3 and AMBand
Panel release
Open/close
Power function to activate or deactivate the unit. To deactive press and hold the power button for 3 secondsPower
Long press to change the audio language of a DVD during playback
These are the preset stations where you can store your favorite radio stations if in tuner mode
This button allows you in CD, USB or SD mode to play or to pause the music.
In MP3 mode press this button to go up or down one folder.
The mode button allows you to go from one source (f.i. CD) to another source (f.i. Tuner) by pushing the button as many times as needed.
AS stands for Autostore; in tuner mode it will automatically store the 6 strongest stations (M1-M6). Note: all previous stored stations are lost
This knob allows you to adjust the volume from minimum to maximum level. NOTE high sound levels may cause damage to your ears
PS stands for Preset stations this means that when you push this button in tuner mode it will automatically switches to the first preset (M1) if you push again it will go to
the next and so on.
Press OSD button once to display amount of time played and time remaining, twice to also display disc type, chapter/track, and total number of chapters/tracks. For DVD
more data will be displayed. Press a third time to make the OSD disappear.
Short press to move to the next station automatically
To stop playback, press again to resume. Press Stop twice to resume from start of disc.
Long press to fast forward to the CD, USB or SD
Shuffle
Scan
Tune up/down
Hold button for 3 seconds to enter the menu. In this menu you can adjust the settings of the unit; OSD language, video settings, rating settings, and back to default
settings.
The Audio menu button gives you the possibility to adjust your sound system with the following options Bass, Treble, Balance and Fader. These options can be used to
fine tune your sound.
Menu (system)
Set-up
Hold button for 3 seconds to open the menu. Press repeatedly to view menu items; viewing angle, contrast, brightness, color, date, clock, AV jack, camera, tuner settings,
beep tone, turn-on volume, rear speaker on/off, internal amplifier on/off. Adjust with the rotary volume knob.
PS
Rotary volume
Stop
Fast forward/backward
DVD Audio
Audio menu
Mode
AS
M1-M6
Pause/Play
DVD menu
File/track down/up
SYSTEM
TUNER
CD/MP3/WMA
reset (behind panel)
Shuffle will play all the songs random. Available in CD, USB and SD mode
Repeat will play a selected song or album continuously. Available in CD, USB and SD mode
Scan will play 10 seconds of each song on the CD, USB or SD. If the preferred song is playing, push again and it will play that song
OSD
Repeat
Seek up/down
Disconnect
TransferTo audio transfer from headunit back to the mobile phone. Long press the Transfer (MODE) button to transfer the audio back to your mobile
phone, to have a private conversation. LCD will display "CALL TRANSFER"
DVD
BLUETOOTH
Repeat Off
Repeat track
Repeat disc
Repeat Off
Repeat chapter
Repeat title
Panel release button
3.5mm A/V in Jack
KEY
Note! Do not operate the unit or look at the monitor while driving.
Reject incoming call
Open Bluetooth menu by pressing and holding "Disp-Menu" button for more than 3 seconds
When Pairing is displayed press the Audio button (to end pairing press Clear(BAND) button at any time) Activate BlueTooth on your
mobile phone, and search for available devices. Select "BT 60", password "1234". If succesfull "Pairing OK" is displayed, if not "Pairing Fail!" will
be displayed for 3 seconds. The unit will go back to the previous mode.
The unit will normally auto-reconnect. If a call is answered when the mobile phone is out of reach (>2meters) the headunit will not auto-reconnect
Reconnect manually by choosing Reconnect in the Menu.
Access into Menu -> RECONNECT mode, then rotate the volume knob to select the DISCONNECT mode. Press Audio button to confirm.
Press Clear (BAND) button if you not wish to answer the call, and return to normal playing mode.
Libble takes abuse of its services very seriously. We're committed to dealing with such abuse according to the laws in your country of residence. When you submit a report, we'll investigate it and take the appropriate action. We'll get back to you only if we require additional details or have more information to share.
Product:
Forumrules
To achieve meaningful questions, we apply the following rules:
First, read the manual;
Check if your question has been asked previously;
Try to ask your question as clearly as possible;
Did you already try to solve the problem? Please mention this;
Is your problem solved by a visitor then let him/her know in this forum;
To give a response to a question or answer, do not use this form but click on the button 'reply to this question';
Your question will be posted here and emailed to our subscribers. Therefore, avoid filling in personal details.
Register
Register getting emails for Caliber mcd 775 at:
new questions and answers
new manuals
You will receive an email to register for one or both of the options.
Get your user manual by e-mail
Enter your email address to receive the manual of Caliber mcd 775 in the language / languages: English, German, Dutch, French, Italian, Polish, Portuguese, Swedish, Spanish as an attachment in your email.
The manual is 1,42 mb in size.
You will receive the manual in your email within minutes. If you have not received an email, then probably have entered the wrong email address or your mailbox is too full. In addition, it may be that your ISP may have a maximum size for emails to receive.
If you have not received an email with the manual within fifteen minutes, it may be that you have a entered a wrong email address or that your ISP has set a maximum size to receive email that is smaller than the size of the manual.
The email address you have provided is not correct.
Please check the email address and correct it.
Your question is posted on this page
Would you like to receive an email when new answers and questions are posted? Please enter your email address.