Byron No.SX220B&W (5L pg.1) Size: 420 x 740mm Date: 30 Jan 2009
433MHz
R&TTE
APPROVED
CH Byron Electrical United Kingdom. www.chbyron.com
CH Byron Electrical Ltd
Byron House
34 Sherwood Rd, Astonfield
Bromsgrove, B60 3DR
UK
Tel: 0845 2301231
e: support@chbyron.com
w: www.chbyron.com
433MHz
R&TTE
APPROVED
CH Byron Electrical United Kingdom. www.chbyron.com
CH Byron Electrical Ltd
Byron House
34 Sherwood Rd, Astonfield
Bromsgrove, B60 3DR
UK
Tel: 0845 2301231
e: support@chbyron.com
w: www.chbyron.com
GB FR NL
Draadloze Oplaadbare Deurbelkit
SX-220B/220W
5
Drukknop installatie
• Gebruik de gaten aan de achterkant van de drukknop als een
sjabloon, markeer de bevestigingspositie voor het apparaat.
• Boor gaten, doe er muurpluggen in en zet het
Drukknopapparaat vast tegen de muur d.m.v. schroeven.
• Bevestig het niet op een metalen oppervlak of UPVC-deurframe.
100m
8
Bediening
• Druk éénmaal op de knop op de Drukknop, het stuurt een
draadloos signaal naar de Deurbel en uw Deurbel gaat af.
• Gebruik de Deurbel binnen het functioneringsbereik, test het
vóór de uiteindelijke installatie.
7
Reset
Pas het volume aan
Gebruik een kleine platte schroevendraaier om het volume aan te
passen.
Volume
3
Melodie selectie
Druk éénmaal op de melodieknop om een melodie als uw
deurbelgeluid te kiezen. Er kan uit 8 melodieën gekozen worden:
1) Buizen 3 noten
2) Big Ben
3) Buizen 2 noten
4) Solo
Extra Byron “SX” assortiment producten kunnen aangeschaft
worden voor compatibiliteit.
5) Buizendans
6) Klarinet
7) Saxofoon
8) Ochtendgloren
Melodieknop
1
Drukknop
• Open de Drukknop door op het lipje aan de onderkant van
drukknop te drukken met een smalle schroevendraaier.
• Haal de isolatiestrook uit het batterijcompartiment. Het is dan
dan klaar voor gebruik.
• Controleer, tijdens het vervangen van de batterij, of de polariteit
overeenkomt met de interne markeringen (“+” naar boven toe
gericht), druk dan de batterij naar beneden zodat het stevig in
het compartiment zit.
CR2032 3V
Lithium Batterij
Verwijder
lsolatie-
Strook
4
Digitale code instelling
• Druk éénmaal op de Drukknop, een nieuwe functioneringscode
wordt willekeurig gegeneerd en naar de Deurbel gestuurd.
• De Deurbel zal af gaan om aan te geven dat de nieuwe
functioneringscode geregistreerd en opgeslagen is.
Signaal gestuurde indicatorlamp
2
Reset
Deurbel
• De oplaadbare batterijen zijn geïnstalleerd; laad de batterijen
volledig op vóór gebruik.
• Steek een smalle pin in het kleine gaatje met markering “Reset”
en druk in. U zult tweemaal een piepje horen ter indicatie dat
het gereed is voor registratie van een nieuwe gebruikscode (Zie
a.u.b. “De Digitale Code Instellen”).
• Plaats de Deurbeleenheid op de batterijlader. Laatstgenoemde
zal “Rood” oplichten om aan te geven dat de batterijen worden
opgeladen.
• Wanneer de LED van de batterijlader op “Groen” springt,
betekent dit dat de oplaadprocedure voltooid is en de
Deurbeleenheid klaar voor gebruik is.
Deurbel installatie
Zet de Deurbel op een tafelblad of vlak oppervlak, het is gereed
voor gebruik.
Batterijlader
Verbind de batterijlader met de A/C-D/C 9volt 300mA adapter
(Byron model SX-36 - inbegrepen), sluit de adapter aan op
het gewenste stopcontact en vervolgens is het klaar voor
gebruik.
6
LED
A/C lngang
Wire Free Rechargeable Door Chime Kit
SX-220B/220W
Important
1. Ne monter aucun des appareil à proximité d’une source de feu ou ou dans un endroit exposé à de hautes
températures.
2. Ne pas exposer le récepteur à la lumière directe du soleil ni à l’humidité
3. Se débarrasser des piles usagées de manière respectueuse de l’environnement selon les règlements
concernés.
4. Atttention à ne placer aucune source de flamme nue, telle que bougies, sur l’appareil.
5. L’appareil ne doit pas être exposé au risque d’être arrosé ou éclaboussé et aucun objet rempli de liquide,
vases par exemple, ne doit être placé dessus.
6. ATTENTION: Remplacer les piles uniquement par des piles de même type ou de type équivalent
recommmandé par le fabriquant.
7. ATTENTION: S’assurer que les piles sont correctement installées, selon les marquanges intérieurs.
8. ATTENTION: Danger d’explosion en cas d’erreur d’installation ou de remplacement des piles.
9. IMPORTANT: cet appareil ne contient aucun élément réparable, ne pas tenter de réparer.
Conseils
Si la sonnette ne sonne pas, vérifier les éléments suivants:
a) Pile usée dans le bouton de sonnette ou le récepteur - changer la pile du bouton de sonnette et recharger
les piles du récepteur.
b) Erreur de polarité d’une des piles des boutons - réinsérer les piles.
c) Le bouton et le récepteur ne sont pas réglés sur le même code de gestion - réinitialiser le code (voir réglage
du code digital).
d) Les appareils sont hors de portée - faire fonctionner le récepteur à une distance correspondant à sa capacité
de portée.
e) Initialiser le récepteur s’il ne sonne pas ou si le son présente des distortions.
Caractéristiques techniques
Température de fonctionnement: -10C - +40C
Distance de fonctionnement: 100 mètres (330ft approx. - en champ ouvert & dans les conditions nécessaires)
Tonalités à sélectionner: Huit (8) mélodies disponibles
Code digital à sélectionner: En tout deux cent cinquante six (256) codes digitaux possibles
”Appareil de type R2 - appareil dont la sortie de son est créée par l’activation initiale d’une commande et où la
période de son s’étale sur une durée déterminée quelles que soient les conditions de commande.”
Door Chime
• Les piles rechargeables sont installées; charger entièrement les
piles avant utilisation.
• Enfoncer une pointe dans le trou portant l’indication “Reset”
(initialisation). Deux bips retentissent pour indiquer que
l’appareil est prêt pour l’enregistrement d’un nouveau code
(voir Réglage du code digital).
• Placer le récepteur sur son chargeur, une lumière rouge
s’allume sur le chargeur, indiquant que les piles sont en cours
de chargement.
• Lorsque l’indicateur lumineux devient vert, le proccessus de
chargement est terminé et le récepteur est prêt.
2
Reset
5
Installation du boîtier du bouton
de sonnette
• Utiliser les trous pratiqués à l’arrière du boîtier du bouton de
sonnette comme référence pour marquer la position de fixation
de l’appareil.
• Percer des trous et insérer des chevilles puis fixer le boîtier
avec des vis.
• Ne pas le monter sur une surface métallique ni sur un cadre de
porte en PVC.
100m
8
Fonctionnement
• Appuyer une fois sur le bouton de sonnette qui envoie un signal
au récepteur. La sonnette retentit.
• Faire fonctionner le récepteur dans sa portée opérationnelle,
tester avant installation finale.
1
Bouton de sonnette
• Ouvrir le boîtier du bouton de sonnette en poussant avec un
petit tournevis plat la languette située sur le fonds du boîtier
• Retirer la bande isolante du compartiment à pile, le boîtier est
prêt à fonctionner.
• Pour remplacer la pile, bien faire correspondre la polarité de la
pile avec les marquages du boîtier (“+” vers le haut), puis
appuyer sur la pile pour l’insérer complètement dans le
compartiment.
Pile lithium
CR2032 3V
Retirer la
bande
isolante
3
Sélection d’un mélodie
Appuyer une fois sur le sélecteur de mélodie pour sélectionner
une mélodie en faisant sonner la sonnette. Il y a 8 mélodies:
1) Carillon 3 notes
2) Big Ben
3) Carillon 2 notes
4) Solo
Des produits de la gamme Byron “SX” peuvent être achetés par
ailleurs.
5) Alerte carillon
6) Clarinette
7) Saxophone
8) Rosée du matin
Sélecteur de
mélodie
4
Réglage du code digital
• Appuyer une fois sur le bouton de sonnette, un nouveau code
de gestion est généré aléatoirement et envoyé au récepteur.
• La sonnette retentit pour indiquer que le nouveau code est
enregistré et mémorisé.
Indicateur lumineux d’envoi de signal
7
Reset
Réglage du volume
Ajuster le volume sonore avec un petit tournevis plat.
Volume
Wire Free Rechargeable Door Chime Kit SX-220B/220W
Bouton de sonnette
Alimentation: 1 pile lithium 3 volts (CR2032 - incluse)
Récepteur
Alimentation : 3 piles “AA” Ni-MH 1,2 volts (incluses)
Sélection mélodie
Il y a 8 mélodies disponibles:
1) Carillon 3 notes
2) Big Ben
3) Carillon 2 notes
4) Solo
Des produits de la gamme Byron “SX” peuvent être achetés par ailleurs.
Réglage code digital
Cette sonnette est équipée d’une fonction avancée de gestion par code, aléatoire et auto-mémorisante, ne
nécessitant aucun réglage. Lire les instructions suivantes avant utilisation.
1. Première utilisation:
Une fois la pile du bouton de sonnette installée, initialiser le récepteur en insérant une petite pointe dans le
trou portant l’indication “Reset” à l’arrière du récepteur; la sonnette émet deux bips pour indiquer qu’elle
est prête pour l’enregistrement d’un nouveau code de gestion. Appuyer une fois sur le bouton de sonnette
pour générer aléatoirement un nouveau code et envoyer un signal au récepteur; la sonnette retentit,
indiquant que le nouveau code est enregistré et mémorisé.
2. Interférence d’appareils similaires présents dans le voisinage:
a) Retirer la pile du bouton de sonnette et attendre 10 secondes, puis insérer une petite pointe dans le trou
portant l’indication “Reset” à l’arrière du récepteur, la mémoire est ainsi effacée.
Le récepteur émet 2 bips pour indiquer qu’il est prêt à enregistrer un nouveau code.
b) Ré-insérer la pile dans le boîtier du bouton de sonnette et presser une fois le bouton qui génère alors un
nouveau code et envoie un signal au récepteur. La sonnette retentit pour indiquer que le nouveau code
est enregistré et mémorisé.
3. Fonctionnement pour deux sonnettes, porte principale et porte arrière:
a) Retirer les piles des boîtiers des boutons de sonnette (portes principale et arrière) et attendre 10
secondes; initialiser le récepteur pour effacer la mémoire. Le récepteur émet 2 bips pour indiquer qu’il
est prêt à enregistrer un nouveau code.
b) Réinsérer les piles dans les boutons de sonnette (portes principale et arrière).
c) Appuyer une fois sur le bouton de la porte porte principale pour générer aléatoirement un nouveau code
et envoyer un signal au récepteur, la sonnette retentit pour indiquer que le nouveau code est enregistré et
mémorisé.
d) Puis (dans les 2 minutes qui suivent) appuyer une fois sur la sonnette de la porte arrière pour générer
aléatoirement un nouveau code et envoyer un signal au récepteur, la sonnette retentit pour indiquer que
le nouveau code est enregistré et mémorisé. Le récepteur peut enregistrer les deux codes et ne
fonctionne qu’avec ces codes.
e) Tester les sonnettes pour s’assurer qu’elles fonctionnent correctement avant de terminer l’installation.
Récepteur de sonnette - Procédé de chargement
1. Connecter le chargeur à l’adaptateur A/C-D/C 9 volts 300mA (modèle Byron SX-36 - inclus), puis brancher
l’adaptateur sur une prise murale, le chargeur est prêt à l’emploi.
2. Placer le récepteur sur le chargeur, l’indicateur lumineux du chargeur s’allume en rouge pour indiquer que
les piles sont en cours de chargement.
3. Lorsque l’indicateur lumineux devient vert, le processus de chargement est terminé et le récepteur est prêt
à l’emploi.
Note: charger les piles entièrement avant utilisation.
5) Alerte carillon
6) Clarinette
7) Saxophone
8) Rosée du matin
Installation du récepteur de la sonnette
Placer le récepteur sur une table ou toute surface plane, il est
prêt à l’emploi.
Charger
Connecter le chargeur à l’adaptaeur A/C-D/C 9volts 300mA
(modèle Byron SX-36 – inclus), puis brancher l’adaptateur sur
une prise murale, l’appareil est alors prêt à l’emploi.
6
A/C Input
LED
Wire Free Rechargeable Door Chime Kit
SX-220B/220W
Wire Free Rechargeable Door Chime Kit SX-220B/220W
Push Button unit
Power: 1 x 3volt Lithium battery (CR2032 - included)
Door Chime unit
Power: 3 x 1.2volt “AAA” Ni-MH batteries (included)
Melody Selection
There are 8-melodies for selection:
1) Tubular 3-notes
2) Big Ben
3) Tubular 2-notes
4) Solo
5) Tubular Scare
6) Clarinet
7) Saxophone
8) Morning Dew
Additional Byron “SX” range products can be purchased for compatibility.
Digital Code Set Up
The Door Chime kit is equipped with an advanced random and self-learning operation coding ability
therefore no setting is needed. Read the following instructions before use.
1. First time operation:
After battery installation on the Push Button, then reset the Door Chime unit by insert a small pin into the
small hole marked “Reset” on the back of chime unit and press, the door chime unit will beep twice to
indicate that it is ready for new operation code registration. Press the Push Button once and it will generate
a new operation code randomly and send a wireless signal to the Door Chime unit, the door chime will
sound to indicate that a new operation code is registered and memorised.
2. Interference from similar unit operating nearby:
a) Simply remove the battery from the Push Button and rest for 10 seconds, after then insert a small pin
into the small hole marked “Reset” on the back of chime unit and press, this will erase the memory.
The Door Chime unit it will give 2-beeps to indicate that it is ready for the new code registration.
b) Re-insert the battery into the Push Button, then press the Push Button once, it will generate a new
operation code randomly and send a wireless signal to the Door Chime and it will sound to indicate that a
new operation code is registered and memorised.
3. Front and back door Bell Push operation:
a) Remove the battery from the Push Buttons (Front & Back Door) and rest for 10 seconds, after then reset
the Door Chime units and this will erase the memory. The Door Chime unit it will give 2-beeps to indicate
that it is ready for the new code registration.
b) Insert the battery into the Push Buttons (Front & Back Door).
c) Press the front door Push Button once, it will generate a new operation code randomly and send a
wireless signal to the door chime unit and it will sound to indicate that a new operation code is registered
and memorised.
d) After, (within 2 minutes) press the back door Push Button once, it will generate a new operation code
randomly and send a wireless signal to the door chime unit and it will sound to indicate that a new
operation code is registered and memorised. The door chime unit has ability to memorize both operation
codes and will only work with it.
e) Test to ensure correct operation before final installation.
Door Chime Unit – Charging Procedure
1. Connect the charger with A/C-D/C 9volt 300mA adaptor (Byron model SX-36 - included), then plug the
adaptor into any convenient wall socket, after then the charger is ready to use.
2. Place the Chime unit on to the charger, the LED on the charger will light up in “Red” to indicate that the
batteries are charging.
3. When the LED on the charger lights up in “Green” colour, it is indicating that the charging procedure is
completed and the chime unit is ready to use.
Note: Charge the batteries fully before use.
Melody Selection
Press the melody selector once to select a melody as your door
chime sound. There is a total of 8 melodies for selection:
1) Tubular 3-notes
2) Big Ben
3) Tubular 2-notes
4) Solo
Additional Byron “SX” range products can be purchased for
compatibility.
5) Tubular Scare
6) Clarinet
7) Saxophone
8) Morning Dew
Melody Selector
3
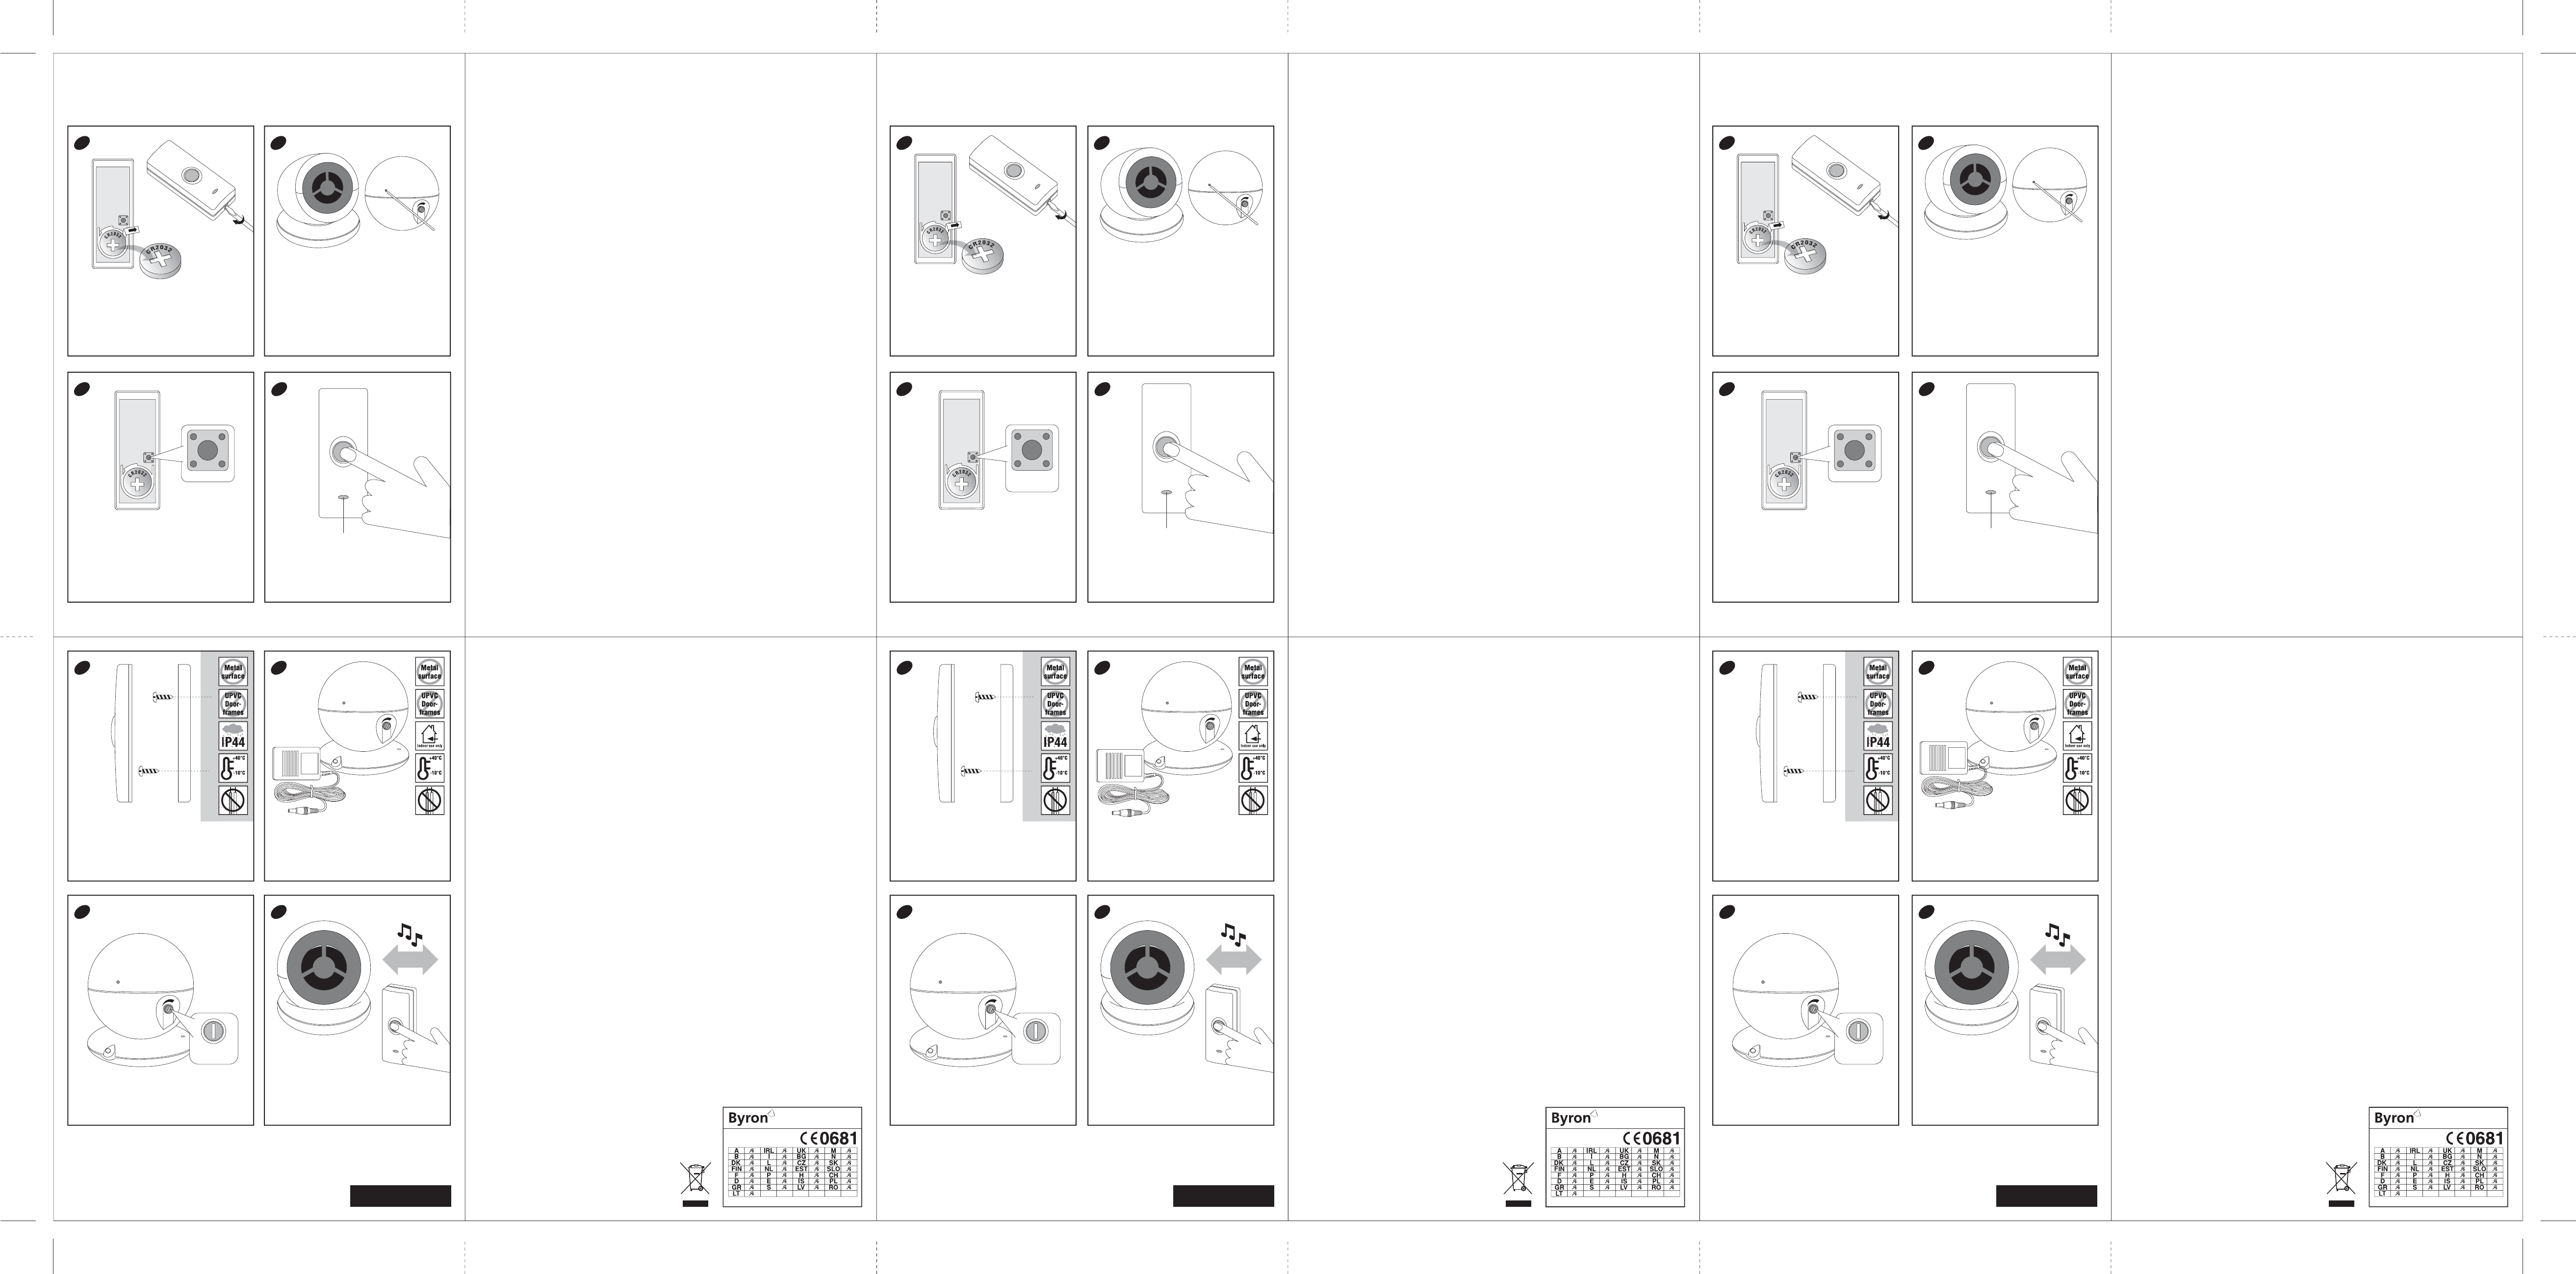
Push Button Installation
• Using the holes on the back of push button as a template, mark
the fixing position for the unit.
• Drill holes and fit wall plugs and secure the push button unit to
the wall with screws.
• Do not mount it on any metal surface or UPVC door frame.
5
Digital Code Set Up
• Press the Push Button once, a new operation code is generated
randomly and sent to the Door Chime unit.
• The Door Chime will sound to indicate that a new operation
code is registered and memorised.
4
Signal Sent Indicator Light
Operation
• Press the button on the Push Button unit once, it sends a
wireless signal to the Door Chime and your Door Chime unit will
sound.
• Operate the Door Chime unit within the operation range, test it
before final installation.
100m
8
Important
1. Do not mount either unit close to fireplace or expose to high temperatures.
2. Do not expose the Door Chime unit to direct sunlight or moisture
3. Always use alkaline battery. Please dispose of old, defective batteries in an environmentally friendly manner
in accordance with the relevant legislation.
4. Make sure that no naked flame sources, such as lighted candles, should be placed on the unit.
5. The unit should not be exposed to dripping or splashing and no objects filled with liquids, such as vases,
should be placed on the unit.
6. CAUTION: Replace only with the same or equivalent type of battery that is recommended by the
manufacturer.
7. CAUTON: Make sure batteries are installed correctly as per the internal markings.
8. CAUTION: Danger of explosion if battery is incorrectly installed or replaced.
9. IMPORTANT: There are no serviceable parts in the units, do not attempt to repair it.
User Hints
If the door chime unit does not sound, please check the following:
a) Flat batteries in either Push Button or Door Chime units - change the Push Button battery and re-charge the
Door Chime batteries.
b) Wrong battery polarity in either Push Button - re-insert the batteries.
c) Push Button and Door Chime units are not on the same operation codes - reset the code (see digital code
set up).
d) Units are out of range - Operate the Chime unit within the operation range.
e) Reset the door chime unit if it does not sound, or has sound distortion.
Specification
Operating Temperature: -10C - +40C
Operating Distance: 100metre (330ft approx. - in open field & at suitable condition)
Selectable Tone: Total Eight (8) melodies available
Selectable Digital Code: Total two hundred fifty six (256) possible digital codes
“Type R2 Device - device where the sound output is created by the initial operation of the control and where
the period of sound output continues for the designed duration irrespective of condition of the control.”
Push Button
• Open up the push button by pushing in the tab at the bottom of
the push with a small flat screwdriver.
• Remove the isolation strip from the battery compartment then
it is ready to use.
• When replacing the battery, ensure the battery polarity matches
the internal markings (“+” facing upwards), then press the
battery down so that it is sitting firmly in its compartment.
CR2032 3V
Lithium Battery
Remove
Isolation
Strip
1
Door Chime
• The rechargeable batteries are installed; charge the batteries
fully before use.
• Use a small pin insert into the small hole marked “Reset” and
press. It will beep twice to indicate that it is ready for the new
operation code registration (Please see Digital Code Set Up).
• Place the Chime unit onto the charger, the LED on the charger
will light up in Red to indicate that the batteries are charging.
• When the LED on the charger lights up in Green colour, it is
indicating that the charging procedure is completed and the
chime unit is ready to use.
2
Reset
Adjust the volume
Use a small flat screwdriver to adjust the sound volume.
7
Volume
Reset
Door Chime Installation
Place the Door Chime unit on any table top or flat surface, then it
is ready to use.
Charger
Connect the charger with A/C-D/C 9volt 300mA adaptor (Byron
model SX-36 – included), then plug the adaptor into any
convenient wall socket, after then it is ready to use.
6
A/C Input
LED
433MHz
R&TTE
APPROVED
CH Byron Electrical United Kingdom. www.chbyron.com
CH Byron Electrical Ltd
Byron House
34 Sherwood Rd, Astonfield
Bromsgrove, B60 3DR
UK
Tel: 0845 2301231
e: support@chbyron.com
w: www.chbyron.com
Belangrijk
1. Bevestig beide apparaten niet in de nabijheid van een openhaard en stel ze ook niet bloot aan hoge
temperaturen.
2. Stel de Deurbel niet bloot aan direct zonlicht of vocht.
3. Gooi oude of defecte batterijen weg op een milieuvriendelijke manier in overeenstemming met de daarbij
van toepassing zijnde wetten.
4. Zorg er voor dat geen open vuurbronnen, zoals brandende kaarsen geplaatst worden op het apparaat.
5. Het apparaat mag niet blootgesteld worden aan druppels of spatten en zorg ervoor dat er geen voorwerpen
gevuld met vloeistof, zoals vazen, op het apparaat gezet worden.
6. OPGELET: Vervang het alleen door hetzelfde of soortgelijke batterij die aanbevolen wordt door de fabrikant.
7. OPGELET: Controleer of de batterijen er goed in gedaan worden zoals aangegeven door de interne
markeringen.
8. OPGELET: Er is explosiegevaar als de batterij verkeerd geïnstalleerd of vervangen wordt.
9. BELANGRIJK: Er zijn geen onderdelen in de apparaten die onderhouden moeten worden, probeer ze niet te
repareren.
Gebruikerstips
Als de Deurbel niet af gaat, controleer dan het volgende:
a) Lege batterijen in zowel de Drukknop als de Deurbel, verwissel de Drukknopbatterij en laad de
Deurbelbatterijen opnieuw op.
b) Verkeerde batterijpolariteit in beide Drukknoppen, doe de batterijen er opnieuw in.
c) De Drukknop en de Deurbel hebben niet dezelfde functioneringscodes, reset de code (zie Digitale code
instelling).
d) De apparaten zijn buitenbereik, gebruik de Deurbel binnen het operationele bereik.
e) Reset de Deurbel als er geen geluid klinkt of als het geluid stoort.
Specificaties
Functioneringstemperatuur: -10C - +40C
Functioneringsbereik: 100 meter (in het open veld en bij gunstige condities)
Selecteerbare melodie: Er zijn acht (8) melodieën beschikbaar
Selecteerbare digitale code: Er zijn in totaal tweehonderdzesenvijftig (256) mogelijke digitale codes
“Type R2 apparaat”, apparaat waar de geluidsuitvoer gecreëerd wordt door de initiële instelling van de
bediening en waar de periode van geluidsuitvoer doorgaat voor de bepaalde tijdsduur ongeacht de toestand
van de bediening.
Draadloze Oplaadbare Deurbelkit SX-220B/220W
Drukknopapparaat
Energie: 1 x 3volt lithium batterij (CR2032 - inclusief)
Stekkerdeurbel
Voeding: 3 x 1,2volt “AAA” Ni-MH batterijen (inbegrepen)
Melodie selectie
Er zijn 8 melodieën waaruit gekozen kan worden:
1) Buizen 3 noten
2) Big Ben
3) Buizen 2 noten
4) Solo
Extra Byron “SX” assortiment producten kunnen aangeschaft worden voor compatibiliteit.
Digitale code instelling
De Deurbelkit is uitgerust met een geavanceerde willekeurige en zelflerende functioneringscodering en daarom
is instellen niet nodig. Lees de volgende aanwijzingen voordat u het gaat gebruiken.
1. Het allereerste gebruik:
Reset na het installeren van batterijen in de Drukknop, de Deurbel door een smal puntig voorwerp in het met
“Reset” gemarkeerde gat te steken, en het in te drukken, aan de achterkant van de Deurbel. De Deurbel zal
twee keer een beepje geven om aan te geven dat het gereed is om een nieuwe code registratie te ontvangen.
Druk éénmaal op de Drukknop, het zal een nieuwe functioneringscode willekeurig genereren en een
draadloos signaaal sturen naar de Deurbel en het zal afgaan om aan te geven dat een nieuwe
functioneringscode geregistreerd en opgeslagen is.
2. Interferentie van een soortgelijk apparaat wat in de nabijheid functioneert:
a) Verwijder eenvoudigweg de batterij uit de Drukknop en laat het voor 10 seconden rusten, steek dan een
smal puntig voorwerp in het kleine met “Reset” gemarkeerde gat aan de achterkant van de Deurbel en
druk er op. Dit zal het geheugen wissen.
De Deurbel zal 2 beepjes laten horen om aan te geven dat het gereed is voor de nieuwe code registratie.
b) Doe de batterij opnieuw in de Drukknop en druk erop, het zal een nieuwe functioneringscode willekeurig
genereren en een draadloos signaal sturen naar de Deurbel en het zal afgaan om aan te geven dat een
nieuwe functioneringscode geregistreerd en opgeslagen is.
3. Voor- en achterdeurbel functioneren:
a) Haal de batterijen uit de Drukknoppen (voor- en achterdeur) en laat ze voor 10 seconden rusten, reset dan
de Deurbelapparaten. Dit zal het geheugen wissen. De Deurbel zal 2 beepjes laten horen om aan te geven
dat het gereed is voor de nieuwe code registratie.
b) Doe de batterijen in de Drukknoppen (voor- en achterdeur).
c) Druk éénmaal op de Voordeurdrukknop, het zal een nieuwe functioneringscode willekeurig genereren en
een draadloos signaal sturen naar de Deurbel en het zal afgaan om aan te geven dat een nieuwe
functioneringscode geregistreerd en opgeslagen is.
d) Druk daarna (binnen 2 minuten) éénmaal op de Achterdeurdrukknop, het zal een nieuwe
functioneringscode willekeurig genereren en een draadloos signaal sturen naar de Deurbel en het zal
afgaan om aan te geven dat een nieuwe functioneringscode geregistreerd en opgeslagen is. De Deurbel is
in staat om beide functioneringscodes op te slaan en zal alleen met deze functioneren.
e) Test het om te controleren of het correct functioneert voordat het geïnstalleerd gaat worden.
Deurbeleenheid - Oplaadprocedure
1. Verbind de batterijlader met de A/C-D/C 9volt 300mA adapter (Byron model SX-36 - inbegrepen), sluit de
adapter aan op het gewenste stopcontact en vervolgens is het klaar voor gebruik.
2. Plaats de Deurbeleenheid op de batterijlader, de LED op de lader zal in “Rood” oplichten om aan te geven
dat de batterijen worden opgeladen.
3. Wanneer de LED van de batterijlader op “Groen” springt, betekent dit dat de oplaadprocedure voltooid is en
de Deurbeleenheid klaar voor gebruik is.
Opmerking: Laad de batterijen volledig op vóór gebruik.
5) Buizendans
6) Klarinet
7) Saxofoon
8) Ochtendgloren