Pairing Wirefree BY door chimes. Note: For full pairing instructions please refer to the original chime unit manual.
Kopplung drahtloser BY-Türgongs. Hinweis: Die vollständigen Kopplungsanweisungen entnehmen Sie bitte der Bedienungsanleitung des Türgongs.
Koppelen van draadloze BY deurbellen. Let op: raadpleeg voor volledige koppelinginstructies de handleiding van de deurbel.
Carillons de porte BY avec appairage sans fil. Note : Pour obtenir toutes les instructions sur l’appairage, consultez la notice d’origine du carillon.
Emparejamiento inalámbrico BY timbres de puerta. Nota: Para instrucciones de emparejamiento completas, consulte el manual de la unidad de timbre
original.
Abbinamento senza fili BY il citofono della porta. Nota: Per le istruzioni complete relative all'abbinamento, fare riferimento al manuale d'uso originale del
campanello.
Parkoppling trådlös BY dörrklocka. Notera: För fullständiga parkopplingsinstruktioner se se den ursprungliga manualen för dörrklockan.
Emparelhamento sem fios de campainhas de porta BY. Nota: Para ver as instruções de emparelhamento completas consulte o manual original da campainha.
Kapı zillerinin BY kablosuz eşleştirmesi. Not: Tam eşleştirme talimatları için orijinal zil ünitesi kılavuzuna bakın.
Parowanie bezprzewodowego dzwonka do drzwi BY. Uwaga: Pełne instrukcje dotyczące parowania znajdują się w oryginalnym podręczniku zestawu
dzwonka.
Bezdrátové párování BY domovních zvonků. Pozn.: Veškeré pokyny, ohledně párování, naleznete v návodu k obsluze originální jednotky zvonku.
Párovanie dverových zvončekov Wirefree BY. Poznámka: Pre úplné párovanie si, prosím, pozrite pôvodný manuál pre zvončekovú jednotku.
A & C
A & C
ABC
CR2032
ABC
CR2032
ABC
CR2032
A & C
ABC
CR2032
A
BC
STAYS
ON
Option 1
EN
DE
NL
FR
ES
IT
SV
PT
TR
PL
CZ
SK
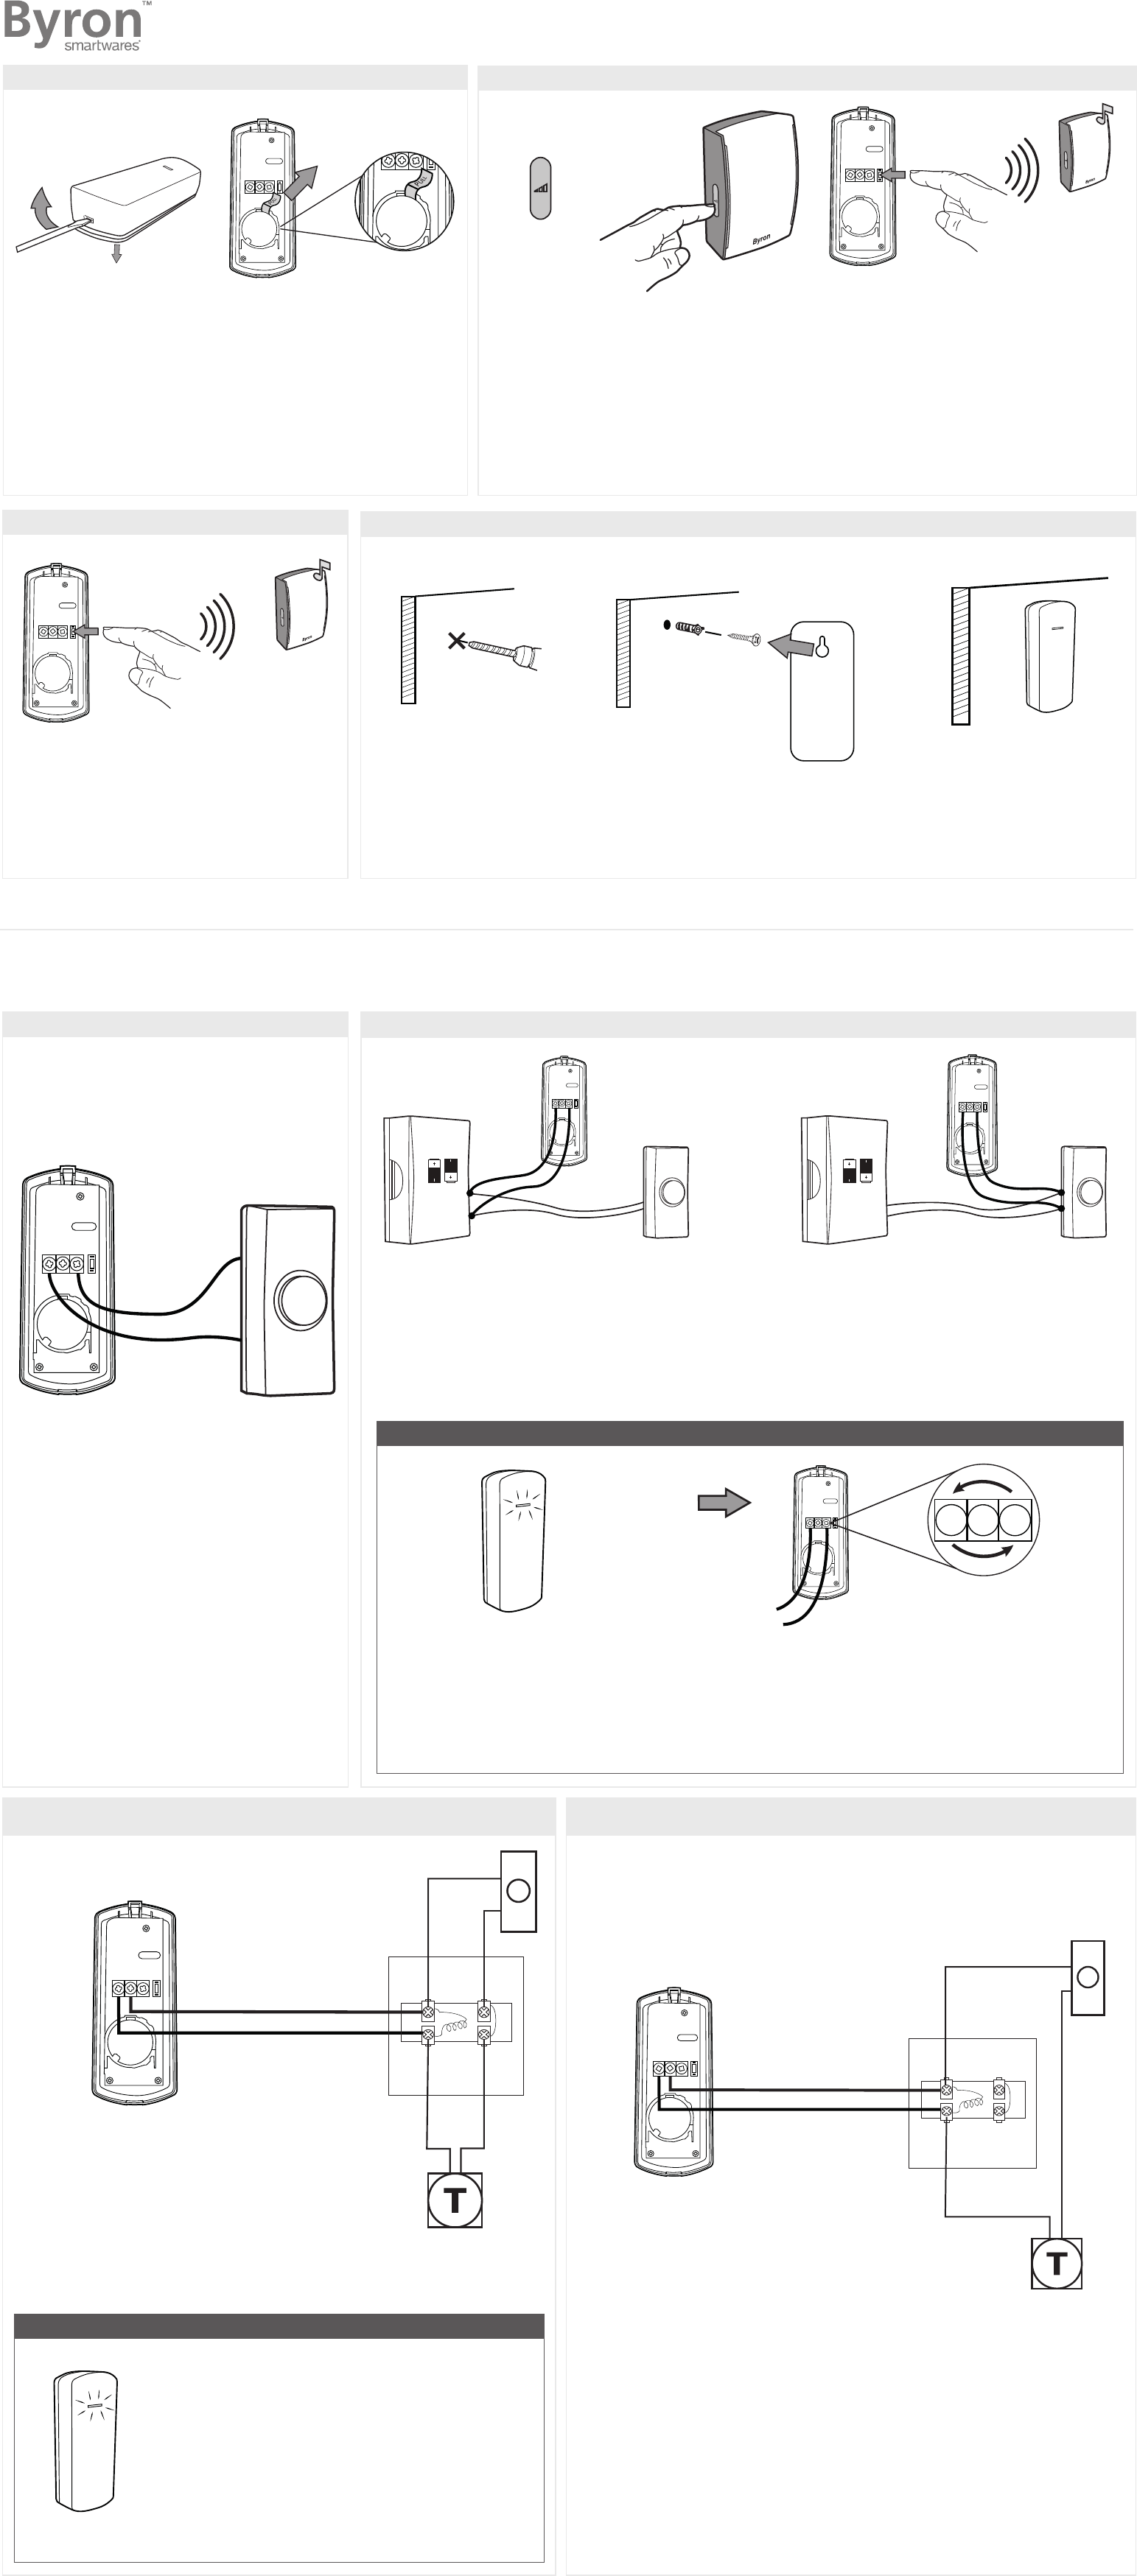
Twin bell wire from the bell push should be wired to terminals A & C.
Den doppelten Klingeldraht vom Klingelknopf an Klemmen A & C anschließen.
Dubbele beldraad van beldrukker moet op aansluitingspunten A & C
aangesloten worden.
Lefil à deux conducteurs du bouton De sonnette doit être raccordé aux bornes
A et C.
El hilo metálico doble para llamador QUE sale del pulsador debe conectarse a
las bornas A y C.
Collegare il doppio filo del campanello dal pulsante del campanello ai terminali
A e C.
De två kablarna från tryckknappen ska anslutas till kontakterna A & C.
O fio de campainha duplo do botão da campainha deve ser ligado aos
terminais A e C.
Zil düğmesindeki çift zil kablosu A & C terminallerine bağlanmalıdır.
Poprowadzić podwójny przewód od przycisku dzwonka do zacisków gongu nr
A i C.
Dvouvodič vedoucí od tlačítka zvonku musí být připojen ke svorkám A a C.
Dvojvodič zvončeka z tlačidla zvončeka by mal byť pripevnený k svorkám A & C.
Option 2
EN
DE
NL
FR
ES
IT
SV
PT
TR
PL
CZ
SK
Twin bell wire from the bell push should be wired to terminals A & C.
Den doppelten Klingeldraht vom Klingelknopf an Klemmen A & C anschließen.
Dubbele beldraad van beldrukker moet op aansluitingspunten A & C aangesloten
worden.
Lefil à deux conducteurs du bouton De sonnette doit être raccordé aux bornes A et C.
El hilo metálico doble para llamador QUE sale del pulsador debe conectarse a las
bornas A y C.
Collegare il doppio filo del campanello dal pulsante del campanello ai terminali A e C.
De två kablarna från tryckknappen ska anslutas till kontakterna A & C.
O fio de campainha duplo do botão da campainha deve ser ligado aos terminais A e C.
Zil düğmesindeki çift zil kablosu A & C terminallerine bağlanmalıdır.
Poprowadzić podwójny przewód od przycisku dzwonka do zacisków gongu nr A i C.
Dvouvodič vedoucí od tlačítka zvonku musí být připojen ke svorkám A a C.
Dvojvodič zvončeka z tlačidla zvončeka by mal byť pripevnený k svorkám A & C.
BATTERY OPERATION | BATTERIEBETRIE | GEBRUIK VAN BATTERIJEN | FONCTIONNEMENTDE LAPILE | FUNCIONAMIENTO CON PILAS | FUNZIONAMENTO ABATTERIA | BATTERIDRIFT |
FUNCIONAMENTO COM PILHAS | PİL ÇALIŞMASI | ZASILANIE BATERYJNE | ČINNOST PŘI NAPÁJENÍ Z BATERI | NAPÁJANIE Z BATÉRIE
OR
EN
DE
NL
FR
ES
IT
SV
PT
TR
PL
CZ
SK
Twin bell wire from your existing chime unit should be connected to terminals A & C.
Den doppelten Klingeldraht der vorhandenen Klingel an Klemmen A & C anschließen.
Dubbele beldraad van uw bestaande gong moet op aansluitingspunten A & C aangesloten worden.
Lefil à deux conducteurs du carillon existant doit être raccordé aux bornes A et C.
El hilo metálico doble para llamador QUE sale De su unidad De timbre existente debe conectarse a
las bornas A y C.
Collegare il doppio filo del campanello dall’unità del campanello elettronico preesistente ai terminali
A e C.
De två kablarna från din befintliga högtalarenhet ska anslutas till kontakterna A & C.
O fio de campainha duplo do seu carrilhão de porta existente deve ser ligado aos terminais A e C.
Mevcut zil ünitesindeki çift zil kablosu A & C terminallerine yerleştirilmelidir.
Poprowadzić podwójny przewód od istniejącego gongu do zacisków nr A i C.
Dvojvodič vedoucí od vašeho stávajícího zvonku musí být připojen ke svorkám A a C.
Dvojvodič zvončeka z vášho existujúceho zvončeka bude pripojený k svorkám A & C.
TROUBLESHOOT
EN
DE
NL
FR
ES
IT
SV
PT
TR
PL
CZ
SK
If light remains on, swap bell wire in terminals A & C.
Wenn das Licht leuchtet, Klingeldraht in den Klemmen A & C vertauschen.
Verwissel de bedrading in terminals A & C als het licht aan blijft.
Si la lumière reste allumée, inversez les fils du carillon entre les bornes A et C.
Si la luz permanece encendida, cambie el cable del timbre en los terminales A y C.
Se la luce rimane accesa, invertire il collegamento dei terminali A & C.
Om lampan fortfarande lyser, skifta klockans ledningar i terminalerna A och C.
Se a luz permanecer acesa, troque o fio da campainha nos terminais A e C.
Eğer ışık yanıyorsa terminaldeki A & C uçlarındaki kabloların yerini birbirleriyle değiştirin.
Jeśli światło pozostaje włączone, zamień przewody dzwonka na zaciskach A i C.
Pokud svítí kontrolka, zaměňte zvonkový drát na terminálech A & C.
Ak svieti kontrolka, zameňte zvonkový drôt na termináloch A & C.
The vilume on my BY32 converter is far to low. It is much quieter than my 80dcb existing unit . How do I increase it please
Submitted on 18-6-2022 at 14:56
Libble takes abuse of its services very seriously. We're committed to dealing with such abuse according to the laws in your country of residence. When you submit a report, we'll investigate it and take the appropriate action. We'll get back to you only if we require additional details or have more information to share.
Product:
Forumrules
To achieve meaningful questions, we apply the following rules:
First, read the manual;
Check if your question has been asked previously;
Try to ask your question as clearly as possible;
Did you already try to solve the problem? Please mention this;
Is your problem solved by a visitor then let him/her know in this forum;
To give a response to a question or answer, do not use this form but click on the button 'reply to this question';
Your question will be posted here and emailed to our subscribers. Therefore, avoid filling in personal details.
Register
Register getting emails for Byron BY32 at:
new questions and answers
new manuals
You will receive an email to register for one or both of the options.
Get your user manual by e-mail
Enter your email address to receive the manual of Byron BY32 in the language / languages: English, German, Dutch, French, Italian, Polish, Portuguese, Swedish, Spanish as an attachment in your email.
The manual is 1,61 mb in size.
You will receive the manual in your email within minutes. If you have not received an email, then probably have entered the wrong email address or your mailbox is too full. In addition, it may be that your ISP may have a maximum size for emails to receive.
The manual is sent by email. Check your email
If you have not received an email with the manual within fifteen minutes, it may be that you have a entered a wrong email address or that your ISP has set a maximum size to receive email that is smaller than the size of the manual.
The email address you have provided is not correct.
Please check the email address and correct it.
Your question is posted on this page
Would you like to receive an email when new answers and questions are posted? Please enter your email address.