Türklingel, bis sie "Beep Beep" klingelt (6 Sekunden).
Lassen Sie die "VOL" Taste los. Drücken und halten Sie
wieder die "VOL"-Taste an Ihrer Türklingel, bis sie
wieder "Beep" (6 Sekunden) klingelt. Die Türklingel ist
jetzt zurück gesetzt. > 3
RESET DEURBEL NAAR DE
FABRIEKSINSTELLINGEN:
Houd de 'VOL' knop op uw gong ingedrukt, totdat de
gong 'Piep Piep' geeft (6 seconden). Laat de knop los 3
Houd opnieuw de 'VOL' knop op uw gong ingedrukt,
totdat de gong 'Piep Piep' geeft (6 seconden). De bel is
nu gereset. > 3
RESETEAR EL TIMBRE A LOS VALORES INICIALES
DE FÁBRICA:
Pulse y mantenga pulsado el botón 'VOL' en su timbre,
hasta que la campana haga "Beep Beep" (6 segundos).
Suelte el botón 'VOL'. Re-presione y mantenga
presionado el botón 'VOL' en su puerta timbre, hasta
que la campana haga 'Beep' (6 segundos). El timbre se
ha restablecido. > 3
Austauschen der Batterien
Vervangen van de batterijen
Reemplazo de las pilas
NOT WORKING....TRY A FACTORY RESET
Press and hold the ‘VOL’ button on your Door Chime,
until the Chime goes ‘Beep Beep’ (6 Seconds). Release
the ‘VOL’ button. Re-press and hold the ‘VOL’ button
on your Door Chime, until the Chime goes ‘Beep’ (6
Seconds). The Chime is now reset. > 3
NE FONCTIONNE PAS .... ESSAYEZ UN FACTORY
RESET
Appuyez sur le bouton ‘VOL’ du carillon, jusqu'à ce
que le carillon émette un "Beep Beep" (6 secondes).
Relâchez le bouton ‘VOL’. Re-appuyez sur le bouton
‘VOL’ sur votre Carillon, jusqu'à ce que le carillon
émette à nouveau ‘Beep’ (6 secondes). Le carillon est
maintenant réinitialisé. > 3
PLATZIERUNG IHRER TÜRKLINGEL:
Platzieren Sie die Türklingel innerhalb der Reichweite,
da die Übertragung des Signales durch Wände, Türen
und Decken usw., reduziert werden kann. Die
Türklingeleinheit ist nur für die Anwendung im
Innenbereich geeignet.
PLAATSING VAN UW DEURBEL:
Plaats de deurbel binnen het bereik, muren, deuren en
plafonds etc, kunnen het bereik verminderen. Deurbel
voor gebruik binnenshuis.
COLOCACIÓN DE SU TIMBRE:
Coloque el timbre en el rango de operación, si la
transmisión de la señal sin cables es a través de
paredes, puertas y techos, etc, se puede reducir el
rango de operación. La unidad de timbre es solo para
uso en interiores.
POSITIONING YOUR CHIME:
Test the Chime in the intended location, as
internal walls and surfaces may reduce
operating range. DO NOT mount onto metallic
surfaces.
POSITIONNEMENT CARILLON DE PORTE:
Testez le carillon en le plaçant à l'emplacement
intérieur prévu, les murs intérieurs et les types de
matériaux peuvent réduire la distance de fonctionne-
ment. NE PAS INSTALLER SUR DES SURFACES
METALLIQUES.
MELODIEAUSWAHL:
Entfernen Sie die Rückplatte am Klingeltaster. Drücken
Sie die Melodie-Taste. Die Türklingel spielt jetzt die
ausgewählte Melodie ab. Drücken Sie erneut die
Melodie-Taste um die gewünschte Melodie
auszuwählen.
MELODIEKEUZE:
Verwijder de achterzijde van de belknop. Druk op de
knop Melodie selecteren. Druk nogmaals op om de
volgende melodie te selecteren: De bel zal het nieuw
gekozen geluid afspelen.
SELECCIÓN DE MELODÍA:
Retire la placa trasera del pulsador. Pulse el botón
Seleccionar melodía. El timbre tocará el nuevo sonido
seleccionado. Pulse de nuevo para seleccionar la
melodía que viene.
MELODY SELECTION:
Remove the back plate from the bell push
Press the melody select button. The chime will play the
newly selected sound. Press again to select the next
melody.
CHOIX DE LA MÉLODIE:
Retirer la plaque arrière de la sonnette. Appuyez sur le
bouton de sélection de la mélodie. Le carillon fait
entendre la nouvelle mélodie. Appuyez à nouveau pour
sélectionner la mélodie suivante.
LAUTSTÄRKENREGELUNG:
Um die Lautstärke einzustellen, drücken Sie die
'VOL'-Taste an der Türklingel. Es gibt 4 wählbare
Lautstärken. Bei Auslieferung ist die Türklingel ist auf
die höchste Lautstärke eingestellt.
VOLUMEREGELING:
Om het volume niveau van de bel te selecteren druk op
de 'VOL' knop op de bel. Er zijn 4 volume niveau's. De
deurbel staat standaard op de meest luide stand.
CONTROL DE VOLUMEN:
Para seleccionar el nivel de volumen del timbre, pulse
el botón 'VOL' del timbre. Hay 4 niveles de volumen
seleccionable, el timbre esta pre-establecido con el
volumen más alto.
VOLUME SELECTION:
To select the chime volume level, press the ‘VOL’
button on the chime there are 4 selectable volume
levels, the door chime is pre-set to the loudest volume
setting.
CONTRÔLE DU VOLUME:
Pour sélectionner le niveau de volume de la sonnerie,
appuyez sur la touche «VOL» sur le carillon. Il ya 4
niveaux sonores possibles, le carillon de porte est
pré-réglé sur le volume le plus élevé.
Changing batteries
Remplacement des piles
BY216 Wirefree Plug In Doorchime Kit
3
5
EN
FR
DE
NL
SP
Installing the push battery
Insertion des piles du bouton de sonnette
Einsetzen der Batterien in den Türdrücker
bel knop batterijen installeren
Instalación de las pilas del pulsador
1
4
EN
FR
DE
NL
SP
PLUG-IN UNIT: Plug chime into a UK 3 pin socket, 220 – 240V ~ 50Hz. Switch the socket on. Chime
will ‘Beep’ on Start
PLUG-IN UNIT: Chime fiche à, 220 - 240V ~ 50Hz. Changer la prise de. Le carillon est maintenant
réinitialisé.
PLUG-IN TÜRKLINGEL: Schließen Sie die Türklingel an eine Steckdose mit 220 - 240V ~ 50Hz an.
Schalten Sie die Steckdose ein. Die Türklingel wird "Beep" beim Start klingeln
PLUG IN DEURBEL: Plug Chime in het stopcontact, 220 - 240V ~ 50Hz. Zorg voor spanning op het
stopcontact.
TIMBRE ENCHUFABLE: Timbre en el zócalo, 220 - 240V ~ 50Hz. Cambiar la toma de.
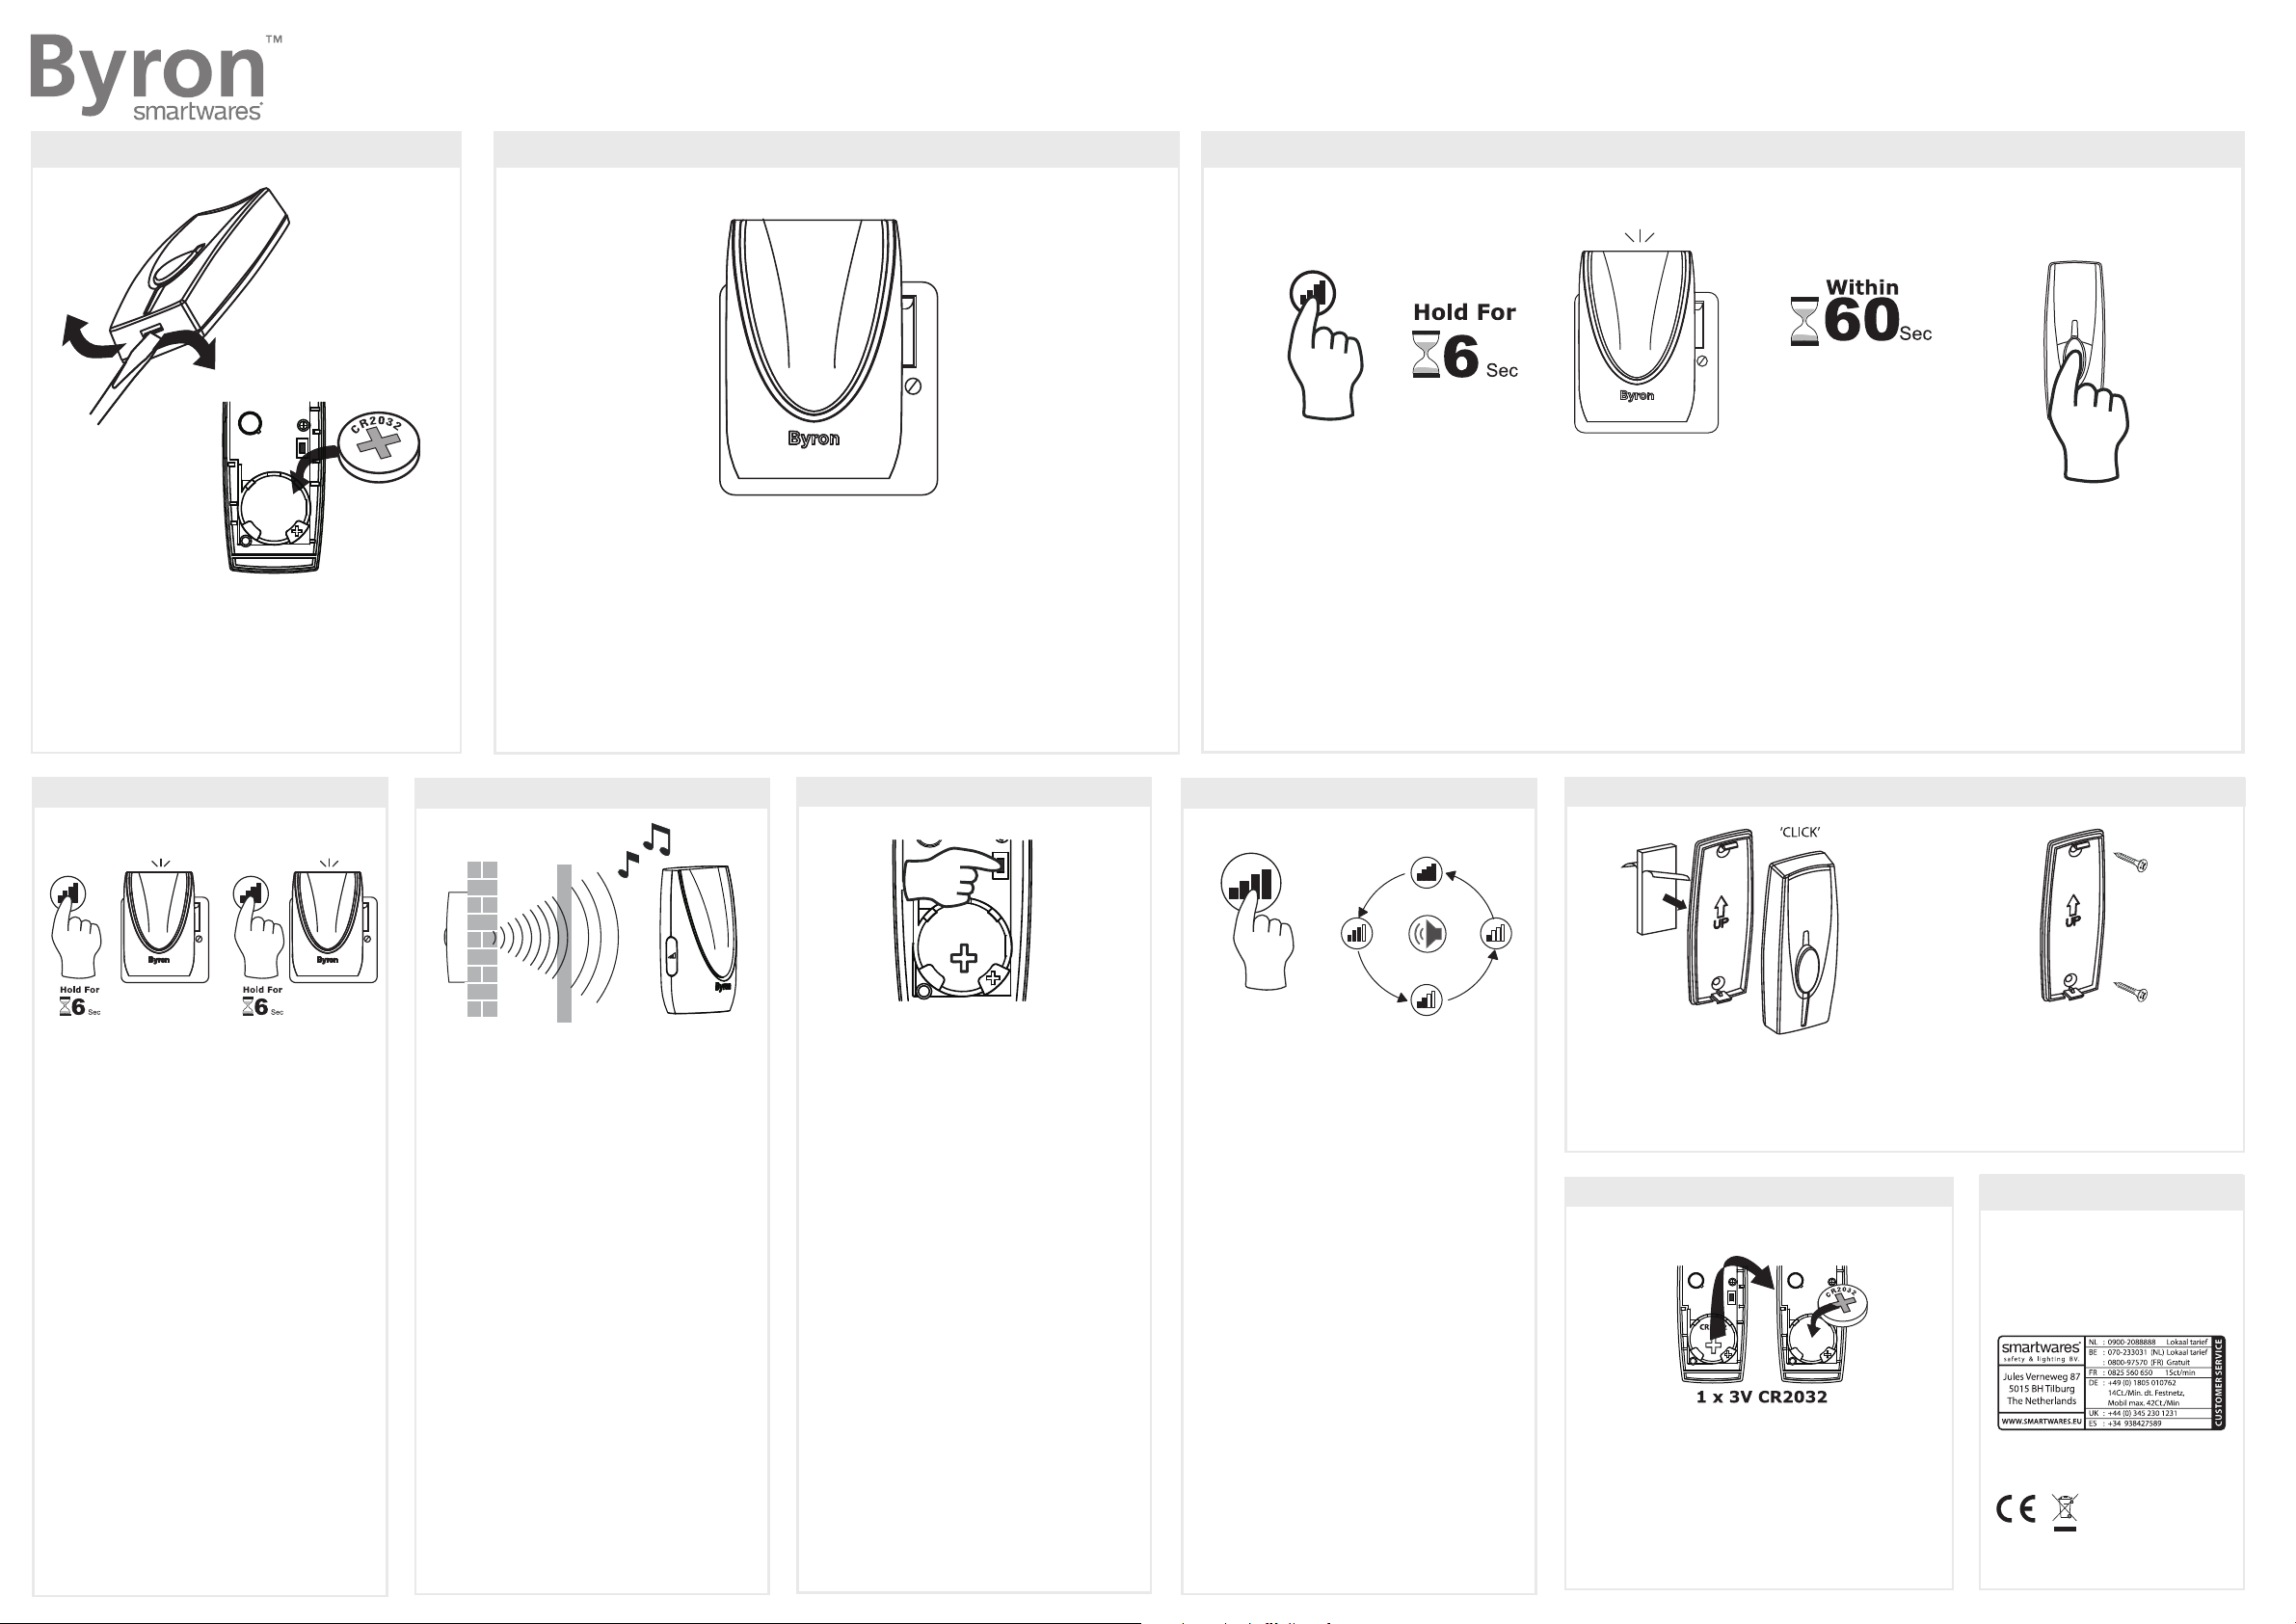
2
a) Drücken und halten Sie die VOL-Taste an Ihrer neuen Türklingel, bis sie "Beep Beep" (6 Sekunden) läutet.
b) Drücken Sie die Klingeltaste 60 Sekunden lang, damit die Türklingel und der Klingeltaster sich aneinander anlernen können. Die Türklingel läutet um das Setup zu
bestätigen, warten Sie weitere 60 Sekunden bis die Türklingel den Anlernmodus verlassen hat, um den Türklingeltaster los zu lassen.
a) Houd de 'VOL' knop van uw nieuwe deurbel ingedrukt (6 seconden) totdat de gong gaat 'Beep Beep' geluid geeft.
b) Druk op de belknop binnen 60 seconden om de extra belknop aan te leren. Bel moet overgaan om setup te bevestigen, wacht 60 seconden tot de bel uit de
leermodus is voor nogmaals op de bel te drukken.
a) Pulse y mantenga pulsado el botón "VOL" en su nuevo timbre , hasta que el timbre haga "Beep Beep" (6 segundos).
b) Pulse el pulsador durante 60 segundos para sincronizar el timbre adicional con el pulsador del timbre. El timbre sonará para confirmar la configuración, espere 60
segundos para que el timbre salga del modo de sincronización.
a) Press and hold the ‘VOL’ buttons on your door chime, until the chimes ‘Beep Beep’ (6 Seconds).
b) Press the bell push within 60 seconds to learn the bell push to the chimes.
The chimes will ring to confirm setup, wait 60 seconds for the chimes to exit the learn mode before repressing the bell push.
a) Appuyez sur le bouton ‘VOL’ de votre carillon, jusqu'à entendre un "Beep Beep" (6 secondes)
b) Appuyez sur le bouton poussoir dans les 60 secondes afin de procéder à l'apprentissage raduio sur les autres carillons. Chaque carillon sonnera pour confirmer
l'apprentissage radio, attendre 60 secondes pour laisser le carillon quitter le mode d'apprentissage avant deprocéder à des essais.
Libble takes abuse of its services very seriously. We're committed to dealing with such abuse according to the laws in your country of residence. When you submit a report, we'll investigate it and take the appropriate action. We'll get back to you only if we require additional details or have more information to share.
Product:
Forumrules
To achieve meaningful questions, we apply the following rules:
First, read the manual;
Check if your question has been asked previously;
Try to ask your question as clearly as possible;
Did you already try to solve the problem? Please mention this;
Is your problem solved by a visitor then let him/her know in this forum;
To give a response to a question or answer, do not use this form but click on the button 'reply to this question';
Your question will be posted here and emailed to our subscribers. Therefore, avoid filling in personal details.
Register
Register getting emails for Byron BY216 - 20.007.41 at:
new questions and answers
new manuals
You will receive an email to register for one or both of the options.
Get your user manual by e-mail
Enter your email address to receive the manual of Byron BY216 - 20.007.41 in the language / languages: English, German, Dutch, French, Spanish as an attachment in your email.
The manual is 1.42 mb in size.
You will receive the manual in your email within minutes. If you have not received an email, then probably have entered the wrong email address or your mailbox is too full. In addition, it may be that your ISP may have a maximum size for emails to receive.
The manual is sent by email. Check your email
If you have not received an email with the manual within fifteen minutes, it may be that you have a entered a wrong email address or that your ISP has set a maximum size to receive email that is smaller than the size of the manual.
The email address you have provided is not correct.
Please check the email address and correct it.
Your question is posted on this page
Would you like to receive an email when new answers and questions are posted? Please enter your email address.