A
Avoid positioning the Bell Push/Chime on or
directly near metallic surfaces as this may reduce
the operation range.
UPVC Door Frames:
When positioning the bell push onto a UPVC
door
before final installation, internal metal frame of
the door may affect performance.
Tip: T
slightly to the Left/Right or place on an external
wall.
Note: the appliance is not to be used by children
or persons with reduced physical, sensory or
mental capabilities, or lack of experience and
knowledge unless they have been given
supervision or instruction. Children should be
supervised to ensure that they do not play with
the appliance.
TROUBLE SHOOTING.
In case of the door chime does not sound, please
check the followings:
a) Flat batteries in either push button or door
chime.
b) Wrong battery polarity in either push button or
door chime.
c) For plug-in door chimes make sure the socket is
switched on.
d) Bell push and door chime are not paired
together
e) Materials in between the bell push & chime will
reduce the operating range, move the door
chime closer to the bell push
f) Wire free devices can be affected by external
sources e.g. wirefr
transformers/adapter
T
is created by the initial operation of the control
and where the period of sound output continues
for the designed duration irrespective of condition
of the control.
IMPORT
There are no serviceable parts, do not r
appliance is not to be used by children or persons
with reduced physical, sensory or mental
capabilities, or lack of experience and
knowledge,unless they have been given
supervision or instruction. Children should be
supervised to ensure that they do not play with
the appliance.
SPECIFICA
Bell Push: 98YJ
Power: 1 x 23A Battery
(Included)
IP44 Weather Resistant
Portable Door Chime: B304
Power: 3 x ‘AA
(not included)
Range: 50 Metres
Indoor Use Only
GUIDE D'UTILISA
Insérez un petit tournevis plat dans le clip de
verrouillage et tournez doucement. La plaque
arrière va se déclipser du bouton de sonnette.
Retirez le couvercle des piles et insér
'AA' / piles LR6, en vous assurant bien de
respecter les marquages internes Plus et Moins.
Le carillon sonne lorsque les piles sont insérées.
Insérez la batterie 23A (incluse) dans le support
de la pile, en vous assurant bien de respecter
les marquages internes Plus et Moins. La
batterie est livrée pré-installée.
A
Évitez de placer la cloche / carillon sur ou
directement à proximité de surfaces métalliques,
cela peut réduire la distance de fonctionnement.
Cadres de porte PVC
Lors du positionnement du bouton de sonnette
sur une porte PVC, vérifiez toujours la
performance de fonctionnement avant
l'installation finale, le châssis métallique interne de
la porte peut affecter les performances.
Astuce: essayez d'ajuster l'emplacement du
bouton de sonnette légèrement vers la gauche /
droite ou de le placer sur le mur extérieur
Remarque: l'appareil ne doit pas êtr
des enfants ou des personnes à capacités
physiques, sensorielles ou mentales réduites, ou
manquant d'expérience, sauf si elles sont
supervisées ou ont été formées. Les enfants
doivent être surveillés afin de s'assurer qu'ils ne
jouent pas avec l'appareil.
Appuyez sur le bouton apprendre (L) sur
l’arrière du carillon pour activer le mode
apprentissage. Le carillon va sonner pour
confirmer
Appuyez sur le bouton de sonnette dans les 30
secondes, le carillon va sonner pour confirmer
l’association du bouton et du carillon.
CONSEILS D'UTILISA
Si le carillon ne sonne pas, s'il vous plaît vérifier
les points suivants:
a) Les piles sont vides, soit sur le bouton-poussoir
ou le carillon.
b) la polarité des piles est incorrecte sur le
bouton-poussoir ou le carillon
c) Pour les carillons enfichables s'assurer que la
prise est sous tension.
d) le bouton poussoir et le carillon de porte ne
sont pas coordonnés au niveau radio, consultez
le guide d'installation pour procéder à
l'apprentissage du signal.
e) Le carillon est hors de portée du bouton
poussoir
du bouton poussoir
f) le fonctionnement des systèmes radio peut être
affecté par la présence d'interférences telles que
les alarmes sans fil ou les transformateurs de
puissance / adaptateurs secteurs
Matériel classifié R2 - dispositif dont la sortie
sonore est créée par l'opération initiale de la
commande et lorsque la période de la sortie
sonore se poursuit pendant toute la durée conçus
indépendamment de l'état de la commande.
IMPORT
Il n'y a pas de pièces réparables à l'intérieur
pas tenter de réparer
utilisé par des enfants ou des personnes
handicapées, sauf si elles ont été formées ou
encadrées. Les enfants doivent être surveillés pour
s'assurer qu'ils ne jouent pas avec l'appareil.
SPÉCIFICA
Bouton sonnette: 98YJ
Puissance : piles 1 x 23A 12V
(fournies)
IP44 Résistant aux intempéries
Carillon sans fil portatif: B304
Puissance : piles 3 x AA/LR6 1.5V
(non fournies)
Gamme : 50 mètres
Usage intérieur uniquement
FR
CHANGEMENT DE LA PILE BOUTON
POUSSOIR.
Retirez le couver
Enlevez la pile usagée de son support
Remplacer par une nouvelle pile '23A '
Assurez vous de la polarité corr
Effectuer un test.
MURALE VOTRE BOUTON POUSSOIR.
En utilisant la plaque arrière en tant que
modèle
S'assurer que les points UP HAUT
Marquer et percer des tr
Insérer les chevilles et fixer au mur à l'aide
des vis fournies
Clipser le bouton à la plaque arrière et
s’assurer qu’il est bien en place
Placez le carillon de porte à l’intérieur de la
distance de fonctionnement (50m). La
transmission du signal radio peut être
réduite par les murs, portes et plafonds, etc,
Le carillon est conçu pour un usage intérieur
CHOIX DE LA MÉLODIE:
Pour sélectionner une nouvelle mélodie de carillon:
Appuyez sur le bouton Sélectionner la
mélodie sur l’avant / arrière du carillon (M).
Le carillon va jouer la mélodie nouvellement
sélectionnée
Appuyez à nouveau pour sélectionner la
mélodie suivante
RÉINITIALISA
Pour réinitialiser le carillon et supprimer le bouton
de sonnette déjà en mémoire :
Appuyez et maintenez enfoncé le bouton
apprentissage (L) jusqu'à ce que le carillon
joue une mélodie - environ 6 secondes.
Le carillon a été réinitialisé - voir les points 4
et 5 pour réaliser un nouvel apprentissage
de bouton
T
intérieur prévu, les murs intérieurs et les types
de matériaux peuvent réduire la distance de
fonctionnement. NE P
SURF
GB
Remove the battery cover and insert 3 X 1.5V
size ‘AA
positive/negative terminals match the internal
markings.
Insert the 23A battery (Supplied) into the
battery holder
Positive/Negative terminals match the internal
markings.
GETTING ST
Using a small flat screwdriver
locking clip and gently twist. The back plate will
unclip from the Bell Push.
Press the Bell Push within 30 seconds, the
chime will ring to confirm that the Bell Push has
been paired to the Chime.
CHANGING PUSH BA
Remove back plate from the Bell Push
Remove old battery from the holder
Replace with new ‘23A
Insert the 23A battery into the battery
holder
terminals match the internal markings.
T
W
Using back plate as template.
Making sure UP arrow points UP
Mark and drill holes.
Insert wall plugs and attach to wall using
screws provided.
Clip the Bell Push on to the back plate
making sure the Bell Push ‘Clicks’ in to
place.
Plug the Door Chime into a socket, within
the operating range (50M). T
the wire free signal thr
ceilings etc, may reduce the operating range.
MELODY SELECTION:
T
Press the melody select button on the
(front/back) of the chime unit (M).
The chime will play the newly selected melody
Press again to select the next melody
NOT WORKING....TR
Press and hold the learn button (L) until the
chime plays a melody – approximately 10
seconds.
Now Press the learn button (L) on the back of
the Portable Chime quickly (DO NOT HOLD
DOWN) to enter the Learn mode. The chime
will ring to confirm.
POSITIONING YOUR CHIME:
T
internal walls and surfaces may reduce
operating range. DO NOT mount onto metallic
surfaces.
1
2
3
4
Press the Bell Push within 30 seconds, the
chime will ring to confirm that the Bell Push
has been paired to the chime.
9
8
7
6
5
10
1
2
3
4
9
8
7
6
5
10
3
5
9
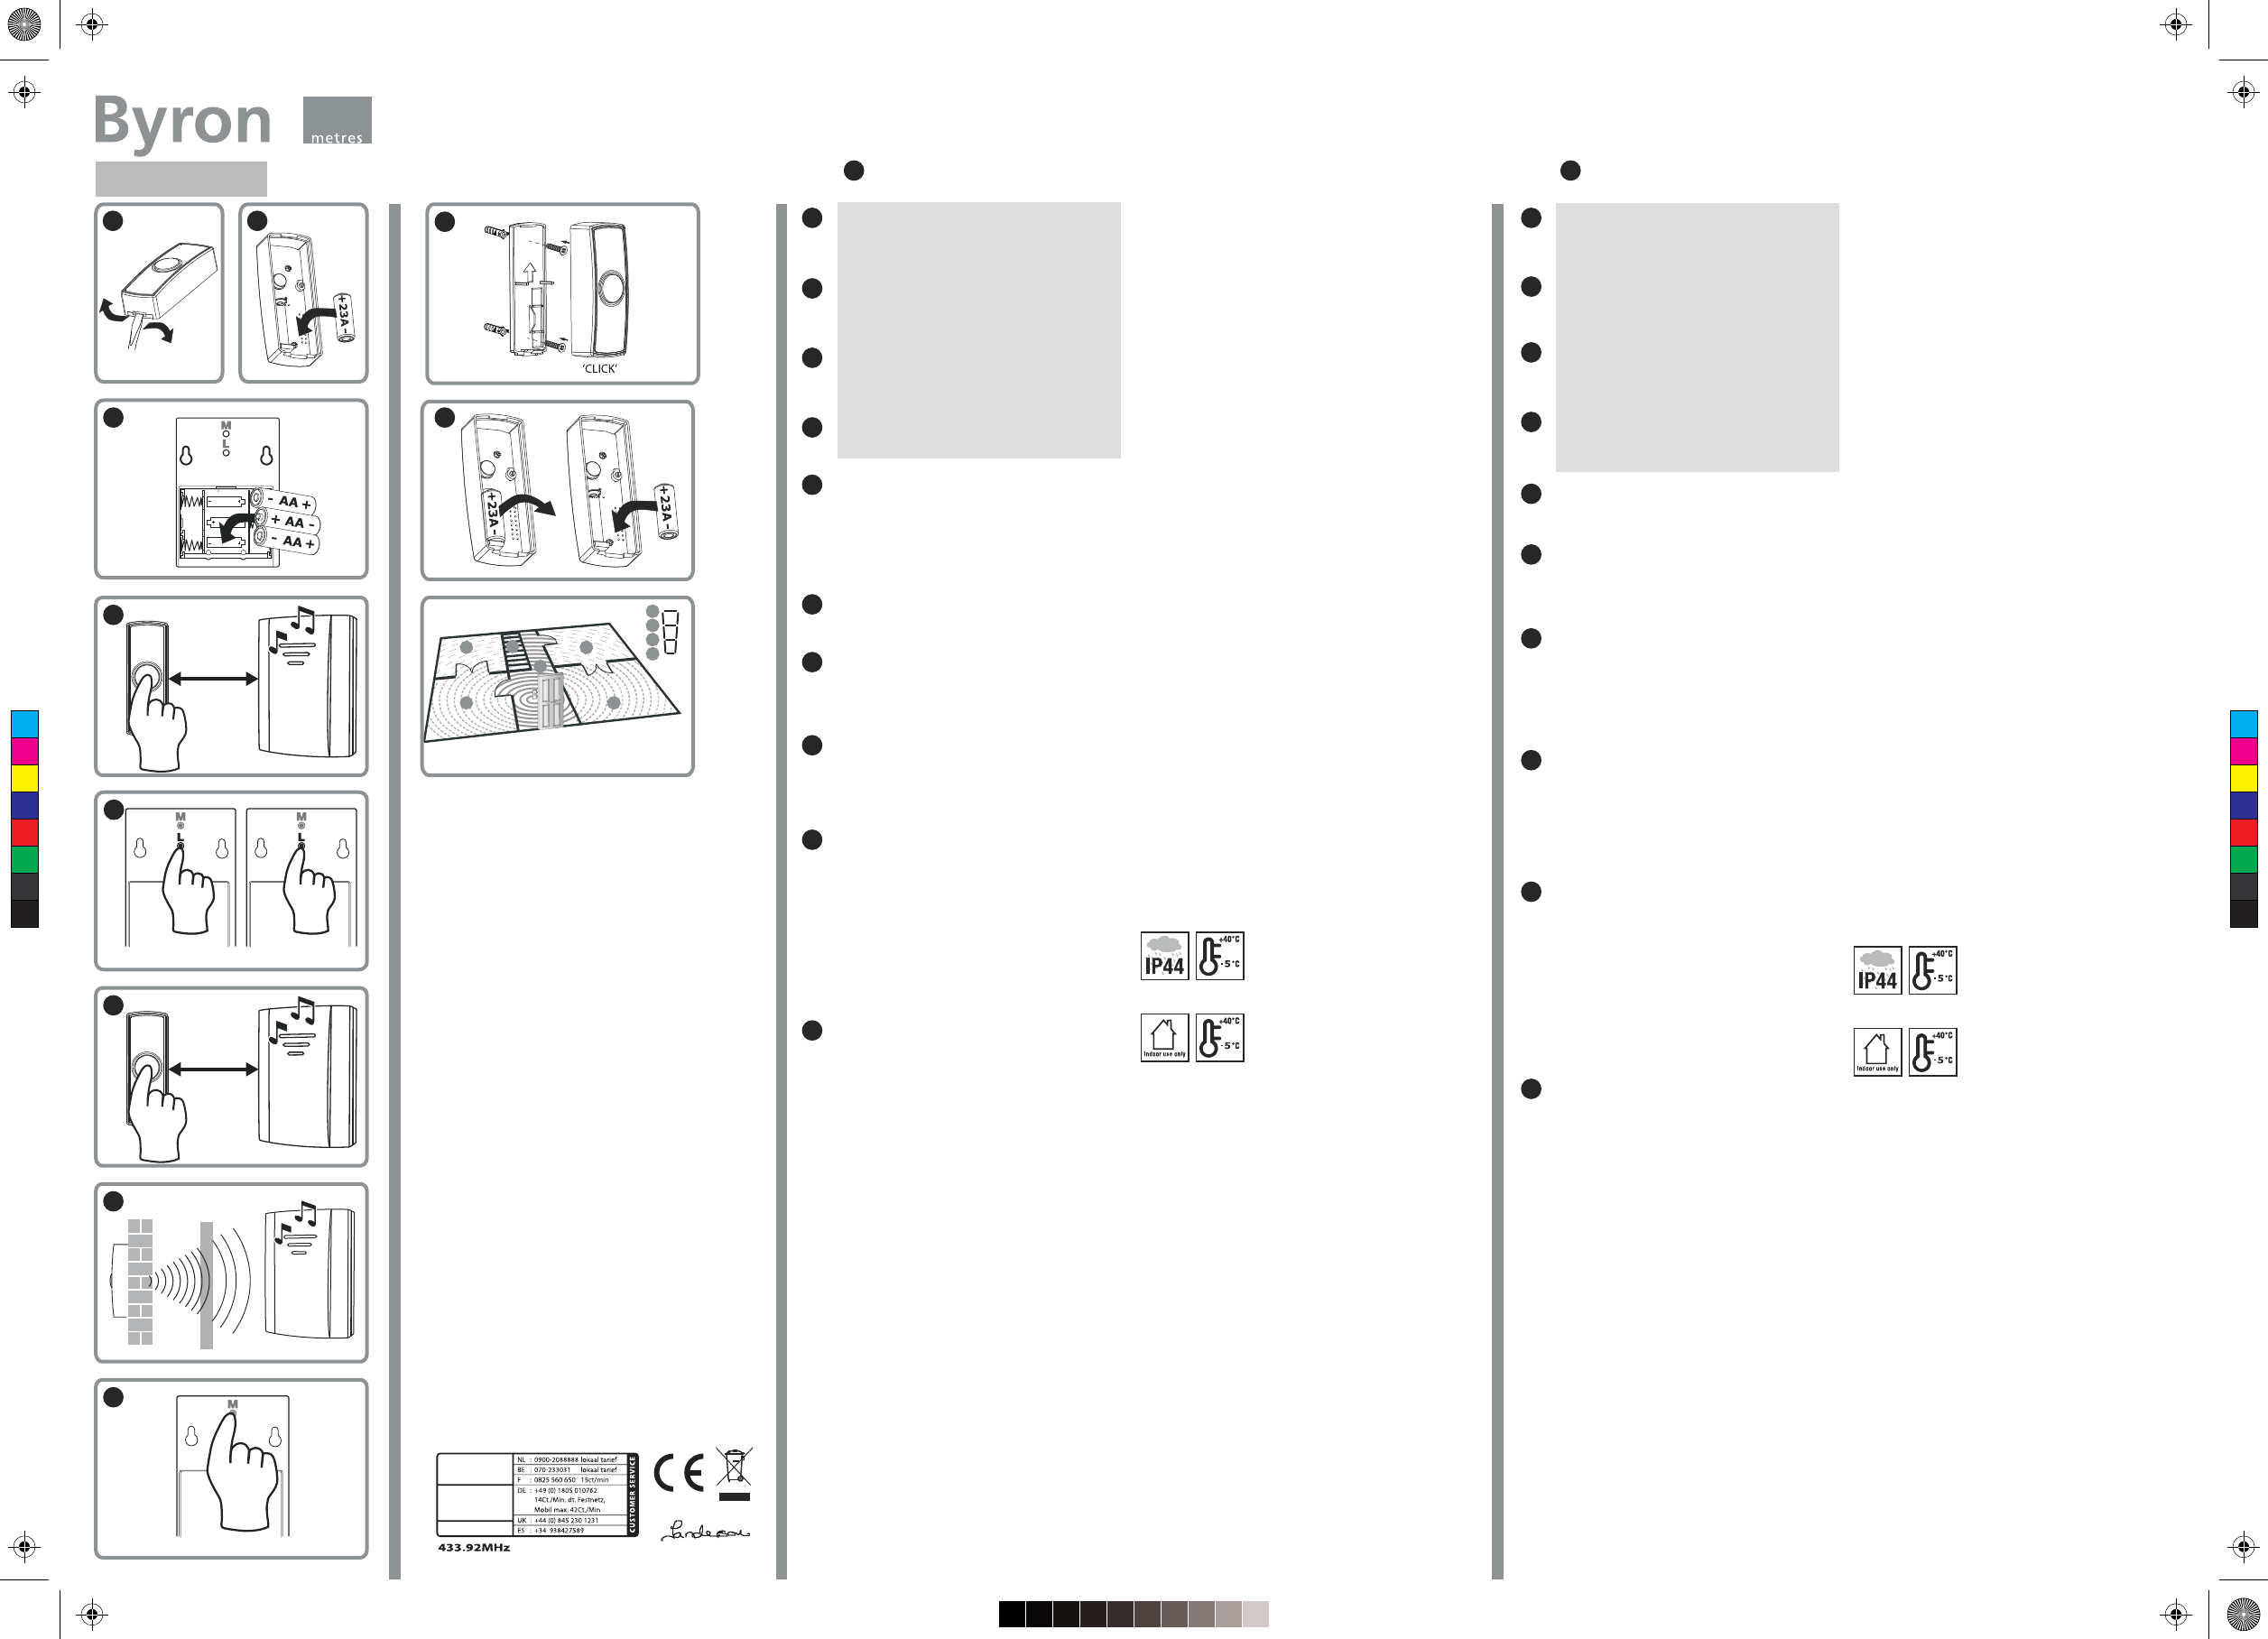
Range Guide
3
2
4
3
2
1
4
3
2
1
Strong
Weak
Chime unit for INDOOR use only
QuickStart
1 2
4
1 metre
7
8
10 seconds 1 second
1 2
6
1 metre
10
™
Wirefree portable door chime kit
B314 Instructions
50
Quality Manager
34, Sherwood Rd
Bromsgrove
B60 3DR. UK
www.chbyron.eu
sm
safety & lighting Ltd
Smartwares declares that this
appliance complies with the main
essential requirements of the R&TTE
directive, 1999/5/CE. The complete
declaration of conformity is available
on request at:
Smartwares Safety & Lighting
Byron House,
34, Sherwood Rd,
Aston Fields,
Bromsgrove
B60 3DR
UK
www
T
10-4 Mon-Fri, except Thurs 12:30-4
Local call charges apply
C
M
Y
CM
MY
CY
CMY
K
B314 IM AW 190314.pdf 1 19/03/2014 09:03