Проводная система для режима парковки | Защита аккумулят |
Совместимость c напряжением 12/24 В | Возмо
напряжения отключения питания | Переключат
Pow
счет проводного по
питания при низком напряжении и таймер режима парк
аккумулятор от разрядки.
С помощью переключателя режима парковки вы может
дезактивировать режим парковки, не влияя на автомати
при запуске двигат
Т
Номинальное выходное напр 12–24 В постНастройки таймера
отключения питания: от 6 часов | Вых номинальное
значение: 1 А (макс. 2 А)/не более 200 мкА | Напряжение о
(по вхо12Напряжение
восстановления питания (по вхнапряж
+ 0.2 В и выше | Страна производства: Южная Корея | Г заводская гарантия
сроком на 1 год
Примечания
Производитель не несет о
рекомендаций в руководстве по эксплуа
Настройки
Перед настройкой таймера и напряжения отключения питания убедитесь, чт
переключатель режима парковки выключен, и отключите кабельную систему от P
Magic Pro
• Переключатель режима парковки
Переключатель режима парковки позволяет с легкостью активировать и
дезактивировать режим парковки, не влияя на работу вашего видеорегистратора.
У
положения переключателя (ON или OFF) и авт
видеорегистратор в процесс
• Настройки отключения питания
У
парковки до тех пор, пока напряжение с аккумулят
установленного значения или не срабатывае
событие произойдет первым).
Инструкция по установке
Перед началом работ проверь
с данной инструкцией. Местонахождение и схема блока предохранителей, а т
предохранителей различаю
вы не уверены, что у вас получит
к специалисту.
* Перед началом работ убедит
вспомогат
Настройте таймер и установи
У
напряжения отключения питания»).
Подключите красный провод A
С помощью руководства по эксплуат
разъединяющий предохранит
во внутреннем блоке предохранителей. Обычно э
или автомагнит
Уразъединяющий предохранитель. Многие ав
щипцами для предохранителей, кот
двигателя.
УA и оберните его вокр
разъединительного предо
Подключите желтый прово
Найдите в блоке предохранипостоянного питания (пит
от аккумулятора). Обы
предохранитель аварийног
фонарей и освещения салона. Если ваш автомобиль снабжен функцией экономии
ресурса аккумулятора, следует использовать предохранит
Упостоянног. У
желтогBA и оберните его вокруг ножей предопостоянного
питания. Вставь
Подключите черный провод GND к т
Найдите т
касается металлической части рамы авт
оголенной части металлической рамы ав
Вставь
помощью кабельной системы.
Чтобы обеспечить х
прикуривателе с помощью изоленты.
Подключите кабельную систему к устройству P
Подключите кабели и проверь
дезактивации переключателя режима парковки. Запустите двига
питание подает
парковки (ON/OFF).
Закрепите устройство Po
Закрепите излишки кабеля и зафиксируйте полож
помощью двусторонней клейкой ленты и/или винтов.
Hardwiring Kit for Parking Mode | Battery Discharge Pre | 12V / 24V Compatible |
Congurable | Parking Mode Swit
The Pow
battery. A low voltage po
from discharge.
Using the Parking Mode Switch you can easily enable/disable parking mode, without aecting
drive recording auto-start at ignition.
Specications
Rated output voltage: 12 - 24 Power cut-o timer setting: 6 hours – innity |
Output current / Quiescent current: Rated: 1A (Maximum: 2 A) / Below 200μA |
Power cut-o voltage (based on the input v12 V
| PowCut-o voltage + 0.2V and higher |
Country of origin: Republic of Korea | W1 year manufacturer's warranty
Notice
The company will not be liable for an
manual.
Settings
Before adjusting the cut-o voltage and timer switches, ensur
Switch OFF and unplug the wire harness from the P
• Parking Mode Switch
The Parking Mode Switch lets you easily enable/disable parking mode without aecting
drive recording
detects when you start your engine and automatically powers your dashcam while
driving.
• Pow
The Pow
battery voltage drops to the congured value or the congur
occurs rst).
Installation Guide
Please check all components and read through this guide bef
layout of your fuse bo
year
professional.
* Make sure the engine is o and accessory pow
Set the voltage and timer switches
Refer to the Po
requirements.
Connect the red AC
Referring to your vehicle Owner's Manual/Handbook, identify a Switched (accessory
power) fuse in your interior fuse panel
stereo fuse slots.
Remove the identied Switched fuse
compartment fuse panel.
Remove the sleeve from the end of the rAC wire, and wrap the wire ar
the blades of the Switched fuse. Reinsert the fuse back into the fuse panel.
Connect the yellow BA
Identify a Constant PConstan
fuses are the hazard light (emergency lamp), tail lights and interior light fuses
has a
Remove the identied Constan fuse
yellow BAwire, and wrap the wire arConstant P
fuse. Reinsert the fuse back into the fuse panel.
Connect the black GND wire to a ground point
Locate a ground poin
frame. Secure the ground wir
the bolt).
Plug your dashcam's pow
T
together
Plug the wire harness into the P
Plug the wire harness in and check that the Parking Mode Switch turns the LED on/o
Start your engine and check that the dashcam is powered when the P
is both ON and OFF
Fix the P
Secure any excess wir
sided tape and/or screws.
Conecte el cable rojo AC
Identique un fusible con interruptor (alimentación de ac
de fusibles consultando el manual del propietario del vehículo
son las ranuras de fusibles del encendedor y de la radio del coche.
Extraiga el fusible con interruptor identicado
para extraer los fusibles en la caja de fusibles del compartimento del motor
Retire la protección del extremo del cable rojo A y enrolle el cable en una de las
clavijas del fusible con interruptor .
Conecte el cable amarillo BA
Identique un fusible de alimentación constante (alimentación de bat
fusibles. Los fusibles de alimentación constant
(luces de emergencia), las luces traseras y las luces int
de ahorro energético
Extraiga el fusible de alimentación constante identicado
extremo del cable amarillo BA y enrolle el cable en una de las clavijas del fusible de
alimentación constante.
Conecte el cable negro GND a un punto de toma de tierra
Localice un punto de toma de tierra, c
una pieza de metal desnudo del chasis del vehículo. F
metal desnudo (por ejemplo, jándola bajo el tornillo).
Conecte el enchufe de alimentación de la cámara de salpicadero a la toma del
encendedor del arnés de cables
Para garantizar un buen c
enchufe y la toma.
Conecte el arnés de cables al Pow
Conecte el arnés de cables y compruebe si el LED del interruptor de modo de
aparcamiento se enciende y apaga. Arranque el motor y compruebe si la cámara de
salpicadero recibe alimentación cuando el interruptor de modo de apar
posición ON y OFF
Fijar el P
Aance el cable excedent
y/o los tornillos incluidos.
Kabelsatz für Parkmodus | Batterie-Entladeschutz | 12/24-V |
Spannungsabschaltung und T | Parkmodusschalter
Pow
mit der Autobatterie ver
Parkmodustimer verhindern, dass Ihre Autobatterie entladen wir
Mit dem Parkmodusschalter können Sie den Parkmodus ganz leicht aktivieren/deaktivieren,
ohne dass sich dies auf die automatische Aktivierung der F
Zündung auswirkt.
T
Nennausgangsspannung: 12 – 24 V DC | T6 Stunden bis unendlich |
Ausgangsstrom/Ruhestrom: Nennstrom: 1 A (maximal: 2A
Abschaltspannung (auf Basis der Eingangsspannung): 12 V
(±0.1 V) | Einschaltspannung (auf Basis der Eingangsspannung): Abschaltspannung + 0.2 V
und höher | Herkunftsland: Republik Korea | Gewährleistung: 1 Jahr
Herstellergewährleistung
Hinweis
Das Unternehmen haftet nicht für Schäden, die darauf zurückzuführen sind, dass diese
Bedienungsanleitung nicht eingehalten wird.
Einstellungen
Stellen Sie vor dem Einstellen der Abschaltspannung und des
Parkmodusschalter auf OFF steht, und trennen Sie den Kabelbaum vom P
• Parkmodusschalter
Mit dem Parkmodusschalter können Sie den Parkmodus ganz leicht aktivieren/
deaktivieren, ohne dass sich dies auf die F
ob der Schalter auf ON oder OFF steht, erkennt Po
starten und versorgt Ihre Dashcam während der F
• Abschalteinstellungen
Pow
die Spannung Ihrer Autobatterie auf den eingestellten
Zeit im
Montageanleitung
Prüfen Sie alle Bauteile und lesen Sie diese Anleitung dur
beginnen. Der Einbauort, die Anordnung des Sicherungskastens und die Art der Sicherungen
sind je nach F
Pow
* Stellen Sie sicher
ausgeschaltet ist, bevor Sie beginnen.
Juego de cableado para modo de aparcamiento | Pre |
Compatible con 12 | Ajustes congur |
Interruptor de modo de aparcamiento
Pow
a la batería del coche. La función de corte de alimentación por bajo voltaje y el temporizador del
modo de aparcamiento evitan que la batería del coche se descargue
Gracias al interruptor de modo de aparcamiento puede activar o desactivar fácilmente el modo
de aparcamiento sin afectar al inicio automático de g
Especicaciones
T 12-24 V CAjuste de temporizador de corte de alimentación: 6
horas – innito | Corriente de salida/CNominal: 1 A (máximo: 2 A)/Inferior
a 200 μA | T12 V
22.8 V T
TPaís de origen: República de Corea | Garantía: Garantía
del fabricante de 1 año
Aviso
La empresa no se hará responsable de daños derivados del incumplimiento de este manual de
instrucciones.
Conguración
Antes de ajustar los interruptores del temporizador y de la t
el modo de aparcamiento y desconectar el arnés de cables del Pow
• Interruptor de modo de aparcamiento
El interruptor del modo de aparcamiento le permite activar o desactivar el modo de
aparcamiento sin afectar a la grabación de la conduc
está encendido o apagado, P
automáticamente la cámara de salpicadero mientr
• Ajustes de corte de alimentación
Pow
que la tensión de la batería del coche se reduzca al valor c
periodo del temporizador congurado (lo que suceda primero).
Guía de instalación
Compruebe todos los componentes y lea completamen
ubicación y diseño de la caja de fusibles y el tipo de fusibles empleados varía según el modelo
y año del vehículo. Si tiene dudas acer
profesional.
* Asegúrese de que el motor esté apagado y la alimentación de los acc
desconectada antes de continuar
Ajuste los interruptores de t
Consulte el punto Ajustes del c
según lo requiera.
Die Spannungs- und T
Siehe Abschalteinstellungen oben und stellen Sie die
Den roten AC
Sehen Sie in der Bedienungsanleitung bzw. dem Handbuch zu Ihrem
eine geschaltete (Zubehörstrom-) Sicherung im Sicherungskasten im Innenraum zu
identizieren.
oder das Autoradio
Nehmen Sie diese geschaltet e Sicherung heraus. Bei vielen F
Sicherungszieher im Sicherungskasten des Motorraums vorhanden.
Entfernen Sie die Ummantelung am Ende des roten A-Kabels und wickeln Sie das
Kabel um eines der Anschlussenden der geschalteten Sicherung. Setzen Sie die Sicherung
dann wieder in den Sicherungskasten ein.
Das gelbe BA
Suchen Sie nach einer Konstantstrom -(Batteriestr
Typische Konstan
Rückleuchten und die Innenbeleuchtung. F
hat, verwenden Sie bitte die Sicherung für die
Nehmen Sie die Konstantstrom -Sicherung heraus
Ende des gelben BA-K
der Konstantstrom -Sicherung
Sicherungskasten ein.
Den schwarzen GND-Draht an einen Erdungspunkt anschließen
Suchen Sie einen Erdungspunkt, wie zum Beispiel eine Schraube, der sich direkt an
blankem Metall der Fahrzeugkarosserie bendet. Befestigen Sie das Er
an blankem Metall der Karosserie (beispielsweise, indem Sie es unter der Schraube
befestigen).
Den Stromstecker Ihrer Dashcam in die Zigarett
Kabelbaum einstecken
Um einen guten elektrischen Kontakt zu gewährleisten, können Sie Stecker und Steckdose
mit Isolierband zusammenkleben.
Den Kabelbaum an Pow
Schließen Sie den Kabelbaum an und prüfen Sie, ob der Parkmodusschalterdie LED ein-
und ausschaltet. Starten Sie den Motor und prüfen Sie, ob die Dashcam mit Strom v
wird, wenn der P
Den Pow
Befestigen Sie die Kabel und den Power Magic P
Klebeband und/oder den beiliegenden Schrauben.
Kit de câblage pour le Mode Parking | Système pr |
Compatibilité 12 V/24 V | T |
Sélecteur de Mode Parking
Branché directement à la batterie de la voiture
lorsque le moteur est arrêté. Une f
une temporisation en Mode Parking empêchent à la batterie de votre v
En utilisant le sélecteur de Mode Parking, vous pouvez facilement activer/désactiver ce dernier
sans aecter le lancement automatique de l’
Spécicationsz
T De 12 à 24 VCC | Réglage de la temporisation de la coupur
d’alimenta De 6 heures à l’inni | C Nominal : 1A
(maximum : 2A)/Moins de 200 μA | T
tension d’12 T
l’alimentaT
PayRépublique de Corée | Garantie: 1 an de garantie du fabricant
Note
La société ne sera responsable d’aucun dommage r
d’instructions.
Réglages
Avant de régler les sélecteurs de la tension de c
désactiver le Mode Parking et de débrancher le faisceau de câbles du Pow
• Sélecteur de Mode Parking
Le sélecteur de Mode Parking vous laisse facilement activer/désactiver ce dernier
sans aecter l’
OFF
automatiquement votre dashcam pendant que v
• Réglages de la coupure d’alimentation
Le Po
de la batterie de votre voitur
congurée s’
Guide d’
Veuillez v
l’agencement de votr
l’année du véhicule. Si v
consulter un professionnel
* Assurez-vous que le moteur est étein
procéder
Réglez les sélecteurs de tension et de temporisation
Reportez-vous aux Réglages de la tension de coupure ci-dessus et réglez les sélecteurs
selon vos besoins.
Branchez le l AC
En vous reportant au manuel/guide du propriétaire de votre v
connecteur (alimentation accessoire) à l’
types sont les emplacements à fusible de l’allume-cigare et de la stéréo d’une voiture.
Retirez le fusible connecteur identié. De nombreuses voitur
extracteur de fusible dans la boîte à fusible du compartiment moteur.
Retirez le manchon de l’AC, et enroulez le l autour de l’une des
lames du fusible connecteur . Remettez le fusible dans la boîte à fusible.
Branchez le l BA
Identiez un fusible d’alimentation continue (batterie) dans v
fusibles d’alimentation continue sont ceux des f
feux arrière et les fusibles de l’
d’
Retirez le fusible d’alimentation continue identié
l jaune BA, et enroulez le l autour de l’une des lames du fusible d’ alimentation
continue. Remettez le fusible dans la boîte à fusible.
Branchez le l GND noir à un point de masse
Localisez un point de masse, tel qu
métallique du châssis du véhicule. F
en le xant sous le boulon).
Branchez le cordon d’
le faisceau de câbles
Pour assurer un bon con
ensemble la che et la prise.
Branchez le faisceau de câbles dans le P
Branchez le faisceau de câbles et vériez que le sélecteur de Mode Parking éteint/allume
le témoin. Démarrez votre moteur et v
Sélecteur de Mode Parking est en position ON ou OFF
Fix
Fixez t
adhésif double-face et/ou les vis fourni(es).
1
1
1
2
3
4
5
6
7
2
3
4
5
6
7
2
3
4
5
6
7
3
4
5
6
2
1
7
Kit di cablaggio per la modalità parcheggio | prevenzione dell'esaurimen|
compatibilità 12 V/24 V | T |
Interruttore modalità parcheggio
Il Power Magic P
la batteria dell'auto quando il motore è spento
tensione e una modalità parcheggio impediscono che la batteria si scarichi.
Utilizzando l' interruttore della modalità parcheggio è possibile attiv
senza alcuna conseguenza per l'avvio automatico della registrazione all'ac
Speciche tecniche
T 12 – 24 V CImpostazioni timer di interruzione della corrente:
6 ore – illimitato | Corr Nominale: 1 A (Max.: 2A) / Minore di 200 μA
|
T
12 VT
in ingresso): Paese di origine: Repubblica
di Corea |
Garanzia: 1 anno di garanzia del costruttore
Nota
La società non sarà responsabile per alcun danno qualora l'utente non si att
contenute nel present
Impostazioni
Prima di regolare la tensione di in
modalità parcheggio e scollegare il cablaggio dal P
Interruttore della modalità parcheggio
L
la modalità parcheggio senza alcuna conseguenza per la registr
Indipendentemente dallo stato dell'interruttor
l'avvio del motore e alimenta automaticamente la dash cam duran
Impostazioni dell'interruzione dell'alimentazione
Pow
della batteria sarà scesa no al valore congur
(a seconda di quale delle due condizioni si verichi per prima).
Guida all'installazione
Prima di cominciare, c
posizione e lo schema della cassetta dei fusibili e il tipo di fusibili utilizzati varierà a seconda del
modello e dell'anno di costruzione del veicolo
sorgessero dei dubbi, contattar
* Accertarsi che il motore sia spento e l'alimen
procedere.
Impostazione della tensione e degli interruttori del timer
Consultare la sezione dedicata alle Impostazioni di interruzione dell'alimentazione qui sopra
e impostare gli interruttori in base alle proprie necessità.
Collegamento del lo rosso A
Consultare il manuale per l'uso del proprio veicconnesso (per
l'alimentazione degli accessori) nella cassetta dei fusibili. Esempi tipici sono gli slot per i
fusibili dell'accendisigaro e dell'impianto ster
Rimuovere il fusibile connesso individuato
motore di molte auto
Rimuovere la guaina dall'estremità del lo rAC e avvolgere il lo su uno dei contatti
del fusibile connesso . Reinserire il fusibile nell'apposita cassetta.
Collegamento del lo giallo BA
Individuare un fusibile di alimentazione costante (alimentazione a batt
portafusibili. Tipici fusibili di alimentazione costan
pericolo (luci di emergenza), luci posteriori e interne. Se il veicolo è dotat
di risparmio batteria”
Rimuovere il fusibile di alimentazione costant individuato. Rimuover
dall'estremità del lo rosso BA e avvolgere il lo intorno a uno dei con
di alimentazione costante . Reinserire il fusibile nell'apposita cassetta.
Collegamento del lo nero GND a un pun
Localizzare un punto di messa a terra, ad esempio un bullone
parte metallica del telaio del veicolo. F
esempio sotto il bullone).
Inserire lo spinotto di alimentazione della dash cam nella presa dell'acc
cablaggio
Per garantir
e la presa.
Collegamento del cablaggio al P
Collegare il cablaggio e accertarsi che l'interruttore della modalità
spenga la spia LED. A
l'interruttore della modalità parcheggio è ac
Fissaggio del P
Fissare ev
fornito in dotazione e/o le viti.
2
3
2
3
4
5
6
7
1
1
4
5
6
7
Manufacturer Pittasoft Co., Ltd
Address 7F
Republic of Korea, 08506
Service Center +82-2-6947-4670(ext.3)
facebook.com/BlackVueOcial
www.blackvue.com
Made in Korea
Timer Settings
6h 12h 24h 36h
48h 72h 120h Innity
For regular cars: For heavy vehicles:
.
.
Parking Mode
Switch ON
Parking Mode
Switch OFF
ON
OFF
Parking mode enabled
When the ignition is o: The P
in parking mode.
Driving mode enabled
When the ignition is on:
in driving mode.
ON
OFF
Parking mode disabled
When the ignition is o: The P
dashcam.
Driving mode enabled
When the ignition is on:
in driving mode.
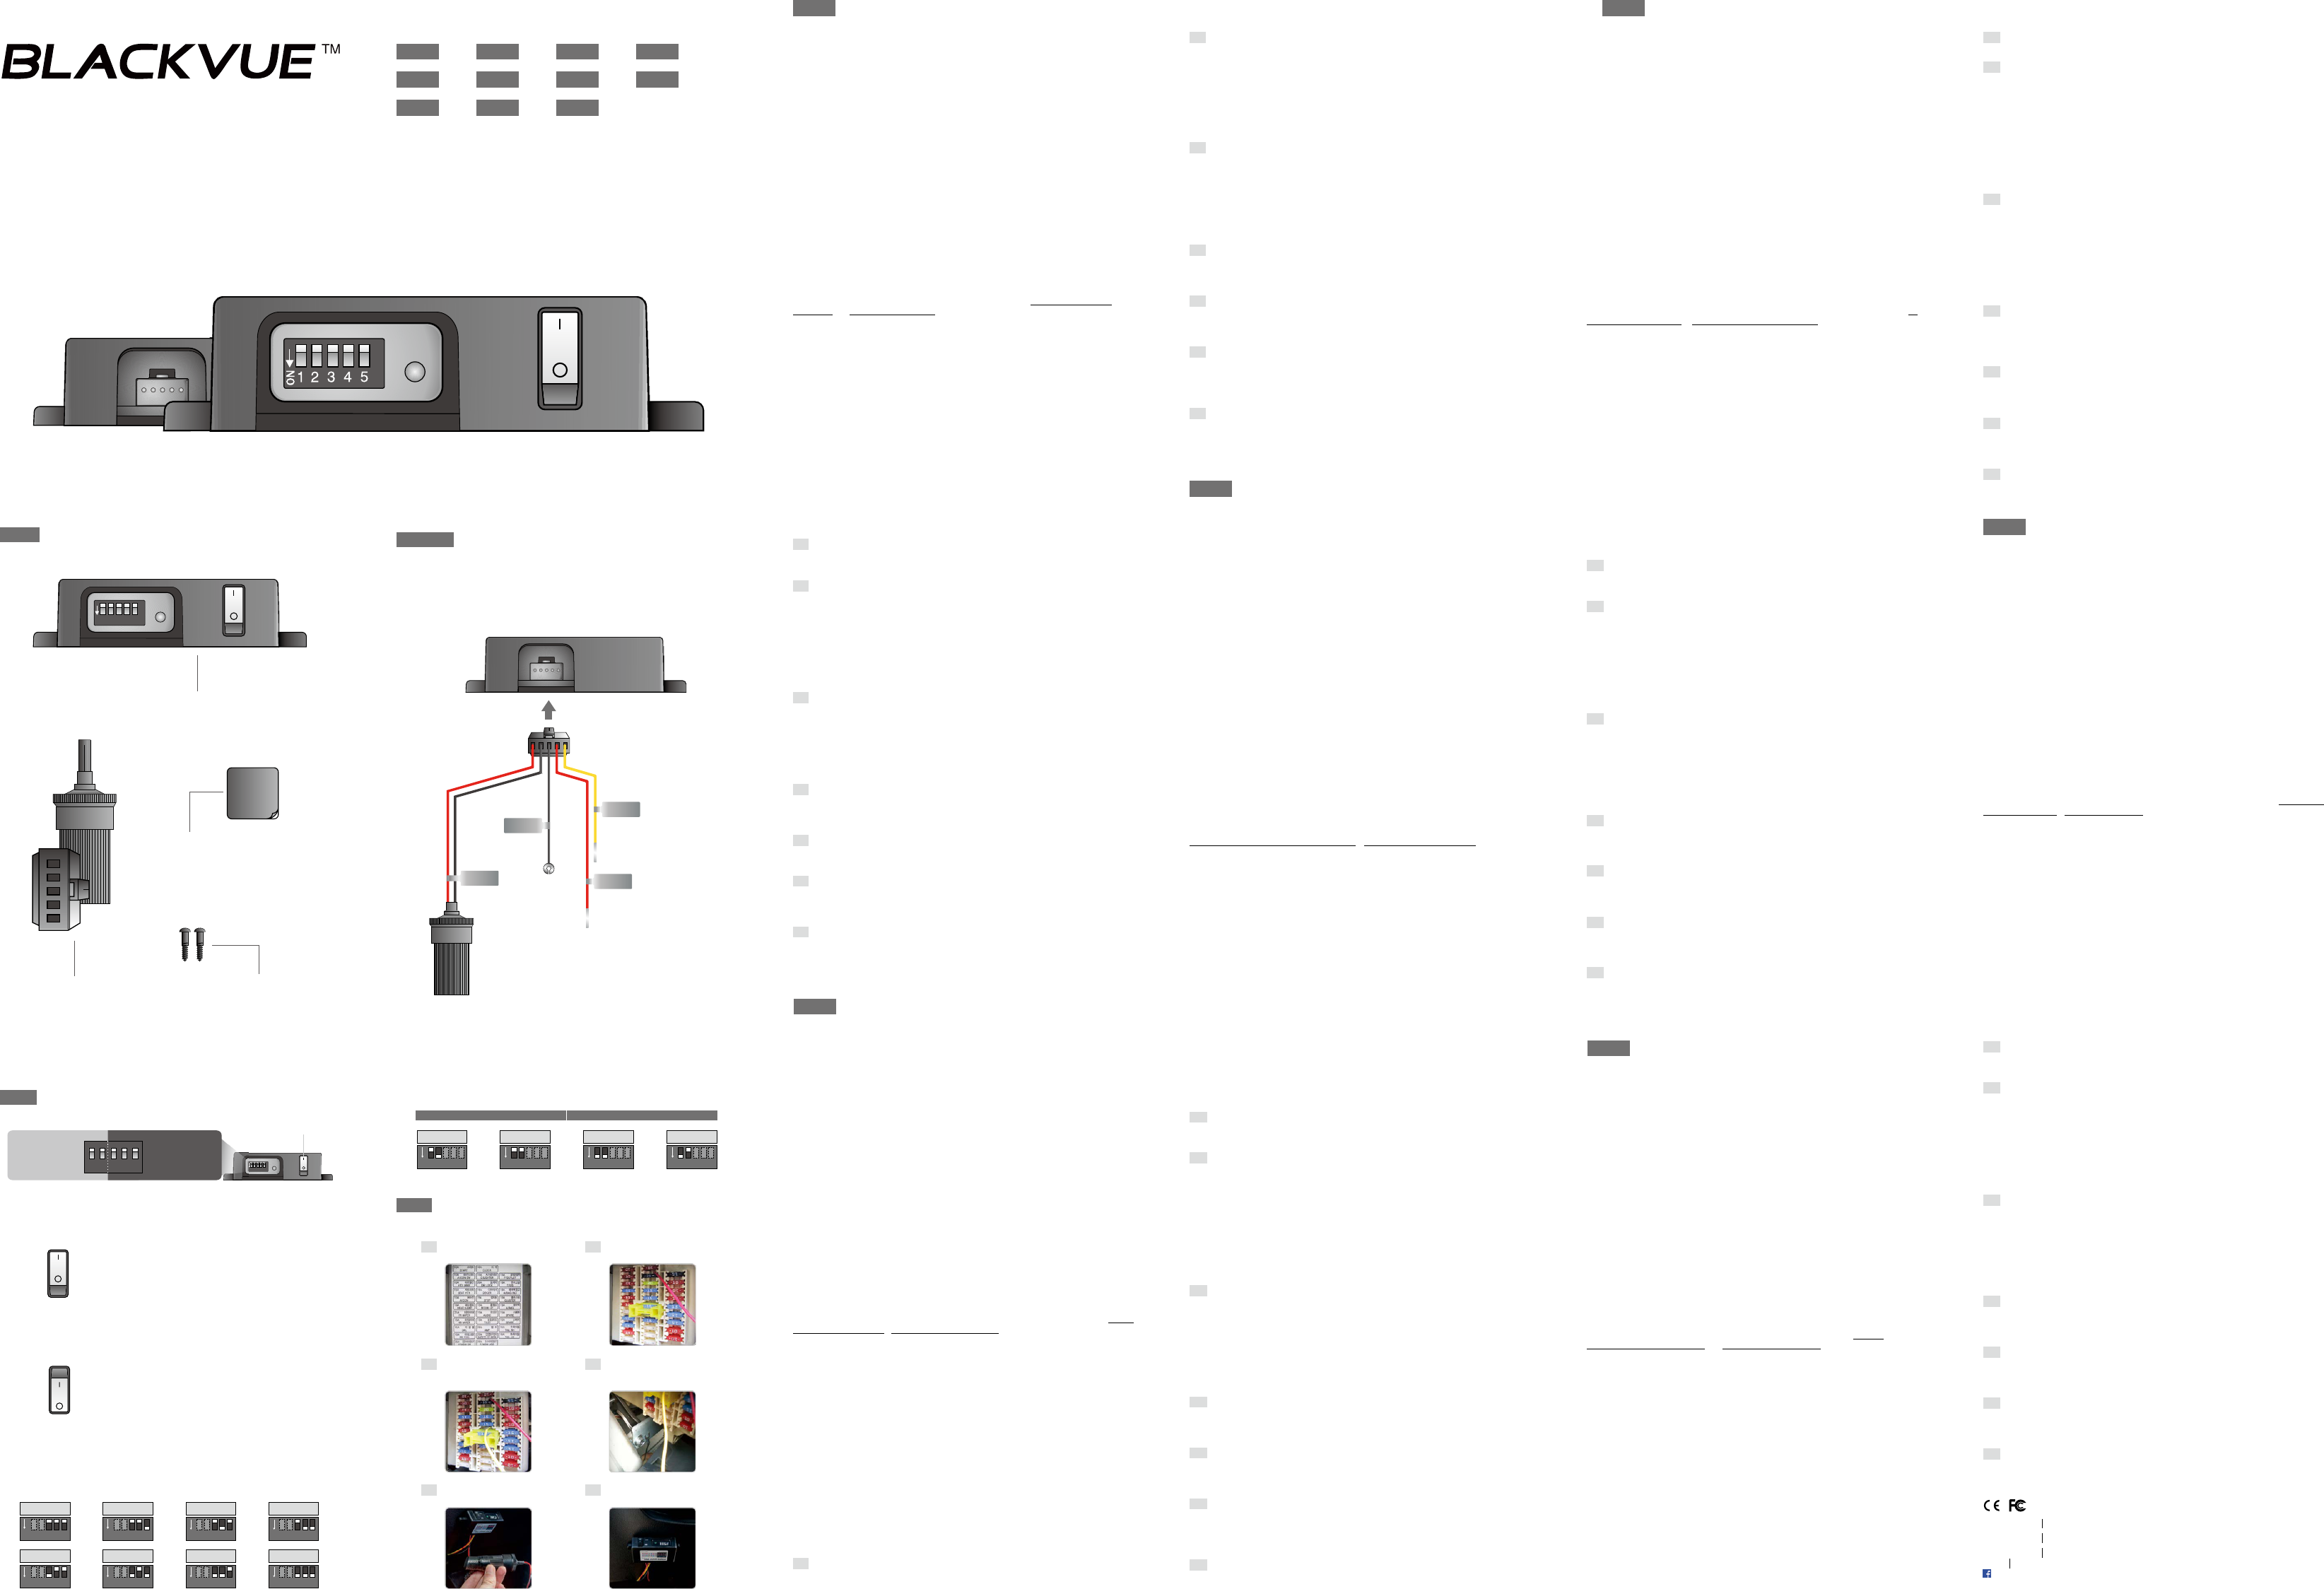
Power Magic Pro
BA
AC
GND
DASHCAM
to Constant P
to Switched fuse slot
to ground point
to BlackVue dashcam
Po
W
Double
Sc
Contents
Wire Harness
Settings
Photos
1 2 3 4 5
NO
1 2 3 4 5
NO
1 2 3 4 5
NO
1 2 3 4 5
NO
1 2 3 4 5
NO
1 2 3 4 5
NO
1 2 3 4 5
NO
1 2 3 4 5
NO
Parking Mode Switch
Timer Settings
Switches 3, 4 and 5
Voltage Settings
Switches 1 and 2
ON
OFF
1 2 3 4 5
NO
12.5V
(±0.1V)
1 2 3 4 5
NO
12V
(±0.1V)
1 2 3 4 5
NO
22.8V
(±0.1V)
1 2 3 4 5
NO
23.2V
(±0.1V)
1 2 3 4 5
NO
Hardwiring Kit for P
P Manual
Français
Deutsch
Italiano
Español
Pусский
2
3
5
2
4
7
Example fuse panel diagram
Dashcam power cable plugged in
Red ACC(+) and yello
wires connected
Red ACC(+) wir
Ground (GND) wire c
Fixed in plac
Cut-O Voltage Settings
Français
Deutsch
Italiano Indonesian
日本語
Tiếng Việt
中文
Español
Pусский
English
English
1 2 3 4 5