Dok./R
A
6
5
4
3
2
1
7
8
9
10
11
12
13
B
6
5
13
C
11
12
13
D
2 mm max.
7
11
8
E
14
10
11
F
11
1
G
5 1
H
User Manual
ID: #07177
m
y
h
a
n
s
e
c
o
n
t
r
o
l
.
c
o
m
C
E
R
T
I
F
I
E
D
Use
Man
DISTRIBUTED B
AL
WWW
USA
MODEL:
22
service@80
866-558-8096
AFTER SALES SUPPORT
USA
95698
05/20
WIRELES
C
YEAR
WARRANTY
3
General information
Reading and storing the
user manual
Th-
companies this wireless
solar bic
It contains imp
information about
star
Before using the bicycle comput-
er
This par
sa-
low th
in seve
bic
manu
the bi
par
to inc
Ex
The following s
word-
ual, on the bicycle computer or on
the packaging.
WAR
This signal sy
nates a h
deg
to deat
avoide
NOTICE!
This signal word war
poten
Th-
vid-
ful supplementar
information about
assembly or use.
FC
This bic
wi-
er
t
may no-
ence
accept any interference received,
includin
cause undesired oper
Please take attention that chang-
es or m
appr-
ble for compliance could
use
equipment.
Th-
t
S
Proper use
Th
exclusively for displayin
lec
a bic
pr
commercial purp
Only use the bic
as de-
al. Us
deem
in dam
pers-
pu
The manufac
acc
ca
use.
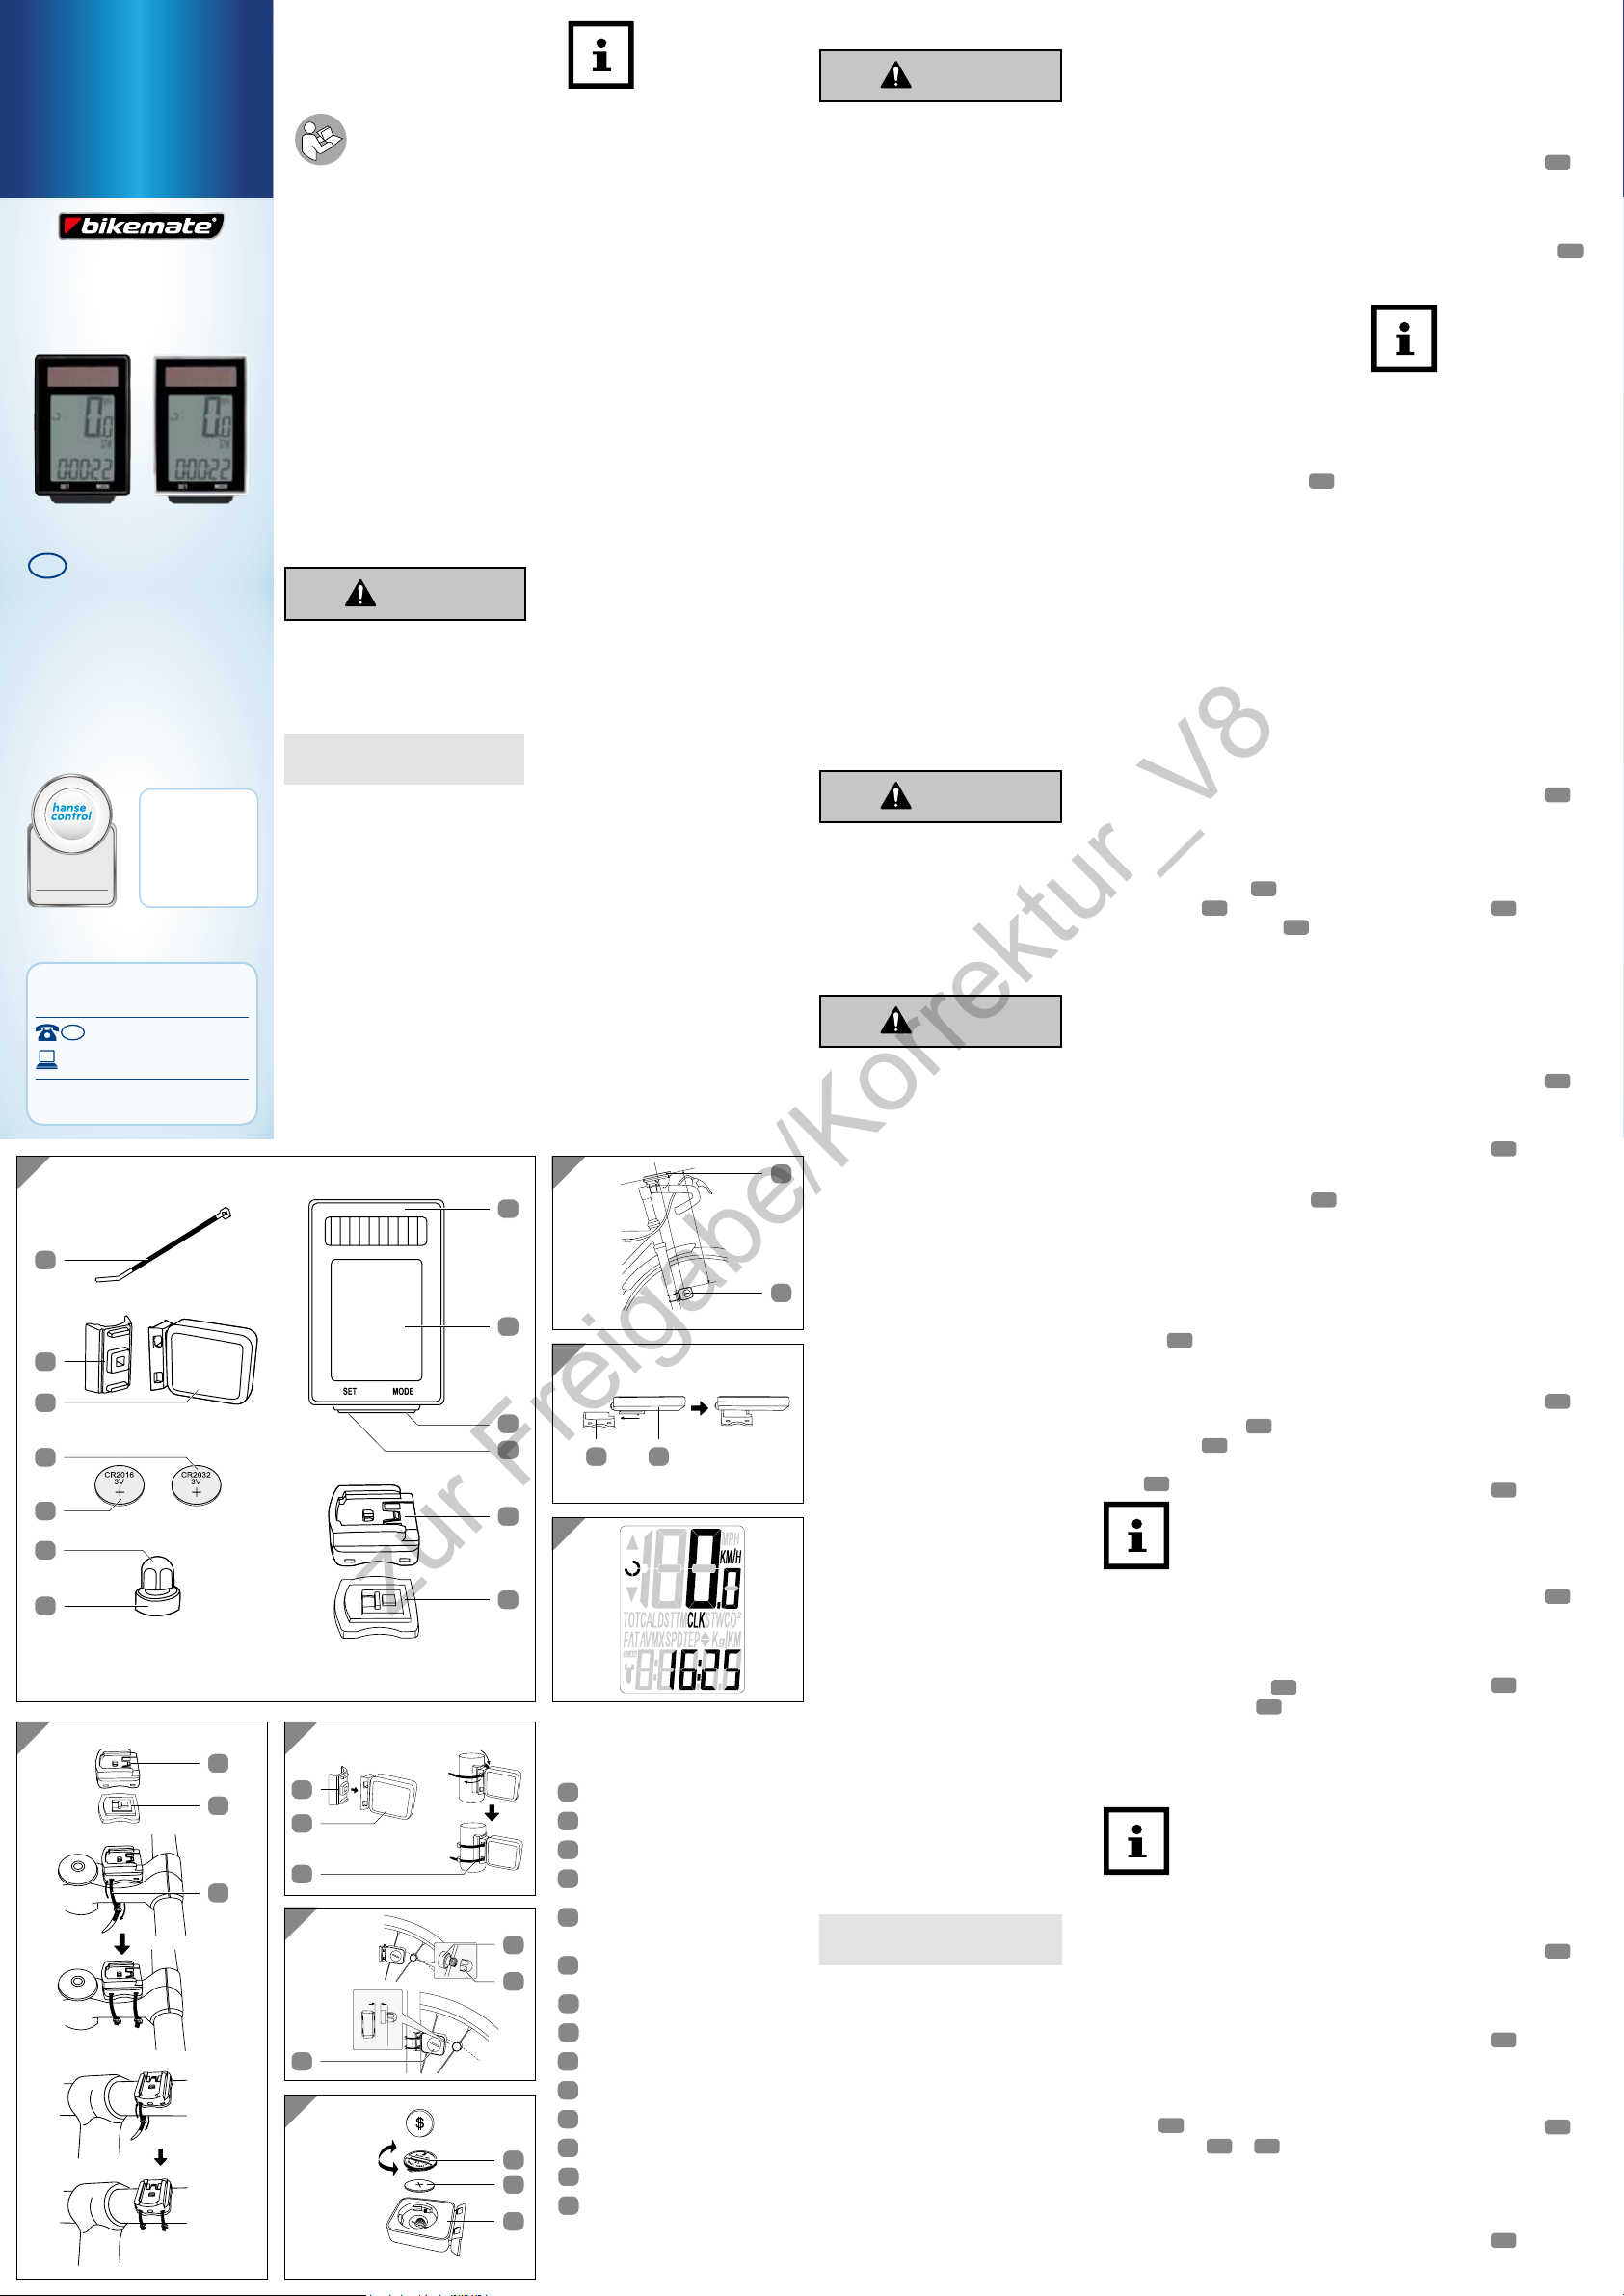
Package contents/
devic
1Bic
2Display
3Ri
4Lef
5Bic
bracket
6Rubber pad (bic
computer)
7 Magnet
8 Magnet holder
9CR
10 CR
11 Sensor
12 Rubb
13 Ca
14 Bat
Safet
WAR
Danger for children and per
sons with impaired ph
sensor-
ties (
persons, older persons with
reduced ph
capacities-
ence an
older children
This bicycle computer may
be used by children ages
eight and over as well as
persons with impaired
physical, sensory or
mental capacities or those
lacking experience and
knowledge, if they are
supervised or have been
instructed in how to safely
use the bicycle computer
and understand the risks
associated with operating
it. Children must not play
with the bicycle computer
Cleaning and user mainte-
nance must not be per
formed by unsupervised
children.
Keep children under eight
years of age away from the
bicycle computer
WAR
Danger of suffocation!
The bic
small par
sw
and choke.
Keep small parts away from
children.
WAR
Bat
The bi
senso
Improper handling of the-
teries m
serio
Store both new and used
batteries so that they are
not accessible to children.
If you suspect that a battery
has been swallowed or
otherwise incorporated,
promptly consult a physi-
cian.
Only replace the batteries
with the same battery type.
Do not touch leaky bat
teries. If you do come into
contact with battery acid,
wash the affected area
thoroughly and rinse it with
plenty of water
battery acid comes into
contact with your eyes or
causes skin irritation, also
seek medical attention.
If it is no longer possible to
securely close the battery
compartment, dispose of
the bicycle computer as
described in the chapter
“Disposal”.
Do not charge or r
batteries, do not disassem-
ble them, do not throw
them in fire and do not
short circuit them.
Dispose of batteries at your
local collection point.
NOTICE!
Risk of damage
Improper handling of the
bicycle computer may
result in damage to the
bicycle computer
Y
computer at ambient
temperatur
14°F and 122°F (-10°C and
+50°C).
Do not expose the bicycle
computer to permanent
moisture.
Avoid dust, heat and con-
tinuous exposur
sunlight.
Never try to repair the bicy-
cle computer yourself
technical problems, cont
the service address indicat
ed on the warranty card.
Information about
solar cells
This bic
with solar cells that transform
ligh
ex
bat
nee
supp
Checking the bic
computer
1. T 1
ou
2. Remove t
from the bicyc
3. Che-
cle computer is complete
undaF).
If i
bic
ser
the w
As
A
computer
brac
pu
1. Atta
mounting b 5 and the
rubber pa 6 to the han-
bar w 13 .
Th
• If you a-
pu
handlebar tube, thread the
ca
froF).
• If you a-
pu
stem of the handlebar
the cable ties horizontally
fro
(seFig.B, middle).
2. Slide the bicyc 1
fro
computer
unt
(seFig).
3. T
that i
sensor 11 .
Assembling the sensor
and magnet
1. Attac 11 and the
rubber pa 12 to
of the f
ties 13 (seFi).
Make sure that the
bic
and th
at a 9
another-
tance bet-
pu
no mo
(seFig).
2. Unscrew the magnet 7 and
the magnet holder 8 .
3. At
on the f
the magnet holder
magnF).
Ensure that the
magnet passes the
sen
of app
(
marF).
Star
Switchin
computer
Before star-
pu
made.
T
puter 1 , press one of the
two buttons 3 or 4 on the
bicycle computer
Selec
miles
Th
measure kilometers (K
mile
fir
Press the right button 3 to
switch between the units of
measure.
Confirm your selection by
pressing the left button 4 .
Set
Nec
bat
reboot
How t
the tire circ
1. T
lowes
pos
f
2. Move th
one front wheel revolution
unt
the lowest position.
3. Measure the distance covered
in inches
Th
Th
set-
ence (=mm). The th
2 fl
be s-
ing nu
between 0–9
Press the right button 3
until the correct number
appears.
Th
Confirm your entry by pressing
the left button 4 .
Repeat the steps for the hun-
dreds, tens and ones.
Set
Th
set
“00000”
Press the right button 3 to
increase the number by one.
Confirm your entry by pressing
the left button 4 .
Th-
sa-
sume a v
Set
interva
Th
set
distan
remaining dist
bike inspec
Press the right button 3
to increase the ones, t
hundreds by one.
Confirm your entry by pressing
the left button 4 .
Set
Th
set
Press the right button 3 to
increase the hundreds, t
ones by one.
Confirm your entry by pressing
the left button 4 .
Set
Th
savings
muc
pro
bee
by bic
doc
emis
the d
Th
Press the right button 3 to
increase the hundreds, t
ones by one.
Confirm your entry by pressing
the left button 4 .
Set
Th
Press the right button 3
until the correct number
appears.
Th
Confirm your entry by pressing
the left button 4 .
zur Freigabe/Korrektur_V8