19
Assembly without tools
T
top rail with the T
Powder is not included and easily available in the market.
Bestway Inflatables will not be responsible for damage caused
to the pool due to mishandling or failure to follow these
instructions.
1. Lay out all parts and check that you have the correct
quantities as listed in the components list. For assistance or
F
www
2. Spread out the pool and make sure the pool is right side up,
let it sit exposed to direct sunlight for 1 hour or more so that
the pool is more flexible during set up.
3. Place the pool near an adequate drainage system to deal
with overflow water and ensure the pool’s inlet
B are correctly positioned to allow your filter pump to
connect to a power source.
Note: Do not use extension power cords to power your
pump.
A Do not drag the pool on the ground, this can
damage the pool.
Aufbau ohne Werkzeug
Um die Lebensdauer Ihres Pools zu verlängern ist es wichtig,
dass Sie vor der Montage T
Schiene verteilen. Der T
sich jedoch am Markt einfach beschaffen.
Die Firma Bestway Inflatables kann nicht für Schäden am Pool
durch die falsche Behandlung oder Nichtbeachtung dieser
Anweisungen haftbar gemacht werden.
1. Entnehmen Sie alle T
T
vorhanden sind. Für Hilfestellung oder Fragen &
besuchen Sie bitte den entsprechenden
Webseite, www
2. Falten Sie den Pool auseinander und prüfen Sie, dass die
richtige Seite nach oben zeigt. Lassen Sie ihn für
mindestens 1 Stunde dem direkten Sonnenlicht ausgesetzt,
so dass der Pool während des
3. Platzieren Sie den Pool in der Nähe eines geeigneten
Abflusssystems, um überlaufendes Wasser ableiten zu
können und stellen Sie sicher
des Pools korrekt positioniert sind, damit Sie Ihre
Filterpumpe an eine Spannungsversorgung anschließen
können.
HINWEIS: V
Ihre Pumpe anzuschließen.
ACHTUNG: Ziehen Sie den Pool nicht über den Boden, da
dies den Pool beschädigen kann.
Montage zonder gereedschap
Om ervoor te zorgen dat je zwembad langer meegaat, is het
belangrijk om de bovenste rail met talkpoeder te bestrooien
voor de montage. T
eenvoudig in de handel verkrijgbaar
Bestway Inflatables kan niet aansprakelijk gesteld worden voor
schade aan het zwembad die toe te schrijven is aan een
verkeerde hantering of het niet naleven van deze
aanwijzingen.
1. Leg alle onderdelen neer en controleer of u de juiste
hoeveelheden heeft, zoals op de onderdelenlijst staat
vermeld. V
op onze website bezoeken op www
2.
dit dan zorgvuldig open op de gewenste plaats. Zorg ervoor
dat het zwembad zich in de buurt van een stopcontact van
220-240volt
restspanning.
3. Plaats het zwembad nabij een adequaat afvoersysteem om
overstromend water te kunnen afvoeren en zorg ervoor dat
invoer
gepositioneerd zijn zodat uw filterpomp aangesloten kan
worden op een stroombron.
OPMERKING: Gebruik geen verlengsnoeren om uw pomp
op de stroom aan te sluiten.
AANDACHTTrek het zwembad niet over de grond, dit kan
het zwembad beschadigen.
FR Assemblage sans outils
Pour prolonger la durée de vie de votre piscine, il est important
d'appliquer du talc sur le rail supérieur avant assemblage. Le
talc n'est pas inclus et s'achète facilement dans le commerce.
Bestway Inflatables n’est pas responsable pour les dommages
causés à la piscine par une mauvaise manipulation ou par le
non respect de ces instructions.
1. Étalez toutes les pièces et contrôlez que vous disposez des
quantités correctes conformément à la liste des
composants. Si vous avez besoin d’aide ou si vous
souhaitez consulter les F
assistance de notre site web, www
2. Déployez la piscine et contrôlez qu’elle soit tournée dans le
bon sens, laissez-la au soleil pendant 1 heure ou plus pour
qu’elle soit plus flexible pendant le montage.
3. Placez la piscine près d’un système de vidange approprié
pour gérer le débordement de l'eau et vérifiez que l’entrée
et la sortie B de la piscine sont correctement positionnées
pour permettre à votre pompe de filtration d’être branchée
sur une source de courant.
Remarque : N’utilisez pas de rallonge pour alimenter votre
pompe.
ANe traînez pas la piscine sur le sol car cela
peut l’abîmer
0°
30% 70% 90%
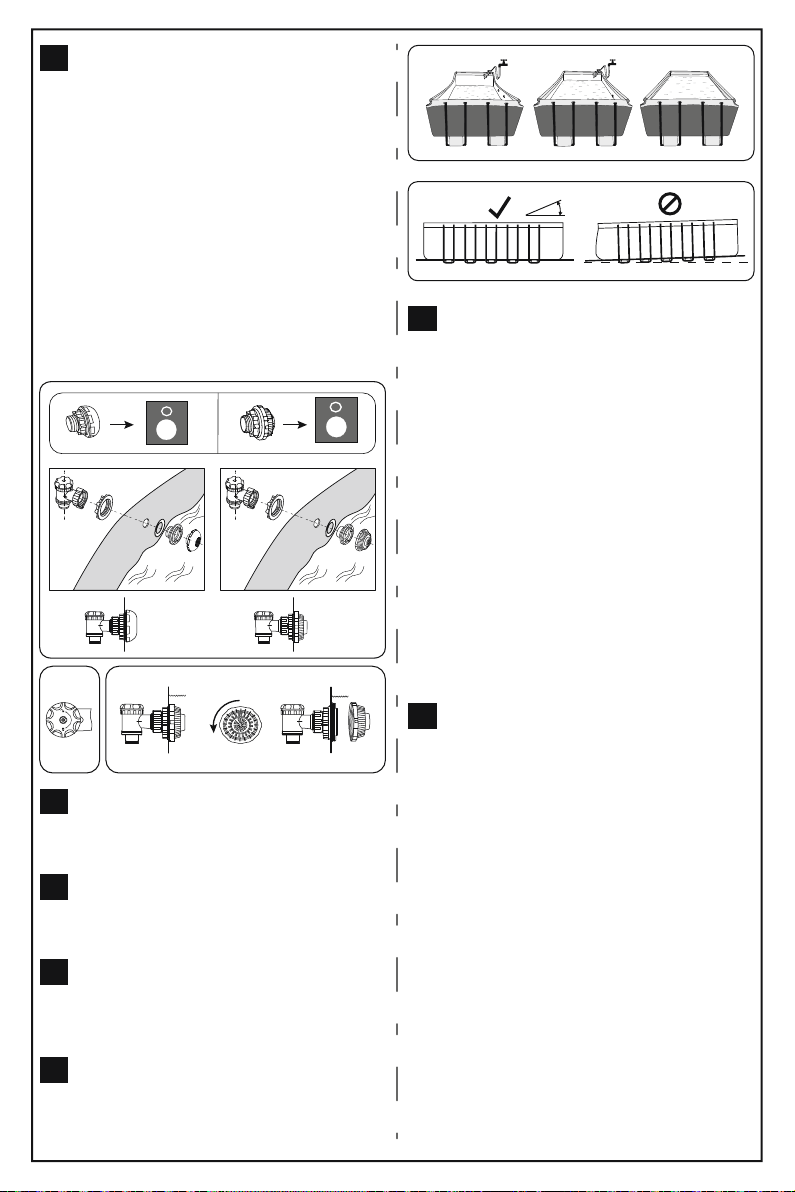
Connection
For pool with connection valve.
NOTE: If you want to connect other pool cleaning kits to the
pool through the connection valve,
disassemble the Debris Screen from the Connector
Montage V
Bei Pools mit
HINWEIS: Wenn Sie ein Poolreinigungsset über das
Anschlussventil anschließen möchten,
dann schrauben Sie das Schmutzsieb ab.
Montage van aansluitingsklep
V
OPMERKING:
zwembad wilt aansluiten via het
verbindingsventiel, verwijder het vuilscherm dan van de
connector
Montage de la vanne de communication
Pour les piscines avec vanne de communication.
REMARQUE : Si vous souhaitez raccorder d’autres kits de
nettoyage de piscine à la piscine au
moyen de la vanne de communication, démontez la grille du
connecteur
EN
DE
NL
FR
Filling Pool with W
A Do not leave pool unattended while filling with
water
1. Fill pool until water capacity is 90%, DO NOT OVERFILL
this could cause the pool to collapse. In times of heavy
rainfall you may need to empty some of the water to ensure
the level is correct.
2. When filling the pool is completed, check that the water is
not collecting on any side to ensure the pool is level.
IMPORT If pool is not level, drain water and re-level
ground by digging out.
Never attempt to move the pool with water in it, serious
personal injury or damage to the pool may result.
W Y
If your pool has any bulge or uneven side then the pool is
not level, the sides may burst and the water may discharge
suddenly causing serious personal injury and/or damage to
property
3. Check pool for any leaks at valves or seams, check any
evident water loss. Do not add chemicals until this has been
done.
Füllen des Pools Mit W
ACHTUNG: Lassen Sie den Pool während des Einfüllens des
Wassers nicht unbeaufsichtigt.
1. Überprüfen Sie den Pool auf Undichtigkeit an V
Nähten, prüfen Sie auf erkennbar austretendes Wasser
Fügen Sie Chemikalien erst im
2. Nachdem der Pool vollständig befüllt ist, prüfen Sie, dass
sich das Wasser nicht auf einer Seite sammelt, um zu
gewährleisten, dass der Pool eben ist.
WICHTIG: Lassen Sie, wenn der Pool nicht eben ist, das
Wasser ab und nivellieren Sie den Boden durch
V
Wasser zu bewegen. Dabei kann es zu schweren
V
ACHTUNG: Der Pool kann eine Menge Druck enthalten.
Wenn Ihr Pool
aufweist, dann ist der Pool nicht auf einer Ebene. Die
Seitenkönnen platzen und das Wasser plötzlich entweichen,
was zu schweren V
führen kann.
3. Überprüfen Sie den Pool auf Undichtigkeit an V
Nähten, prüfen Sie auf erkennbar austretendes Wasser
Fügen Sie Chemikalien erst im
EN
DE
Het Zwembad V ullen Met W ater
OPGELET : Laat het zwembad niet zonder toezicht wanneer
het gevuld wordt met water .
1. V ul het zwembad tot 90% van de inhoud. V ul NIET TE VEEL
omdat het zwembad hierdoor in elkaar kan zakken. Bij
hevige regenval kan het nodig zijn om wat water af te
voeren, om het correct niveau te herstellen.
2. W anneer het zwembad gevuld is, controleer of het water
niet hoger staat aan een zijde van het zwembad.
BELANGRIJK: ls het zwembad niet genivelleerd is, wordt
het water afgevoerd en de ondergrond uitgegraven. Probeer
het zwembad nooit te verplaatsen wanneer er water in zit,
om persoonlijke letsels of schade aan het zwembad te
vermijden.
W AARSCHUWING: Uw zwembad kan heel wat druk
bevatten. Indien uw zwembad een bobbel of een ongelijke
zijde heeft, dan is het zwembad niet waterpas, ade zijdes
kunnen barsten en het water kan plotseling afgevoerd
worden waardoor ernstig persoonlijk letstel en/of schade
aan eigendommen kan ontstaan.
3. Controleer het zwembad op lekken bij ventielen of naden,
controleer op duidelijke waterlekken. V oeg geen
chemicaliën toe tot dit gecontroleerd werd.
Remplir D’eau la Piscine
A TTENTION : Ne laissez pas la piscine sans surveillance
quand vous la remplissez d’eau.
1. Remplissez la piscine à 90%. NE REMPLIS SEZ P AS
TROP car cela pourrait provoquer un ef fondrement de la
piscine. En cas de fortes pluies, vous devez vider
suf fisamment la piscine pour que le niveau reste correct.
2. Lorsque le remplissage de la piscine est achevé, contrôlez
que l’eau ne se rassemble pas d’un côté pour s’assurer que
la piscine est bien nivelée.
IMPORT ANT : Si la piscine n’est pas nivelée, enlevez l’eau
et nivelez de nouveau le sol en le creusant. N’essayez
jamais de déplacer la piscine avec de l’eau à l’intérieur , cela
pourrait provoquer de graves blessures ou endommager la
piscine.
A TTENTION : V otre piscine peut contenir une forte
pression. Si votre piscine est bombée ou présente un côté
irrégulier cela veut dire qu’elle n’est pas à niveau, les côtés
pourraient exploser et l’eau pourrait se vider à l’improviste
en provoquant des blessures graves et/ou des dégâts
matériels.
3. Vérifiez que la piscine ne présente aucune fuite au niveau
des valves ou des coutures, contrôlez qu’il n’y ait aucune
perte d’eau visible. N’ajoutez aucun produit chimique tant
que cela n’a pas été fait.
A
B