Met de functie Snel koelen kan de koelcapaciteit in de koelkast te verhogen. Het gebruik van deze functie wordt aanbevolen als u zeer veel levensmiddelen in
de koelkast plaatst. Druk op de toets Snel koelen
om de functie Snel koelen te activeren.
Het controlelampje Snel koelen wordt ingeschakeld als de functie geactiveerd is. De functie wordt na 6 uur automatisch uitgeschakeld en kan handmatig
worden uitgeschakeld door nogmaals op de toets Snel koelen te drukken
.
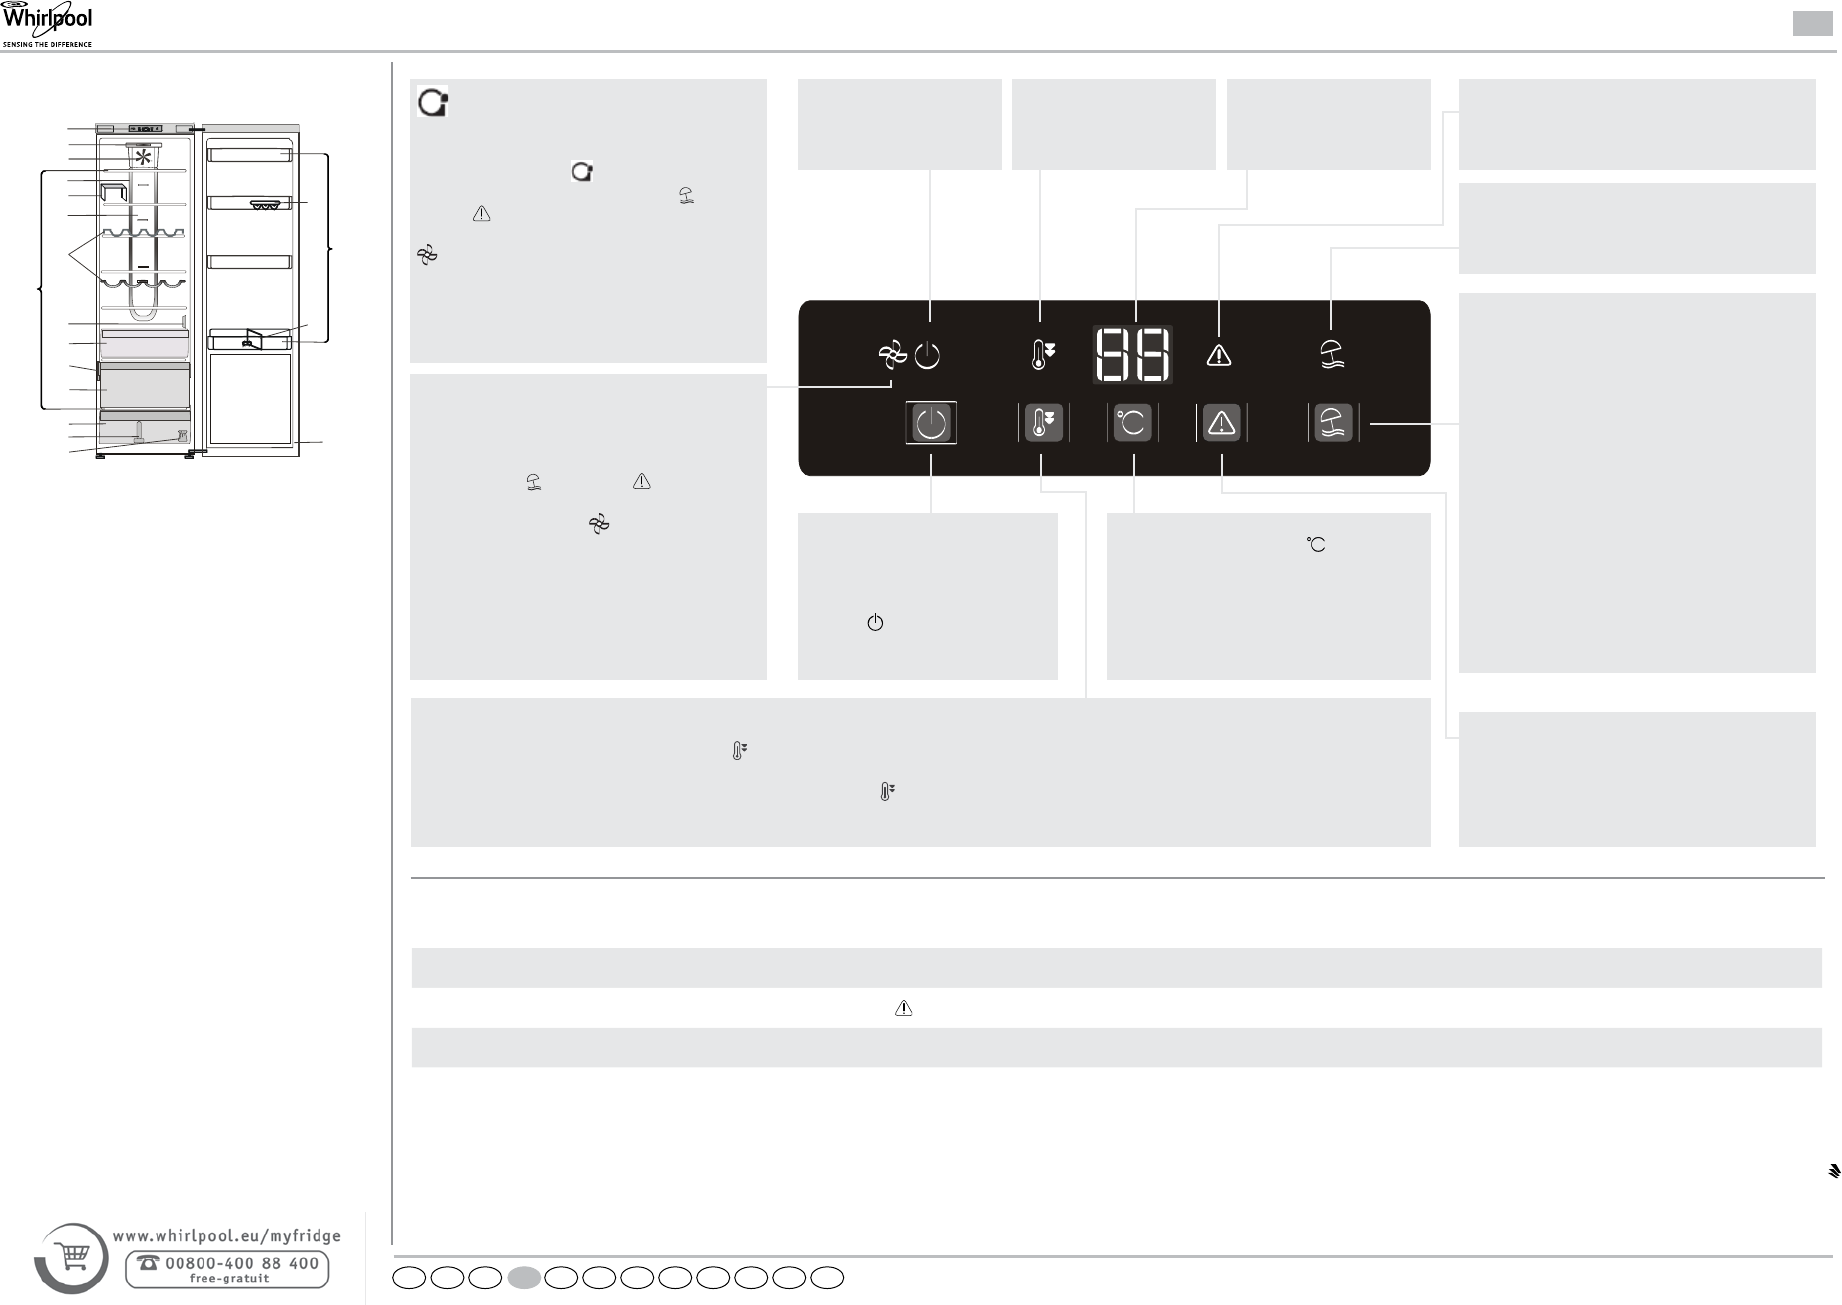
AlArmstop-toets
Druk op de alarmstop-toets om het geluidsalarm te
stoppen.
snel koelen-
controlelampje
VAkAntIe-toets
Deze functie kan geactiveerd worden om het
energieverbruik van het apparaat langere tijd te
verlagen. Voordat de functie geactiveerd wordt,
moet alle bederfelijke levensmiddelen uit de
koelkast verwijderd worden en moet de deur goed
gesloten worden, want de koelkast zal een geschikte
temperatuur (+12 °C) aanhouden om de ontwikkeling
van onaangename geuren te voorkomen.
Houd de toets Vakantie 3 seconden ingedrukt om
de functie te activeren/deactiveren. Wanneer
de functie ingeschakeld wordt, gaat het betreffende
symbool branden en wordt de temperatur van
de koelkast op een hogere waarde ingesteld (de
nieuwe temperatuurwaarde van +12 °C wordt op het
temperatuurdisplay weergegeven).
Door de temperatuurwaarde te wijzigen, wordt de
functie automatisch gedeactiveerd.
VAkAntIe-controlelampje
VENTILATOR
De Ventilator verbetert de temperatuurverdeling in het
product, waardoor de etenswaar beter geconserveerd
wordt. De ventilator is standaard ingeschakeld. Om
de VENTILATOR uit te schakelen, houdt u de
toetsen Vakantie
en Alarmstop
tegelijkertijd
3 seconden ingedrukt tot een geluidssignaal hoorbaar
is en het ventilatorsymbool wordt uitgeschakeld
om te bevestigen dat de ventilator uitgeschakeld is.
Herhaal dezelfde procedure om de VENTILATOR in
te schakelen. Ter bevestiging is een geluidssignaal
hoorbaar en wordt het symbool ingeschakeld.
Opmerking: Zie “TIPS VOOR
ENERGIESBESPARING” in de Gebruiksaanwijzing
voor redenen om de ventilator uit te schakelen.
AAn/stAnD-BY-
controlelampje
ALARM-controlelampje (zie de Tabel met alarmen)TEMPERATUURDISPLAY
AAn/stAnD-BY-toets
Om het product in Stand-by te zetten,
houdt u de toets 3 seconden ingedrukt.
Alle symbolen worden uitgeschakeld
behalve het controlelampje Aan/
Stand-by . Druk eenmaal (kort) op
deze toets om het apparaat weer te
activeren (zie de Gebruiksaanwijzing).
temperAtuur-toets
Druk op de toets Temperatuur
om de
temperatuur te wijzigen: de waarde verandert
steeds opnieuw tussen 8 °C en 2 °C.
Opmerking: De weergegeven
temperatuurinstelling komt overeen met de
gemiddelde temperatuur in de hele koelkast.
4
1.INSTALLING TWO APPLIANCES
During installing the freezer and the fridge
together ensure that the freezer is located on the left and
the fridge on the right (as shown on the drawing). Left side
of refrigerator is equipped with special device in order to
avoid condensation problems between appliances.
We recommended installing two appliances together
using the linking-kit (as shown on the drawing).
You can buy it in Service.
2.FUNCTIONS
2.1. SMART DISPLAY*
This function can be used to save energy.
Please follow the instructions contained in the Quick
Start Guide to activate/deactivate the function.
Two seconds after activation of the Smart Display, the
display goes off. To adjust the temperature or use other
functions, it is necessary to activate the display by
pressing any button. After about 15 seconds without
performing any action, the display goes off again.
When function is deactivated the normal display is
restored. The Smart Display is automatically disabled
after a power failure. Remember that this function does
not disconnect the appliance from the power supply,
but only reduce the energy consumed by external
display.
Note: The declared appliance energy consumption
refers to operation with the Smart Display function
activated.
This function is available only on the model with User
Interface on the door.
2.2. 6th SENSE /
GREEN INTELLIGENCE
The 6th Sense/Green Intelligence function works to
maintain the right temperature in the following cases:
- Door opened for a while
The function activates when door opening causes the
internal temperature to increase to values that do not
ensure safe storage of food and remains active until
optimal storage conditions havebeen restored.
- Fresh food stored in the freezer
The function activates when fresh food is placed in the
freezer and remains active until optimal freezing
conditions are reached so as to ensure the best
freezing quality with the lowest power consumption.
Note: Besides the quantity of food loaded into the
freezer, ambient temperature and the quantity of food
already inside the freezer affect the duration of the 6th
Sense/ Green Intelligence function. Therefore
significant duration variations are quite normal.
*Available on selected models only. Please on the QUICK START GUIDE if this function is actually available on your model.
GREEN INTELLIGENCE
Deze functie werkt automatisch om optimale
omstandigheden te behouden voor het bewaren van
de levensmiddelen. Om
4
1.INSTALLING TWO APPLIANCES
During installing the freezer and the fridge
together ensure that the freezer is located on the left and
the fridge on the right (as shown on the drawing). Left side
of refrigerator is equipped with special device in order to
avoid condensation problems between appliances.
We recommended installing two appliances together
using the linking-kit (as shown on the drawing).
You can buy it in Service.
2.FUNCTIONS
2.1. SMART DISPLAY*
This function can be used to save energy.
Please follow the instructions contained in the Quick
Start Guide to activate/deactivate the function.
Two seconds after activation of the Smart Display, the
display goes off. To adjust the temperature or use other
functions, it is necessary to activate the display by
pressing any button. After about 15 seconds without
performing any action, the display goes off again.
When function is deactivated the normal display is
restored. The Smart Display is automatically disabled
after a power failure. Remember that this function does
not disconnect the appliance from the power supply,
but only reduce the energy consumed by external
display.
Note: The declared appliance energy consumption
refers to operation with the Smart Display function
activated.
This function is available only on the model with User
Interface on the door.
2.2. 6th SENSE /
GREEN INTELLIGENCE
The 6th Sense/Green Intelligence function works to
maintain the right temperature in the following cases:
- Door opened for a while
The function activates when door opening causes the
internal temperature to increase to values that do not
ensure safe storage of food and remains active until
optimal storage conditions havebeen restored.
- Fresh food stored in the freezer
The function activates when fresh food is placed in the
freezer and remains active until optimal freezing
conditions are reached so as to ensure the best
freezing quality with the lowest power consumption.
Note: Besides the quantity of food loaded into the
freezer, ambient temperature and the quantity of food
already inside the freezer affect the duration of the 6th
Sense/ Green Intelligence function. Therefore
significant duration variations are quite normal.
*Available on selected models only. Please on the QUICK START GUIDE if this function is actually available on your model.
Green Intelligence te
deactiveren, houdt u de toetsen Vakantie
en Alarm
stoppen
tegelijkertijd 3 seconden ingedrukt tot een
geluidssignaal hoorbaar is en het ventilatorsymbool
wordt uitgeschakeld om te bevestigen dat de
functie gedeactiveerd is. Herhaal dezelfde procedure
om deze functie weer te activeren.
Opmerking: Deactivering van de functie voor het
uitschakelen van de VENTILATOR in de koelkast.
5019 420 00033
FIDKNOSEGRITPTESGBFRNLDE
Need help? Post your question in this forum.
Report abuse
Libble takes abuse of its services very seriously. We're committed to dealing with such abuse according to the laws in your country of residence. When you submit a report, we'll investigate it and take the appropriate action. We'll get back to you only if we require additional details or have more information to share.
Product:
Forumrules
To achieve meaningful questions, we apply the following rules:
First, read the manual;
Check if your question has been asked previously;
Try to ask your question as clearly as possible;
Did you already try to solve the problem? Please mention this;
Is your problem solved by a visitor then let him/her know in this forum;
To give a response to a question or answer, do not use this form but click on the button 'reply to this question';
Your question will be posted here and emailed to our subscribers. Therefore, avoid filling in personal details.
Register
Register getting emails for Bauknecht KR PLATINUM SW at:
new questions and answers
new manuals
You will receive an email to register for one or both of the options.
Get your user manual by e-mail
Enter your email address to receive the manual of Bauknecht KR PLATINUM SW in the language / languages: Dutch as an attachment in your email.
The manual is 0,4 mb in size.
You will receive the manual in your email within minutes. If you have not received an email, then probably have entered the wrong email address or your mailbox is too full. In addition, it may be that your ISP may have a maximum size for emails to receive.
If you have not received an email with the manual within fifteen minutes, it may be that you have a entered a wrong email address or that your ISP has set a maximum size to receive email that is smaller than the size of the manual.
The email address you have provided is not correct.
Please check the email address and correct it.
Your question is posted on this page
Would you like to receive an email when new answers and questions are posted? Please enter your email address.