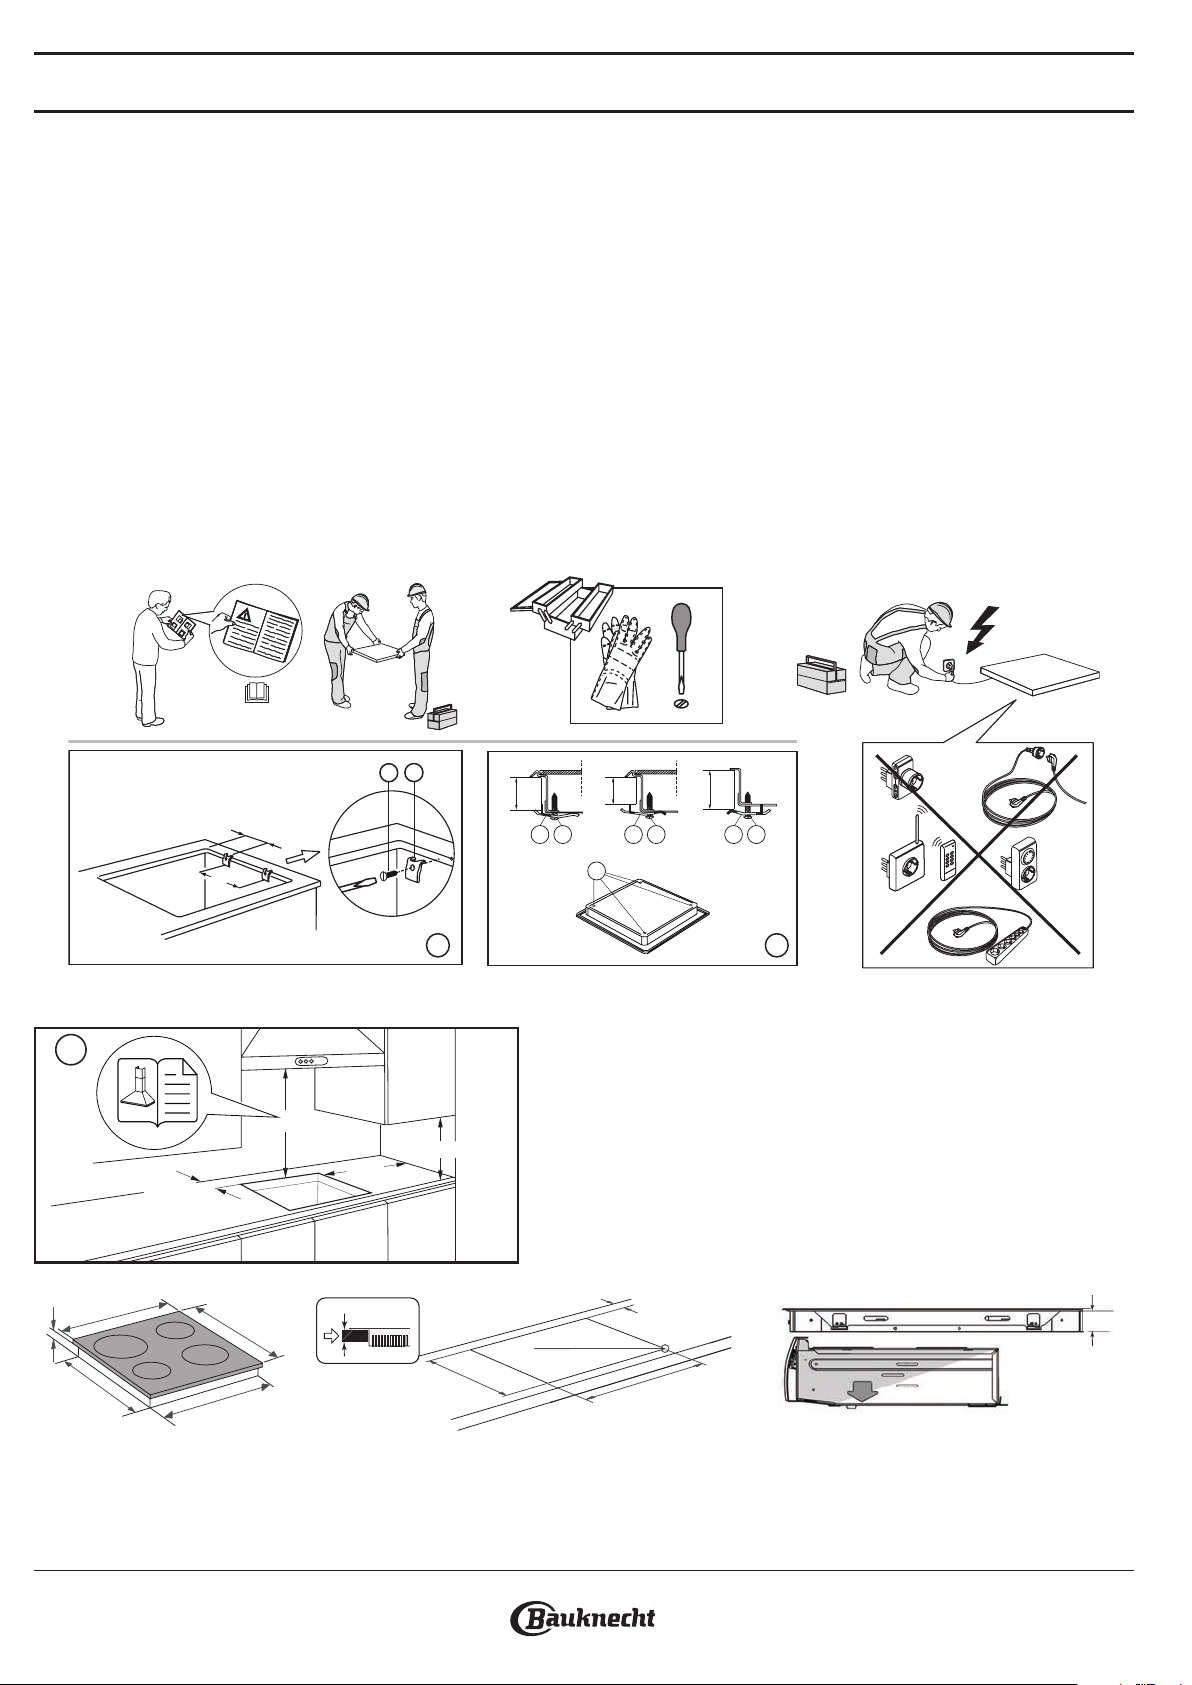
• The cooktop must be set into a worktop at least 20 mm deep.
• There must be nothing between the cooktop and the oven (cross rails, brackets, etc.).
• For built-in dimensions and installation, see the picture in this paragraph.
• A minimum distance must be maintained between the hob and the hood above it. Please refer to the user manual of the hood for more information.
• Apply the supplied gasket to the cooktop (unless it has already been tted), after having cleaned its surface.
• Do not install the cooktop near a dishwasher or washing machine, so that the electronic circuits do not come into contact with steam
or moisture, which could damage them.
• If an oven is installed beneath the cooktop, make sure that it is equipped with a cooling system. If the temperature of the electronic circuits
exceeds the maximum permitted temperature, the cooktop will switch o automatically; in this case, wait for a few minutes until the internal
temperature of the electronic circuits reaches a tolerable level, at which point it will be possible to switch the hob on again.
• ATTENTION: to install the hob on other surfaces than wood (marble, plastic, ceramic, stone, etc.) remember to ask After Sales Service
for the xing plates (g. 2) Code 4819 404 78697.
PLACING THE HOB
Important: remove any protective lm before installing the hob.
Make sure that the opening in the worktop for the hob is cut according to the dimensions given in the drawing, paying attention to the tolerance
range. The hob should not be forced into the worktop. Forcing the glass-ceramic top may cause it to crack (even at a later date)!
If the worktop is made of wood, use the spring clips and screws provided. Secure the spring clips (A) (g. 1) with the screws provided (B) (g. 1) as
shown, paying attention to the specied distances. Fit the hob into the worktop.
If the worktop is made of marble, plastic, ceramic, stone, etc., the hob must be secured with special brackets (C) (g. 2). Fit the hob into the
worktop (g. 1). Place the 4 brackets (C) in position in accordance with the thickness of the worktop as shown in g. 2. Fasten the 4 screws (D) in the
positions (E) (g. 2).
B
A
145 ± 1mm
200 mm
CDCDCD
E
40 mm
30 mm
50 mm
21
DIMENSIONS AND DISTANCES TO BE MAINTAINED
Min. 40 cm
L
Min. 5 cm
Min.10 cm
i
552 mm
47 mm
507 mm
577 mm
Min. 6,5 mm
Max. 8 mm
490 - 492 mm
560 - 562 mm
Min. 50 mm
Min.
20 mm
482 mm
47 mm
REMOVING THE HOB:
To remove the hob, rst, disconnect it from the electric supply. It is strongly recommended to free the underneath part from the oven, drawer, separator, or other.
It allows the technician to access the lower part of the hob to unfasten the four clips with a screwdriver, lift the hob and remove it, avoiding any worktop damage.
Libble takes abuse of its services very seriously. We're committed to dealing with such abuse according to the laws in your country of residence. When you submit a report, we'll investigate it and take the appropriate action. We'll get back to you only if we require additional details or have more information to share.
Product:
Forumrules
To achieve meaningful questions, we apply the following rules:
First, read the manual;
Check if your question has been asked previously;
Try to ask your question as clearly as possible;
Did you already try to solve the problem? Please mention this;
Is your problem solved by a visitor then let him/her know in this forum;
To give a response to a question or answer, do not use this form but click on the button 'reply to this question';
Your question will be posted here and emailed to our subscribers. Therefore, avoid filling in personal details.
Register
Register getting emails for Bauknecht CHR 9642 IN at:
new questions and answers
new manuals
You will receive an email to register for one or both of the options.
Get your user manual by e-mail
Enter your email address to receive the manual of Bauknecht CHR 9642 IN in the language / languages: English as an attachment in your email.
The manual is 0.61 mb in size.
You will receive the manual in your email within minutes. If you have not received an email, then probably have entered the wrong email address or your mailbox is too full. In addition, it may be that your ISP may have a maximum size for emails to receive.
If you have not received an email with the manual within fifteen minutes, it may be that you have a entered a wrong email address or that your ISP has set a maximum size to receive email that is smaller than the size of the manual.
The email address you have provided is not correct.
Please check the email address and correct it.
Your question is posted on this page
Would you like to receive an email when new answers and questions are posted? Please enter your email address.