Hartelijk dank voor de aanschaf van deze kwaliteitsklok. De klok is met de grootste zorg
ontworpen en geproduceerd. Lees de instructies en bewaar deze goed zodat u deze later nog
eens kunt nalezen.
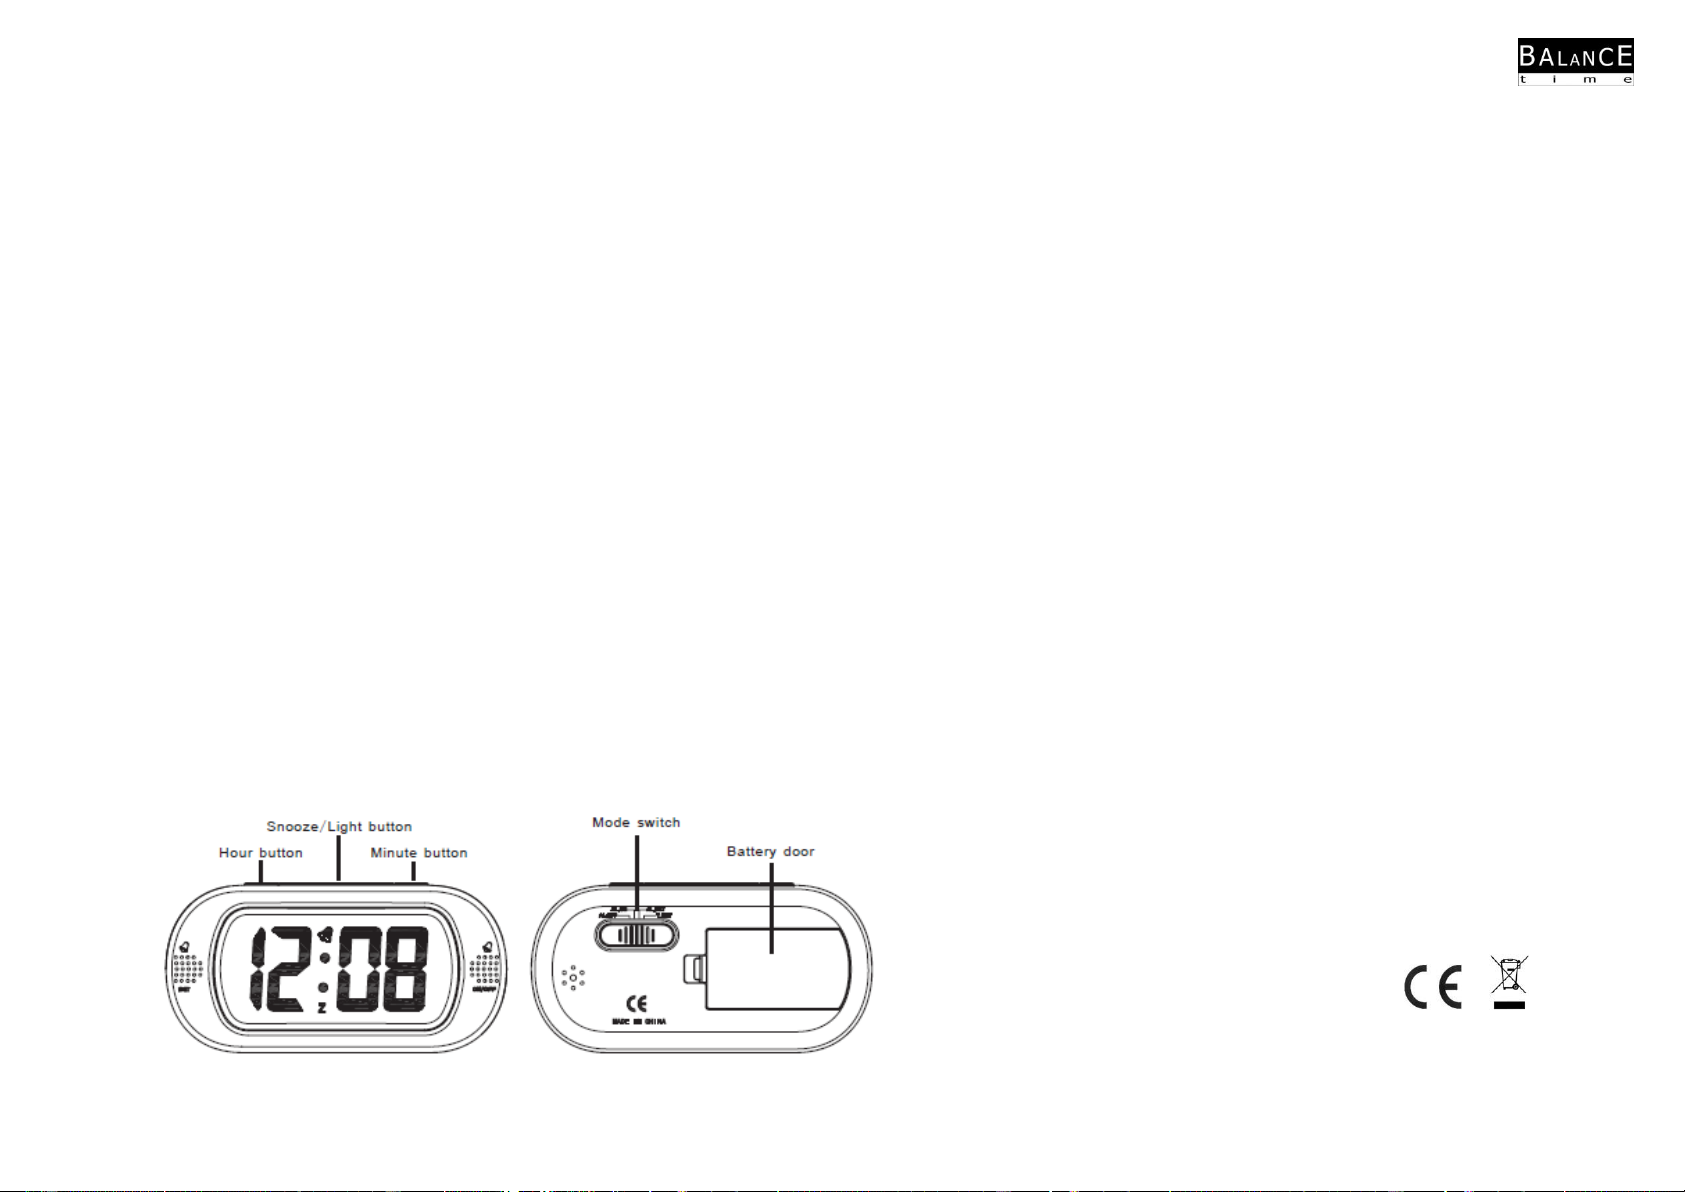
DE KLOK ACTIVEREN
3 AAA-batterijen (niet meegeleverd)
Verwijder het deksel van het batterijcompartiment aan de achterzijde van de klok en plaats de
batterijen.
DE TIJD INSTELLEN
Verschuif de knop naar T.SET (Time Set) om de tijd in te stellen.
Druk op de knop HOUR om het juiste uur in te stellen.
Druk op de knop MINUTEom de juiste minuten in te stellen.
Schuif de knopterug als u klaar bent met het instellen van de tijd.
DE ALARMTIJD INSTELLEN
Verschuif de knop MODE SWITCH naar AL. SET (Alarm Set) om het alarm in te stellen.
Druk op de knop HOUR om het juiste alarmuur in te stellen.
Druk op de knop MINUTEom de juiste alarmminuten in te stellen.
Schuif de knop terug als u klaar bent met het instellen van het alarm.
DE ALARMTIJD BEKIJKEN
Schuif de MODE SWITCH naar AL. ON (Alarm on) of AL. OFF (Alarm off) positie en druk
vervolgens op de HOUR of MINUTE knop om de ingestelde alarmtijd te zien.
HET ALARM IN- OF UITSCHAKELEN
Verschuif de MODE SWITCH naar AL. ONom het alarm in te schakelen. Wanneer het alarm
is ingeschakeld, worden de alarmsymbolen op het display weergegeven.
Het alarm klinkt gedurende 60 seconden op het ingestelde tijdstip.
Schuif de MODE SWITCH terugnaar AL. OFFom het alarm permanent uit te schakelen. De
alarmsymbolen worden niet langer weergegeven.
HET SLUIMERALARM GEBRUIKEN
Schuif de MODE SWITCH naar AL. ON om het alarm in te schakelen. Wanneer het alarm
afgaat, drukt u op de knop SNOOZE/LIGHT. Het alarm stopt en klinkt na 4 tot 6 minuten
opnieuw.
Wanneer de sluimerstand is geactiveerd, knippert het symbool op het display.
DE DISPLAYVERLICHTING GEBRUIKEN
Druk op de knop SNOOZE/LIGHT om de verlichting van het display gedurende 1 tot 3
seconden te laten branden.
Opmerking:Als u de verlichting vaak gebruikt, zal de batterij sneller leegraken.
BATTERIJEN PLAATSEN EN VERVANGEN
De Jumbo LCD-klok gebruikt 3 AAA-batterijen.
Voer de volgende stappen uit om de batterijen te plaatsen en te vervangen.
Open het batterijcompartiment.
Plaats de batterijen volgens de juiste polariteit (zie de markeringen aan de binnenzijde van het
batterijcompartiment).
Sluit het batterijcompartiment.
Opmerking: Gebruik geen oude en nieuwe batterijen door elkaar. Gebruik geen alkaline
batterijen, standaardbatterijen (koolzink) of oplaadbare batterijen (nikkelcadmium) door elkaar.
ONDERHOUD
U moet de batterijen vervangen als het display vaag wordt weergegeven, het alarm zacht
klinkt of als beide niet meer werken. Als u de klok niet gebruikt, verwijder dan de batterijen als
u hem opbergt. U kunt de klok reinigen met een zachte of papieren doek. Gebruik geen
agressief reinigingsmiddel of chemische oplossing op de klok. Om problemen te voorkomen
dient de klok schoon en droog gehouden te worden
Gooi oude batterijen weg volgens de geldende voorschriften.
Article 262813
RÉVEIL LCD JUMBO
MODE D'EMPLOI
Nous vous remercions d'avoir choisi ce réveil de qualité, conçu et fabriqué avec la plus grande
expertise. Veuillez lire attentivement le mode d'emploi et le conserver pour référence.
MISE EN MARCHE DU RÉVEIL
3 piles « AAA » (non-incluses)
Ouvrez le compartiment à piles au dos du réveil et insérez-y les piles.
RÉGLAGE DE L'HEURE
Placez le SÉLECTEUR en position T. SET (réglage de l’heure) pour activer le mode réglage
de l’heure.
Appuyez sur le bouton HOUR jusqu'à ce que l'écran affiche l'heure voulue.
Appuyez sur le bouton MINUTE jusqu'à ce que l'écran affiche les minutes voulues.
Placez le SÉLECTEUR en position AL. ON ou AL. OFF une fois le réglage terminé.
RÉGLAGE DE L'ALARME
Placez le SÉLECTEUR en position AL. SET (réglage de l’alarme) pour activer le mode
réglage.
Appuyez sur le bouton HOUR jusqu'à ce que l'écran affiche l'heure voulue pour l’alarme.
Appuyez sur le bouton MINUTE jusqu'à ce que l'écran affiche les minutes voulues pour
l'alarme.
Placez le SÉLECTEUR en position AL. ON ou AL. OFF une fois le réglage terminé.
AFFICHAGE DE L’HEURE DE L’ALARME
Placez le SÉLECTEUR soit en position AL. ON (alarme activée) soit en position AL. OFF
(alarme désactivée) puis appuyez soit sur le bouton HOUR soit sur le bouton MINUTE pour
afficher l’heure programmée pour l’alarme.
ACTIVATION OU DÉSACTIVATION DE L'ALARME
Placez le SÉLECTEUR en position AL. ON (alarme activée) pour activer l'alarme. Le symbole
de l'alarme s’affiche tant que l'alarme est activée. L'alarme retentira pendant 60 secondes à
l'heure programmée.
Placez le SÉLECTEUR en position AL. OFF (alarme désactivée) pour désactiver l’alarme.
UTILISATION DU RAPPEL D'ALARME (SNOOZE)
Lorsque l'alarme retentit, appuyez sur le bouton SNOOZE/LIGHT. L'alarme cesse et reprend
au bout de 4 à 6 minutes.
Lorsque la fonction de rappel d'alarme est active, le symbole affiché clignote en permanence.
UTILISATION DE L'ÉCLAIRAGE
Appuyez sur le bouton SNOOZE/LIGHT pour éclairer l'affichage pendant 1 à 3 secondes.
Remarque :l'utilisation fréquente de l'éclairage use plus vite les piles.
INSTALLATION ET REMPLACEMENT DES PILES
Le réveil LDC Jumbo nécessite 3 piles « AAA ».
Procédez comme suit pour installer ou remplacer les piles.
Ouvrez le compartiment à piles.
Installez les piles en respectant la polarité (indiquée à l'intérieur du compartiment).
Refermez le compartiment à piles.
Remarque : Ne mélangez pas des piles neuves et des piles déjà utilisées. Ne mélangez pas
des piles alcalines avec des piles zinc-carbone ou des piles rechargeables (nickel-cadmium).
ENTRETIEN
Les piles doivent être remplacées lorsque l'affichage ou l'alarme s'affaiblissent ou fonctionne
mal. Lorsque le réveil est inutilisé, retirez les piles. Un chiffon doux ou un papier absorbant
peuvent servir à nettoyer le réveil. N'utilisez jamais de produits d’entretien agressifs ou de
produits chimiques sur votre réveil. N'exposez pas le réveil à l'humidité et à la poussière.
Veuillez recycler les piles dans le respect de l'environnement.
Article 262813
JUMBO LCD ALARM CLOCK
OPERATING INSTRUCTIONS
Thank you for your purchase of this quality clock. The utmost care has gone into the design
and manufacture of your clock. Please read these instructions and store them in a safe place
for future reference.
TO ACTIVATE THE CLOCK
3X “AAA” batteries (not included)
Open the battery compartment cover located at the back of the clock and place the batteries.
TO SET THE TIME
Slide the MODE SWITCH to the T. SET (Time Set) position to enter time setting mode.
Now press the HOUR button to advance the display to the correct hour.
Now press the MINUTE button to advance the display to the correct minute.
Slide the MODE SWITCH out of the T. SET position once the time setting is complete.
TO SET THE ALARM TIME
Slide the MODE SWITCH to the AL. SET (Alarm set) position to enter setting mode.
Now press the HOUR button to advance the display to the correct alarm hour.
Now press the MINUTE button to advance the display to the correct alarm minute.
Slide the MODE SWITCH out of the AL. SET position once the alarm time setting is complete
TO VIEW ALARM TIME
Slide the MODE SWITCH to the AL. ON (Alarm on) position or AL. OFF (Alarm off) position,
and then press either the HOUR or MINUTE button to see the programmed alarm time
TO TURN THE ALARM ON OR OFF
Slide the MODE SWITCH to the AL. ON (alarm on) position to activate the alarm. The alarm
symbol will be visible on the display when the alarm is activated. The alarm will sound for 60
seconds at the selected time.
Slide the MODE SWITCH to the AL. OFF (alarm off) position to turn the alarm off.
TO USE THE SNOOZE ALARM FEATURE
When the alarm sounds, press the SNOOZE/LIGHT button. The alarm will stop and sound
again after 4-6 minutes.
When snooze is activated symbol keep flashing on display.
TO USE THE DISPLAY LIGHT
Press the SNOOZE/LIGHT buttonto light up the display for 1-3 seconds in the dark.
Note: frequent use of the light will drain the battery more quickly.
TO INSTALL AND REPLACE BATTERIES
The jumbo LCD clock uses 3x “AAA” batteries.
To install and replace the batteries please follow the steps below.
Remove the battery compartment.
Insert batteries observing the correct polarity (see marking inside battery compartment).
Replace the battery compartment.
Note:do not mix new and old batteries. Do not mix alkaline, standard (carbon-zinc), or
rechargeable (nickel cadmium) batteries.
MAINTENANCE
The batteries should be replaced if the display or alarm becomes weak or dysfunctional. Store
the clock without batteries when not in use. A soft cloth or a paper towel may be used to clean
your clock. Do not use any corrosive cleanser or chemical solutions on the clock. Keep the
clock clean and dry to avoid any problems.
Please dispose of old batteries in a reasonable manner.
Need help? Post your question in this forum.
Report abuse
Libble takes abuse of its services very seriously. We're committed to dealing with such abuse according to the laws in your country of residence. When you submit a report, we'll investigate it and take the appropriate action. We'll get back to you only if we require additional details or have more information to share.
Product:
Forumrules
To achieve meaningful questions, we apply the following rules:
First, read the manual;
Check if your question has been asked previously;
Try to ask your question as clearly as possible;
Did you already try to solve the problem? Please mention this;
Is your problem solved by a visitor then let him/her know in this forum;
To give a response to a question or answer, do not use this form but click on the button 'reply to this question';
Your question will be posted here and emailed to our subscribers. Therefore, avoid filling in personal details.
Register
Register getting emails for Balance 262813 at:
new questions and answers
new manuals
You will receive an email to register for one or both of the options.
Get your user manual by e-mail
Enter your email address to receive the manual of Balance 262813 in the language / languages: English, Dutch, French as an attachment in your email.
The manual is 0.18 mb in size.
You will receive the manual in your email within minutes. If you have not received an email, then probably have entered the wrong email address or your mailbox is too full. In addition, it may be that your ISP may have a maximum size for emails to receive.
The manual is sent by email. Check your email
If you have not received an email with the manual within fifteen minutes, it may be that you have a entered a wrong email address or that your ISP has set a maximum size to receive email that is smaller than the size of the manual.
The email address you have provided is not correct.
Please check the email address and correct it.
Your question is posted on this page
Would you like to receive an email when new answers and questions are posted? Please enter your email address.