108859
37
Zoom out
Zoom in
Previous page
1/38
Next page
DE 15DE 14
Montage (Forts.)
Motormodul markieren und montieren
Markieren Sie die untere Kante der Haube an der Wand
(berücksichtigen Sie dabei den Mindestabstand zum
Kochfeld). Geben Sie die (vertikale) Mittellinie an.
Falten oder schneiden Sie die Schablone gemäß Haubentyp
und markieren Sie die oberen Befestigungslöcher.
Bohren Sie die Befestigungslöcher (2x ø 10 mm).
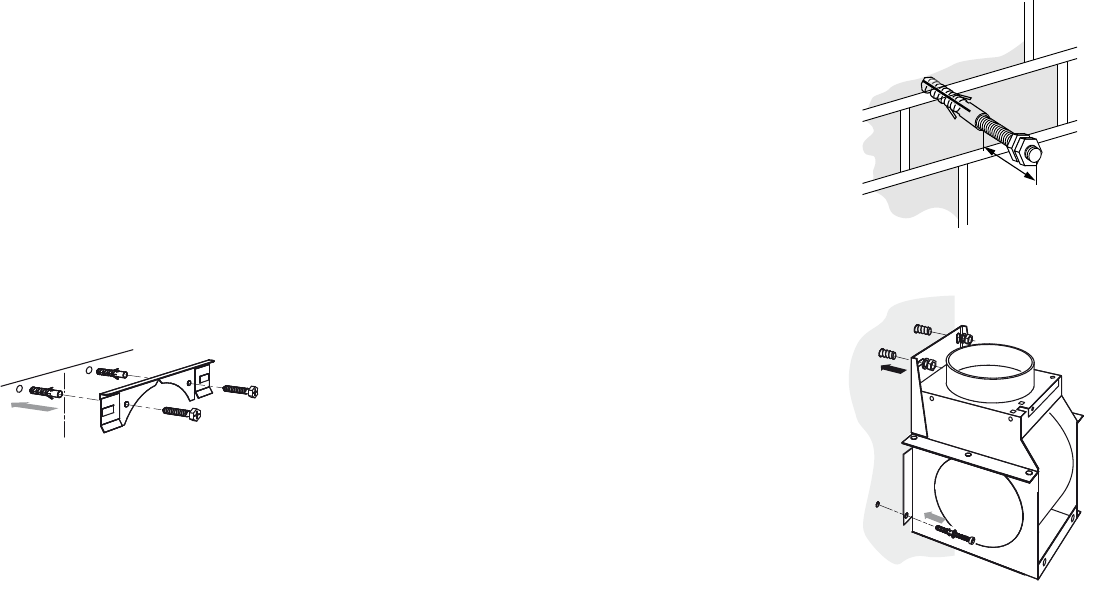
Befestigen Sie die Dübel. Drehen Sie die beiden Muttern in
entgegengesetzter Richtung auf die Stiftschrauben. Drehen
Sie die Stiftschrauben 20 mm tief in die Wand ein (siehe
Abbildung).
Entfernen Sie die Muttern.
Hängen Sie den Motormodul an den Stiftschrauben (1) auf.
Ziehen Sie die Muttern an. Sorgen Sie dafür, daß der Modul
horizontal hängt.
Bohren Sie die Bohrlöcher (2x ø 6 mm) und sichern Sie den
Motormodul mit den mitgelieferten Nageldübeln (6x60) (2).
Montieren Sie den Abluftkanal.
Sorgen Sie für den elektrischen Anschluß.
1
2
20
Montage (Forts.)
Einbau Wandmodel
Auf der vorigen Seite sind die wichtigsten Maße angegeben.
Sie können die Höhe des Teleskoprohres einstellen.
Beachten Sie jedoch die erlaubten Abweichungen.
Befestigen Sie den Abluftstutzen und den elektrischen
Anschluß so, daß Sie sie später einfach an die
Dunstabzugshaube anschließen können.
Entfernen Sie vor Montage erst die Transportsicherung,
siehe Seite 12.
Befestigungsmaterial markieren und montieren
Markieren Sie die vertikale Mittellinie an der Wand (in der
Mitte der Haube).
Positionieren Sie den Befestigungsbügel so an der Wand,
daß er an der Decke liegt. Der Pfeil auf der Abkantung gibt
die Mitte der Dunstabzugshaube an. Zeichnen Sie die
Bohrlöcher an.
Bohren Sie die Löcher für die Befestigung (ø 8 mm).
Montieren Sie die Dübel in der Wand und befestigen Sie die
Befestigungsbügel an der Wand mit den mitgelieferten
Schrauben (5x50 mm).
37


Need help? Post your question in this forum.

Forumrules


Report abuse

Libble takes abuse of its services very seriously. We're committed to dealing with such abuse according to the laws in your country of residence. When you submit a report, we'll investigate it and take the appropriate action. We'll get back to you only if we require additional details or have more information to share.

Product:

For example, Anti-Semitic content, racist content, or material that could result in a violent physical act.

For example, a credit card number, a personal identification number, or an unlisted home address. Note that email addresses and full names are not considered private information.

Forumrules

To achieve meaningful questions, we apply the following rules:

Register

Register getting emails for ATAG EG 311 U at:


You will receive an email to register for one or both of the options.


Get your user manual by e-mail

Enter your email address to receive the manual of ATAG EG 311 U in the language / languages: English, German, Dutch, French as an attachment in your email.

The manual is 1,05 mb in size.


You will receive the manual in your email within minutes. If you have not received an email, then probably have entered the wrong email address or your mailbox is too full. In addition, it may be that your ISP may have a maximum size for emails to receive.

The manual is sent by email. Check your email

If you have not received an email with the manual within fifteen minutes, it may be that you have a entered a wrong email address or that your ISP has set a maximum size to receive email that is smaller than the size of the manual.

The email address you have provided is not correct.

Please check the email address and correct it.

Your question is posted on this page

Would you like to receive an email when new answers and questions are posted? Please enter your email address.


Info